T-Th 9:05
or
T-Th 11:15
in Olin 155
CS 1110: Introduction to Computing Using Python
Fall 2012
About:
Announcements
Staff
Consultants
Times & Places
Calendar
Materials:
Texts
Python
Command Shell
Terminology
Handouts:
Lectures
Assignments
Labs
Assessment:
Grading
Exams
Resources:
CMS
Piazza (link)
Piazza (about)
AEWs
FAQ
Python API
Style Guide
Academic Integrity
Sucblasses
There is a PDF version of these instructions, if you would prefer to have that instead.
This lab demonstrates the power of subclasses, particularly in GUI applications.
Subclasses are a great way to customize visual behavior of a GUI object. In
addition to basic subclasses, you this lab will also give you some experience with
the use of the super function.
The lab this week is quite short because you also have an assignment due this next week with a very short turn-around. In fact, you will find you spend more time reading the lab than doing it.
Requirements For This Lab
There are several files necesssary for this lab. You should create a new directory on your hard drive and download the following four files into this directory:
To use these files, put them all in a single directory and run lab8app.py
as an application. That is, open a command prompt and type

python lab8app.py
A figure like that on the right should appear in the window. Your command prompt will fill with the usual messages from Kivy. In addition, you should see some test ouput about the various shapes that are drawn in the window.
This lab will involve the modification of two of the above files: lab8.py
and lab8app.py. There is no unit test for this lab. When you are done,
simply show these two files your lab instructor. As always, you should try to finish the
lab during your section. However, if you do not finish during section, you have until
the beginning of lab next week to finish it. You should always do your best to finish
during lab hours; remember that labs are graded on effort, not correctness.
Understanding the Application
Before you get started on this lab, we should first describe a bit how
lab8app works. If you open it up you will notice that it
contains two classes. The first is Lab8App; it is a subclass
of the Kivy class App and has a single important method:
run(). This run() method is called in the
application code of this module, and is what opens up a new Window.
By itself, Lab8App just draws a blank window.
The second class, Panel represents the contents of the Window,
and it is responsible for drawing the figure above. When the application
is built, a Panel object is "placed inside" the Window. The
constructor for Panel calls the method drawShapes(),
which draws the figure you see.
The method drawShapes() creates several objects, all of which
are subclasses of class Shape. The Shape class,
which is defined in the module shapes.py, contains information
about the position of the shape, as well as its size and geometry. When
the method draw() is called, the shape is added to the panel and
remains there until you quit the application.
Like the Turtle in
Assignment 4,
the values of x and y, as well as the side
lengths, are given in pixels. In this application, the pixels are indexed
by integer coordinates starting at the bottom left corner, as follows:
  ...
  (0,2)  (1,2)  (2,2)  ...
  (0,1)  (1,1)  (2,1)  ...
  (0,0)  (1,0)  (2,0)  ...
In a pixel coordinate (x,y), x is the horizontal coordinate; it increases from left to right. Similarly, y is the vertical coordinate; it increases from bottom to top. This is similar to how the Turtle worked, except in that case the origin was in the middle of the Window, not the bottom left as it is here.
All of the shapes in this lab are subclasses of the class Shape.
The class Shape has several attributes (many of which it inherits
from Widget, a Kivy class) that position it correctly inside
of the Panel. However, the primary method for drawing a shape
is called draw(). You will notice that the body of this method
in Shape says pass; which means it is undefined.
This is why we never create an object whose type is simply Shape.
All of the drawing is done in the subclasses, which are listed below.
| Class | Subclass Of | Description |
|---|---|---|
Parallelogram |
Shape |
Four sided shape where each pair of opposing sides is parallel. |
Line |
Shape |
Line segment between two points. |
Rhombus |
Parallelogram |
Parallelogram where all four sides are equal length. |
Square |
Rhombus |
Rhombus where all angles are right angles. |
You should now look at the documentation of Parallelogram (which is
in shapes.py) to see how it works. You can either look at the
source code directly, or import the module and use the help()
function as shown in class. You should pay particular attention to the concept of
the "leaning factor" in the definition of a parallelogram.
Lab Instructions
This lab is broken up into two tasks, the first of which is quite short.
Task 1: Complete the Constructors
The image in the window is incomplete. Right now, only Parallelogram
and Line draw properly. That is because the constructors in
Rhombus and Square are incomplete. If you open
the lab8.py file, you will see that both of their __init__
methods have pass as their body.
This is unacceptable. At the very least, each of these subclasses must call
the __init__ method in their parent class as a helper function.
In this case, this is all we need. The class Parallelogram
does all the work for drawing, so we just need to be sure to (eventually)
invoke its __init__ as a helper.
Of course, we cannot call __init__ simply by invoking
self.__init__(). That is because we are overriding
__init__ in each of these classes, and so this will call
the new version of __init__ (thus putting us in a recursive
loop). We need to use the super function to call the
__init__ in our parent class.
We showed you how super works in class. It is a function
that takes two arguments: a class name and an object (which is always self).
It returns the partition corresponding to the parent class of the one
specified. So, for example,

super(Parallelogram,self)
returns the Shape partition of self (as that is the
parent class of Parallelogram. Similarly,
super(Rhombus,self)
returns the Parallelogram partition of self.
Use this to complete the constructors of Rhombus and
Square. Each constructor should be a single line using
super and __init__ together. When you are
done, run lab8app.py as a application again. You should
now get the image on the right.
Task 2: Add Some Arms
The shape above looks almost like a person. It has a head (the Parallelograms),
a body (the Square), and some legs (the Rhombuses). You will give
the person arms. All the changes you will make will be in class Panel in module
lab8app.py. Read through method drawShapes() of Panel.
But before you do anything else, you should comment out the code that produces the two black lines (in DemoShapes).
Hint: look for where the color is set to black.
Each arm is should be a green rectangle that is 60 pixels long and 20 pixels high.
Its leaning factor (field d of class Parallelogram) is 0, which means that it is a
rectangle. The leaning factor is defined in the specification of Parallelogram.
Later, when you get the program going with leaning factor 0, you can try a different
leaning factor, say 15, and see what it looks like.
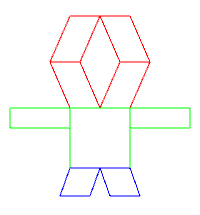
The arms should be attached at the top right and top left of the square that makes up the body. The tops of the arms should be parallel to the top line of the square. When done, it should look like the image to the right.
In writing the code that draws these rectangles, use the variables that are defined at
the top of method drawShapes(). Also, use variables to contain all the
constants that you need, as we did in method drawShapes(). You should
avoid using numbers directly in the constructor Parallelogram.
Hint: to figure out the coordinates for the arms, look at the positioning of the green square. For debugging purposes, you may want to include print statements to see important values for the objects you create, like we did.
When you are finished, show your lab8app.py and lab8.py
to your instructor.