AniGraph
AniGraph is a framework I created to support the more open-ended projects in this course. You used a modified 2D version of it already for assignments 0-2. For the final project we'll be taking advantage of a lot more of its functionality.
Anigraph is built on top of ThreeJS and WebGL, which you can use to build extensions as well.
At a high level, AniGraph's main functionality is making it easy to define a mapping from some user-defined graph of data models to a threejs scene graph. It also offers easier to use math libraries, toold for defining interactions, and a bunch of other conveniences.
Adding a 3rd Dimension
In previous AniGraph assignments, transformations were represented with 3x3 matrices. In 3D, that's not gonna cut it...
For the full 3D version of AniGraph, we have two ways to represent transformations. The first is using a general 4x4 matrix, represented with the class Mat4. The second option is to use a NodeTransform3D instance, which has:
transform.position:Vec3| Represents the point that the transform maps the origin to.transform.rotation:Quaternion| Represents a 3D rotationtransform.scale:Vec3| Represents the scale factor of the matrix in x, y, and z
The corresponding matrix for a node transform is given by M, defined as:
let P = Mat4.Translation3D(transform.position);
let R = transform.rotation.Mat4();
let S = Mat4.Scale3D(transform.scale);
M = P.times(R).times(S);
There is additionally a transform.anchor:Vec3 property that can be used to shift the origin of the input coordinate system to the transform. However, I would caution about modifying the anchor value in transformations unless you feel very confident in what you are doing, as it can complicate other common operations. The anchor property modifies M by right-multiplying it with a translation such that:
let A = Mat4.Translation3D(transform.anchor.times(-1))
M = M.times(A);
You can convert between matrices and node transforms with:
let m:Mat4;
let nt:NodeTransform3D;
let nodeTransformFromMatrix = NodeTransform3D.FromMatrix(m);
let matFromNodeTransform = nt.getMat4();
Both Mat4 and NodeTransform3D implement the TransformationInterface interface, which can be useful if you want to type a function so that it accepts either. Just keep in mind that the mapping from 4x4 matrices to NodeTransform3D objects is not one-to-one (e.g., you can't represent projection matrices with NodeTransforms).
Application Structure

The main application entry points for an AniGraph App are the an ASceneModel, ASceneView, and ASceneController.
For the most part, you will not need to modify the main scene view directly---you can always access if through the main controller if you really want, but you'll mostly be making custom view nodes (we'll discuss this later). The top-level entry points for most customization will be the scene model and scene controller. To facilitate this, we've provided customizable subclasses for you to start with.
- MainAppSceneModel: This is where you will add new nodes to your scene model and update application logic.
- MainAppSceneController: The main task of the controller is to create new views when nodes are added to the model hierarchy. The second task is to manage the active interaction mode, which governs user input.
MainAppSceneModel
In general, the MainAppSceneModel is where most of the game logic should be executed. In particular, initScene() and timeUpdate(t:number, ...args:any[]). In the starter code you will find:
async PreloadAssets(): You can optionally specify assets like shaders or textures to preload.initCamera(): Set up the camera projection and initial poseinitViewLight: Places a point light. In the example code this point light is added as a child of the camera, which means there will be a light source located at the camera that moves with the camera. Warning: you can turn the intensity of this light to 0 if you don't want it to light your scene, but you may not want to remove it completely, as this could complicate the binding of some shaders.async initScene(): this function will set up a new scene. It is a required function. Optionally, you can choose to define and use the additional helper functions provided in the starter example:async initTerrain(): initializes the terrain modelasync initCharacters(): initializes the player and bot models
getCoordinatesForCursorEvent(event: AInteractionEvent): optionally define a mapping from event coordinates based on the scene model. You may not need this, but it is offered in case anyone needs to re-map user input from different devices.timeUpdate(t: number, ...args:any[]): this will be your main entry point for the logic that runs each time a frame is rendered. The argumenttis the time on the application clock.
MainAppSceneController
initModelViewSpecs(): This is the function where you specify what view classes should be created for each model node class in your application.initScene(): You can use this to set the background appearance of your scene. The example code uses a cube map of space.initInteractions(): This is where you declare interaction modes, which you can switch between from the control panel or programatically usingthis.setCurrentInteractionMode(...)onAnimationFrameCallback(context:AGLContext): This function updates the model and renders the view.
Setting up the MVC Spec
There are two things you need to do to create a new mapping from an ANodeModel3D subclass to an ANodeView subclass.
First, when you define the custom model class, make sure to decorate it with @ASerializable. Here is an example of what that looks like from the definition of APlayerModel:

Second, you will need to add the mapping to the scene controller. This is done in the ASceneController method initModelViewSpecs(). We can see how this is done by looking at the implementation of this method from the example code in MainSceneController.ts:
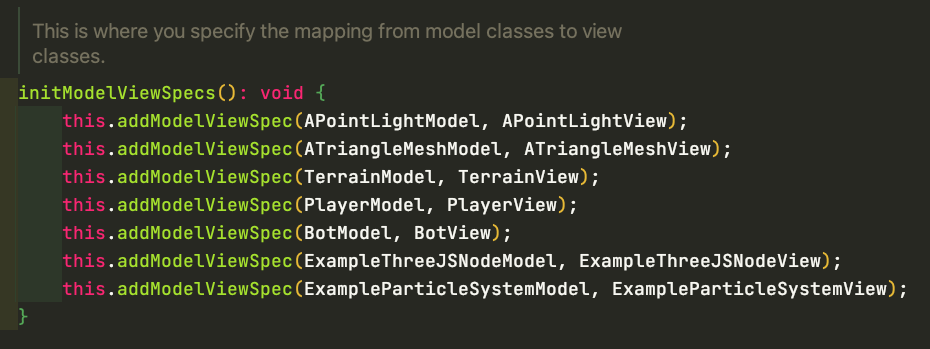
From here, the associated view class should be created any time a corresponding model is added to the scene.
You can look at the example node classes (each is a pair consisting of one custom ANodeModel3D subclass and one ANodeView subclass) to see how they are created and customized.