T-Th 9:05
or
T-Th 11:15
in Olin 155
CS 1110: Introduction to Computing Using Python
Fall 2012
About:
Announcements
Staff
Consultants
Times & Places
Calendar
Materials:
Texts
Python
Command Shell
Terminology
Handouts:
Lectures
Assignments
Labs
Assessment:
Grading
Exams
Resources:
CMS
Piazza (link)
Piazza (about)
AEWs
FAQ
Python API
Style Guide
Academic Integrity
Assignment 5:
Transforms
Due to CMS by Wednesday, October 31st at 11:59 pm
As we saw in class, one of the cool features of classes in Python is that we can use them to make new mathematical objects, like Fractions. While mathematical objects may not sound cool and exciting, you can often do cool and exciting things with them.
Nowhere is this more true that in the field of linear algebra. Linear algebra involves objects that you may have heard of such as vectors or matrices. But even if you have not heard of these, you use them all the time when you play a 3D game or do any other work on your computer that requires a graphics card. They are the foundation of modern computer graphics.
The actual work that you will do in this assignment is relatively short; Most of these methods are shorter than the functions in Assignment 1. But you also only have a week to do it. We have shortened this assignment quite a bit to give you as much time as possible on the last two assignments (which are the most involved). However, when you are done, you will have a Python application that allows you to do several cool things with image files.
Learning Objectives
This assignment has several important objectives.
- It introduces the basics of linear algebra with vectors, matrices, and transforms.
- It shows you how linear algebra relates to simple computer graphics.
- It gives you practice writing classes with both mutable and immutable properties.
- It gives you practice enforcing invariants on your attributes (in this assignment, properties).
- It gives you practice with operator overloading in classes.
Because we are doing some sophisticated things with graphics, this is an
incredibly complex Python application, with an awful lot of files. There are so many
files that we have started to hide them in subfolders. Once again,
you only need to focus on one module: a5.py. In addition, we
will ask for a unit test once again, but we have not provided you with the
code this time. You need to make the file a5test.py yourself.
Important Announcement
This assignment makes use of some features in Kivy that were added since the beginning of the semester. To do this assignment, you will need to reinstall the CornellExtensions package that contains Kivy. You will not need to redownload the ActivePython; just the Cornell Extensions. Your for convenience, they are provided below. Both Windows and Macintosh users should reinstall.
Linux users that have installed Kivy 1.4.x do not need to reinstall. However, if you installed Kivy 1.3.x, then you will need to reinstall Kivy.
Table of Contents
- Before You Get Started
- An Introduction to Linear Algebra
- Assignment Overview
- Assignment Instructions
- Vector: Properties
- Vector: Constructor
- Vector: Addition
- Vector: Optional Methods
- Matrix: Properties
- Matrix: Constructor
- Matrix: Vector Multiplication
- Matrix: Matrix Multiplication
- Matrix: Optional Methods
- Finishing the Assignment
- Appendix: Common Linear Transforms
Before You Get Started
Academic Integrity
This is a brand new assignment, so it is unlikely that you are going to find source code out there to help you with it. Still, we remind you that you should not share your code with others, or look at other people's code. Such cheating helps no one, especially you, and it makes more unnecessary work for us.
Collaboration Policy
You may do this assignment with one other person. If you are going to work together, then form your group on CMS as soon as possible. If you do this assignment with another person, you must work together. It is against the rules for one person to do some programming on this assignment without the other person sitting nearby and helping.
With the exception of your CMS-registered partner, you may not look at anyone else's code or show your code to anyone else, in any form what-so-ever.
Getting Help
If you do not know where to start, if you do not understand classes, or if you are completely lost, please see someone immediately. This can be the course instructor, a TA, or a consultant. Do not wait until the last minute, particularly since you only have one weekend. A little in-person help can do wonders. See the staff page for more information.
An Introduction to Linear Algebra
Linear algebra is a complex topic that has several courses at Cornell devoted to the topic. However, this is an introductory course, and we will not assume that anyone has had exposure to a course like that yet. Fortunately, we are only going to be working with 2D graphics for this assignment. This allows us to teach you all that you need to know within this very assignment.
Vectors
|
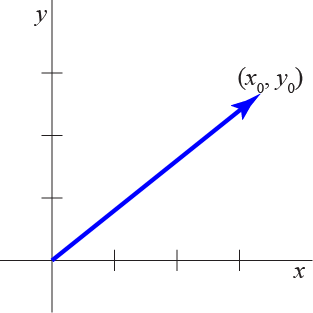
If you have taken a physics course before, you know what a vector is. A vector is a direction and a magnitude. It is typically drawn as a line segment with an arrow on one end (to signify the direction) as shown to the right.
Of course, when we write a Python program, we cannot draw arrows in our program,
so we need an alternate way of representing them. Typically we represent a vector
(in 2D space) as a pair
Because of this representation, vectors often look like points (which we have
already shown in class several times). Indeed, if we were to put the "non-arrow"
end of a vector at the origin, then the vector representation
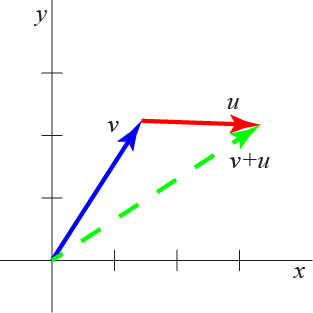
However, we can do a lot more with vectors than we can with points. First of all,
we can add vectors together. Visually, we add vectors by graphically arranging
them head-to-tail, as shown in the picture to the right. However, mathematically,
all we really need to do is to sum the x and y components of the two vectors.
For example, if we have vectors
We can also scale vectors to stretch them or shrink them. Scaling involves the
multiplication of a number (also called a scalar) and a vector. For a scalar
The result is magnifying (or shrinking) the vector by a factor of |

|
Matrices
For the purposes of this assignment, we define a two-dimensional matrix as just
a 2x2 square of numbers, as shown below. In general, matrices can have an arbitrary
positive number of rows and/or columns; but in this assignment we are sticking to
two of each. In a two-dimensional matrix, we typically call the elements
a, b, c, and d, reading left to
right, top to bottom. When we want to refer to the whole matrix, we often give it a
capital letter for a name (as opposed to vectors, which traditionally have lowercase
letters for names). Note that this is a mathematics convention, not a
programming convention.
![]()
(matrix formulas are images and can be clicked for higher resolution)
In many ways, a matrix is essentially a two-dimensional list, such as the ones
we talked about in class. With that in mind, we could represent a matrix in Python as
[[a,b],[c,d]], remembering what we said about rows and columns for
2-dimensional lists. However, we want to use objects, not lists for matrices.
The reason why is that matrices, like vectors, support mathematical operations.
We want to use operator overloading to support these operations.
Matrices support addition and multiplication. Addition is easy. We just add elements in the same position together, as shown below.
![]()
Multiplication is a little trickier. For each position in the new matrix, we take the corresponding row from the matrix on the left and combine it with the corresponding column from the matrix on the right in the way shown below. This definition of matrix multiplication may seem unintuitive to you, but it is a very useful definition, as we will see. Note that unlike for multiplication of scalars (numbers), multiplication of matrices is not commutative; it matters which matrix is on the left and which is on the right.
![]()
Linear Transforms
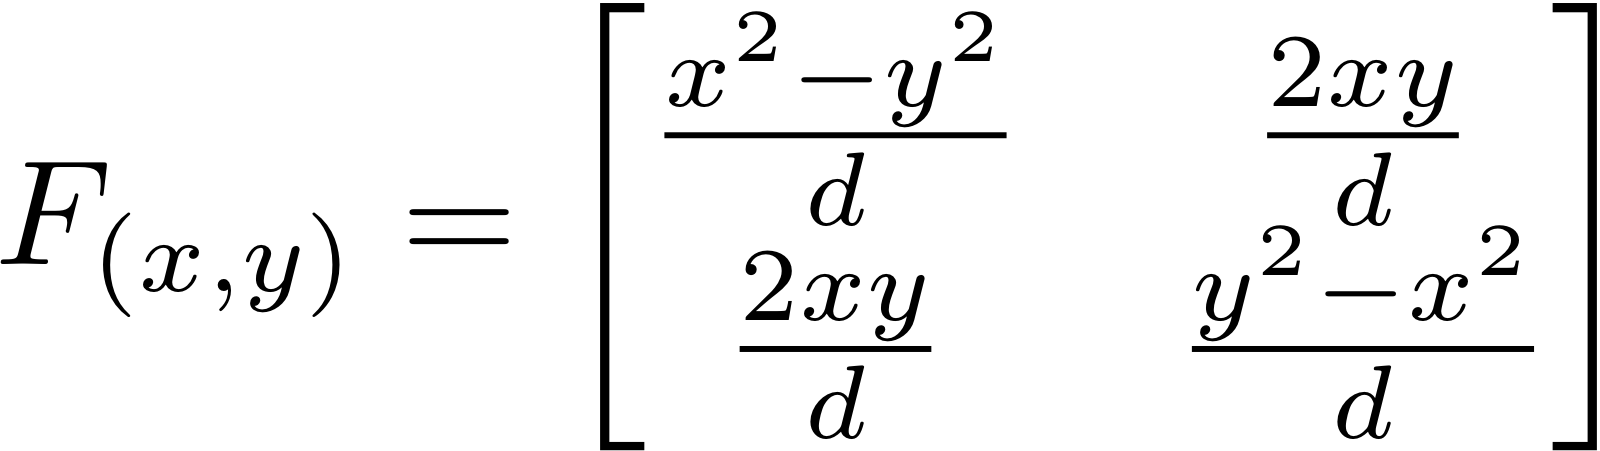
In addition to multiplying two matrices together, we can can multiply a matrix times a vector. When we do this, the matrix is always on the left and the vector is on the right. Matrix-vector multiplication looks very similar to matrix-matrix multiplication, as shown by the formula below.
![]()
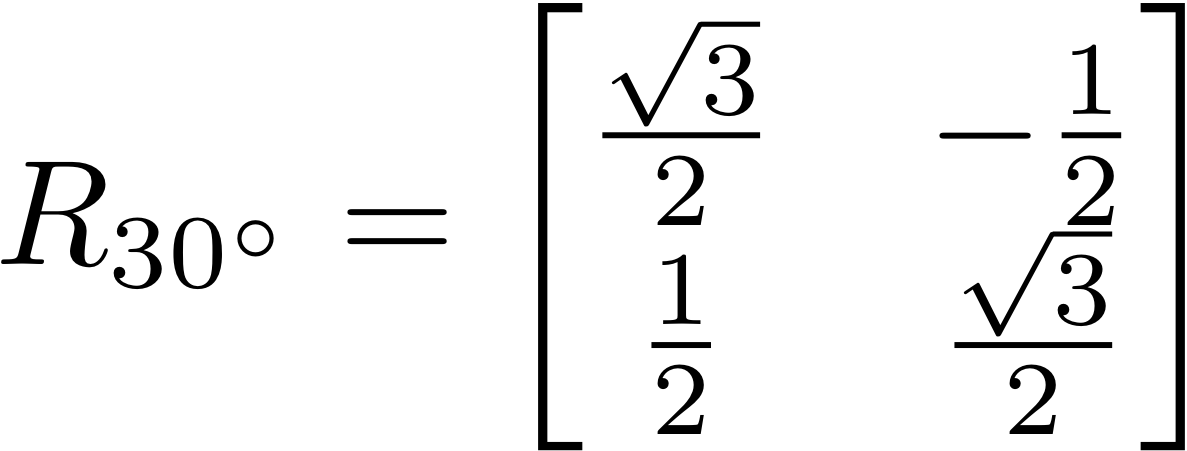
| When we use a matrix in this way, we call it a linear transform. The name means that it transforms one vector into a new one, and does it in such a way that it preserves parallel vectors (i.e., vectors that were parallel before are still parallel, though their angles may have changed). These transforms allow us to do cool effects with vectors. For example, the matrix to the right rotates a vector by 30 degrees. Matrices are useful for several common effects such as rotating, scaling (increasing or decreasing in size), reflecting, and shearing. These are all enumerated in the appendix at the end of these instructions. |
|
Vectors and Graphics
Because vectors are essentially points with more features, graphics programs use vectors everywhere, even when they really are working with points. A classic example of this is with polygons. You have already worked with polygons in the Turtle assignment. A polygon is just a sequence of points, with a line segment connecting each point to the next one in the sequence. In the Turtle assignment, you moved the Turtle from point to point. This time, you will work with the points directly. Except that you will use vectors instead of points.
|
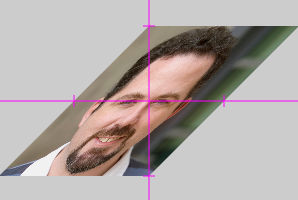
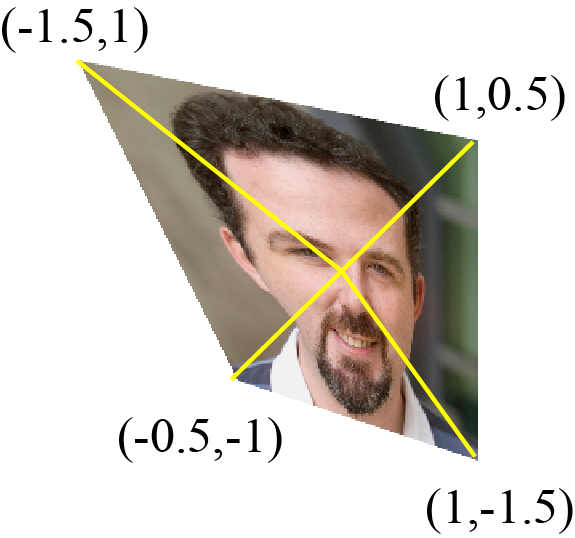
When you draw a polygon on the screen, you typically want to fill the insides with a color or an image. When we fill a polygon with an image, we often call that image a texture. One of the main purposes of a graphics card is to automatically handle the details of putting a texture in a polygon. For example, suppose you had a polygon that is made of exactly four vectors; we typically call such a shape a quadrilateral or a quad. When an image is placed inside of a quad, the graphics card automatically stretches and distorts the image so that the four corners of the image file match up with the four corners of the quad. An example using your instructor's picture is shown to the right. The yellow lines in the second picture show how each corner corresponds to a vector. In this assignment, you be completing an application that displays a square image centered at the origin. This square image is actually a textured quad. The application provides a list of transforms (e.g. rotation, scaling, reflection, etc.) from a pull-down menu. Your choice transforms the four corners of the quad, which in turn transforms the whole image. One of the things you need to do to get this program working correctly is to implement matrix-vector multiplication. This is how the corners of the quad move; the graphics card will take care of the rest. |

|
General Transforms
Linear transforms have a very special property. When you apply them to the zero vector (i.e. the vector (0,0) with no length and no direction), you always get the zero vector back. When dealing with computer graphics, this means that any part of an image that is at the origin cannot move from the origin. That pixel is always stuck there, no matter what you do.
You can see this concretely with several of the examples. Rotation always rotates about the origin, so the center stays in place. Scaling an image scales out from the origin, so again the center stays in place. And any reflection must be about a line centered through the origin, and all the pixels exactly on the line of reflection are unaffected.
But what if we want to shift a quad left or right? This transformation has to move all of the pixels, even the one at the origin. We cannot do this by multiplying a vector by a matrix. But we can move a quad by adding a vector (called the offset) to each of its four corners. This transform is called a translation.
All transforms in computer graphics are either a linear transform
(i.e., multiplication by a matrix), a translation (i.e., addition of an offset vector),
or both. Therefore, a general transform is a function F(x) from vectors to vectors
of the form
F(x) = A*x + b
In this definition, A is a 2x2 matrix (the linear transform component) and
b is the offset vector. If the transform is a translation, then A is the
"identity matrix" (i.e., the matrix which, when you multiply it times a vector gives the
same vector back). If the transform is a linear transform, then b is the
zero vector.
Composing Transforms
The way we get interesting graphical effects is by applying transforms in succession, one after the other. For example, we might want to scale and then rotate. Or rotate and then scale. The order of transforms matters as the image below illustrates.
| Rotate, then Translate | Translate, then Rotate | |
|
|
|
|
When we have a sequence of one or more transforms — such as rotate and scale —
we can combine them into a single transform (this is how we get transforms that have both a
non-identity matrix part and a non-zero offset). Suppose that we have two transforms F(x)
and G(x) where
F(x) = A*x + b
G(x) = C*x + d
If we apply them in the order F(x), then G(x), then the result is
G(F(x)) = C*(A*x + b) + d = (C*A)*x+(C*b+d)
In other words, this is a brand new transform where C*A is the new matrix and
C*b+d is the new offset vector. This is why we need both matrix-matrix
multiplication and matrix-vector multiplication. We call this new transform the composition
of the transforms F(x) and G(x).
Assignment Overview
This assignment is going to be very similar to Assignment 3 in the sense that we provide you with a lot of GUI code, and ask you to complete the application by completing a single module (and testing it). As with that assignment, we ask that you turn in both the module and a unit test for the module.
The primary difference with this assignment is that there is a little less hand-holding with
the required modules. In particular, we are not providing you with a skeleton for the unit
test at all. At this point, we believe that you should understand a unit test well enough
to be able to write one on your own. We do still provide you the module
cunittest.py, so that you can use
assert_equals to write your test cases.
Assignment Source Code
The GUI for this assignment is quite complicated, and hence this assignment involves
far more files than you have seen in an assignment so far. To keep you from getting
confused, we have bundled everything but the most important files into a subfolder
that we call a5lib. You will learn more about the challenges of designing
multi-module applications in the next assignment, but you should ignore the contents
of this folder for now.
Even with the a5lib subfolder, this assignment still has multiple files.
We highly recommend that you download them all as a single compressed zip file called
A5.zip. Find a place on your hard drive to expand this folder.
Inside, you will find the following files:
a5app.py- This module provides the GUI functionality (e.g. window, buttons, and text boxes) of the program. It will not work at first, but will become more functional as you complete more of the assignment.
transform.kv-
This is a
.kvfile that specifies the exact location and style of the various GUI widgets such as buttons and test boxes. (It serves much the same purpose as acssfile, for those of you familiar with web page development.) cunittest.py-
The familiar unit test module, that you will you use to create the module
a5test.py. a5.py-
When completed, this module will contain the definitions for the
VectorandMatrixclasses. Currently it is incomplete, and it is the only module of the ones provided that you should modify.
In addition to these three files, there are two subfolders in this directory:
a5lib-
This folder contains several modules that provide behind-the-scenes GUI functionality. Kivy
requires that we do a lot of things "from scratch". To keep the code readable, we broke
the bits up over several modules instead of making one monster module. We then put this
in a subfolder called
a5libto cut down on clutter. images- This is a folder of sample images to play with. While you are free to use whatever images you like for this assignment, we have provided you this folder so that you have something to start with.
In order for the application to work, all three files and two subfolders must be in the same directory. Again, we recommend that you download the compressed zip file A5.zip and work with that.
To get started with this code, you should run a5app.py as an application.
That is, open the command shell and navigate to the directory for this assignment. Then type
python a5app.pyYou will see the same Kivy messages that you saw in Assignment 3, followed by a GUI window that looks like the one shown below.
![]()
In this application, there is an image in the top left corner, while the bottom left
corner is currently blank. The top right corner shows off several vectors and a
matrix. These represent the four corners of the image to the left, as well as the
current transform (which is the identity transform). Finally at the bottom right, you
will see a tabbed panel with several buttons; the tabs, which are unlabeled, run down the right side of the screen (the image has only one tab) and the buttons (e.g., the one named "File") run along the top of the panel. Most of these things don't actually do
anything yet; they are waiting on you to complete a5.py.
Your job is to write and test the two classes — Vector and
Matrix — in module a5. As you do, more and more
of the GUI will work properly.
Understanding the Program GUI
A working GUI should look like the one shown below. There should be an image at the top and at the bottom. The image at the bottom left should be a transformed version of the image at the top. The transform used is defined by the one selected in the panel to the bottom right. Simply choose a transform from the drop-down menu and fill in the parameters. In the illustration below, the image is rotated by 23 degrees counter-clockwise.
![]()
At the top right is a display giving you information about the transform. The four
vectors at the top are the four corners of the transformed image in the bottom
left. They will change as you pick a different transform. Below that are the matrix
and offset of the current transform T(x) = A*x + b.
You can change the image at any time by pressing the File button. This
will load a Kivy-style file chooser that will allow you to pick a new image. You can
find new image files in the images folder, or you can pick any image
on your hard drive.
It is possible to have more than one transform at a time. To add a new transform, press the add button. This will add a new tab to the panel in the bottom right and allow you to chose a new transform. When you click on a tab, the program will compose the transform with all of the tabs above it.
For example, in the illustration below, we have three tabs. The top tab is a translation, the second tab is a rotation, and the third tab is a shear. We have currently selected the second tab, so the program shows the result of a translation followed by a rotation. It does not show the shear; to see the shear we need to click on the third and final tab. This feature allows you to look at what transforms do to an image step-by-step.
| After clicking Tab Two | After clicking Tab Three |
|
|
|
We will show off our solution in class a few times. We will also make it available to TAs to show in office hours.
Testing
Despite the complexity of the GUI, the code for this assignment is actually fairly
straight-forward. But that does not mean that you should not test out your code.
As you work on this assignment, we expect you to create a unit test file called
a5test.py.
We have not provided you with the unit test file this time; we expect that you know how to make a file like this at this point. We do not want you leaving this file to the end, however. So throughout the instructions below, we give you hints about what you should be putting in this file.
Assignment Instructions
In the instructions below, we take you step-by-step through the various parts of the
classes that you are to implement: fields, properties, constructors, operators, and methods.
As you implement each task, more and more of the GUI will start working properly. With that
said, you do not actually need to use the GUI to do this assignment. You could implement
a5.py (and test it) completely by itself. But we think that you will find
the GUI a lot more enjoyable.
While we take you through these classes step-by-step, we have also provided you with some documentation that gives you an idea of what your classes should look like when you are done. You might find this useful.
Vector: Properties
Right now, a Vector object does not store anything at all. To make it useful, we need to add some properties.
The class Vector has two properties — x and y — with
the following invariants:
| Attribute | Description | Invariant |
|---|---|---|
| x | x-coordinate | Stored as a float; if assigned an int, converts it to a float |
| y | y-coordinate | Stored as a float; if assigned an int, converts it to a float |
Recall from class that a property requires a field and a getter (e.g. the method that follows
the @property keyword). The field is a variable assigned at the start of the class;
it should be a hidden variable (e.g. start with an underscore) with the same name as the property.
For example, property x corresponds to field _x. In addition, the
docstring for the getter should contain the description and the invariant.
The properties for Vector should be mutable. That means each property should
have a setter. This setter should enforce the invariant above as follows:
- If the property is assigned a value that is not an number (e.g. int or float), it raises an error.
- If the property is assigned an int, it converts it to a float and stores it.
- If the property is assigned a float, it stores the value normally
While this part of the assignment might sound complex, it is actually pretty easy once you
understand properties. If you are lost, you might want to look at the point.py
module in Lab 3. The class in that module has a lot of similarities with the one you are
expected to implement here (though that class has a lot more than you should not implement).
Testing
Once you are done with this step, the GUI still will not do anything new. However, it is possible
for you to start testing right away. Recall that every class starts with a default constructor,
whether we implement __init__ or not. And once you make a Vector object, you can
start to assign values to its properties.
Open up an interactive prompt and try the following:
>>> from a5 import *
>>> v = Vector()
>>> v.x = 5
>>> v.x
See what happens? Try further tests with your Vector object to make sure that the properties
behave properly and your invariant is never violated. You do not have to include these tests
in a5test.py.
Vector: Constructor
In order to get the image to show in the bottom left corner of the GUI, you need to implement
a custom constructor. Your constructor __init__ should meet the following
specification:
def __init__(self,x,y):
    """Constructor: Creates a new Vector (x, y).

    The x and y values are 0.0 by default, unless
    otherwise specified.

    Precondition: x and y are numbers (either an int
    or a float)."""
Note that the specification indicates x and y have default values. This means that you must edit the header above to support default values. In addition, remember that your property invariants must be true at all times.
There are two ways that you can make sure your invariants are true. Recall that the
__init__ method is not much more than a sequence of assignment statements.
If you assign to the fields, then you must have assert statements in your method
body to enforce the preconditions. In addition, if the values given for x and y
are ints, you must convert them to floats.
However, your assignment statements in __init__ could assign to the
properties instead of the fields. In that case, the setter methods in the
properties will take care of enforcing the invariant for you. The setters
should already have assert statements in them, and they should convert ints
to floats already.
Testing
Once you have implemented this constructor, you should start up the application
a5app.py. You will now see an image in the bottom left corner! You
cannot do anything with this image yet, but you are making progress none the less.
It is also time to start adding test cases to your unit test a5test.py.
The way to test a constructor is to make a new object and use assert_equals
(from the provided module cunittest)
to verify that the properties have the values that you provided
in the constructor. You may want to use assert_floats_equal instead
of assert_equals, but this is unnecessary as long as your floats are
relatively simple.
Vector: Addition
You still cannot apply any transforms yet. The first transform that we are going to get working is a translation. In order for this to work, we need to implement vector addition. Implement the following method according to its specification.
def __add__(self, other):
    """Returns: a new Vector that is the sum of
    self and other.

    This method should not alter the contents of
    either self or other.

    Precondition: other is a Vector object."""
Your implementation must use asserts to enforce the precondition.
Testing
Once you have implemented this method, go to the panel in the bottom right. Select
Translation in the drop-down menu and enter a dx and
dy value. Watch the image move about the screen! The coordinates in
the image box range from -2 to 2, so if you pick a dx or dy
with absolute value bigger than 3 the image will disappear off the screen.
You should also add some unit tests to a5test.py. Make several vectors
and add them. Make sure that you get the result you expect. We suggest that you
test adding the zero vector as one of the test cases.
Check the results attribute-by-attribute; do not use assert_equals on
whole objects. In particular, you have not implemented __eq__, so ==
(and hence assert_equals) will only compare folder names, not object contents.
Optional: Other Methods
In class, we saw a lot of useful object operators, such as __eq__,
__ne__, __str__, and __repr__. None of
these methods are required for this assignment. Implementing them will not
have any effect on the GUI. Your are also not implementing scalar multiplication,
as that feature will handled when by the Matrix class below.
However, you might still find them useful, so you may wish to implement some
of these. In particular, if you want to use assert_equals to
compare objects instead of attribute-by-attribute, you will need to implement
__eq__ and __ne__.
We will not take off from your unit test a5test.py if you implement
the tests this way, provided that __eq__ and __ne__
are defined. However, you will not receive extra credit for the optional methods either.
If you do decide to implement __eq__, here is a word of warning.
It is not a good idea to use == to compare floats directly; the round-off issues cause
problems, as we have seen all semester. If you are going to implement __eq__,
it is a good idea to use the clamp_float function in cunittest.
This function rounds a float to its significant digits, so that you can safely use
it in a comparison. For example, if you want to compare floats a and
b, you would use
cunittest.clamp_float(a) == cunittest.clamp_float(b)
Testing
As these methods are all optional, you also do not need to test them for this assignment.
We will not count off if there are additional tests in a5test.py
for these extra methods, but we will not give extra credit either.
Matrix: Properties
The class Matrix has four properties — a, b, c and
d — with the following invariants:
| Attribute | Description | Invariant |
|---|---|---|
| a | top-left value | Stored as a float; immutable |
| b | top-right value | Stored as a float; immutable |
| c | bottom-left value | Stored as a float; immutable |
| d | bottom-right value | Stored as a float; immutable |
We want these properties to be immutable. That means you should have a getter, but no setter. The docstring for the getter should contain the description and the invariant.
Testing
Because the properties are immutable, you cannot assign anything to them. That means that you will not be able to test them until you make the constructor.
Matrix: Constructor
Your constructor __init__ should meet the following
specification:
def __init__(self,a,b,c,d):
    """Constructor: Creates a new Matrix [[a, b], [c, d]]

    By default, this constructor makes the identity matrix.
    Hence the default values of a and d are 1.0, and the
    default values of b and c are 0.0, unless otherwise
    specified.

    Precondition: a, b, c and d are numbers (either an int
    or a float)."""
Note that the specification indicates a, b,
c and d have default values. This means that you
must edit the header above to support default values.
In addition, remember that your property invariants must be true at all time. Because your properties are immutable, you do not have any setters this time. This means that you constructor must assign directly to the fields (not the property), and that it must enforced the invariants itself. You should use asserts to reject any value other than an int or a float, and all ints should be converted to floats.
Testing
You still will not see any new functionality in the GUI, but you can now test both
the constructor and your properties. Write your unit tests just like you wrote
them for the constructor in Vector.
Matrix: Vector Multiplication
To active the other transforms, you need to implement matrix-vector multiplication. Implement the following method as specified.
def __mul__(self, other):
    """Returns: A new Vector which is the multiple
    of this Matrix and other

    The result is a new Vector using standard Matrix * Vector
    multiplication. Neither self (a Matrix) nor other (a Vector)
    are modified.

    Precondition**: other is a Vector"""
Use the formula given above. Your implementation must use asserts to enforce the precondition.
Testing
Once you implement this method, a world of new functionality opens up in the GUI. Select any transform from the pull-down menu: translate (which you already had), scale, rotate, shear, or reflect. Enter the parameters and watch what happens to the image! You now have available all possible (basic) transforms (although you can't yet compose them).
In addition, you should test out matrix-vector multiplication with test cases in
a5test.py. Remember that the result of this multiplication is a
new vector and you should test that it is the vector you expect. That is, compute
the result by hand, and make a new vector with those coordinates. Then compare
that its coordinates agree with the one you get from matrix-vector multiplication.
Unless you implemented __eq__ and __ne__ as your
optional methods, you should still
test attribute-by-attribute and not compare two Vector objects in
assert_equals. If we see you comparing Vector objects in your
unit tests, we will look for __eq__ and __ne__ in
Vector and count off if they are not there.
We recommend that at least one of your tests involve the identity matrix. Indeed, you might want to look at the list of matrices in the appendix for some good test cases.
Matrix: Matrix Multiplication
While you can now use all of the transforms in the GUI, you can still only use one transform at a time. If you add a new transform tab in the GUI, you will only see the result of the currently selected tab. It will not compose the result with other transform tabs.
To get the GUI to compose transforms, you need to implement matrix-matrix
multiplication. To do this, you are going to replace the method
__mul__ you just wrote with one that satisfies the following
specification:
def __mul__(self, other):
    """Returns: A new value which is the multiple
    of this Matrix and other

    If other is a Vector, the result is a Vector using standard
    Matrix * Vector multiplication.

    It other is a Matrix, the result is a Matrix using matrix
    multiplication.  We assume that self is the matrix on the
    left and other is on the right.

    Neither self nor other are modified.

    Precondition: other is either a Matrix or a Vector"""
To implement this version of the method you need to do what is often called
dispatch on type. After you assert the precondition, the first step
is to check the type of other. It is a Vector, you use the code
for matrix-vector multiplication that you just wrote in the previous step.
If it is a Matrix, you should use matrix-matrix
multiplication instead.
Your implementation must use asserts to enforce the precondition.
Testing
Once you have implemented this method, open the GUI one last time. Define
a transform, like rotation or translation. Then press the Add
button and define a completely different transform. Play with the tabs
and watch what happens. Congratulations! You now have a fully functioning
GUI.
Again, you should test that this method works in a5test.py.
Your old tests for matrix-vector multiplication should still work. Our
change extended the definition of this method to add new functionality
without taking away the old. However, now you need to test matrix-matrix
functionality.
Pick simple test-cases and compute the results by hand to try it out.
Again, we recommend that at least one of your tests involve the
identity matrix.
Check the results attribute-by-attribute; do not use assert_equals
on whole matrices. In particular, you have not implemented __eq__
for the class Matrix, so == (and hence assert_equals) will only compare
folder names, not object contents.
Optional: Other Methods
Once again, there are a lot of methods that we did not have you implement. You
are not asked to implement __eq__, __ne__, __str__
or __repr__. You are also not asked to implement Matrix
addition (e.g. __add__). None of these methods would have any
effect on the GUI even if you did implement them.
Once again, you might want to implement __eq__ and __ne__
so that you can use assert_equals to compare objects directly.
We will not take off from your unit test a5test.py if you implement
the tests this way, provided that __eq__ and __ne__
are defined. However, you will not receive extra credit for the optional methods either.
Testing
As these methods are all optional, you also do not need to test them for this assignment.
We will not count off if there are additional tests in a5test.py
for these extra methods, but we will not give extra credit either.
Finishing the Assignment
Once you have everything working you should go back and make sure that your program meets the class coding conventions. In particular, you should check that the following are all true:
- There are no tabs in the file, only spaces
- Classes are separated from each other by two blank lines.
- Methods are separated from each other by a single blank line.
- Class contents are ordered as follows: fields, properties, constructor, operators, methods.
- Lines are short enough that horizontal scrolling is not necessary (about 80 chars is long enough).
- The specifications for all of the methods and properties are complete.
- Specifications are immediately after the method header and indented.
Furthermore, at the top of each module that you worked on (a5.py, a5test.py)
you have three single line comments with (1) the module name, (2) your name(s) and netid(s), and
(3) the date you finished the assignment.
Turning it In
Upload the files a5.py and a5test.py to CMS by
the due date: Wednesday, October 31st at 11:59 pm.
Do not submit any files with the extension/suffix .pyc. It will
help to set the preferences in your operating system so that extensions always appear.
Survey
In addition to turning in the assignment, we ask that each of you individually (even if you worked in a group) complete the survey posted in CMS. Once again, the surveys will ask about things such as how long you spent on the assignment, your impression of the difficulty, and what could be done to improve it. Please try to complete the survey within a day of turning in this assignment. Remember that participation in surveys comprise 1% of your final grade.
Appendix: Common Linear Transforms
The GUI handles the construction of linear transforms for you. However, it is very easy to construct the various transforms because the matrices all have very simple properties. Here are the various linear transforms used in this assignment.
Identity Matrix

The identity matrix is a matrix that, when multiplied by anything (either a vector or a matrix) produces the thing it was multiplied by. In fact, when multiplying the identity matrix with another matrix, it produces the same result whether it is on the left or the right.
There is only one identity matrix and it has the form
![]()
Scale Matrix
A scale matrix may either be a uniform scale (scale by the same amount in the x and y directions) or a non-uniform scale (scale by different amounts in each direction). The matrix for a scale transform is
![]()
Here sx is the amount to scale in the x-direction and sy is the amount to scale in the y-direction.
Rotation Matrix

A rotation matrix transforms a vector by rotating it counter-clockwise about the origin. If the angle for rotation is α, then the matrix for a rotation transform is
![]()
All rotation takes place about the origin. If you want to rotate about a different point, you need to translate the vector first.
Shear Matrix

A shear matrix transforms a vector by "pulling" it along the either x-axis or the y-axis, as shown to the right. A shear has a factor k which determines how much the image is pulled (The actual amount pulled is the mutliple of k and the value of the vector perpendicular to the shear axis. The result is a "diagonal" image, as show to the right). The shear matrix is given by
![]()
You can shear only along a single direction at a time. If you want to shear along multiple directions, you need to compose the transforms.
Reflection Matrix

A reflection matrix "flips" a vector across a line. To reflect about either the x-axis or the y-axis, we use the matrices
![]()
In general, if we want to reflect about an arbitrary line, we find a vector v = (x,y) that runs parallel with the line. We then use the matrix
where d is the length of the vector v.