Implementation Strategy
Once you have implemented all the unimplemented functions in the starter code, you will have a fully functioning ray tracer that can render the test scenes. The provided test cases for the basic ray generation, intersection, and shading methods will let you get these working in any order, but it's nice to proceed in an order that lets you generate results to confirm things are working along the way, to save on integration headaches at the end. So here we describe a recommended implementation strategy with a nice sequence of check points.
Step 0: Rendering an Orthographic Sphere
To get you started, we'll outline some minimum functionality you can implement in order to generate a picture:
- Start by assuming that our camera is sitting at the origin, looking down the negative z axis.
- Generate rays for an Orthographic Camera (one where all rays are parallel)
- Here we will need to map pixels of our output image to points on our image plane
- For now, assume:
- Wach ray
p+tv, should havepequal to the image plane point andvpointing in the same direction of our camera (down the negative z axis) - The image plane is a square that ranges from -1 to 1 in both x and y, and sits at z=0
- Wach ray
- Intersect your generated rays with the first surface in a scene (a sphere, for our
ortho friendly exampletest scene) - Set a pixel white if its ray intersects the sphere and black if it doesn't
Note that this is effectively creating a placeholder for ray generation in render_image. In step 1 you will move this
code to your camera class.
You can implement the above by changing just two functions: render_image, and Sphere.intersect. You can test it with
the ortho friendly example, where the scene consists of just one sphere centered
at [0,0,-0.5].
The structure of render_image at this point might look something like:
def render_image(camera, scene, lights, nx, ny):
    output_image = np.zeros((ny,nx,3), np.float32)
    for i in range(ny):
        for j in range(nx):
            ray = # Generate Ray---we recommend just generating an orthographic ray to start with
            intersection = scene.surfs[0].intersect(ray); # this will return a Hit object

            # set the output pixel color if an intersection is found
            # ...

    return output_image
To implement sphere intersection you will need to finish the Sphere.intersect method, which
returns an appropriate Hit object depending on whether a "valid" intersection is found, where "Valid" intersections are
those with t values between ray.start and ray.end.
If there is no valid intersection, the value of the hit returned should be no_hit which is
defined in the ray.py starter code as
no_hit = Hit(np.inf)
If there is a valid intersection, then the Hit object will contain:
- The
tvalue along the ray that corresponds to the first valid intersection - The location of that intersection
- The material value at the point of intersection (used for shading later)
- the normal at the point of intersection (used for shading later)
If you implement the above and run the ortho friendly example scene you should get this image:

The rest of the steps!
- Implement ray generation for the included perspective camera class. Here, rays should originate at the center of projection for the camera. If you run the ortho friendly example at this point with perspective ray generation you should get this image:

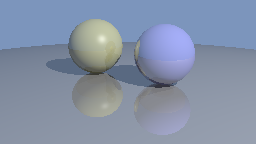
And if you run the two spheres example you should get this image

- Implement scene intersection, which iterates through all of the surfaces in the scene and looks for intersections. Stub in shading to just return the object's diffuse color
k_d, which you can get from its material object. Return the background color for misses. That will get you to this rendering forthree_spheres.py:

- Implement diffuse shading.

- Add specular shading.

- Add the shadow test.

- Implement ray-triangle intersection, resulting in the following for
cube.py.

- Implement mirror reflection, resulting in the following for
three_spheres.py.
If you pass the test cases and also match the reference images, it's reasonable bet your ray tracer works correctly, though there are a few interesting cases with shadows that are not tested anywhere.
We generally store geometry in single precision (out of habits built from saving space in large scenes).
But it's important to ensure your geometric calculations, particularly ray intersection, are carried out in double precision.
You'll notice the initializer of Ray converts the origin and direction to double precision; this may be enough depending on the details of your implementation.