Implementation Strategy
Once you have implemented all the unimplemented functions in the starter code, you will have a fully functioning ray tracer that can render the test scenes. The provided test cases for the basic ray generation, intersection, and shading methods will let you get these working in any order, but it's nice to proceed in an order that lets you generate results to confirm things are working along the way, to save on integration headaches at the end. So here is a recommended sequence.
- Implement ray-sphere intersection and ray generation. Then you can make a provisional outer loop that intersects the eye ray with the first object in the scene, returning white on a hit and black on a miss, to get an image like this for
two_spheres.py:

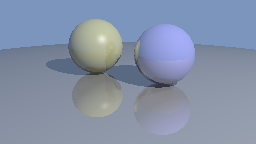
- Implement scene intersection and stub in shading to just return the object's diffuse color. Return the background color for misses. That will get you to this rendering for
three_spheres.py:

- Implement diffuse shading.

- Add specular shading.

- Add the shadow test.

- Implement ray-triangle intersection, resulting in the following for
cube.py.

- Implement mirror reflection, resulting in the following for
three_spheres.py.
If you pass the test cases and also match the reference images, it's reasonable bet your ray tracer works correctly, though there are a few interesting cases with shadows that are not tested anywhere.
We generally store geometry in single precision (out of habits built from saving space in large scenes).
But it's important to ensure your geometric calculations, particularly ray intersection, are carried out in double precision.
You'll notice the initializer of Ray converts the origin and direction to double precision; this may be enough depending on the details of your implementation.