Git
Git is an extremely popular tool for software version control. Its primary purpose is to track your work, ensuring that as you make incremental changes to files, you will always be able to revert to, see, and combine old versions. When combined with a remote repository (in our case GitHub), it also ensures that you have an online backup of your work. Git is also a very effective way for multiple people to work together: collaborators can upload their work to a shared repository. (It certainly beats emailing versions back and forth.)
In CS 3410, we will use git as a way of disseminating assignment files to students and as a way for you to transfer, store, and backup your work. Please work in the class git repository that is created for you and not a repository of your own. (Publishing your code to a public repository is a violation of academic integrity rules.)
A good place to start when learning git is the free Pro Git book. This reference page will provide only a very basic intro to the most essential features of git.
Installing Git
If you do not have git installed on your own laptop, you can install it from the official website. If you encounter any problems, ask a TA.
Activate your Cornell GitHub Account
Before we can create a repository for you in this class, we will need you to activate your Cornell github account. Go to https://github.coecis.cornell.edu and log in with your Cornell NetID and password.
Create a Repository
Create a new repository on GitHub: Go to the top right of the GitHub home page, where you’ll see a bell, a plus sign, and your profile icon (which is likely just a pixely patterned square unless you uploaded your own). Click on the downward pointing triangle to the right of the plus sign, and you’ll see a drop-down menu that looks like this:

Click on “New repository” and then create a new repository like this:
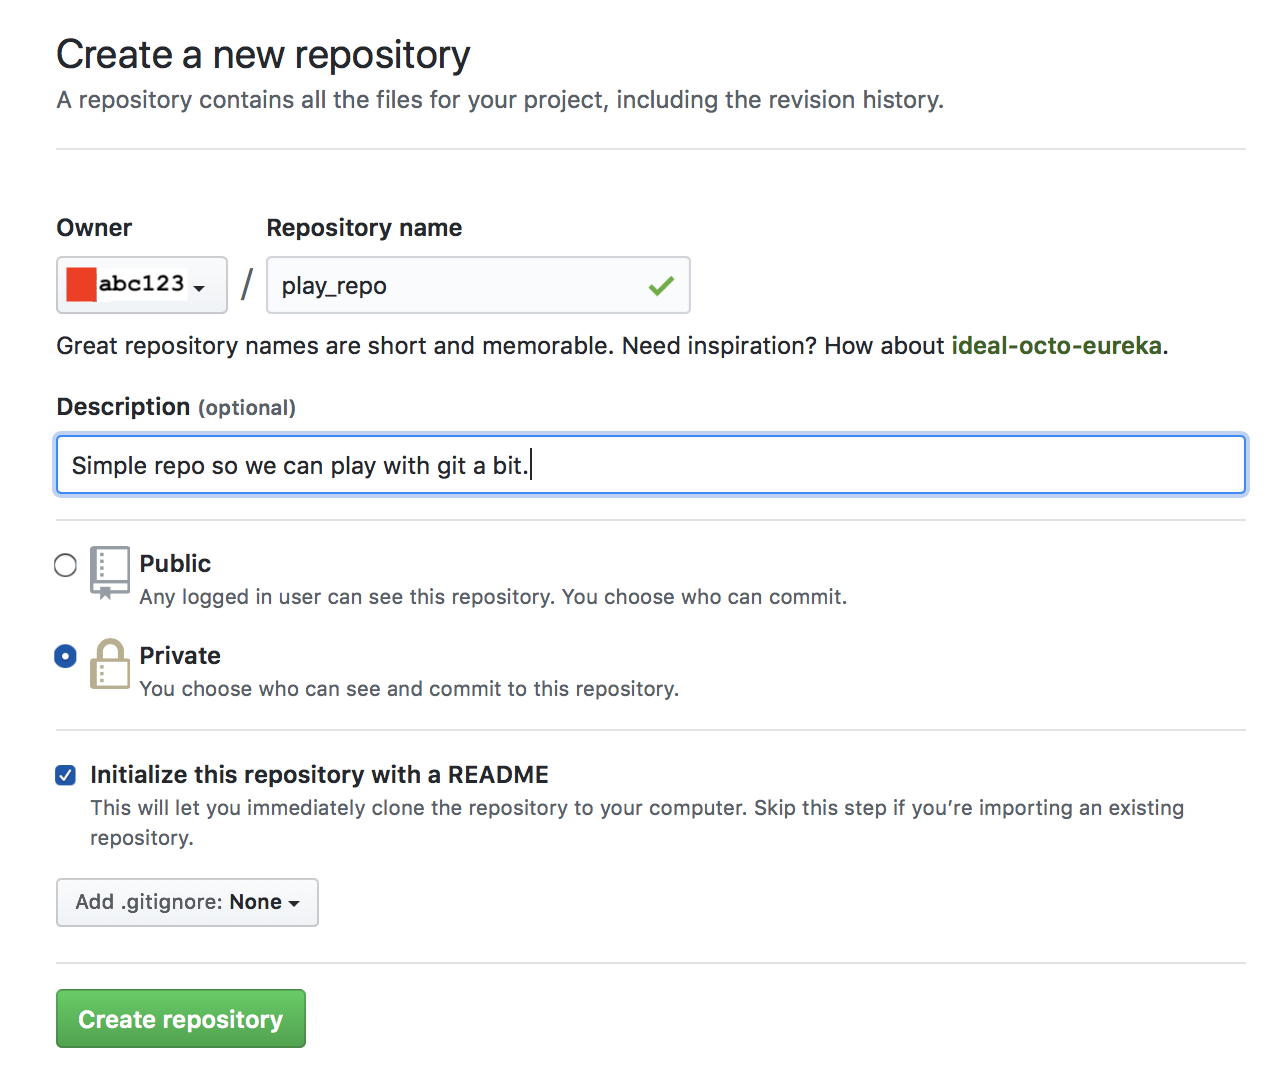
Note that the default setting is to make your repository public (visible to everyone). Any repository that contains code for this course should be made private; a public repository shares your code with others which constitutes an academic integrity violation.
Now click on the green “Create Repository” button.
Set Up Credentials
Before you can clone your repository (get a local copy to work on), you will need to set up SSH credentials with GitHub.
First, generate an SSH key if you don’t already have one. Just type this command:
$ ssh-keygen -C "<netid>@cornell.edu"
and use your NetID. The prompts will let you protect your key with a passphrase if you want.
Next, follow the instructions from GitHub to add the new SSH key to your GitHub account.
To summarize, go to Settings -> SSH and GPG Keys -> New SSH key,
and then paste the contents of a file named something like ~/.ssh/id_rsa.pub.
Clone the Repository
Cloning a git repository means that you create a local copy of its contents. You should clone the repository onto your own local machine (lab computer or laptop).
Find the green button on the right side of the GitHub webpage for your repository that says “Code”. Click it, then choose the “SSH” tab. Copy the URL there, which will look like this:
git@github.coecis.cornell.edu:abc123/play_repo.git
In a terminal, navigate to the folder where you would like to put your repository, and type:
$ git clone <PASTE>
That is, just type git clone (then a space) and paste the URL from GitHub.
Run this command to download the repository from GitHub to your computer.
At this point, you’ll get authentication errors if your SSH key isn’t set up correctly. So try that again if you get messages like “Please make sure you have the correct access rights and the repository exists.”
Look Around
Type cd play_repo to enter the repository. Type ls and you’ll see that your repo currently has just one file in it called README.md.
Type git status to see an overview of your repository. This command will show the status of your repository and the files that you have changed. At first, this command won’t show much.
Tracking Files with Git
There are 3 steps to track a file with git and send it to GitHub: stage, commit, and push.
Stage
To try it out, let’s make a new file.
Create a new file called <netid>.txt (use your NetID in there).
Now type git add NetID.txt from the directory containing the file to stage the file.
Staging informs git of the existence of the file so it can track its changes.
Type git status again.
You will see the file you added highlighted in green.
This means that the file is staged, but we still have two more steps to go to send your changes to GitHub.
(You might consider going back to the GitHub web interface to confirm that your new <netid>.txt file doesn’t show up there yet.)
Commit
A commit is a record of the state of the repository at a specific time. To make a commit, run this command:
$ git commit -m "Added my favorite color!"
The message after -m is a commit message, which is an explanation of the changes that you have made since you last committed. Good commit messages help you keep track of the work you’ve done.
This commit is now on your local computer. Try refreshing the GitHub repository page to confirm that it’s still not on the remote repository.
Push
To send our changes to the server, type this:
$ git push
The git push command sends any commits you have on your local machine to the remote machine.
You should imagine you are pushing them over the internet to GitHub’s servers.
Try refreshing the GitHub repository page again—now you should see your file there!
Pull
You will also want to retrieve changes from the remote server. This is especially helpful if you work on the repository from different machines. Type this command:
$ git pull
For now, this should just say that everything’s up to date. But if there were any new changes on the server, this would download them.
Typical Usage Pattern
Here is a good git workflow you should follow:
git pull: Type this before you start working to make sure you’re working on the most up to date version of your code (also in case the staff had to push any updates to you).- Work on your files.
git add file.txt: Type this for each file you either modified or added to the repo while you were working. Not sure what you touched or what’s new? Typegit statusand git will tell you!git commit -m "very helpful commit message": Save your changes in a commit. Write a message to remind your future self what you did.git push: Remember that, without the push, the changes are only your machine. If your laptop falls in a lake, then they’re gone forever. Push them to the server for safekeeping.
Git can be a little overwhelming, and sometimes the error messages can be hard to understand. Most of the time, following the instructions git gives you will help; if you run into real trouble, though, please ask a TA. If things get really messed up, don’t be afraid to clone a new copy of your repository and go from there.
It is completely OK to only know a few of the most common git commands and to not really understand how the whole thing works.
Many professional programmers get immense value out of git while only ever using add, commit, push, and pull.
Don’t worry about learning everything about git up front—you are already ready to use it productively!
Even More Commands
Here are a few other commands you might find useful. This is far from everything—there is a lot more in the git documentation.
Log
Type this command:
$ git log <netid>.txt
You’ll see the history of README.md.
You will see the author, time, and commit message for every commit of this file, along with the commit hash, which is how Git labels your commits and how you reference them if you need to.
At this point, you’ll only see a single commit.
But if you were to change the file and run git commit again, you would see the new change in the log.
You can also type git log with no filename afterward to get a history of all commits in your entire repository.
Stash
If you want to revert to the state of the last commit after making some new changes, you can type git stash.
Stashed changes are retrievable, but it might be a hassle to do so.
git stash only works on changes that have not yet been committed.
If you accidentally commit a change and want to wipe it out before pulling work from other machines, use git reset HEAD~1 to undo the last commit (and then stash).