
A6: GUIs
Graphical User Interfaces (GUIs) enable richer human–computer interaction by responding to more kinds of input, such as mouse movements, and presenting users with more dynamic output, such as animated graphics. The capabilities and configurations of a program become more discoverable when they can be controlled via familiar graphical “widgets” like buttons, menus, and sliders. Moreover, object-oriented toolkits, like Swing, make GUIs easy to build (some IDEs, including IntelliJ IDEA, even let you drag-and-drop widgets to form a GUI).
But programming an interactive application requires some different techniques from what you’ve used so far, namely inversion of control. Instead of prescribing the order of operations yourself, your program must respond to whatever the user decides to do, typically by executing event handlers that you have defined and configured to “listen” for certain user or timer actions.
Of course, before any of this can happen, the interface itself needs to be defined. Designing an attractive and usable interface is an artform, and GUI toolkits provide a wealth of reusable and customizable components to help you realize your vision, but assembling them in code by hand can admittedly be rather tedious.
In this project, you will complete an interactive game that responds to mouse clicks and whose settings can be controlled during gameplay with standard widgets. You will write code to assemble the interface, draw the game board, and handle a variety of user interactions. In the process you’ll work with Swing components both from inside (inheritance) and from the outside.
While this assignment will give you practice programming GUIs, it is also intended to give you practice learning new skills from reference materials. You will be using widgets and layout managers that have not previously been shown in lecture or discussion, and this is intentional. The code includes numerous links to API documentation and official tutorial pages that directly relate to the new classes you’ll need to use, and reading and understanding this material on your own is a big part of the assignment.
Collaboration policy and academic integrity
The same policies apply as in previous assignments A4 and A5.
Recommended timeline
This is a shorter assignment than the previous couple of assignments, so you will have correspondingly less time to work on it: just over a week. This is also so you don’t have to be worrying about any assignments across Prelim 2. Even so, don’t try to do this assignment at the last minute. Instead, get started early: you will need to look at a significant amount of API documentation, and you don’t want to be trying to ingest that at the last minute.
There are 15 TODOs to complete. Here is one way to spread out the work:
Day 1: Download and study the demo code from the GUI lectures. Download and read the release code for A6, looking for similarities with the slides and demos. Make a list of the fields and methods in
GameComponentandTargetso you know what tools are at your disposal. The JavaDoc for the given code might help you keep your focus on the interfaces rather than their implementation.Day 2: Complete TODOs 1 through 4. Test as you go, as suggested by the handout. Take a break, then complete TODOs 5 through 8. These involve the most complicated logic of all the tasks.
Day 3: Seek assistance if you could not complete TODOs 5 through 8 the previous day.
Day 4: Complete TODOs 9 through 12. You should be comfortable reading Java API pages and Swing Tutorial pages by this point.
Day 5: Make a sketch of the slider panel described in TODO 13. Use it to plan what code you need to write. Implement TODO 13. Then complete TODO 14.
Day 6: Complete TODO 15.
Getting started
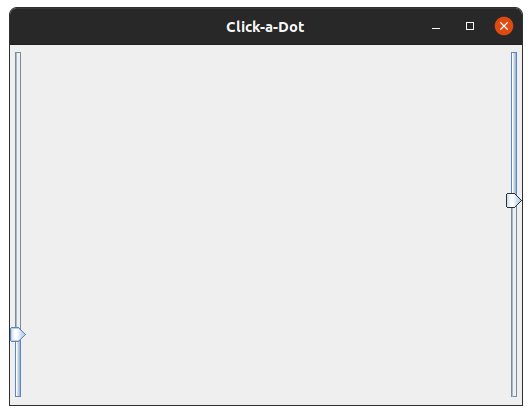
Open the given code as a new project in IDEA and set the project’s SDK. Try running GameMain; you should see a window with vertical sliders on either side.
Carefully read all of the code in “GameComponent.java” (it’s not too long). Identify the fields used to represent the game’s configuration and state, and take inventory of the methods that it provides (yes, some methods have a get or set prefix—that is a convention of Swing code, and this class is trying to fit in). Class GameComponent is a subclass of JComponent, meaning it can be used just like any other Swing widget (specifically, it is a subclass of JPanel, which represents a generic opaque component). It responds to any mouse clicks that occur over it, and it also responds to ticks from a Timer that it maintains.
Next, read over the code in “GameMain.java”. The style here is different—there are no fields, and all methods are static. Most of the code is in one long procedure that configures the various widgets, assembles them into a window, and attaches event handlers to be triggered by the widgets. Method main() is present, but it’s a procrastinator, asking the Swing framework to do work on its behalf sometime later (all interaction with Swing components must be done from the “Event Dispatch Thread,” which Swing controls, so main() shouldn’t touch any widgets itself). Notice how font sizes are adjusted, how widgets are incorporated into the layout, and how event handlers are specified (typically via anonymous functions).
Repeat: read all of the given code and specifications before writing any code of your own. You need to be aware of what tools (methods, fields, local variables) you have at your disposal. And be prepared to read several relevant API and tutorial pages. Start early so this reading is not rushed.
The code you need to write is marked with TODO comments. Each item is numbered in the order we recommend completing it in. This is not the order in which they appear in the files, so use your editor’s “find” feature to search for the next numbered TODO if necessary. This handout gives tips on how to test your changes along the way, but if something doesn’t work, you will need to debug your code. Debugging event-driven code can be tricky; a general tip is to add println() statements to each method so you can distinguish between a buggy method implementation and a bug that prevents the method from being called in the first place (remove all such print statements before submitting your code).
There are too many widget types and properties to cover them all in lecture, so you will need to learn how to use the ones you need yourself. Get comfortable with the API pages for classes like JComponent, and browse some of the Swing Tutorial. When a TODO references tutorial pages, read them thoroughly so you know how to use the component it describes. Most importantly, play around—since a GUI is interactive, you can see the effects of small changes right before your eyes.
Step 1: Finishing the basic layout
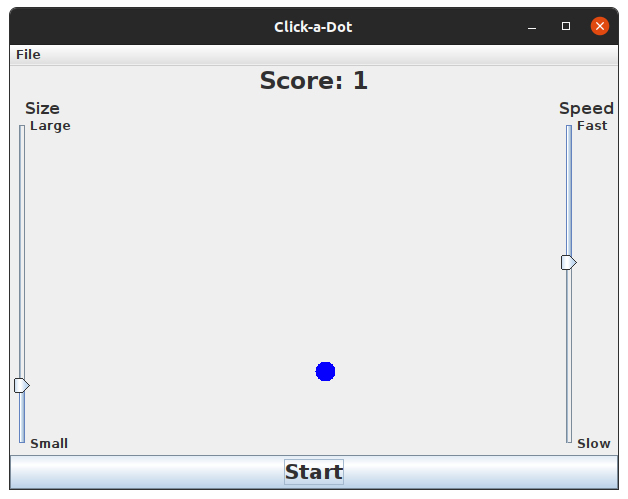
Complete TODO items 1 and 2 in GameMain to add the score label and the start button to the layout. Run the application to check that the new widgets appear in the correct place.
Complete TODO 3 in the same file before switching over to GameComponent. That way, you’ll be able to start a game in order to test the changes you make there. Recall that the method to start a game is in GameComponent, and the local variable game in GameMain.createAndShowGUI() references a GameComponent object.
Step 2: Finishing the game logic and presentation
Complete TODO 4 in GameComponent so that the game board can draw itself. The coordinate system is a little different from what you may be used to in mathematics: the origin is in the upper-left corner, and the y-coordinate increases moving down. Integer coordinates label grid lines between pixels (not columns and rows of pixel centers), which is why “fill” commands that color pixels between grid lines are easier to think about than “draw” commands that try to trace on top of grid lines (hint: draw some sketches on graph paper to help you visualize the coordinate system and fill operations).
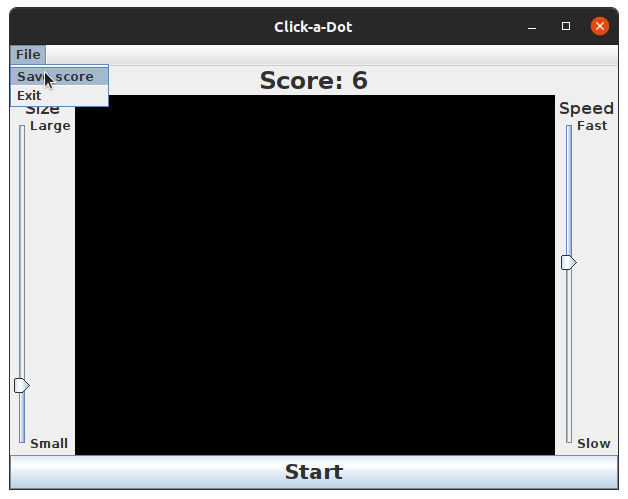
The background of the board should be black when the game is inactive, and the default color when the game is active. The default color could change depending on the OS, dark vs. light mode, etc. So don’t color the background yourself while the game is active; rather, let the super method call provided in the code handle it for you.
To scale a shape to the size of the game board, you will need to know its size (width and height). This is not something you can know in advance—users can resize the game window, which will resize the game board—so you will need to query how large the board is at some point in your method implementation. Fortunately, since GameComponent is a JPanel, and JPanel is a JComponent, you can use methods like JComponent.getHeight() for this purpose.
While working on TODO 4, don’t worry about TODO 6 just yet. Knowing how to call a supporting method (like Target.paintDot()) is sufficient to allow you to move on with your current task, even if that method doesn’t work yet. Run the application; did the “inactive” game board get drawn? Does it change appearance when you start a game?
Note: you may need to import additional classes, like
java.awt.Color, in order to call or pass arguments to certain methods; your IDE will hopefully do most of this automatically, or at least offer suggestions (if multiple suggestions are provided, prefer those injavax.swing,java.awt,java.io, andjava.util). Expect to encounter this several times throughout the assignment.
Next, complete TODO 5, which controls what happens whenever the timer ticks. In order to specify the respawn bounds, you once again have to know how big the game board currently is. Run the application again and start a game; the board’s appearance should revert to the “inactive” state after 15 (= maxTargets * targetTimeMillis / 1000) seconds.
Now you can complete TODO 6 and teach the target how to draw itself. Run the application and start a game, and you should see a blue dot hopping around. (You should only see one dot on the board at a time; if old ones persist, double-check that you fulfilled all of the requirements of TODO 4.)
Finally, you need to tell the game how to respond when the user clicks somewhere on the game board. Complete TODO 7 so that the target knows how to check for and evaluate a “hit,” then complete TODO 8 to invoke that logic when the mouse button is pressed. Hint: event objects often contain useful information about the event that occurred; browse the API for MouseEvent for ways to query where the mouse was clicked (the “source component” will be our GameComponent instance, with origin in the game board’s upper-left corner). Now when you run the application, if you manage to click on the target, you should see it turn red. This is all the work that needs to be done in GameComponent.
Step 3: Connecting widgets to the game
Users can now interact with the game board, but the only way to see their score or change settings is by invoking the game’s methods from code. Let’s connect these methods to the broader user interface.
Start with TODO 9 in GameMain for showing the score in the score label. As with TODO 3, the work to be performed should be specified in an anonymous function, which is passed to a method of the object that will be generating the events (in this case, the GameComponent game). Search the documentation for that object’s superclasses to find an appropriate method; look for an overload that will only listen for changes to the “GameScore” property. It may seem strange that GameMain needs to listen for a PropertyChangeEvent in order to update the label; why not give GameComponent a reference to the label so it can update it directly whenever the score changes? We do things this way to encourage separation of concerns and avoid a circular dependency. GameComponent shouldn’t be concerned with any part of the interface outside of the game board, and there are many ways a score could be reported besides updating a label. Thus, it employs inversion of control to merely notify interested parties when the score has changed, leaving them to respond as they wish. This kind of loose coupling improves the future reusability of GameComponent, potentially in applications with very different interfaces.
Next, complete TODO 10 and TODO 11 so that manipulating the sliders causes the game’s settings to be changed. Run the application and watch the target get bigger or smaller and move around more or less frequently in response to clicking and dragging on the sliders. Notice how most of the event handlers in GameMain are specified very succinctly—typically as an anonymous function with only one statement. This is a good sign—GUI assembly code like that in GameMain should be used only to “wire things up” and should not be the home of detailed application logic.
For more about separating concerns in interactive applications, read about Model-View-Controller (MVC) and related design patterns [1], [2]. This small program doesn’t rigidly adhere to any of these patterns, but it still aims to reduce coupling between the game’s logic and its interface.
Step 4: Improving appearances
Just like numbers should always be printed with units, GUI widgets should always be accompanied by labels. The sliders in particular need to indicate which settings they affect, and in which directions.
Complete TODO 12 to add labels to the start and end of a slider (note how this helper method is called above when the sliders are constructed).
Then complete TODO 13 to add a label above a slider by creating a composite component to contain both the label and the slider. JPanels are often used for this purpose (in fact, when you add elements to a JFrame, you’re really adding them to a JPanel with a BorderLayout layout manager that fills the frame).
Step 5: Menus and dialogs
When we use desktop applications, we expect certain common features, such as file menus and file browser dialogs used to open or save files. We’re also used to seeing error dialogs pop up when things go wrong. By adding a “save score” feature to our game application, you can get experience with all of these components.
Complete TODO 14 to add a file menu to a menu bar at the top of the window. The two menu items have already been created, and the “Exit” item is even functional thanks to its ActionListener—try it out!
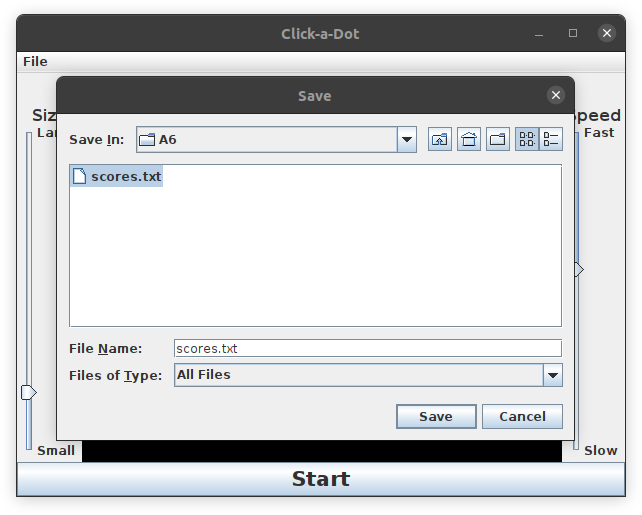
Finally, complete TODO 15 to implement the “save” feature. When it comes time to open the file to be written, use the following try-with-resources statement to create a buffered PrintWriter (which provides the familiar println() method) while guaranteeing that it is properly closed whether or not an Exception is thrown:
try (PrintWriter out =
    new PrintWriter(new BufferedWriter(new FileWriter(file, true)))) {
    // Write data to file with `out.println()`
} catch (IOException e) {
    // Handle exception `e`
}
Here, file is a variable of class File specifying which file to open (you should get such an object from your file chooser dialog). By passing true as the second argument of FileWriter’s constructor, an existing file will be appended to rather than being overwritten (see the API for FileWriter’s constructors).
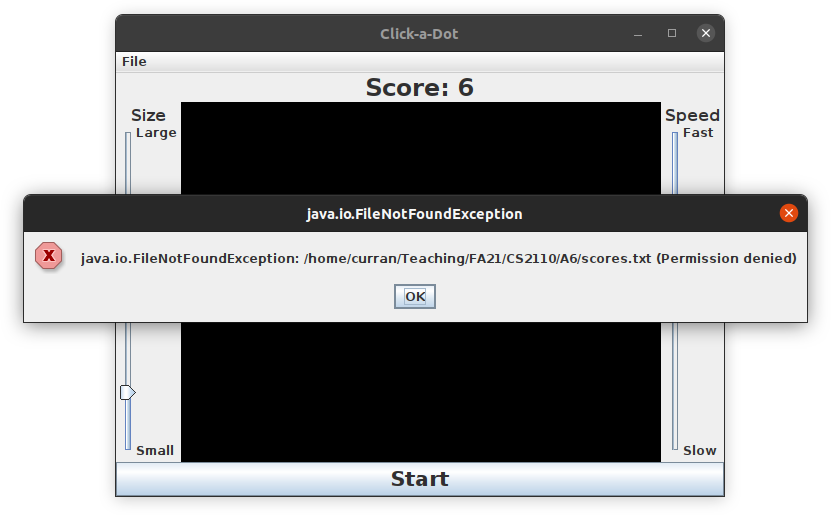
Test out the new functionality by playing a few games, saving your scores to the same file, and opening that file in a text editor to confirm that all of the scores were saved. To test out the error dialog, you can mark your scores file as “read-only” using your computer’s file browser, then attempt to save on top of it.
Submission
If you have a partner, be sure to set up your group on CMSX well before the deadline and certainly before you submit your work.
When you have finished implementing all of the TODOs, testing your application interactively, and playing a few games just for fun, submit both of your source files (GameComponent.java and GameMain.java) on CMSX.
Also submit the file summary.txt, updated with the specified information:
- Who was in your project group.
- Implementation strategy: describe how you went about implementing the assignment and how the work was divided between the partners.
- Testing strategy: how did you perform testing and design test cases?
- Known problems: are there any things that do not work?
- Time spent on the assignment, in hours.
- Other comments on the assignment.
You are encouraged to try tweaking the behavior and appearance of your game app, though we recommend doing so on a separate copy of your code. Your final submission may have minor embellishments, but it must compile and run and it must adhere to the requirements specified in Javadoc comments and this handout.
Testing Rubric
This assignment is unusual in that it doesn’t involve JUnit test cases. Rather, the graders will run your game and playtest it to see whether it behaves correctly; they will also read your source code to check that you have implemented the TODO’s in the right way. Here are the most important features they will be examining:
- The score label appears in the correct place.
- The start button appears in the correct place.
- The background is black when the game is inactive.
- The inactive background has the correct size.
- There are no target dots when the game is inactive.
- The game starts (and restarts) when the start button is pressed.
- The background is the default color when the game is active.
- The target dot is displayed when the game is active.
- The target dot moves around randomly at the correct rate.
- The target dot has the correct radius.
- The target dot’s center is at the correct coordinates.
- The target is deemed hit if the player clicks inside its circular area, but not outside.
- The target dot is blue if it has not been hit, red if it has.
- The target is not hit after respawning.
- The game stops after the maximum number of targets have been spawned and the player has had time to click the last target.
- The score increments by one when a target is hit.
- The score does not increase when the same target is re-hit.
- The current score is displayed in the score label.
- The size slider controls the radius of the target, with the correct min and max.
- The speed slider controls the respawn rate, with the correct min and max.
- The sliders are in the correct places with the correct empty borders.
- The labels near the sliders have the correct text and size and are in the correct positions.
- The menus have the correct structure and items.
- The Save menu item shows a save dialog, not an open dialog.
- After a file is approved in the Save dialog, the current score is written to the end of the file without deleting any of the other scores in the file.
- If an error occurs opening or writing to the save file, another error dialog is shown.
- The error dialog shows an error icon and has the correct title and message.
- No output is printed to the terminal.