Older assignments
CS 2043 Assignment 5: Create a Google Cloud VM
Due Date: Friday March 8 at 11:15 am
Assignment Captain: Ted Bauer
In this assignment, you’ll launch a virtual machine on one of Google’s fancy computers, and then you’ll communicate with it from Wash using some networking commands. In Assignment 6, you’ll build off of this setup, so make sure you follow the instructions carefully!
Part 1: set up a VM on Google Cloud.
- Navigate to https://console.cloud.google.com, and login with your Cornell Google account. The screen you’ll see is a general hub where you can manage the Google Cloud projects you’re working on.
- In the sidebar on the left, click the button that says “Compute Engine”, which should bring up another menu; click “VM instances.” (See Figure 1.)
- You’ll likely need to set up a free trial for Google Cloud at this point. You can sign up for a free trial that will last a year, and provide you with $300 of credit (this will fund the computers that run your VMs). After A6 (the next assignment), you’ll probably want to cancel the trial so you don’t forget about it and get billed! We’ll remind you at the end of this writeup, and also at the end of A6.
- Next, click “Create Instance”.
- You should now be on a screen with details about your VM instance. You can name this instance anything you like. Check the boxes that say “Allow HTTP traffic” and “Allow HTTPS traffic”. This is important for Assignment 6, so don’t forget this! You can leave everything else as-is. (See Figure 2.)
- Click “Create” and you’ll be brought to a table of your active VMs. It might take a few seconds for your VM to start up, but once it does, you’ll have your very own VM running on Google’s servers.
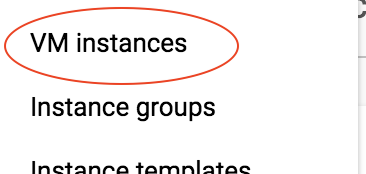
Figure 1
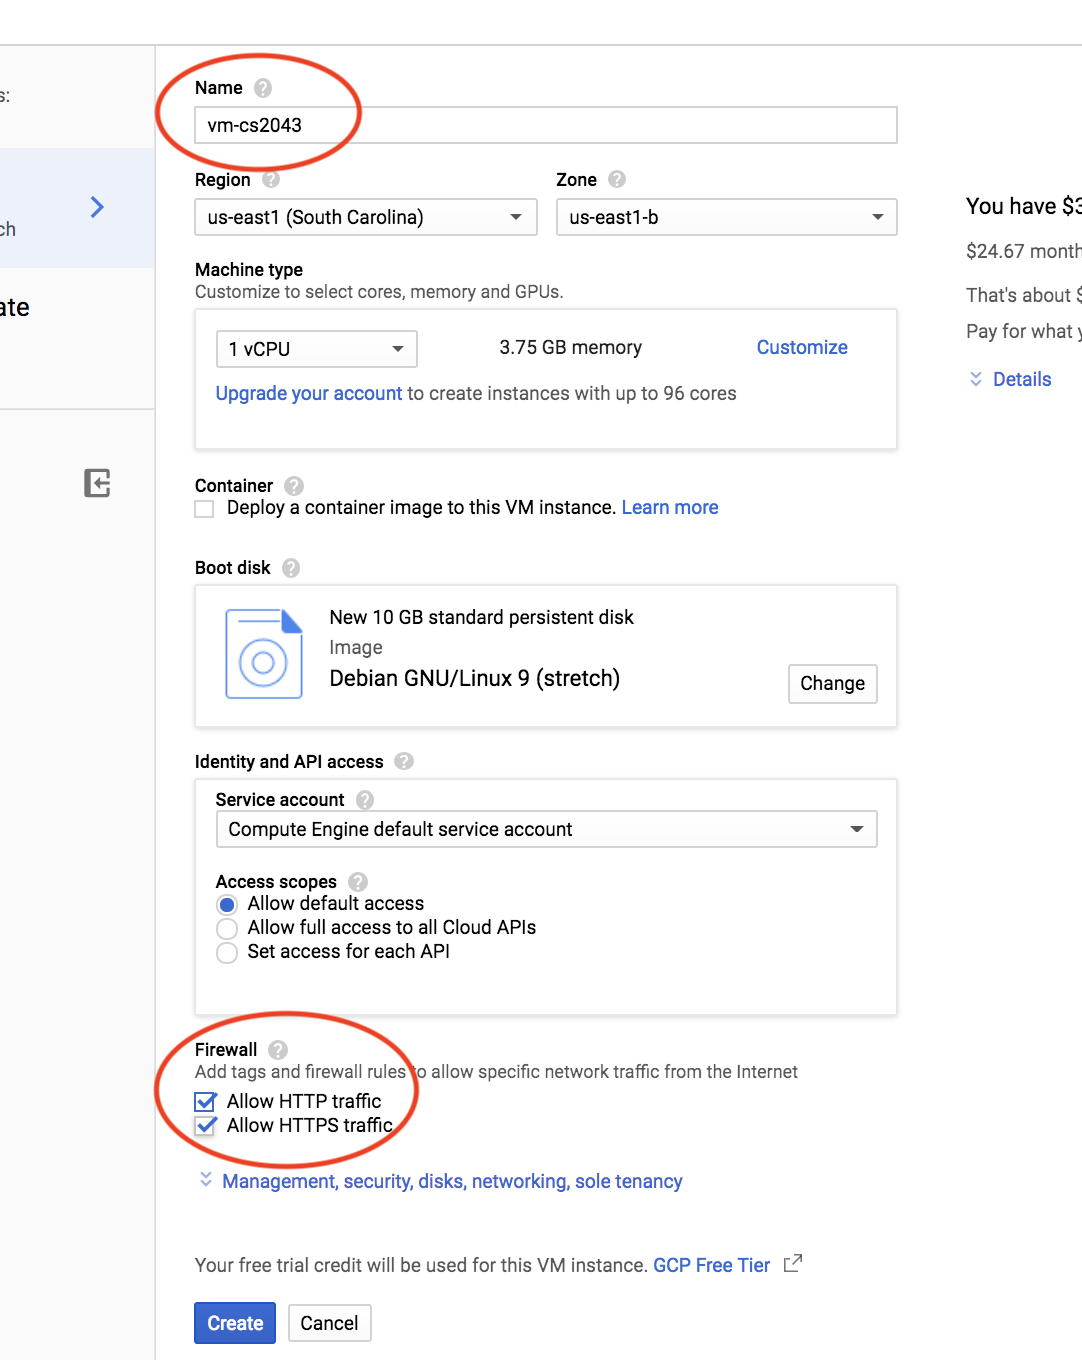
Figure 2
Part 2: connect to your VM
In the table of your active VMs, under the “Connect” column, click “SSH” (See Figure 3). A window should appear that looks like a computer terminal. You can use this terminal to interact with your VM.

Figure 3
Part 3: install networking commands.
We’ll need to install a couple of commands on your VM that are often available pre-installed on many Unix systems. They’re called ifconfig and netcat; install them by typing sudo apt-get install net-tools and sudo apt-get install netcat into the web-terminal. (Type ‘Y’ for ‘Yes’ when prompted.)
Part 4: find the IP address of your VM.
You can find the IP address of your VM by navigating to the list of your VM instances, and finding the entry under “External IP”. See Figure 4:
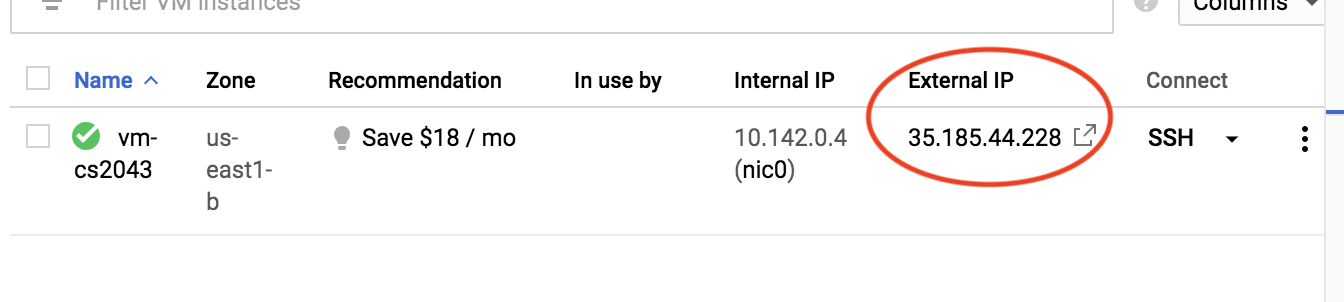
Figure 4
Part 5: modify the firewall for your VM.
In order to communicate between Wash and the VM, we’ll need to open a port on the VM. For this assignment, we’re going to open port 3389. On the Google Cloud Platform, you can do this by following these steps:
- In the sidebar, under the “Networking” section, navigate to VPC network -> Firewall rules.
- Click “Create Firewall Rule.”
- Make sure the settings look something like this (see Figure 5):
- Set “Name” to something like “a5-rule.”
- Set “Network” to “default”.
- Set “Direction” to “Ingress”.
- Set “Targets” to “All instances in the network”.
- Set “Source filter” to “IP ranges”.
- Set “Source IP ranges” to “0.0.0.0/0”.
- Under “Protocols and ports”, check “tcp” and specify the port to be 3389.
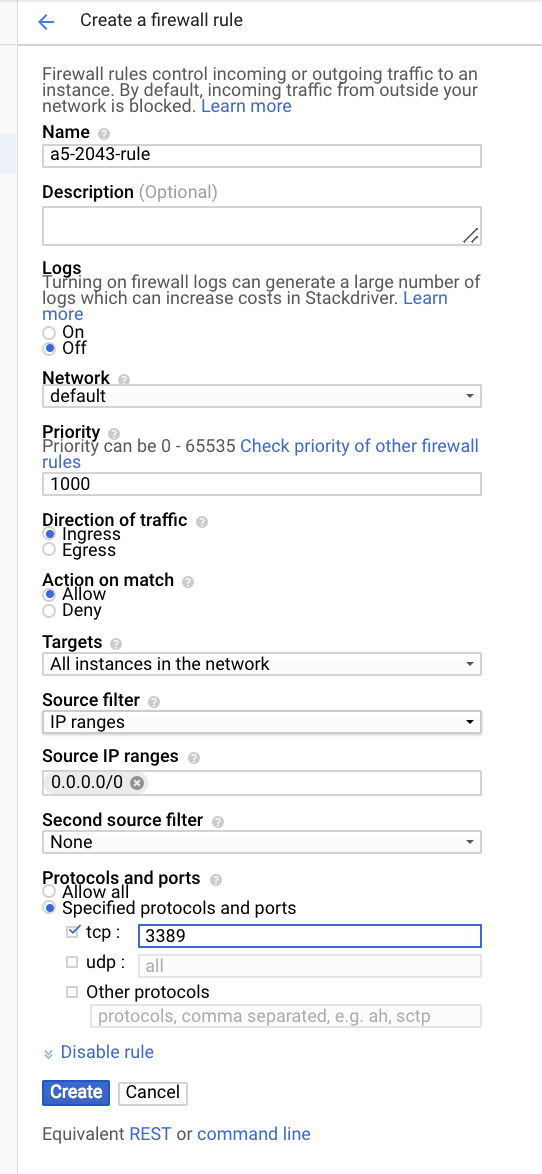
Figure 5
Part 6: wait for a connection on the VM.
For this part of the assignment, you’ll set up the VM to listen for a connection from Wash. You’ll send the output of running ifconfig to Wash; to receive credit for the assignment, make sure you follow this step carefully! In the web-terminal for your Google VM, pipe the output of sudo ifconfig to netcat -p 3389 -l -q 0. This will make your VM listen for connections on port 3389, and will send the output of sudo ifconfig to devices that connect. (The -q 0 makes it a bit easier to end the netcat connection when you do step 7, but it’s not important; don’t worry about it.)
Part 7: turn in your assignment with check-vm!
Now, you’ll receive the VM’s output of sudo ifconfig on Wash, and turn it in! We’ve provided you with a command check-vm. It will connect to your VM (which should be waiting for such a connection if you followed step 5) and turn in the output. Invoke it by typing check-vm hostname port, where hostname is the IP address you found in step (4), and port is 3389.
- If you run the command and it outputs “check-vm succeeded! You’ve successfully turned in A5.”,you’re done! Good work.
- Otherwise, you’ll see “check-vm failed: could not communicate with VM. Please troubleshoot.”, or something similar. You’ll need to do some troubleshooting. Make sure you followed all of the steps carefully! You can run check-vm as many times as you want, but each time you’ll need to do step (6) again: the VM needs to be listening for connections.
Part 8: remember to eventually cancel your free trial!
Don’t forget: after you finish the assignment after this one (i.e. after you finish A6), cancel your free trial so you don’t get billed!
CS 2043 Assignment 6: Deploying Benji’s Artisanal Soda Web App on the Cloud
Due Date: Friday March 8 at 11:15 am
Assignment Captain: Pakin Wirojwatanakul
Assignment 6 is contained within the /course/cs2043/assignments/a6/ directory. If you can run docker on your laptop, then please scp -r /course/cs2043/assignments/a6/ (the slash after a6/ is important) onto your laptop. Please continue on your laptop, not wash, whenever possible.
Introduction: Benji is an entrepreneur in NYC who specializes in making Artisanal Soda. He currently has a locally deployed web app, but his servers keep on crashing. He knows that you are a specialist in Google Cloud and Docker so he decides to come to you for help.
Note: Knowledge of how web apps work is not required.
Part 1: Dockerization
Before you start:
- Create an account for docker hub if you have not done so already.
- Review the lecture slides.
- Try this tutorial, https://docs.docker.com/get-started/part2/
Good to know:
- An image is an executable package that includes everything needed to run a container: the code, a runtime, libraries, environment variables, and configuration files.
- A Dockerfile is what docker uses to build images. Each instruction in a Dockerfile creates a layer in the image. You can build new images based on top of existing images by using the
Fromcommand. You can also use other Dockerfile commands to install packages, expose container ports, and copy files from your local directory. For more information please refer to the lecture slides.
Step 1
Code up the Dockerfile by following the directions provided by the comments in the Dockerfile. Please do this on your laptop if at all possible.
Step 2
Build an image in the current directory using the Dockerfile. Please do this on your laptop if at all possible.
Good to know:
- A container is a runnable instance of an image. You can create, start, stop, move, or delete a container using the Docker API or CLI. For more information please refer to the lecture slides.
- Definition of localhost: the default name describing the local computer address also known as the loopback address. You can access your localhost by using any web browser.
- A port is a specific number associated with a particular application running on your computer. If we imagine that an IP address works kind of like a street address, then a port number would correspond to an apartment number. Port numbers allow packets destined for your computer to target a specific application directly; this means multiple internet-facing services can exist on your computer simultaneously without worry.
- p flag of command
docker container run: The p flag takes in two arguments-p <local port number>:<container port number>. This flag redirects network traffic from localhost port<local port number>to container port<container port number>.
Step 3
Run the image, and direct traffic from your localhost port 8081 to port 8080 of the container. Please do this on your laptop if at all possible. This requires binding to an external port; only one application can do this at a time. If you run this command on wash, you will probably conflict with a classmate doing the same. If you must run this on wash, then please change 8081 to some other random number above 1024.
Step 4
Check localhost on your web browser (Chrome or Safari) to see if the web app is rendering properly. Do so by typing localhost:8081 in your web browser. You should see Benji’s website. If not, please check for mistakes in steps 1-3. This sanity check is for your own good. (If you are doing this on wash and you changed the 8081 in the previous step to some other port, then you must replace the 8081 in this step with the other port as well).
Good to know:
A docker registry such as Docker Hub stores docker images. Docker images can be pulled from or pushed to Docker Hub in a similar fashion to pushing or pulling from Github.
Step 5
Login to Docker on your server.
Step 6
Push Benji’s web app to Docker Hub.
Part 2: Google Cloud
Step 1
SHH into your Debian GNU/Linux 9 (stretch) Instance that you have previously created in assignment 5.
Step 2
Follow the instructions in the link to install Docker on your cloud instance. https://docs.docker.com/v17.09/engine/installation/linux/docker-ce/debian/#upgrade-docker-ce-1
Step 3
On the cloud, run the image and direct traffic from your localhost port 80 to port 8080 of the container. This may require root!
Step 4
Use your web browser to access your Instance’s External IP. (Note use HTTP instead of HTTPS)
Step 5
Hand in your assignment using the command a6_handin <<Your External IP>>. If you get “success” as a response you will get full credit. Otherwise, please try again.
Step 6
Once you receive the message “success”, feel free to shut down your cloud instance to save money. Benji is very grateful for your help!