T-Th 9:05
or
T-Th 11:15
in Olin 155
CS 1110: Introduction to Computing Using Python
Fall 2015
About: Announcements
Staff
Consultants
Times & Places
Calendar
Materials:
Texts
Python
Command Shell
Terminology
VideoNote
Handouts:
Lectures
Assignments
Labs
Assessment:
Grading
Exams
Resources:
CMS
Piazza
AEWs
FAQ
Python API
Python Tutor
Style Guide
Academic Integrity
Python in CS 1110
Python comes in several shapes and sizes. To make sure that everything works properly, we require that every single person in the course use the same version of Python. You are free to either work in the ACCEL labs or to use your laptop; but whatever the case, your version of Python must be the same as what we are using in the labs. Hence, even if you already have Python installed on your computer, we ask that you install a new version (see instructions below) so you can be consistent with everyone else.
As you will see, these instructions are a bit long. Installing Python is often much more complicated than simply using it. As many people in this class have not programmed before, we have tried to make installation as simple as possible via step-by-step, "do this, do that" instructions. This is not what the rest of the course is like. You are not expected to understand what many of these steps are doing. Furthermore, these instructions are lengthy mainly because we are trying to support as many operating systems as possible. In practice, you should be able to finish the installation in 15-20 minutes.
If you have problems, and if you have a laptop, the best thing to do is to bring it in to someone to look at. Any of the course staff or consultants can help you with this. If you cannot bring in your computer, we have provided you with some instructions below. If you are having difficulty with these instructions, please email TA William Thomason <wbt23@cornell.edu>.
Table of Contents
Installing Python
While installing the base Python package is usually straight-forward, getting add-ons for Python can be a bit tricky. For that reason, we have tried to simplify this process into as few steps as possible. Depending on your operating system, you first need to install Python. If you are an OS X user, you will use the Python that already comes with your operating system. For all other users, we have decided to standardize on the ActiveState Community Edition of Python. This is a free version of Python that is fairly complete and has a lot of nice features.
Once you have the base Python install, you need to install the "Cornell Extensions". These are 3rd party extensions packaged by us (but not made by us) to fit into either the ActiveState or the OS X version of Python. These extra packages include things like graphics capabilities to make games and flashy applications.
Before you install these, be sure to completely read the instructions for your operating system. While you are unlikely to make any mistakes, it is best for you to do things in exactly the order we tell you to. As we said, you do not need to understand what is going on here.
Installing on Windows
Supported Platforms: Windows 7, Windows 8
Unsure if Supported: Windows 10
The version of Python that we are using for this class has been designed for Windows 7 and Windows 8. We do not support versions of Windows older than Windows 7. If your operating system is Vista or XP, then you will need to either upgrade or use the machines in the ACCEL lab.
We have not yet tested our installation on Windows 10. We are working on testing that right now. We believe that it should work, but we make no guarantees at this time.
This installation process will put Python in the directory C:\Python27.
If you already have a folder of that name (which might be the case if you used Python
before taking this class), you have two options: move it or delete it. You have to
use our version of Python and that is where it wants to go.
Install ActiveState Python
Go to the ActiveState web page and download the free 32 bit Community Edition of Python 2.7.8. This should be the first big blue button on the right. We cannot say the following enough:
Do not download the 64 bit version.
The 32 bit version is called x86, while the 64 bit version is called x64. Even if you are using a 64 bit version of Windows, you must install the 32 bit version of Python. Many of the extra features in the Cornell Extensions will not properly work with 64 bit Python. If you use 64 bit Python, you will not be able to complete some of the later assignments in this class.
In addition, make sure you have Python 2.7.8 or other version starting with 2.7, and not Python 3.4.1. or any other number starting with a 3. Python 3 is incompatible with a lot of important libraries, and therefore not safe to use in this course.
When you download this installation file, you may get a web page asking you to fill in some information. You can ignore this web page. You do not need to fill in the information; your download has started already.
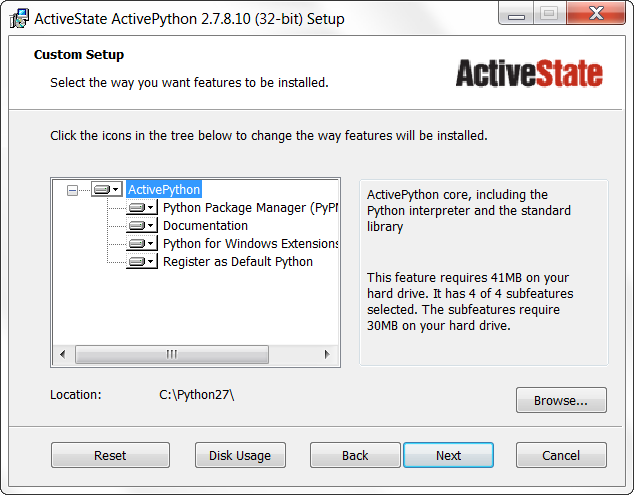
The file that you download is a MSI installer. Simply double click on it and follow
directions. At one point in the installer, it will ask you what directory you want
to install in. By default, it will install in C:\Python27; leave this
alone and click Next.
Install the Cornell Extensions
Download the file CornellExtensionsWindows.zip. This is a big file. If you find the download time too slow, you can come to consulting hours to get a copy, or use a USB drive to get a copy from someone who already has it.
After downloading the file, double click on this zipped folder. This will open an
Explorer Window with another folder inside of it called CornellExtensionsInstall.
Drag the CornellExtensionsInstall folder on to your Desktop.
This is important, as the installation will not work if you click on the installer
while it is still inside the folder with the zipper. Every year we get students with
problems because they skipped this step.
Now that you have a copy of CornellExtensionsInstall on your Desktop, open
this folder (again, not the one in the zipped folder!). Inside, you should
see the following two items:
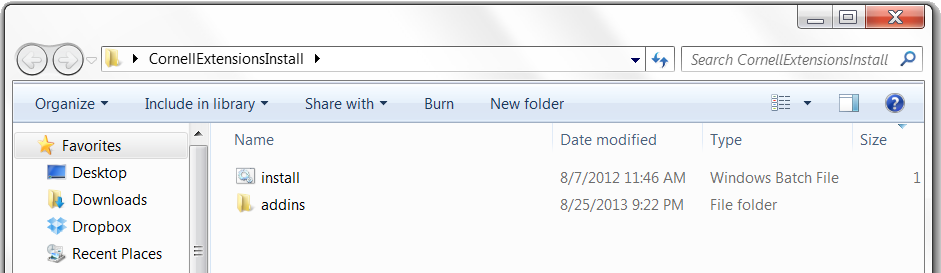
Double-click on the file that is named install. This will pop up a window
with a lot of scrolling text in it. Do not close the Window. When that window
closes, Python is successfully installed. If you close the Window too early, you will
have to install a second time.
Once you have finished with the Cornell Extensions, you should test your installation.
Troubleshooting the Windows Installation (8/27/15)
There appears to be an issue with the ActiveState Python that affects a small number of Windows computers. For these computers, you get a "Command not Found" error when you attempt to run Python.
For computers running into this problem, we have created an alternate version of Cornell Extensions, called CornellExtensionsWindowsRedux.zip. This file does everything Cornell Extensions does and it fixes this error. Follow the instructions for installing the standard Cornell Extensions to install this file.
There are a few differences in this version that will change the installation process a bit. First of all you will get a dialog box saying that install wishes to modify your computer. You should select Yes. Additionally, the scrolling window will not close automatically this time. Instead it will prompt you to hit any key, as shown below.
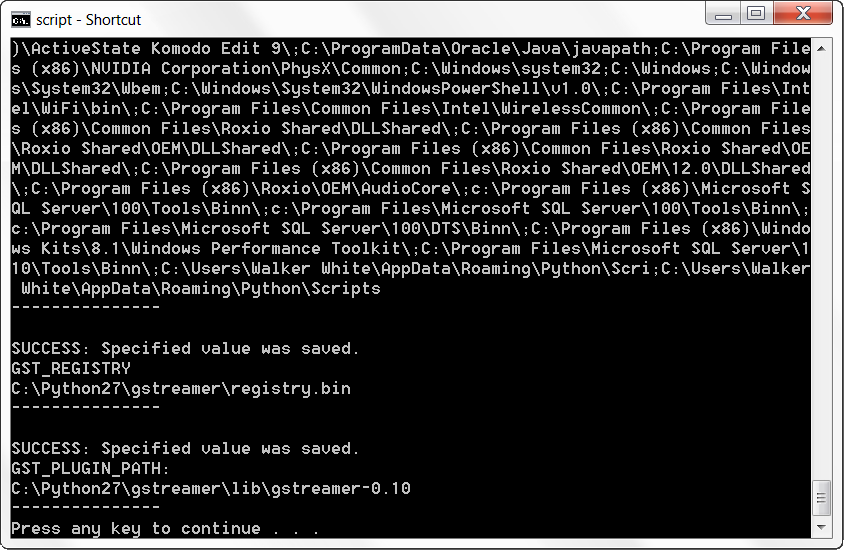
When you press a key, the window will close and your installation will be done. Once again, test your installation to make sure this solves your problem.
Installing on Macintosh
Supported Platforms: 10.9 (Mavericks), 10.10 (Yosemite)
Unsure if Supported:
10.11 (El Capitan)
Our OS X installation is intended for OS X 10.9 (Mavericks) and 10.10 (Yosemite).
In fact, our testing has established that our installation
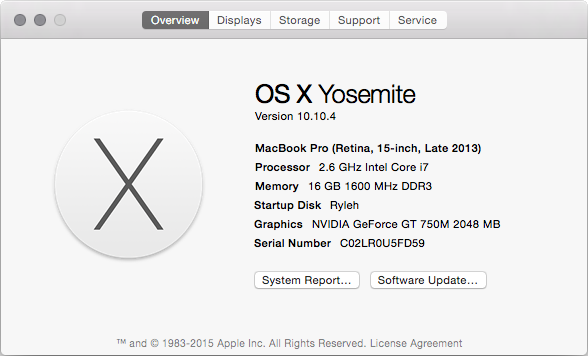
If you are unsure what version of OS X you are using, go to the Apple menu and select About This Mac. You will see a pop-up dialog that looks like the one shown below. If the number is not 10.9 or 10.10, then you will need to upgrade.
We highly recommend that you avoid upgrading to 10.11 (El Capitan), which is set to release in October. For the past two years in a row, Apple has broken the Python installation in this course. Resist the urge to upgrade mid-semester.
While OS X users will use the version of Python built-in to the operating system, there are two other things to install in order to work on the assignments in this class.
Install XQuartz
XQuartz is a library used by scientific computation programs. Download the file XQuartz-2.7.7.dmg. Double click on it and it will turn into a virtual disk drive containing a package installer (an icon that looks like a brown box). Double click on the package installer and follow the directions.
When you install the package, it may complain that it is from an unidentified developer. This is Apple trying to be a little too careful on what you install on your computer. To get around this, control-click on the package and select “Open,” then click “Open” again in the resulting dialog box.
Install the Cornell Extensions
Download the file CornellExtensionsOSX.zip. This is a big file. If you find the download time too slow, you can come to consulting hours to get a copy, or use a USB drive to get a copy from someone who already has it.
After downloading the file, double click on it to unzip the contents into a folder somewhere on your computer. Once again, you see will a package installer. Double click on the package installer and follow the directions. Your installation is now complete.
Once this is done, you are now are ready to test your installation.
Installing on Linux
Linux installation is possible, but it is not as straight-forward as the two main OS options. In particular, to install on Linux, you have to be comfortable with command shell and be ready to compile some of the software from source. If this sounds daunting to you, you might want to rethink about whether you want to use Linux just yet.
In the past, we have had install parties for Linux users. We have worked to make the instructions more self-sufficient this year. However, if there is still demand for a Linux install party, post your request on Piazza.
Install ActiveState Python
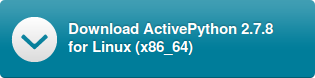
The first step is to install Python. Chances are, your Linux machine already has a version of Python. However, one of the key things about this class is that we want to ensure that every Linux distribution is exactly the same. So you need to install the ActiveState version.
Go to the ActiveState web page and download the free Community Edition of Python 2.7.8 (or other number starting with 2.7). This should be the big blue button on the right. Make sure you have Python 2.7.8 and not Python 3.3.4 (or any other number starting with 3). Python 3 is “bleeding-edge” software and too new to safely use in this course (particularly because it is not backwards compatible with Python 2.7).
Unlike Windows, it is not necessary to download the 32 bit version. You may download the 64 bit version of Python, should you desire. However, your installation must be consistent. That means that every single package that you install must be the same version (if there is a choice).
Install the Basic Packages (Linux)
The Cornell Extensions package that we provide for Windows and OS X contains a lot of extra Python packages. We do not have an installer for Linux. Therefore, Linux users will need to install each one of these separately.
We find that the easiest way to install is with pip. This is a package
manager that comes with Python. To use it, simply open a command shell and type.
pip install <package-name>
To guarantee success, you generally need to run pip as root. For example,
to install Cython, you would type
sudo pip install cython
In the few instances where pip does not work properly (MatPlotLib has been
particularly flaky in the past), you might be able to download a custom installer from
the appropriate website.
Now that you know how to install a Python package, here is a list of all the basic packages that you need to install.
The last one is the most important. We highly recommend that you install Kivy using
pip. There are lot of special files in Kivy and the default installer
from the website puts them in weird places. We find that the pip installation
is the safest.
Install the Custom Cornell Modules (Linux)
There are a few extra modules in Cornell Extensions that are unique to Cornell. These modules will be used in the early labs and assignments, so it is important to install them.
The hard part of this step is locating the site-packages directory.
This depends on your installation of Python. It is likely to be found in
the directory
/usr/local/lib/python2.7
but we are not sure (and it may not be the same for all distributions). If you do find it, post its location on Piazza so that we can share the information with others.
Once you do find this directory, you need to download the following five files and put them inside it. It is a good idea to change the ownership and permissions of these files to match those of the others in this folder (if you know how to do that).
Getting Started with Python
Now that you have installed Python, it is a good idea to test it out. While you do not need to know anything about Python yet, you do need to learn how to run Python programs that are already made for you.
The Command Shell
The first thing that you need to do is to familiarize yourself with command shell for your OS. The command shell is a text-based version of the Windows Explorer or Finder; you can use it to move and rename files and folders. It is also how we will run Python in this class.
Using the command shell requires a bit of practice, so we have created a separate page of instructions for this. Right now, all you need to know is how to start up the command shell; you do not need to know any special commands. Start the command shell for your OS and type
python
This will put you in the "Python Interactive Shell".
The Python Interactive Shell looks exactly like the command shell except that it takes Python commands (and does not respond to operating system commands to list files or change the working directory). While the command shells are different for all operating systems, the Python Interactive Shell should look and behave exactly the same way for everyone. On Windows, it will look something like this.
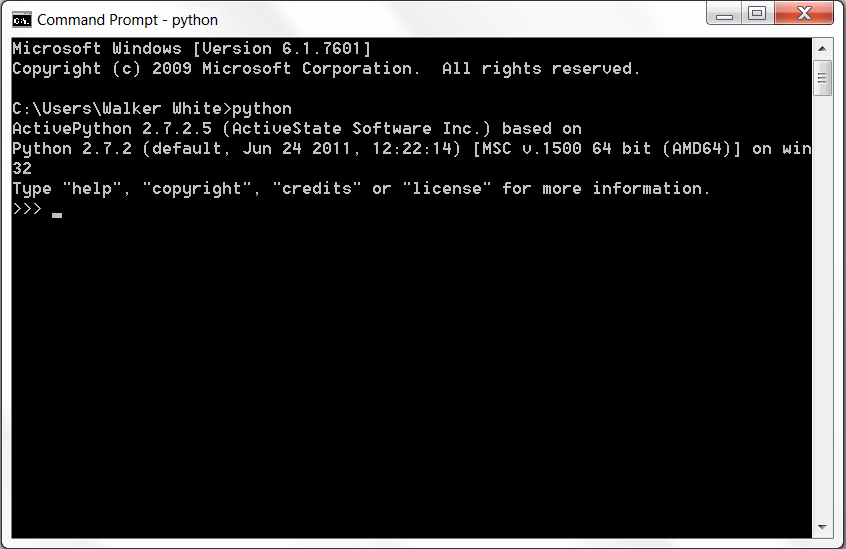
The > > > symbols are the prompt. To get the shell to do something, just type a Python command. For example, type
>>> 1+1
and hit Return (do not type the > > >; it is already there). See what happens?
To exit the Python Interactive Shell, type quit() and hit Return.
You can also exit by typing Control-D.
Testing a Module
It is possible to run Python modules from the command shell as well. A module
is a file (ending in suffix .py) containing Python code. We will
use them throughout the course. To run a module, you type
python <filename>
from the command shell. Do not try to type this in the Python Interactive Shell. This can be a bit confusing at first; it is important to keep the following straight:
- The command shell is a program for accessing files via text based commands. You start Python in this program, but it is not Python.
- The Python Interactive Shell is a program that runs inside the command shell. It looks a bit like the command shell, but you can tell the difference by the presence of the > > > prompt.
Running a module does not start the Python Interactive Shell. It runs all of the commands in the file, and then quits immediately when done with the file.
To test that your installation is working properly, we have a cute Python module that displays a GUI with the phrase "Hello World!" inside it, as shown below.
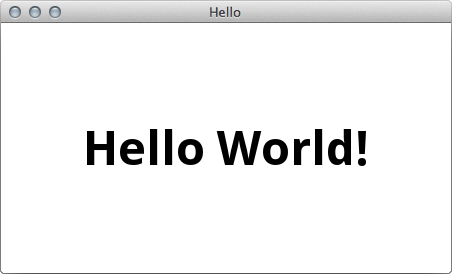
To try out this module, download the file helloApp.py and put it in some easy to find folder. Open up a command shell and navigate to this folder using the drag-and-drop trick for changing directories. Then type the command
python helloApp.py
If you get the window shown above, congratulations! You have successfully installed all the Python libraries needed for this class.
If the Window does not show, look very carefully at the error messages. If it says
it cannot find the file helloApp.py, then you did not use the
drag-and-drop trick correctly; we recommend that you practice with the
command shell tutorial some more. Otherwise, there is
a problem with your installation of Piazza. Post your error message to
Piazza and
we will try to help you out.
Installing Komodo Edit
The last program to install is Komodo Edit (version 9.2). Unlike Python, you will not use this program right away; we will not start to use it until the third week of class. The purpose of Komodo Edit is to make these mysterious modules that you tested in the previous step.
Technically, you can write Python modules in any text editor (e.g. a Word processor that only produces text and does not have fonts or fancy formatting). NotePad and WordPad are text editors in Windows, while TextEdit is provided by OS X. The reason we use Komodo Edit is that it is the same across all platforms. That allows you to collaborate with partners who might be working on other operating systems.
To install Komodo Edit, first download the installer from Active State's website. Be warned that ActiveState will try to trick you into installing Komodo IDE instead, as that as the paid version. Even when you click on the download for Komodo Edit, you will see a web page asking you download Komodo IDE.
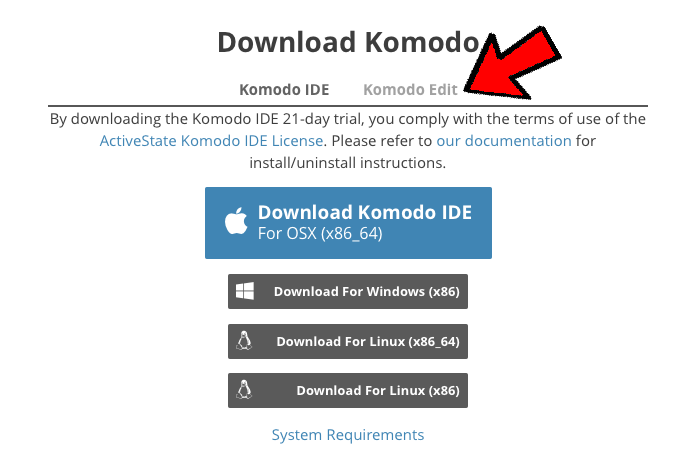
Click on the greyed out Komodo Edit indicated by the red arrow above. Then you will see the proper buttons for downloading. The website may also ask you for some personal information. Ignore that and wait for the download to finish.
The file that you download will either be a MSI installer for Windows or a DMG for Macintosh. Double click on it and follow directions.
Configuring Preferences
One of the most controversial aspects of Python is that it treats spaces and tabs very differently. If you accidentally put a tab in your program, it will cause your program will crash. And you will have a hard time finding it because both tabs and spaces look exactly the same.
To solve this problem, you need to change your preferences to help you distinguish between the two. Open Komodo Edit and then select the Preferences menu option (under Edit on Windows; under Komodo on Macintosh). Choose the Editor category and check the box Show whitespace characters, as shown below.
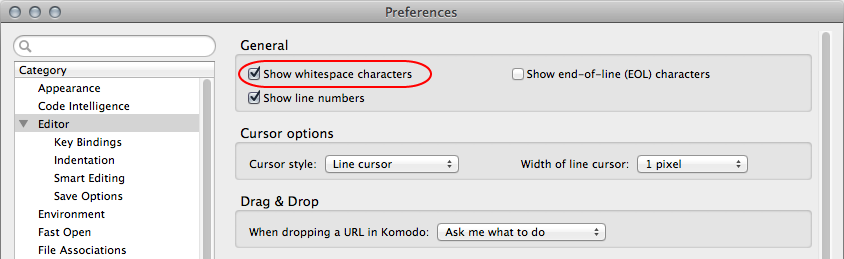
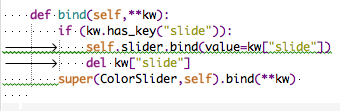
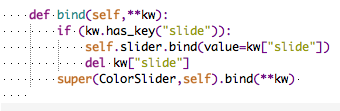
This will allow you to see both tabs and spaces, and to tell the difference between both. Spaces will look like light dots which are centered vertically on each line. Tabs will look like black arrows. These are illustrated in the examples below.
 |
 |
|
| Python with Tabs (Bad) | Spaces Only (Good) |