
|
Swift is a programming language and system for building web applications. Applications are written as if they were desktop programs in a Java-like source language. The development model is very similar to AWT or Swing applications, with graphical widgets and event handlers associated with them. Language level security annotations are used to specify system-wide security policies; these are enforced by the compiler and run-time.
The Swift compiler transforms the single-host sequential program into two separate programs, one running on each of the clients and the other running on the server. The compiler also performs static optimizations to minimize the network communication between the client and the server - automatically generating secure and efficient run-time protocols between the client and server. In this tutorial, we shall learn how to build and deploy a web application using Swift.
The Swift sources can be obtained from here. The README in the top level directory has detailed instructions on building Swift. Swift is implemented in Java and you need JRE 1.5 or higher to use it. In addition you need to install GWT from here.
The package comes with precompiled bytecode, so building it is not necessary. The bin directory contains the required command scripts: swiftc (the Swift compiler), swift (the Swift run-time) and deploy (to deploy on a webserver). Add the bin directory to your PATH to be able to call these scripts from any directory.
Swift programs use Java-like syntax along with security annotations on types. A regular Java editor can be used to author Swift code. All programs end in a .jif extension.
Let us write a simple Hello World Swift application: Hello.jif.
package hello;

import webil.ui.*;

public class Hello {

    final label{*<-*} cl = new label{Client->; Client<-};

    Text[cl, cl]{Client->; Client<-} message;
    final Panel[cl, cl]{Client->; Client<-} mainPanel;

    public Hello{Client->; Client<-}()
    {
        message = new Text("Hello World");
        mainPanel = RootPanel.getRootPanel(Client);

        if(mainPanel != null) {
            mainPanel.addChild(cl, cl, message);
        }
    }

    public static void main{Client->; Client<-}()
    {
        final Hello h = new Hello();
    }
}
Enter the directory where you saved this file. Compile the
program as follows
$ swiftc Hello.jif
This creates two subdirectories: clientclasses and serverclasses. These contain the compiled bytecode for the client and the server respectively.
The compiled program can be tested using the debug mode of GWT, which runs the GWT hosted mode browser (that runs the client side Java bytecode) and the GWT Shell (that runs the server side Java bytecode).
The application can be tested with the swift command. For
instance, our example Hello application is executed by running:
$ swift hello.Hello
The fully qualified name of the main class is passed as a command line argument to swift. This command is run in the same directory that the program was compiled in. Running this command opens up the GWT Development Shell and a GWT Hosted Mode browser. The Shell displays log messages and the browser emulates a real browser.
If all goes well, the GWT browser should display the string " Hello World ", as shown in the screenshots below.


Once the program has been tested and is ready for deployment, the
deploy command is used to deploy it on a standard web server.
In the directory where the program was compiled, run:
$ deploy hello.Hello
By default, the deploy script deploys the application in a Tomcat installation in the system. It expects an environment variable CATALINA_HOME to point to the Tomcat installation base directory. The deploy script compiles the client code into JavaScript, collects all the server side classes required and packages them into a file Hello.war. This file, along with a GWT jar and a Swift runtime jar is copied into the Tomcat installation.
If CATALINA_HOME is not set, these files need to be copied manually into the $CATALINA_HOME/webapps and $CATALINA_HOME/shared/lib directories respectively. The deploy script prints instructions for this. Supposing the Tomcat server is available on localhost, the Hello application can now be accessed in any browser using the URL: http://localhost:8080/Hello
A clean script is included to delete files and directories generated
during compiling and deploying a Swift program. This script is executed with no parameters
from within the directory that contains the output classes and files.
![]()
Now that we have been able to compile and run a real Swift program, let us look at in detail what the various language constructs mean and learn about how things work under the hood.
package hello;
...
public class Hello {
    ...
    Text message;
    final Panel mainPanel;

    public Hello()
    {
        ....
    }
    public static void main()
    {
        ....
    }
}
Java-like syntax. The code in Hello.jif resembles regular Java code, ignoring labels (anything within single-line braces: {...}). The semantics of packages, import statements and class, field and method definitions are the same as in Java. For instance, Hello.jif creates a class named Hello with three fields and two methods in a package named hello. As in Java, exactly one of the classes contains a main method. However, not all of Java is supported. Notable unsupported features are inner classes and threads.
import webil.ui.*;
...
message = new Text("Hello World");
mainPanel = RootPanel.getRootPanel(Client);
if(mainPanel != null) {
    mainPanel.addChild(cl, cl, message);
}
User Interface. The UI model is based on the design of regular desktop UI libraries such as AWT or Swing. To use the UI widgets, classes in the webil.ui package need to be imported explicitly, as done in Hello.jif, with the import statement. Examples of UI classes are Text and Panel; both are used in the example. The API for the UI widgets can be found here. References to any widget on the page can be reached through the top level widget, the root panel, which is an instance of RootPanel. RootPanel has a static method getRootPanel to obtain a reference to the RootPanel used by this application. The Hello example simply creates a new Text widget, with the string "Hello World" and adds that as a child to the root panel. The null check on mainPanel is required since Swift (like Jif) does not allow unchecked exceptions. So, the constructor for Hello cannot even throw a NullPointerException (as a result of mainPanel being null) unless it explicitly contains a throws clause for it. For technical reasons, mainPanel also needs to be declared final; the rationale being that otherwise its value could potentially be changed between the if check and the dereference, (paranoia of another thread doing so) resulting in a possible NullPointerException.
public static void main{Client->; Client<-}() {
    final Hello h = new Hello();
}
Execution Model. Note that the programmer does not have to worry about which code executes on the client and which code executes on the server. The program is written as if it would sequentially execute on a single host. When the Hello program is run, the main method creates a new instance of Hello. In the constructor of Hello, the root panel is modified to display the welcome string in the browser.
Security Labels. The rest of the code expresses security
concerns of the Swift application as security labels on types
and method signatures. The security labels are specified according to
the decentralized
label model. The primitive used in constructing a label is a principal.
A principal is any entity in the system that has
security concerns. Swift has two principals baked into the
language: * and Client, representing the server and
the client browser of the current session. More principals can be
created, if required, as instances of a class that implements the Principal
interface. In the Hello example, we use only the built-in principals. A
security label is composed of one or more confidentiality
policies and one or more integrity policies, specified using
principals. A confidentiality policy is expressed using a right arrow ->.
A policy in which a principal o allows principals r1,
r2, ..., rn to read is written
as o->r1,r2,...,rn. By default
the principal always allows itself to read, and is therefore omitted
from the right side of the arrow. An integrity policy, on the other
hand, is written using a left arrow <-. A policy in which a
principal o allows principals w1,w2,...,wn
to write is written as o->w1,w2,...,wn.
In the integrity policy too, o appears on the right side of the
arrow implicitly. A label is composed of multiple confidentiality
policies c1,c2,...,cn
and integrity policies i1,i2,...,in,
enclosed in braces and separated by semicolons as in {c1;c2;...;cn;i1;i2;...;in}.
For example, the label {Client->; Client<-} means that the
Client principal dictates that reads can be performed only
by the Client principal and that writes can be performed only by the Client
principal.
Text[cl, cl]{Client->; Client<-} message;
final Panel[cl, cl]{Client->; Client<-} mainPanel;
Labels on variables. Labels are associated with types, indicating the security policy on any reference to an instance of that type. For instance, the labels on the field declarations message and mainPanel mean that they are readable and influenced only by the Client principal.
public Hello{Client->; Client<-}() ...

public static void main{Client->; Client<-}() ...
Begin Labels. Control enters the program through the main method, and the label on this method called the begin label, {Client->; Client<-} indicates that the fact that control entered this method is known only to the Client principal and has been influenced only by the Client principal. This mirrors reality, since the client browser initiates the request and no other principal knows about it. We assume that network snooping threats could be adequately addressed, using HTTPS for example. The begin label on the constructor for Hello also has the same meaning. In general, the begin label on any method specifies an upper bound on the sensitivity of the fact that control entered this method. More about the begin label can be found in the Jif Reference Manual.
final label{*<-*} cl = new label{Client->; Client<-};
Dynamic Labels or Label Variables. The only unexplained
part of the code is the label variable cl, as shown in
the definition above and used in the field declarations of message and
mainPanel below. Swift (like Jif) supports variables of the type label.
These are also known as dynamic labels, since their values
could depend on runtime conditions. A label variable like cl
always needs to be declared as final. This ensures that the
value of the label does not change once it is created, and the semantics
of any security enforcement using this label is kept clean. In general,
a dynamic label could be a final access path R.f1.f2...fn
where R is a final local variable, a class type or the special
expression this. Each of the fi expressions is a
final field dereference.
Text[cl, cl]{Client->; Client<-} message;
final Panel[cl, cl]{Client->; Client<-} mainPanel;
Label Parameters
As used in the lines here, cl
is a class label parameter specified after a class type within
square brackets. Multiple parameters can be specified, separated by
commas. These parameters, similar to type parameters on generic
classes in Java, enable more precise tracking of information flow at
compile time. For instance, all UI widgets in Swift have two label parameters. The
first parameter is the upper bound on the sensitivity of the information
contained within this widget and all its descendants. The second
parameter is the upper bound on the sensitivity of the fact that this
widget appears on the displayed page. Tracking these labels during UI
construction and manipulation helps in ensuring that there is no leak
of confidential information to the user when the UI is displayed.
Label parameters are automatically
inferred for code within method bodies. For example, in the following line of code
from the program
message = new Text("Hello World");
the label parameters on Text are automatically inferred. Inference
is still not supported for fields and method arguments. This is the
reason why they are explicitly specified in the field declarations
of message and mainPanel and need to
be sent as method arguments on line 18:
mainPanel.addChild(cl, cl, message);
so that the method addChild
can expect the type of message to correctly be Text[cl,
cl].
final label{*<-*} cl = new label{Client->; Client<-};
Labels on Labels. Label variables themselves have labels on them, as can be seen on line 7. Here the label on cl is {*<-*}, which means that the server principal has allowed no other principal to modify its value.
Trust Relationships. Swift also supports expression of trust relationships between principals in the system. There is a single relation between principals called actsfor. If a principal P actsfor principal Q, it means that P is always allowed to do anything (e.g. read or write data) that Q is allowed to do. An implicit relationship exists between the built-in principals, in that * actsfor Client. This again mirrors reality, since any client that uses the server implicitly trusts it to perform any computation on any of its data, to service its request. More details about labels and principals can be found in the Jif Reference Manual.
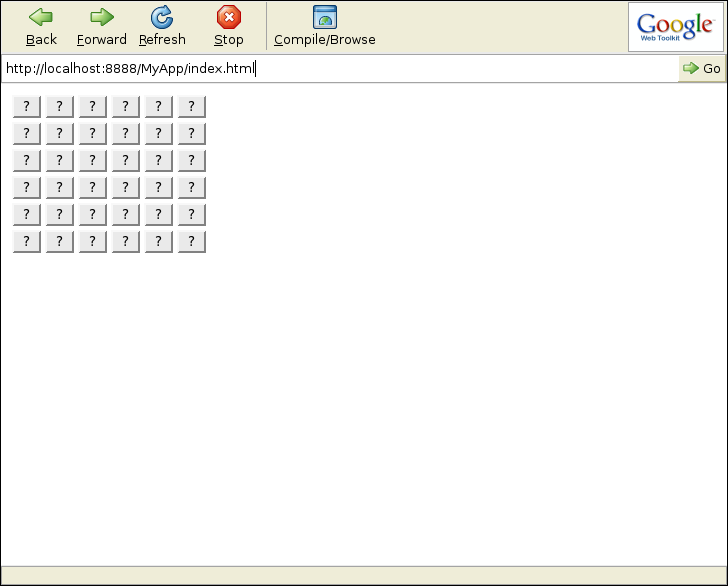
The Hello application simply outputs a string on the browser when executed. A Swift application can be much more complex and can contain multiple widgets that respond to various events such as user action, change in state, timing events, etc. by generating other events, modifying the state of certain widgets, any of which could result in messages between the server and the client. To see some of this in action, let us build a gaming application called Dig. The game involves the player clicking on hidden cells in a grid to expose their contents one by one. A cell could contain one of three possible things - copper, gold or a bomb. The only application level security concern is that the content of any cell is supposed to be kept secret from the player until he clicks on it.
To try out the game, download the file Dig.jif and follow steps from Section 3 above. Figure 3 shows the result of executing the program using the swift script. The explanation of the code follows.
public class Dig authority (*)
{
    final label{Client->;Client<-} cl = new label{Client->;Client<-};
    final Panel[{Client->;Client<-}, {Client->;Client<-}]{Client->;Client<-}
                                                             mainPanel;
    final Grid[{Client->;Client<-}, {Client->;Client<-}]{Client->;Client<-}
                                                             island;
    final private int{*->*; *<-*}[]{*->*; *<-*} map;
    ...
}
Field Declarations. The main class of the program, class
Dig has four fields. The first two are the same as in the Hello example.
The island field refers to a collection of UI widgets that
make up the cells of the grid. The map field is a two
dimensional array that stores the values hidden behind each cell of the
grid. Note the security policy associated with each element of the map
array and the reference to the array itself. The policy means that only
the server principal can read or influence the array or its elements.
This enforces the application level policy that the contents of all
cells are kept secret from the user. However, this does not enforce the
application level security concern completely. We still need to express
the policy that the user can view the content of any cell it has clicked
on. We shall soon see how this is done.
public class Dig authority (*)
{
    ...
    public Dig{Client->;Client<-}()
        where authority (*), endorse({Client->*; *<-*})
    {
        island = new Grid(6, 6);
        DigListener li = new DigListener(this);

        int i=0;
        while (i < 6) {
            int j=0;
            while (j < 6) {
                int index = i * 6 + j;
                Button db = new Button("" + index, "?");
                db.addListener(li);
                island.setWidget(i, j, db);
                j = j + 1;
            }
            i = i + 1;
        }
        ...
        mainPanel.addChild(cl, cl, island);
        ...
        /* Initialize the contents of all cells in the map array */
    }
    public static void main{Client->;Client<-}()
    {
        Dig app = new Dig();
    }
}
UI Widgets. When the program starts up through the main
method, a new instance of Dig is created. The UI for the game
is built in the Dig constructor. The game display consists of a
6x6 grid of buttons, as shown in Figure 3. The statement island
= new Grid(6, 6); creates a grid and stores it in the island
field. The grid is initialized using a doubly nested loop. In the loop,
a new button is created for every cell in the grid with the statement Button
db = new Button("" + index, "?"); and attached to the grid at position
(i,j) using the setWidget method: island.setWidget(i,
j, db); The first argument to the Button constructor is a
string id that identifies this button. Here, the id encodes the
co-ordinates of this button in the grid and is used to pinpoint the
location in the grid that a given button widget appears in. Once the UI
is constructed, it is attached to the root panel using the addChild
method and becomes available for display.
public class Dig authority (*)
{
...
public Dig{Client->;Client<-}()
where authority (*), endorse({Client->*; *<-*})
{
...
DigListener li = new DigListener(this);
...
Button
db = new Button("" + index, "?");
db.addListener(li);
...
}
public void dig{Client->;Client<-}(String{Client->;Client<-} ind)
where authority (*), endorse({Client->; *<-*})
{
...
/* Replace the button widget (with id ind) with a text widget
* displaying the contents of the corresponding cell
*/
}
}
class DigListener
implements ClickListener[{Client->;Client<-}, {Client->;Client<-}]
{
final Dig{Client->;Client<-} app;
public void onClick{Client->;Client<-}(
Widget[{Client->;Client<-},{Client->;Client<-}]{Client->;Client<-}
w)
{
...
String s = w.getID();
app.dig(s);
}
}
Event Handling. Each button in the grid registers a
listener for click events, such that clicking on a button reveals the
content of that cell. Registration is done by the addListener
method: db.addListener(li); where the argument to addListener
needs to implement the ClickListener interface. Here, li
is an instance of the class DigListener, that implements ClickListener
in such a way that when a button is clicked, the dig method of
class Dig is called, passing the id of the button that was
clicked. The dig method, in turn, will modify the UI so as to
reveal the contents of the cell beneath it. This model of event handling
is similar to those of standard UI models such as AWT or Swing. One
minor difference is that Swift does not support inner classes and a
listener class such as DigListener needs to be defined
explicitly. The state of the display after a few cells have been clicked
is shown in Figure 4.

public Dig{Client->;Client<-}()
    where authority (*), endorse({Client->*; *<-*})
{
    ...
    java.util.Random{*->*; *<-*} random = new java.util.Random();
    ...
    map[ti] = random.nextInt(3);
}
public void dig{Client->;Client<-}(String{Client->;Client<-} ind)
    where authority (*), endorse({Client->; *<-*})
{
    ...
    int trustedOut = endorse(out, {*->*; *<-*});
    int revealed = declassify(trustedOut, {Client->; *<-*});
    ...
}
Downgrading and Robustness. As we saw earlier, the method
dig contains the code for exposing the contents of a cell
once the user clicks on it. However, these contents are confidential to
the server principal, and thus not visible to the user. To make it
visible to the user as required by the application, this information
needs to be explicitly declassified using the declassify
statement. This statement has two arguments: the value that has to be
declassified and the security label to which it is declassified. Here,
the declassify statement takes the value reflecting the content
of a cell and declassifies it to have a security label, such that the Client
principal, and therefore the user, is allowed to view it. This
declassify of the content of a cell appears at a time when the button
for the cell has already been clicked. If we recall, the application
security concern was that the content of a cell should be kept secret
from the user until he clicks on it. Therefore, as per the
application requirements and security concerns, this declassify is both
necessary and safe.
In general, such downgrade policies/statements in the
application allow the flow of a controlled amount of information that is
otherwise disallowed by the other security labels. The downgrade
statements, together with the security labels on types and method
boundaries, constitute the expression of the system wide security
policy. The other kind of downgrade is an endorse that is used
to express a controlled amount of influence of untrusted information on
trusted data. The endorse statement before the declassify in the code above
allows the influence of the variable out on the variable trustedOut.
The variable out reflects the content of the cell the user has
clicked on, and has therefore been influenced by the Client
principal. The variable trustedOut keeps track of the same
information but is marked to be influenced only by the server principal.
Like the declassify, the endorse could be used to directly express
application requirements. However, the above endorse statement
indirectly does so by expressing the requirement of the property of robustness,
a property that all Swift programs need to satisfy.
Robustness requires that any value that is being downgraded has not been
influenced by any principal that will gain access to this value after
the downgrade. Since the value of out is influenced by the
Client and the Client will learn its value after the declassify,
it cannot be declassified unless it is first endorsed to be untainted by
the Client principal.
Robustness also requires that the decision to downgrade is not influenced by any principal gaining access after the downgrade. Since the begin label of the dig method allows the Client principal to invoke this method, the decision to perform the above endorse is potentially influenced by Client. Endorsing the pc at this point to make it untainted by Client is a possible solution. However, that leads to a circular problem for the new endorse statement. To support such cases, we use an auto-endorse, i.e. a endorse statement in the method signature as for the dig method. This endorses the pc right at the beginning of the method. The auto-endorse on the Dig constructor does the same, in order to allow the secret map of grid values to be written to. Without the auto-endorse any value written to a map cell would be tainted by Client.
Authority. Since a downgrade is like an escape hatch from the security enforced by the security labels, it can be dangerous if its use is not adequately restricted. In particular, each downgrade needs to be reviewed by all principals that are affected by it. This is enforced by the authority mechanism which requires each downgrade to have the authority of all principals affected by it. The authority of a principal is obtained either through an authority or a caller clause in the signature of a method. The authority clause on a method signature provides the authority of all principals supplied as an argument to the authority clause. All principals are required to carefully review any code that has their authority. The caller clause on a method signature requires the call site to have the authority of all argument principals. The authority of these principals is transferred to the callee method. In the Dig program all downgrades affect the security policies of only the server principal and therefore require only the authority of the server principal *. This is specified using the authority (*) clause in the signatures of the dig method and the Dig constructor.
The example code so far uses only the built-in client and server principals to express its security concerns. Real applications have concerns that require talking about more principals, possibly an unbounded number of them. Swift provides a sound mechanism for this through dynamic principals, thus allowing security policies to safely evolve at run-time. Let us run through an example application, Secret Keeper, that illustrates the use of dynamic principals for authentication, authorization and enforcement of security policies that depend on runtime conditions.
The Secret Keeper application resembles a vault that safely and securely stores secrets for various users of the system. New users can sign up for an account in the system, which can subsequently be accessed via a user name and password. A user can sign into the system, view/update her secret and sign out. The SecretKeeper.jif program is explained in detail below.
Dynamic Principals. Swift allows the creation of dynamic
principals to express richer security policies. A dynamic principal is
an instance of any class that implements interface Principal. This interface defines signatures for
operations that any principal is expected to perform. For example, a
principal is expected to keep track of which other principals act for it
and respond to queries on this data (the delegatesTo method). A
principal also needs to specify how other principals authenticate
themselves to this principal and what operations these principals are
authorized to perform. This is done by appropriately implementing the isAuthorized
method. This method accepts an authentication proof, Object
authPrf and a closure, Closure closure. The
authentication proof could be anything: a simple password, a password
digest, a cryptographic certificate, etc. The closure encapsulates an
arbitrary operation for which authorization is requested. Based on the
implementation of this method by this principal, this method returns true
if the authentication proof for executing the closure is verified to be
correct.
A reference to a dynamic principal can be used as a regular principal within confidentiality and integrity policies. Like dynamic labels, a dynamic principal also needs to be a final access path. The abstract class AbstractPrincipal implements Principal and provides default utility methods for implementing a principal. For convenience, programmers can extend AbstractPrincipal instead of implementing Principal directly.
class WebUser extends AbstractPrincipal
{
    private final String{this->;this<-} password;

    public boolean{authPrf; closure; this<-} isAuthorized{this<-}(
            Object authPrf,
            Closure[this, lb] closure,
            label lb,
            boolean executeNow)
        where authority (this)
    {
        String pub_passwd = declassify(this.password, {this<-});
        if (isAuthorizedClosure(closure, lb) && authPrf instanceof String) {
            String passwd = (String)authPrf;
            return (pub_passwd == passwd ||
                (pub_passwd != null && pub_passwd.equals(passwd)));
        }
        return false;
    }
    protected boolean{closure; this<-; this} isAuthorizedClosure(
        Closure[this, lb] closure, label lb)
    {
        return (closure instanceof SigninClosure[this]);
    }
    ...
}
The Web User Principal. The WebUser class
extends AbstractPrincipal and specializes it to use a password
based authentication mechanism. The intent is to create a reusable
class, with every instance representing a user of a web based system
that uses passwords to sign in. The WebUser class adds a password
field that stores a password for every user. Note the security policy
on the password field: {this->;this<-}. This
means that a principal's password is readable and writable only by itself
and by any principal that acts for it. The policy makes sense as it is permissive enough
that this principal and the system can verify and change the password and it is
restrictive enough that other principals and unauthorized
users cannot view or update the password.
In its implementation of the isAuthorized method, this principal allows only a single
operation to be performed after authentication: the sign in operation,
encapsulated by the SigninClosure class.
Since the password expected to be independent of the operation, the process
of checking whether a closure is authorized is factored out into a separate
isAuthorizedClosure method. This also allows any subclass principals
to extend the set of allowed operations by suitably overriding this method.
As shown in the code above, the isAuthorized method first declassifies
the stored password. This is done only temporarily during comparison with the supplied
password, so that the result of the comparison can readily be made public. If the two
passwords are equivalent and the supplied closure is an allowed operation, the method returns
true. Otherwise, it returns false.
final class SigninClosure[principal P]
    implements Closure[P, {Client->;Client<-}] authority(Client)
{
    public final Object invoke{Client->;Client<-}()
        where caller(P), authority(Client)
    {
        final Principal pp = P;
        if (pp instanceof WebUser) {
            final WebUser user = (WebUser)pp;
            if (user != null) user.signinClosureImpl();
        }
        return null;
    }
}
class WebUser extends AbstractPrincipal
{
    ...
    public final void signinClosureImpl{Client->;Client<-}()
        where caller(this, Client),
        endorse({Client->;this->;Client<- meet this<-})
    {
        declassify ({this->;this<-}) {
            /* add the session principal as a delegate to this principal */
            this.addDelegatesTo(Client);
        }
    }
}
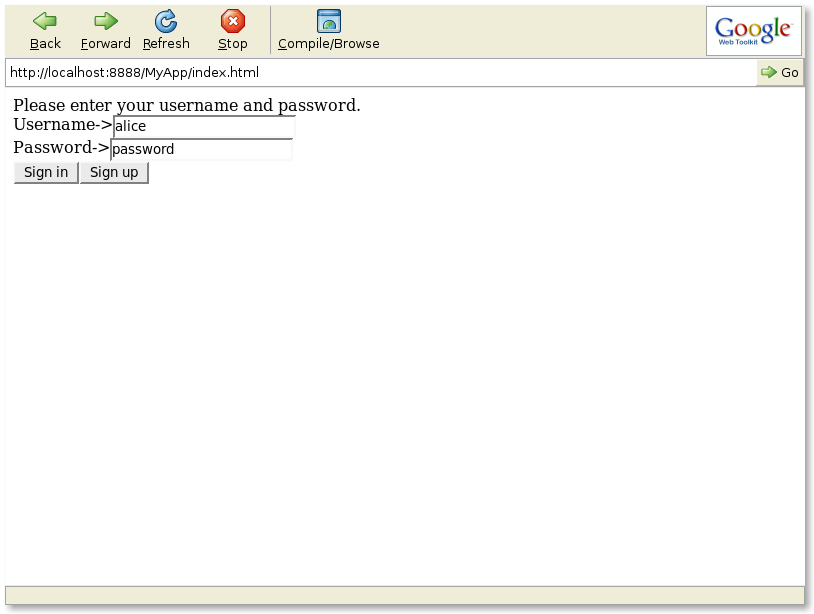
The Sign In operation. When the Secret Keeper application starts up, a sign in screen similar to the one below appears.
The sign in operation, defined in the SigninClosure class,
is invoked after the user name and password are verified to be correct.
This closure delegates
the authority of the user to the Client principal. The
delegation operation by a user principal, user establishes an actsfor
relationship, i.e. Client actsfor user. This allows the
application to perform other operations within the session that require the user principal's
authority, without having to enter its password each time, since the Client
principal can perform any operation on behalf of user. The delegation
operation is performed by the signinClosureImpl method in the User
class, called by the invoke method of SigninClosure. The SigninClosure
is executed by the application, once the user name and password are available
using a utility method in PrincipalUtil (line 214):
PrincipalUtil.execute(user_,
    pass,
    new SigninClosure[user_](),
    new label {Client->;Client<-});
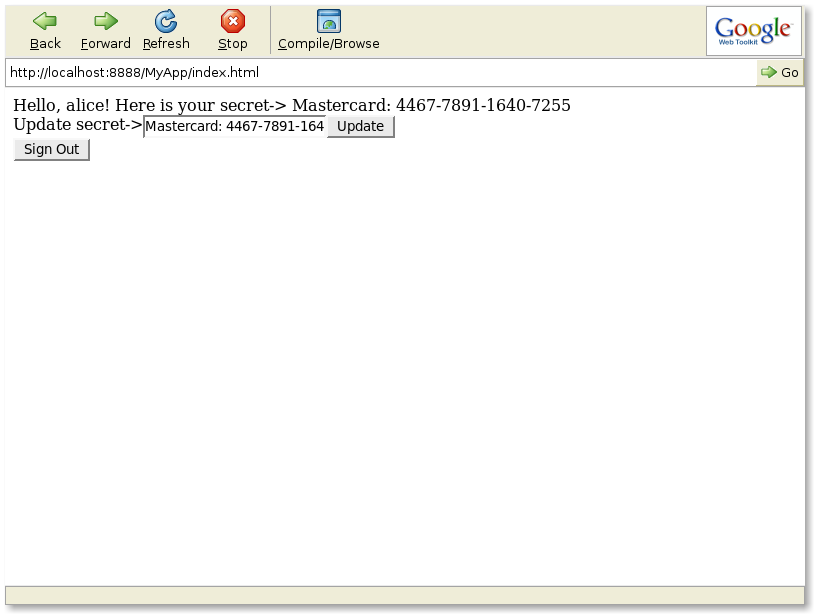
Once the sign in operation completes, the application displays this user's stored secret and a text box widget to modify the value of the secret as shown in the figure below.
class SKUser extends WebUser
{
    private String{this->;this<-} secret; /* a secret for this user */

    protected boolean{closure; this<-; this} isAuthorizedClosure(
        Closure[this, lb] closure, label lb)
    {
        return (closure instanceof SigninClosure[this] ||
            closure instanceof SignupClosure[this]);
    }
    ...
}
Application Specific Principals.
The Secret Keeper application defines its own principal: SKUser.
This extends WebUser by adding a field secret that stores the secret for each
user. The policy on secret is {this->;this<-}, indicating
that only this principal or any principal that acts for it can read or modify the secret.
This precisely reflects the application security requirement.
final class SignupClosure[principal P]
    implements Closure[P, {Client->;Client<-}] authority(Client)
{
    ...
    public final Object invoke{Client->;Client<-}()
        where caller(P), authority(Client)
    {
        ...
        /* Call secretClosureImpl on P
         * passing the supplied secret as argument
         */
    }
}

class SKUser extends AbstractPrincipal
{
    private String{this->;this<-} secret;
    ...
    public final void secretClosureImpl{Client->;Client<-}(
            String{Client->;Client<-} secret)
        where caller(this,Client),
        endorse({Client->;this->;Client<- meet this<-})
    {
        ...
        this.secret = ...
    }
}
The Sign Up operation. A user's secret is initialized during the sign up operation as shown in the figure below.

Once a user signs up, an instance of SKUser is created and the SignupClosure is executed to initialize the value of secret. This instance is added to a database of users, stored as a static field in the SecretKeeper class
public class SecretKeeper authority (*)
{
    public static SKUser{*->*; *<-*}[]{*->*; *<-*} userDB;
}
By definition, any static field is kept on the server. It provides a lightweight mechanism to implement persistence in Swift, since these fields persist across multiple sessions and can be shared between multiple clients. The Secret Keeper application uses this to persistently store all the principal objects in the system. When a user signs in, this store is searched for the principal object corresponding to that user, which is then used to perform the authentication and authorization of operations pertaining to that user. In order to implement a more stable persistence mechanism, this program could be integrated with a standard relational database and the connection to the database could be stored as a static field.