The final assignment for CS 1110 has always been to develop a game in Python. Game development ties together everything that we have learned in this class into one large project. While modern games are far too advanced for this class, classics of the original arcade era (like Space Invaders, Frogger, or Breakout) are well within your ability. This year we are adding a new classic to our list, as we make a clone of the game Asteroids.
|
|
If you have never played Asteroids before, there are a few versions online as HTML5 games. Asteroids Reloaded is a particularly flashy remake. However, it contains a lot of features not found in the original game, and is far more advanced than what you are going to do. At the very least, you should press the R key to play that game with the retro-graphics from the original.
One of the main challenges with this assignment is its scope is completely up to you. There is a bare minimum of functionality that you must implement. You must implement a complete, single wave of Asteroids. But after that point, you are free (and encouraged) to add more interesting features to your game. The video above shows our solution, which has several extra features such as sound, scoring, and a rocket animation. But you are permitted to do anything that you want, provided that the basic functionality is there.
Despite any difficulties you might have had with previous assignments, we know that this assignment is easily within your grasp. You just have to start early, break the problem up into manageable pieces, and program/test incrementally. Below, we discuss stages of implementation and give suggestions for staying on top of the project. If you follow our advice and test each piece thoroughly before proceeding to the next, you should be successful.
Our bare minimum solution is about 1030 lines of code (including specifications and
comments). This is ~260 lines in app.py (including the ~160 lines already there), ~390
lines in wave.py (including the ~85 lines already there), and ~370 lines in
models.py (including the ~120 lines already there). So you should expect to write
just a little over 655 lines of code for the bare minimum solution. While this
may seem intimidating, the majority of that consists of headers and specifications.
Our minimum solution has ~25 methods across five classes, not including getters and
setters.
Asteroids requires some familiarity with vectors. If you do not know how vectors work, we recommend that you read our short tutorial before reading the rest of these instructions
Author: W. White
Learning Objectives
This final assignment has several important objectives:
- It gives you practice reading official class documentation and APIs.
- It gives you experience with a complex, interactive application.
- It gives you experience designing helper functions to structure your code properly.
- It gives you experience using constants to make your code more readable.
- It gives you experience working with vector calculations and simple collisions.
- It gives you experience with an open-ended project that is not fully specified.
Table of Contents
- Academic Integrity and Collaboration
- Organization and Scope
- Overview of Planetoids
- The Basic Game
- Additional Features
- Finishing Touches
Academic Integrity and Collaboration
Academic Integrity
This is a brand new assignment; you are the inaugural year. So we are pretty confident that there are no solutions for this assignment available online. This means our concerns about academic integrity are limited to cases where students violate the collaboration policy. For that reason, we will be running Moss very heavily on this assignment. Because it is so open-ended it is completely impossible for your code to look like someone else’s, unless you looked at the code and then used it to design your own. We are 100% guaranteed to catch you if you do this. No matter how different you think your code will be, it will not be different.
Furthermore, because of the time that it takes to grade this assignment, any academic integrity hearings will have to be delayed until Spring semester (meaning that such students will receive an Incomplete for the course). Do not put yourself in this position. We also ask that you do not enable violations of academic policy. Do not post your code to Pastebin, GitHub, or any other publicly accessible site.
Collaboration Policy
You may do this assignment with one other person. If you are going to work together, form your group on CMS as soon as possible. If you do this assignment with another person, you must work together. It is against the rules for one person to do some programming on this assignment without the other person sitting nearby and helping.
With the exception of your CMS-registered partner, we ask that you do not look at anyone else’s code or show your code to anyone else (except a CS1110 staff member) in any form whatsoever. This includes posting your code on Ed Discussions to ask for help. It is okay to post error messages on online, but not code. If we need to see your code, we will ask for it.
Copyrighted Material
There is another Academic Integrity issue with this assignment: copyrighted material. Gameplay cannot be copyrighted. You can make a game that plays the same as another. This was established in the early days of gaming when Space Invaders lost its court case against Galaxian and Galaga. However, artwork in a game is copyrighted (and in the case of Space Invaders, even trademarked). So you should be careful about adding additional artwork to this game.
While there might be an argument for fair use – this is a class project – your instructor prefers that you avoid the copyright issue entirely. In general, you are only allowed to use copyrighted material if you have a license to do so. For example, many of the songs and sound effects in the NewGrounds library are available for you to use under an Attribution License. That means you are free to use it so long as you cite the source in your documentation (e.g. your header comments). This is okay. A license where you have to pay is not okay.
If you are in doubt as to whether you have a license to use something, ask us on Ed Discussions.
Extension Policy
This assignment is technically due Monday, December 5, which is the last day of class. That is the last day we are allowed to make this due. However, we realize that ALL professors like to load you up with work the last week of class. Because of this fact, minor extensions are possible.
We are allowing no-questions-asked extensions up to Thursday, December 8. To get an extension, you must contact your lab instructor (do not e-mail the professor). Your instructor will assign you an extension in CMS. If you do not ask for an extension, you will be penalized for being late.
Assignment Help
While the code in this assignment is only a little bit more complicated than Assignment 6, the directions are more open ended. We have tried to give you as much guidance in this document as we can. We suggest that you start this assignment early, and that you go to office hours page on the first sign of difficulty.
In addition, you should always check Ed Discussions for student questions as the assignment progresses. We may also periodically post announcements regarding this assignment on Ed and on the course website.
Organization and Scope
This assignment is comparable in length to Assignment 6. Once again the trick is to pace yourself. This can be finished by the end of classes, if you work a little bit every day (excluding the Thanksgiving break).
While there are no test cases this time, you should be able to figure out if everything is working simply by playing the game. There are no tricky “restore everything to how it was” like with Turtles. There are no nasty surprises lurking in the specifications. Just get the game working.
Assignment Source Code
To work on this assignment, you should download two files.
| File | Description |
|---|---|
| planetoids.zip | The application package, with all the source code |
| samples.zip | Several programs that give hints on this assignment |
Only the first is a must download, as it contains the all of the source code necessary to complete the assignment. The second is a collection of demo code from the lecture on GUI programming. This sample code contains a lot of hints on how to approach some of the harder parts of this assignment, and we reference these samples throughout the instructions.
As with the imager application, this assignment is organized as a package with several
files. To run the application, change the directory in your command shell to just
outside of the folder planetoids and type
python planetoidsIn this case, Python will run the entire folder. What this really means is that
it runs the script in __main__.py. This script imports each of the other
modules in this folder to create a complex application. To work properly, the
invaders folder should contain the following:
| File | Description |
|---|---|
| app.py | The primary controller class for the application |
| wave.py | A secondary controller for a single wave of asteroids |
| models.py | All model classes for the game (Ship, Asteroid, etc.) |
| consts.py | A module with all of the constant (global variable) values |
| game2d | A package with classes that can display graphics on the screen |
| Sounds | A folder of sound effects approved for your use |
| Fonts | A folder of True Type fonts approved for your use |
| Images | A folder of images for the ship and aliens |
| Data | A folder with different levels you can play |
For the basic game, you only need to worry about the first three
files: app.py, wave.py, and models.py. The other files and folders can be left
alone. However, if you decide to add a new feature, it helps
to understand how all of these fit together.
app.py
This module contains the controller class Planetoids. This is the controller that
launches the application, and is one of three modules that you must modify for this
assignment. While it is the primary controller class, you will note that it has no
script code. That is contained in the module __main__.py
(which you should not modify).
wave.py
This module contains the secondary controller class Wave. This class manages a
single wave of planetoids. It works as a subcontroller, just like the example
subcontroller.py in the provided sample code. It is another
of the three modules that you must modify for this assignment,and the one that will
require the most original code.
models.py
This module contains the model classes Ship, Asteroid and Bullet. These
classes are similar to those found in the pyro.py demo in the provided sample code.
If you want to add other model classes (e.g. power-ups), then you should add those here
as well. This is the last of the three files you must modify for this assignment.
consts.py
This module is filled with constants (global variables that should not ever change).
It is used by app.py, wave.py, and models.py to ensure that these modules
agree on certain important values. It also contains code for changing your default level.
You should only modify this file if you are adding additional features
to your program
game2d
This is a package containing the classes you will use to design you game. These are
classes that you will subclass, just like we demonstrated in lecture.
In particular, the class Planetoids is a subclass of GameApp from
this package. As part of this assignment, you are expected to read the
online documentation which describes how to use the base classes.
Under no circumstances should you ever modify this package!
Sounds
This is a folder of sound effects that you may wish to use as part of your new feature. You are also free to add more if you wish; just put them in this folder. All sounds must be WAV files. While we have gotten MP3 to work on Windows, Python support for MacOS is unreliable.
Fonts
This is a folder of True Type Fonts, should you get tired of the default Kivy font. You can put whatever font you want in this folder, provided it is a .ttf file. Other Font formats (such as .ttc, .otf, or .dfont) are not supported. Be very careful with fonts, however, as they are copyrighted in the same way images are. Do not assume that you can include any font that you find on your computer.
Images
This is a folder with image files for the ship and asteroids. The GImage and GSprite classes allow you to include these in your game. You can other images here if you wish. For example, you may wish to draw a background. Just remember to draw the background image first.
Data
This is a folder with JSON files that define a level. You will turn these into dictionaries and use them to place objects in your game. Understanding these files will be a major portion of this assignment. But you should look at them briefly to familiarize yourself with these files.
Assignment Scope
As we explained in class, your game is a subclass of GameApp. The parent class does a lot of work for you. You just need to implement three main methods. They are as follows:
| Method | Description |
|---|---|
| start() | Method to initialize the game state attributes |
| update(dt) | Method to update the models for the next animation frame |
| draw() | Method to draw all models to the screen |
Your goal is to implement all of these methods according to their (provided) specification.
start()
This method should take the place of __init__. Because of how Kivy works, initialization
code should go here and not in the initializer (which is called before the window is
sized properly).
update(dt)
This method should move the position of everything for just one animation step, and
resolve any collisions (potentially deleting objects). The speed at which method is
called is determined by the (immutable) attribute fps, which is set by the constructor.
The parameter dt is time in seconds since the last call to update.
draw()
This method is called as soon as update is complete. Implementing this method should be
as simple as calling the method draw, inherited
from GObject, on each of the models.
These are the only three methods that you need to implement. But obviously you are not
going to put all of your code in those three methods. The result would be an unreadable
mess. An important part of this assignment is developing new (helper) methods whenever
you need them so that each method is small and manageable. Your grade will depend partly
on the design of your program. As one guideline, points will be deducted for methods
that are more than 30 lines long (not including specifications or spacing).
You will also need to add methods and attributes to the class Wave in wave.py, as
well as Ship, Asteroid, and Bullet in models.py. These classes are completely
empty, though we have given you a lot of hints in the class specification. You should
read all these specifications.
As you write the assignment, you may find that you need additional attributes.
All new instance attributes should be hidden. You should list these new attributes
and their invariants as single-line comments after the class specification (as we
have done this semester). You do not need to enforce the invariants in the getters
and setters, but you must must have them if the attributes are accessed by another class.
For example, if the Wave class needs to check the velocity of a bullet, then you
are going to need a getter for the velocity in the Bullet class.
Assignment Organization
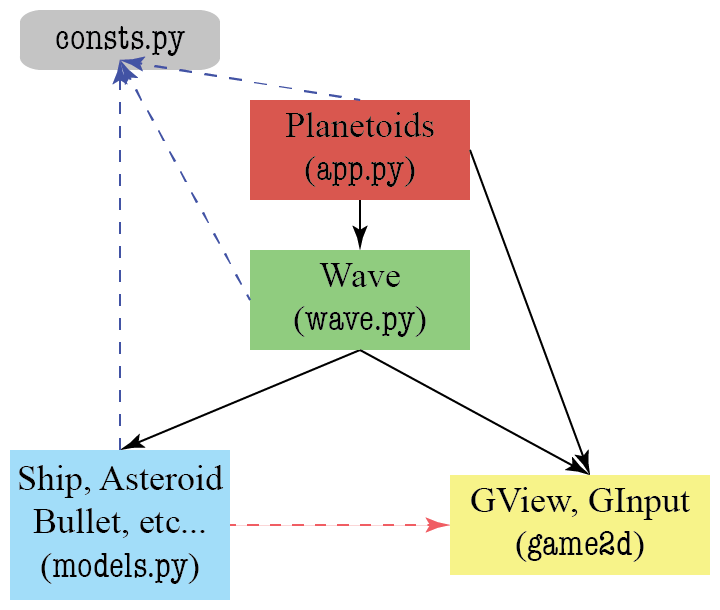
This assignment follows the model-view-controller pattern discussed in class.
The modules are clearly organized so that each holds models, the view, or a controller.
The organization of these files is shown below. The arrows in this diagram mean “accesses”.
So the Planetoids controller accesses the view and Wave subcontroller. The Wave
controller accesses the view and the models. This leads to an important separation of
files. Planetoids is never permitted to access anything in models.py and Wave is
never permitted to access anything in app.py. This is an important rule that we will
enforce while grading.
You will notice that the models module needs to access the view because it needs the
parent GObject to perform any drawing. In practice, we often like
to separate the model and view to cut down on the number of arrows (less meetings between
the various programmers). However, that would make this assignment a lot harder.
Fortunately, the view does not access anything (and should not be modified). This means there are no cycles in this architecture (e.g. A accesses B accesses C accesses A). Cyclical accesses are very dangerous and you have to be careful with them in large applications. Avoiding cycles is one of the reasons we draw pictures like the one below.
In addition to the four main modules, there is another module with no class or function
definitions. It only has constants, which are global variables that do not change. This
is imported by the models module and the two controllers. It is a way to help them
share information.
When approaching this assignment, you should always be thinking about “what code goes where?” If you do not know what file to put things in, please ask on Ed Discussions (but do not post code). Here are some rough guidelines.
Planetoids
This controller does very little. All it does is keep track of the game state
(e.g. whether or not the game is paused). Most of the time it just calls the methods
in Wave, and lets Wave do all the work. However, if you need anything between games,
like a paused message or a high score, this goes here. This is similar to the class
MainApp from the demo subcontroller.py
Wave
This class does all the hard work. In addition to the initializer (which is a proper
__init__, not start), it needs its own update and draw methods. This is a
subcontroller, and you should use the demo subcontroller.py (in the provided
sample code) as a template.
The most complex method will be the update and you will certainly violate the
30-line rule if you do not break it up into helpers. For the basic game, this method
will need to do the following:
- Move the ship according to player input
- Move the asteroids relative to their velocity
- Wrap the ship and/or asteroids when they go off screen
- Fire a bullet from the player’s ship
- Move any bullets across the screen
- Resolve any collisions between a bullet and asteroid
- Resolve any collisions between a ship and asteroid
In our code, each one of these is a separate helper. You should think about doing this in your code as well.
The Models
The models just keep track of data. Most of the time, models just have attributes, with
getters and setters. Think about the Image class from the previous assignment. However,
sometimes models have additional methods that perform computation on the data, like
swapPixel.
The models in this assignment are the game objects on screen: the ship, any asteroids,
and any bullets. The classes Ship and Asteroid are subclasses of GImage,
because we have images for them. Bullet objects will be simple circles and so it can be
a subclass of GEllipse. We inherit methods and attributes from these
classes that allow us to move these shapes about the screen, and to draw them. The
primary reason we need to create subclasses is so that we can add a velocity attribute
to each one. Asteroids was an early attempt at physics-based gameplay, and so all
movement depends on object velocities.
If decide to add new features like scoring, you will probably need extra attributes in
the Asteroid class to track point value. If you add UFOs or other enemies, you may also
need additional model classes to display and track them. If you are in doubt about whether
or not you need a new class, ask us on Ed Discussions.
Suggested Micro-Deadlines
You should start on this assignment soon as possible. If you wait until the weekend before this assignment is due, you will have a hard time completing it. If you work on a little bit of it every day or every other day, then you will enjoy it and get it done on time. We have also tried not to include your Thanksgiving Break in this assignment.
You should implement the application in stages, as described in these instructions. Do not try to get everything working all at once. Make sure that each stage is working before moving on to the next stage. Set up a schedule, but do not focus only on writing code. Leave time for learning things and asking questions.
We have provided you with a schedule of suggested milestone. This schedule ensures you will only work a little each day. However, to fit in the time alloted, this schedule does not leave any time for extra features. This is okay. You can still get a perfect score with no addition features. But if you want to add features you will either need to work faster than the recommended schedule, or ask for an extension. But whatever the case, do not add any new features until you get the basic game working. If you add extensions too early, debugging may get very difficult.
Overview of Planetoids
The layout of a Planetoids game depends on the level file you are using. We have
included many different level files in the Data directory. The files easy1.json and
easy2.json are easy games to help you test your application, while wave1.json is a
little more challenging. The level that you use is defined by the variable DEFAULT_WAVE
in const.py. You can also change the level at any time by specifying it when you run
the game. For example, if you type
python planetoids easy1.jsonit will play the game with the level easy1.json as the DEFAULT_WAVE. Below is the
set-up for the wave1.json to test out your game in the end.

Starting Position
All of the asteroids have an velocity, represented as a vector. A vector looks like
a point, in that it is an object with an x and y attribute. But instead of a location,
it represents a magnitude and direction. If you are unfamiliar with vectors, we have
created a short tutorial for you. At each
animation frame, the velocity of the asteroid is added to its position, moving the
asteroid. The velocity of a planetoid remains unchanged, until it is destroyed.
The player is able to move the ship to avoid the asteroids. The movement keys are the left, right, and up arrow keys. Pressing right will turn the ship in a clockwise direction while pressing left will turn it counterclockwise. Pressing up attempts to move the ship in the direction that it is facing. However, movement is not controlled directly. If you play Asteroids Reloaded, you will see that it fires the rear thrusters, pushing the ship in that direction. But that push has to counteract any movement the ship currently has (courtesy of Newton’s Laws). The same thing happens in Planetoids, though rocket animation is not part of this assignment.
Planetoids is not actually set in space. It is set in a small pocket dimension where movement wraps around the screen. So if an object goesoff the top of the screen, it appears on the bottom. The same is true for the left and right edges. Topologically, this means that the world of Planetoids is on a torus (or a donut). This is shown in the illustration below

An Asteroid Wrapping Around the Screen
If the player collides with an asteroid, the ship is destroyed. To protect itself, the player can fire bullets. The bullet starts from the tip of the ship and moves in the direction that the ship is facing.

Bullet Trajectory from Ship Facing
If the bullet collides with an asteroid, it the asteroid is destroyed. Small asteroids are destroyed outright, while larger asteroids are replaced by three smaller asteroids (simulating the break-up of the asteroid).

Breaking Up an Asteroid
A player has up to three lives, where one life is lost each time a ship is destroyed. If the player has any lives remaining when the ship is destroyed, the game will briefly pause before starting again. The wave continues until either the last planetoid is destroyed, or the ship is ship is destroyed and there are no lives remaining. In the first case, the player wins the game. Otherwise, the player loses. The video below shows the basic game, with no extra features.
|
|
Game State
One of the challenges with making an application like this is keeping track of the game state. In the description above, we can identity several distinct phases of the game:
- Before the game starts, and the asteroid wave has not started
- When the asteroids are set up, but have not started to move
- While the game is ongoing, and the asteroids are drifting about
- While the game is paused (e.g. to show a message)
- While the game is creating a new ship to replace the old one
- After the game is over
Keeping these phases straight is an important part of implementing the game. You need
this information to implement update in Planetoids correctly. For example, whenever
the game is ongoing, the method update should instruct the Wave object to move the
ship. However, if the game has just started, there is no Wave object yet, and the
method update should create one.
For your convenience, we have provided you with constants for six states:
STATE_INACTIVE, before an asteroid wave has startedSTATE_LOADING, when it is time to create a new wave of asteroidsSTATE_ACTIVE, when the game is ongoing and the asteroid are movingSTATE_PAUSED, when the game is paused to display a messageSTATE_CONTINUE, when the player is waiting for a new shipSTATE_COMPLETE, when the game is over
All of these constants are available in consts.py. The current application state
should be stored in a hidden attribute _state inside Planetoids. You are free to
add more states when you add more features. However, your basic
game should stick to these six states.
The rules for changing between these six states are outlined in the specification
of method update in Planetoids. You should read that in its entirety. However,
we will cover these rules in the instructions below as well.
Level JSONs
All of the information about a game level is stored in a JSON file. You should remember what a JSON string is from the very first assignment. A JSON file is just a file that stores a very large JSON string. These JSON files are a lightweight way to store information as nested dictionaries, which is the standard way of sending complex data across the Internet.
The tricky part about JSONs is coverting the string (or file) into the Python dictionary.
Fortunately, we have provided a tool that makes this part easy. The GameApp
class includes a method called load_json which your Planetoids class will inherit.
Simply specify the name of the JSON file. As long as that file is stored in the Data
directory, this method will load this file and convert to a Python dictionary for you.
This means that working with level files is really all about working with a complex
nested dictionary. To understand how these dictionaries work, look at the file
easy1.json. This includes all of the features that you will need to implement for
the basic game. The top-level dictionary has three keys:
"version": A float representing the level version.
This version is only relevant if you define your own levels. It is discussed in the section on additional features.
"ship": A dictionary defining the ship position and angle.
The starting ship position and angle can vary each level. The position is a 2-element list defining its pixel position on the screen. The angle is a measure of the angle of the ship counterclockwise from the x-axis. The measurement is in degrees. So a ship with an angle of 0 is facing due east, while an angle of 90 is facing straight up.
"asteroids": A list of dictionaries defining asteroids.
Each asteroid is defined by a dictionary with keys for "size:, "position" and
"direction". The "position" value is the same as for the ship. The "size" is
one of three values: "small", "medium", or "large". The "direction" defines
the velocity direction,and is explained in more detail in the assignment instructions.
However, if it is [0,0], this means that the asteroid is standing still.
If you understand all of these features, then you will have no problem completing this assignment.
JSON Assumptions
One of the preconditions for this assignment is that level files are properly formatted.
That is, they are proper JSONs and they do not have any important keys missing. While
it is okay for "asteroids" to have an empty list (that will be a very short wave), it
is not okay for the "asteroids" key to be missing entirely.
It is not your responsibility to enforce that the JSON files are in the correct format. That is the responsibility of the level designer, who is typically a different person on the team than a programmer. However if you add any extensions to the game, then you will likely be designing your own level files. And if you make mistakes in your level files, you may cause your program to crash. Again, this is a problem with the level file and not the game itself.
The Basic Game
We have divided these instructions into two parts. This first part covers the basic things that you must implement just to get the game running. Afterwards, we talk about additional features you can put into your game. These extra features can earn you extra credit on this assignment.
You should focus most of your effort on the basic game. This is the bulk of your grade. And if you do everything correct on the basic game, you can still earn a 100 on this assignment. The value of extra credit is typically limited to no more than 8 points. Furthermore, unless your features are incredibly innovative, we will not give you more than a 100, no matter how many things you have added.
Review the Constants
The very first thing that you should do is read the file consts.py. If you ever need a
value like the size of the ship, the size of the game window, or so on, this is where you
go. When writing code, you should always use the constants, not raw numbers
(or “magic numbers,” as we call them). Magic numbers make your code hard to debug, and
if you make a change (e.g. to make the ship bigger), you have no idea about all of the
locations in your code that need to be changed.
With that said, you are welcome to change any of these numbers if you wish. You are also encouraged to add more constants if you think of other numeric values that you need. Anytime that you find yourself putting a number in your code, ask yourself whether or not it would make sense as a constant.
Create a Welcome Screen
We start with a simple warm-up to get you used to defining state and drawing graphics elements. When the player starts the application, they should be greeted by a welcome screen. When you work on your add more features, you can embellish your welcome screen to be as fancy as you wish. But for now, keep it simple. Your initial welcome screen should start with two lines of text.

Because the welcome message is before any game has started, it belongs in the
Planetoids class, not the Wave class. You are already seeing how we separate
what goes where.
The text message will look something like the one above. It does not need to say “Press ‘S’ to play”. It could say something else, as long as it is clear that the user should press a key on the keyboard to continue. However, we recommend against allowing the user to press any key, since in later steps that will make it easy for the user to accidentally miss an important message.
To create a text message, you need to create a GLabel and store in
it an attribute. If you read the class invariant for Planetoids, you will see two
attributes named _title and _message. The title attribute is the logo of the game.
The text attribute is for any messages to display to the player. The text is typically
smaller, like a footnote. While we will never show the logo after the initial state
STATE_INACTIVE, we will use the text attribute for messages throughout the game.
Since the welcome message should appear as soon as you start the game, it should be
created in the method start, the first important method of the class Planetoids.
When creating your message, you will want to set things like the font size and position
of the text. If you are unsure of how to do this, look at the class MainApp from the
demo subcontroller.py in the provided sample code.
As you can see from the documentation for GLabel and
GObject, graphics objects have a lot of attributes to specify
things such as position, size, color, font style, and so on. You should experiment
with these attributes to get the welcome screen that you want. The key thing to
remember is that – in Kivy – screen coordinates start from the bottom-left corner
of the window (and not the center as was the case with the turtle). Note that x and
y are the center of the label. If you want to place the left edge, use the
attribute left instead of x.
When placing label objects, you do not always want to center them. Sometimes you would
like the label to be flush against the edge of the window. For that reason we have
attributes like left, right, top, and bottom. These are alternate attributes
for x and y. They move the label in much the same way, but give you a little more
control over the positioning.
One you understand how to position the label, it is time to think about your font
choice and style. If you want to look exactlty like the picture above, we have some
constants to help you in const.py. The top font is TITLE_FONT while the bottom
is MESSAGE_FONT. Both are variations of the font Redline).
The title has size TITLE_SIZE while the message has MESSAGE_SIZE. However, you
are not constrained to these choices. You may chose a different font or font size if
you wish, so long as it fits on the screen.
Drawing the Welcome Message
Simply adding this code to start is not enough. If you were to run the application
right now, all you would see is a blank white window. You have to tell Python what to
draw. To do this, simply add the lines
    self._message.draw(self.view)
    self._title.draw(self.view)
to the method draw in Planetoids. The (non-hidden) attribute view is a reference to
the window (much like the Window object in Assignment 4).
Hence this method call instructs Python to draw this text label in the window. Now run
the application and check if you see your welcome message appears.
Initializing Game State
The other thing that you have to do in the beginning is initialize the game state. The
attribute _state (included in the class specification) should start out as
STATE_INACTIVE. That way we know that the game is not ongoing, and the program
should (not yet) be attempting to animate anything on the screen. In addition, the
other attributes listed (particularly _wave) should be None, since we have not
done anything yet.
The _state attribute is an important part of many of the invariants in this game. In
particular, we want your new attribute for the welcome message to have the following
invariant:
- If the state is
STATE_INACTIVE, then there is a welcome message with title and text. - If the state is not
STATE_INACTIVE, the_titleattribute is None. - If the state is
STATE_ACTIVE, the_messageattribute is None.
Does your start() method satisfy this invariant? Note the difference between the last
two invariants. That will become important later.
Dismissing the Welcome Screen
The welcome screen should not show up forever. The player should be able to dismiss the
welcome screen (and start a new game) when he or she presses a key. To respond to keyboard
events, you will need the attribute input, which is an instance of GInput.
This class has several methods for identifying what keys are currently pressed.
When using the attribute input, remember the issues that we discussed in class. The
method update(dt) is called every 16 milliseconds. If you hold a key down, then you
see a lot of key presses. You just want the first press! That means you need some way
to determine whether or not the key was pressed this animation frame and not in the
previous one. See the state.py demo from the sample code
for some ideas on how to do this. This may require you to add a new attribute to
Planetoids.
If you detect a key press, then you should change the state STATE_INACTIVE to
STATE_LOADING. This will load a level file and start a new game. You are not ready to
actually write the code to start the game, but switching states is an important first
activity.
Invariants must be satisfied at the end of every method, so you need to assign None
to both _message and _title now. This will require a simple change to method draw()
to keep it from crashing (you cannot draw None). Once you have done that, run the
application. Does the message disappear when you press a key?
Documenting your New Attributes
When working on the steps above, you may have needed to add new attributes beyond the ones
that we have provided. Whenever you a new attribute, you must add it and its corresponding
invariant as a comment after the class specification (these comments are the class invariant).
Add it just after the comment stating ADD MORE ATTRIBUTES, to make it easier for the
graders (and you) to find them. We will deduct style points for instance attributes that
are not listed in the class invariant.
Pacing Yourself
This first part of the assignment looks relatively straightforward, but it gets you used to having to deal with controller state. Try to finish this part by Saturday, November 19, which is a day after starting the assignment. You will spend most of your time reading the online documentation, but this will give you a solid understanding of how this application works.
Load the Level File
The state STATE_LOADING is going to last just one animation frame. During that time
you are going to load the level file and create a Wave object. So for this activity
you are going to write code in two different classes: Planetoids and Wave.
Loading a JSON file is easier than you think. There is a method (technically it is a
class method) in GameApp called load_json, and Planetoiuds inherits this method.
Simply call this method on the constant DEFAULT_WAVE. The method will return a
dictionary and you are good to go. So from this point on, you will treat the level
information like a dictionary.
By default, the starting level is wave1.json. You can go into consts.py to change
this if you wish. Alternatively, you can test other levels by typing
python planetoids levelnameSo you can load the 'easy1.json' level simply by typing
python planetoids easy1.jsonCreating the Wave Object
Once you have loaded the JSON file, you want to create a Wave object and assign it to
the attribute _wave in Planetoids. We have started the definition of the Wave class
for you in wave.py. However, it does not do much, because we have not defined the
initializer.
As the last step in this task, create an initializer for Wave. It should have a
single parameter (other than self): the JSON dictionary containing all of the information
about the level. Assign this to the attribute _data in Wave.
After you have created the Wave object, it is also time to change the state in Planetoids
to STATE_ACTIVE. As we said, STATE_LOADING only lasts on frame. You load the file
and immediately switch, regardless of what keys the player presses.
Creating the Ship
There is a lot of information in the JSON dictionary. But for now we are only interested
in the ship information. You will use this to make a new Ship object and display it
on the screen.
While you have not yet completed the definition of class Ship yet, we have gotten you
started in the module models.py. In particular, the class Ship is a subclass of
GImage. That means it inherits all of its attributes and methods,
including the initializer. Hence (unless you override methods to do otherwise), you
create and draw the ship the same way you create and draw a GImage object.
To define an image, use the attributes x, y, width, height, and source to
specify how it looks on screen. The first four attributes are just like GLabel,
while source specifies an image file in the Images folder. As with the label,
you can either assign the attributes after the object is created or assign them in the
constructor using keywords. Keyword arguments work like default arguments in that
you write param = value. See the online documentation for an
example of how to approach this. In addition, one of the optional videos
covers this topic at the very end.
The information about the ship can be found in the _data attribute. Use the key "ship"
to access it. This will give you another dictionary. The key "position" is the
ship position and "angle" is the ship angle. Create a new Ship object and assign
it to the attribute _ship in Wave. Assign the x and y value according to the
"position" value. Assign the angle attribute according to the "angle" value.
The source image of the ship should be SHIP_IMAGE. But you will need to resize this
image to have the correct size. The width and height should both be twice SHIP_RADIUS
defined in consts.py. If you do not set those values, this ship will be too big.
Drawing the Ship
Once again, creating a Ship object is not enough to draw it on the screen. But
drawing the ship is a bit more complicated than drawing the welcome message. The
ship is a (hidden) attribute in Wave. While the Planetoids code
self._wave._ship.draw(self.view)works (and you should try it out), it is not allowed. That is because the attribute
_ship is hidden inside of the class Wave, and Planetoids is not permitted to
access anything hidden in another class. We will take off style points
if a class of one module ever accesses the hidden attributes of an object of a class
in a different module.
This is the purpose of adding a draw method to class Wave. The draw method in
Planetoids should call the draw method in Wave, and this in turn should call the
the draw method for the ship (defined in GObject).
However, only Planetoids has access to the attribute view, which is necessary for
drawing. The class Wave cannot directly access any attributes in Planetoids.
If a method in Wave needs an attribute from Planetoids, then Planetoids must
provide that attribute as an argument in the method call. This means that the draw
method in Wave needs to have view as a parameter, and the code in Planetoids
should look like this.
self._wave.draw(self.view)Now the only access of something hidden is _wave, which is okay since it is inside
of Planetoids (Planetoids can access its own hidden attributes). Notice this is
very similar to how we draw GObject objects.
When you are done, you should be able to see the ship on the screen. The ship in
wave.json is pointing straight up, while the ship in easy1.json is 45 degrees to
the right, as shown below.

The Ship in easy1.json
Pacing Yourself
Try to finish this part by Sunday, November 20. All you need to do is get the ship on the screen (after the welcome screen). The ship does not need to move. This should not take you more than a day.
Animate the Ship
Now it is time to animate the ship. To do this, we will need to modify the Ship class
to add some new attributes. In particular, you will need to add the following two
attributes:
_velocity: The direction and speed the ship is travelling_facing: The direction the ship is facing.
Note that these are not the same thing. Because of how ship movement works (by firing the thrusters), the ship can be facing backwards as it moves.
We recommend that these attributes both be Vector2
objects. This is class provided by introc, and indeed was part of
assignment 2. Objects of this class represent a
two-dimensional vector. If you do not know what a vector is, or only half-remember, we
recommend that you look at our short tutorial.
The advantage of the Vector2 class is that it has methods to make vector math a
lot easier.
Add a custom initializer to Ship to add these attributes. Remember to call super()
so that you properly inherit the GImage attributes as well. At the start, the
velocity vector should be zero. The facing vector depends on the angle of the ship. If
$\theta$ is the angle of the ship counterclockwise from the x-axis, then the facing
of the ship is $\langle \cos(\theta), \sin(\theta) \rangle$. However, remember
that the Python functions cos and sin require the angle to be in radians, while
the ship attribute angle is in degrees.
Turning the Ship
To turn the ship, you will need to take into account the player’s key presses. The ship only turns when the player presses (or holds down) a key to make it move. By default, we assume that the player will use the left and right arrow keys to turn the ship. However, if you prefer WASD controls or some other control scheme, that is okay.
To see how to turn the ship, you should look at the arrow.py demo from the
provided sample code. This example shows how to
check if the arrow keys are pressed, and how to use that to animate a shape. Note
that this is actually easier than dismissing the welcome message. We do not care
if a key press is the first one. The ship will continue to move so long as we hold
down a key.
The ship movement takes place every animation frame. That is why you want to put it
the update method of Wave. Remember that this method must be called within the
update method of Planetoids, or nothing will happen. Again, see the subcontroller.py
demo from the sample code to understand what we are asking for.
To check the keyboard, the method update in Wave will need to access the input
attribute Planetoids, which is an instance of GInput. Again, since
Wave is not allowed to access any of the attributes of Planetoids, that means you need
to pass input as an argument in this method call.
When the player presses left, the ship should turn counterclockwise. To do that, add
SHIP_TURN_RATE to the angle. When the player presses right, turn clockwise by
subtracting this value from the angle. You are free to change this value in consts.py
if you want to make turning faster or slower.
When you update the angle, you also need to update the facing vector as well (using the
formula above). For this reason, we like to add a method called turn to the ship class
that both 1. updates the angle and 2. updates the facing.
Applying an Impulse
One of the challenges of this game is that the ship must obey Newton’s First Law of Motion. Once the ship starts moving, it continues moving at that speed in a straight line. You can only change this by applying a force, which is caused by the ship’s rear thrusters. While we will not be drawing the rear thrusters (that is an additional features), we will be modeling the affect of this force.
Like velocity, force is represented by a vector. However, force has different units than velocity, as it is mass times acceleration. But if the force does not change over time, and the mass does not change either, we can compute an impulse from the force. An impulse is force times time, and it creates a vector that is added to the ship’s velocity to get the new velocity for this animation frame.

Applying an Impulse
We are not going to get into any complicated physics for this assignment. So to compute
the impulse for the ship thrusters, simply multiply the _facing vector by the
value SHIP_IMPULSE. If the player is pressing the up key, then add this to _velocity
attribute to get the new velocity. Otherwise, leave the velocity unchanged. The
Vector2 class has implemented the methods __add__ and __mul__ to make this
step very easy.
However, there is one more important detail. We do not want your ship to reach light speed.
So we are going to put a cap on the velocity. The ship speed (which is the magnitude of
the velocity) can never exceed SHIP_MAX_SPEED. If that happens, you should replace
the velocity with one in the same direction, but a speed of SHIP_MAX_SPEED. The simplest
way to do this is to normalize
the vector (making it a unit vector) and then multiply that vector by SHIP_MAX_SPEED.
Once again, Vector2 has methods that make this easy so you do not have to do the math
on your own.
Moving the Ship
Moving the ship is now easy. All you do is add the velocity to the ship position to get the new position (we assume that each animation frame is one time unit). Make sure that you do this after you update the velocity with the thruster impulse.
Do this and try out your ship. If you can fly about the screen, you have succeeded. Of course, you may find yourself flying offscreen. That is okay. You will fix that problem in the next step.
Take all together (turning the ship, applying an impulse, and moving the ship),
this is not that hard of activity, provided you understand the arrows.py demo in the
provided sample code. The impulse computation may be the
hardest part, but again, everything you need is provided by the
Vector2 class.
With that said, some people will find that they cannot get the ship to move, even after
properly adapting the code from arrows.py. If your ship refuses to move, add a watch
statement to the draw method of Wave. Print out the id (the folder name) of the ship.
Run the game and look for this print statement. What you see will (hopefully) identify
your bug.
The print statement never appears: In this case, you have forgot to call the
update method for Wave from Planetoids. Make sure Planetoids has this line of code
in its update:
self._wave.update(self.input)The ship id keeps changing: In this case, you are accidentally reseting the Wave
object each frame. Go back and look at the instructions for
loading a level file to see how to stop this.
The ship id is constant: If this is true and the ship still will not move, we have no idea what your problem is. It is something unique. Please see a consultant immediately.
Adjusting the Constants
The movement of the ship is controlled by three constants: SHIP_TURN_RATE, SHIP_IMPULSE
and SHIP_MAX_SPEED. Smaller values make the ship feel more sluggish. Larger values make
the ship feel more repsonsive – if perhaps harder to control. Finding the right values
is a matter of trial-and-error. We have chosen values that we liked. However, if you
do not like them, you are free to change them.
If you do want to change these values, you must change them in the file consts.py.
Remember, we do not want any magic numbers in this assignment. All constants go in one
place. This also allows us to change back to our values if it makes it easier to grade
the assignment.
Pacing Yourself
We highly recommend that you complete this by Tuesday, November 22, just before you leave for Thanksgiving. This is the first place were students are likely stuck, and you can take advantage of the open office hours on that day (there are no lab sections that Tuesday).
Because this is the first major hurdle of the assignment, once you complete this task, you can be confident that you will be able to complete the rest of the assignment. Enjoy your Thanksgiving Break, and be prepared to start again when you get back.
Wrap the Movement
Eventually the ship is going to go offscreen. When that happens, we want to wrap it back around to the other side. So objects going offscreen to the left should come back around on the right, and objects going offscreen to the top should come back around to the bottom (and vice versa).
To simplify this problem, we are going to break it up into two parts.
Wrapping Horizontal Movement
First, we are going to solve the problem of horizontal wrapping. This is what happens
when the ship goes offscreen either on the left or the right. Naively, the way to do this
is to look at the x position of the ship. If it is less than 0, set it the width of the
window (moving it to the other side). If it is greater than the width, set it to 0.
However this solution causes a major problem: “snapping”. The x attribute is the center
of the object. So we will see half of the object immediately disappear on one side, and
the other half teleport in on the other side. We want the movement to be smooth.
We could try to solve the snapping problem by using attributes left and right instead
of x. If the left attribute is fully off the right of the screen, we set the right
attribute to 0. And similarly if the right attribute is less than 0, we set the
right attribute to the width. This gets rid of snapping and the movement looks smooth.
The problem is that the concept of left and right only work if the ship is not rotating.
Which it is doing all the time.
We want a solution that eliminates snapping but also allows us to rotate the ship. The
solution is to have a dead zone. This is a little bit of a distance that all
objects are allowed to go offscreen. The x value is allowed to be as low as -DEAD_ZONE
and as high as GAME_WIDTH+DEAD_ZONE. When the x attribute crosses this threshold,
then the object should wrap around to the other offscreen edge. Note that this distance
is GAME_WIDTH+2*DEAD_ZONE as we have a dead zone on each side. We either add or subtract
this value from x, depending on the direction the ship is moving.

The Horizontal Dead Zone
This all sounds harder than it is. You can accomplish all of this with a few if-statements.
Wrapping Vertical Movement
To wrap the ship vertically, we do the same thing for the y coordinate. The dead
zone is the same size. The only difference is that we use GAME_HEIGHT instead of
width. Once again, your code is just a few if-statements
The only thing to keep in mind is that it is possible for the ship to wrap both horizontally and vertically at the same time. This occurs at the corners. Make sure you write your if-statements to make this possible. And then test it out by flying your ship about the screen.
Pacing Yourself
While it takes a while to wrap your head around this (pun intended), the code is very simple. You should be able to do this by Monday, November 28, the day you get back from Thanksgiving. This should get you warmed up for finishing the assignment by the end of classes.
Add the Asteroids
Now that you have the ship working, it is time to place the asteroids and animate them on screen. Asteroids move very much like the ship. They have a velocity that is added to the position each frame, and they wrap about the screen. The only difference is that the velocity of an asteroid can never change. This means that if you have written your code properly, breaking it up into helpers, you should be able to use those helpers for asteroids as well.
Placing the Asteroids
The class Wave should have an attribute _asteroids that contains a list of
asteroids. In the initializer for Wave you should make this attribute and fill it
with Asteroid objects.
For now, you can work with the existing Asteroid class. It does not have a custom
initializer. But like Ship, it is a subclass of GImage and so already has all of
the attributes that we need other than velocity (which we will add later). In particular,
we can set the position, the source image, and the width and height of that image.
To get the information about the asteroids, we need to look at the JSON dictionary in
the _data attribute. The key "asteroids" has a value that is a list of dictionary
objects. These dictionary objects define an Asteroid object in the same way that the
ship dictionary defined the Ship object.
Each asteroid dictionary has three keys: "size", "position", and "direction". You
can ignore "direction" for now. The key "position" is exactly the same as it was for
the ship. So the only thing different is the "size" key.
The value for the "size" key should be one of "small", "medium" or "large".
Inside of the file consts.py we have different constants for each of these groups.
They all have different images, different sizes, and different speeds. For example.
SMALL_IMAGE is the image for a "small" asteroid, while LARGE_IMAGE is the image
for a "large" asteroid.
Fill the list _asteroids with Asteroid objects, using these constants to define
the image and size. When you are done, remember to update the draw method in Wave
to draw the asteroids. You can draw the asteroids either before or after the ship; it
does not matter. If you do everything correctly, the level wave1.json should look
like the image below.
Asteroids for Level wave1.json
Customizing the Asteroid Class
To do anything more with the asteroids, we need to add some custom attributes. An asteroid
needs to remember its size and its velocity, so you will need attributes for these. Add
an __init__ method to Asteroid that creates these attributes.
The only tricky part of this step is the velocity. You will note that the value in
the JSON file is not called velocity, but "direction". Recall that velocity is
defined as a direction and magnitude (or speed). The speed of an asteroid is determined
by its size – SMALL_SPEED, MEDIUM_SPEED, or LARGE_SPEED. So you need to combine
the direction and speed by converting direction into a
unit vector
and multiplying it by the speed.
There is one exception to this rule about the velocity. Some asteroids, such as the
one found in easy1.json have direction [0,0]. If you attempt to normalize this vector,
the program will crash (you cannot normalize zero vectors). Any such asteroids should
have the zero velocity, indicating that they are stationary.
In addition to the initializer, you may want getters for these attributes, so that you
can access them in Wave. However, neither the size nor velocity of an asteroid will
ever change, so you do not need setters.
Animating the Asteroids
Animating the asteroids is the same as the ship. For each animation frame, add the
velocity to the position to get the old position. Asteroids wrap just like the ship
does, so you can use the same DEAD_ZONE code for the asteroids. The only difference
is that _asteroids is a list of Asteroid objects, so you will need to loop
through this list to animate them all.
Once you complete this, you should see the asteroids moving about the screen. They will pass harmlessly through the ship. We will worry about collisions later.
Pacing Yourself
Try to finish this part by Tuesday, November 29. If you understand how to animate the ship, you should probably be able to get this done within a day after finishing the wrap code.
Fire Bullets
Even though the asteroids are not a threat (yet), we need to give the ship a chance
to defend itself. The player can fire a bullet by pressing the space bar. In game2d
this is referred to as the key "spacebar" in the method is_key_down.
Placing the Bullet
The Bullet class is a subset of GEllipse, not GImage. While you might want to add
fancy graphics for the bullets in your addition features, the
base game draws them as circles. The attributes for a GEllipse are exactly the
same as GImage, except that there is no source attribute for an image. Instead, you
use the fillcolor attribute to set the color, with BULLET_COLOR as the value.
The only challenge at this step is placing the bullet. The bullet should be placed
at the tip of the ship. To find the tip of the ship, taking the facing vector (which
is a unit vector), multiply it by SHIP_RADIUS, and add this vector to the ship
position (which is the center of the ship).
Write code that adds a bullet every frame the user is pressing the space bar. Do not
worry about whether the space bar was pressed last animation frame (yet). The bullet
should be added to the attribute _bullets in Wave, which is a list of bullet objects.
Remember to initialize this list as empty in the initializer for Wave if you have not
already done so.
Finally, you need to draw the bullets in the list, just like you drew the asteroids. Test out your code by firing while spinning your ship in a circle. You should be able to create a ring about your ship, as shown below.

Non-Moving Bullets With Continuous Shots
Timing the Shots
We do not want to create bullets every frame. That would create an solid stream of bullets and make the game too easy. But we do not want to have to force the player to release the space bar to fire again. Instead, we want to fire the bullets as long as the player holds the space bar down, but only create bullets at specific frames.
The solution is to implement a “rate of fire”. You need to create an attribute in
Wave that counts the number of frames since we last fired a bullet. This is set
to zero every time a bullet is generated. Every frame you add one to this attribute.
We only create a bullet if the space bar is held down and this attribute is equal
to or more than BULLET_RATE, defined in consts.py.
Add this change and trying spining your ship while firing. You should see gaps in the ring as the ship takes time to reload.

Non-Moving Bullets With Timed Shots
Customizing the Bullet Class
The only attribute that a bullet needs is velocity. However, once again, velocity is not
included in the GEllipse class, so we will need to add this. As with Ship and
Asteroid, make a custom initializer that sets the velocity of the bullet.
The velocity of the bullet is set when it is fired. The velocity is the facing vector of
the ship (which is a unit vector) multiplied by BULLET_SPEED. As with asteroids, the
velocity of a bullet never changes.
Animating the Bullets
We animate bullets just like we do asteroids. For each animation frame, add the
velocity to the position to get the old position. The only difference is that
bullets do not wrap. If a bullet ever travels outside of the dead zone, it is
destroyed. That means you should remove it from the list _bullets. This keeps
bullets from traveling forever.
To destroy bullets, remember that you should never modify a list that you loop
over with a for-loop. You need to do this with a while-loop. See the demo pyro.py
from the provided sample code for an example of how to do
this with the rocket objects.
Pacing Yourself
Try to finish this part by Thursday, December 1. Because bullets are a little more complicated than asteroids (both in how they move and how we create them), we are giving you two days to finish this part of the code. But once you have this done, you are almost there. There is only one last major step to the game.
Process Collisions
You should now have everything flying about the screen. But everything feels pretty useless. The asteroids are not a threat. And the bullets do nothing. It is time to give the game some bite. We need to detect collisions and remove objects from the game.
In this activity, you are going to detect two types of collisions: asteroid-ship collisions and asteroid-bullet collisions. Asteroids past each other harmlessly (this is space, after all), and a the ship can never be hurt by its own bullets.
The common factor in all these collisions are the asteroids. So in this section
we will talk about how to collide something with an asteroid. Your code in Wave
should loop over all the asteroids and detect any object – ship or bullet – that
collides with each asteroid
Detecting Collisions
When we sized the ship, asteroids, and bullets, we did it by giving them a radius. That is a hint that we are going to treat everything in this game as a circle. Obviously the images are not perfect circles, not even the asteroids. But they are close enough for this assignment.
Circles are nice because it is super easy to detect if they collide with each other. Compute the distance between the two centers. If this distance is less than the sum of the radii of the two circles, they must overlap. You can see this in the image below.

Calculation for Overlapping Circles
Resolving Collisions
When two objects collide, they are destroyed. Both the asteroid and the bullet
and/or ship. In the case of an asteroid or bullet, this means removing the object
from the appropriate list. In the case of the ship, this means setting it to None.
Because a None ship can cause a lot of problems with the code in Wave, you may
want to add an if-statement to update that skips over everything if the ship
is None.
Removing an asteroid or a bullet from a list is easier. But if you have studied the
demo pyro.py from the provided sample code you may have
noticed that a lot of times it is easier to delete objects in its own loop, after
all the collisions are processed. This is okay. However, an important rule is
that each object may only be involved in one collision. If a collision destroys
and object, then the object should be ignored from future collision computations
if you do not delete it right away.
We recommend that you test your code pretty thoroughly after this step. With this
code you should be able to destroy all the asteroids on screen. If the game is
too hard for you, think about reducing the BULLET_RATE so you can fire more often.
Breaking Up Asteroids
One of the challenges of asteroids is that one bullet is often not enough. This is why we have asteroids of different sizes. If the asteroid is small, then the bullet will destroy it. However, if it is large or medium, the bullet will only break it up into smaller asteroids.
This means that, at the same time you remove a medium or large asteroid from the list, you will need to add more asteroids to the list, replacing them. These asteroids should not be including in any collision calculations. They are not allowed to collide with anything until the next animation frame.
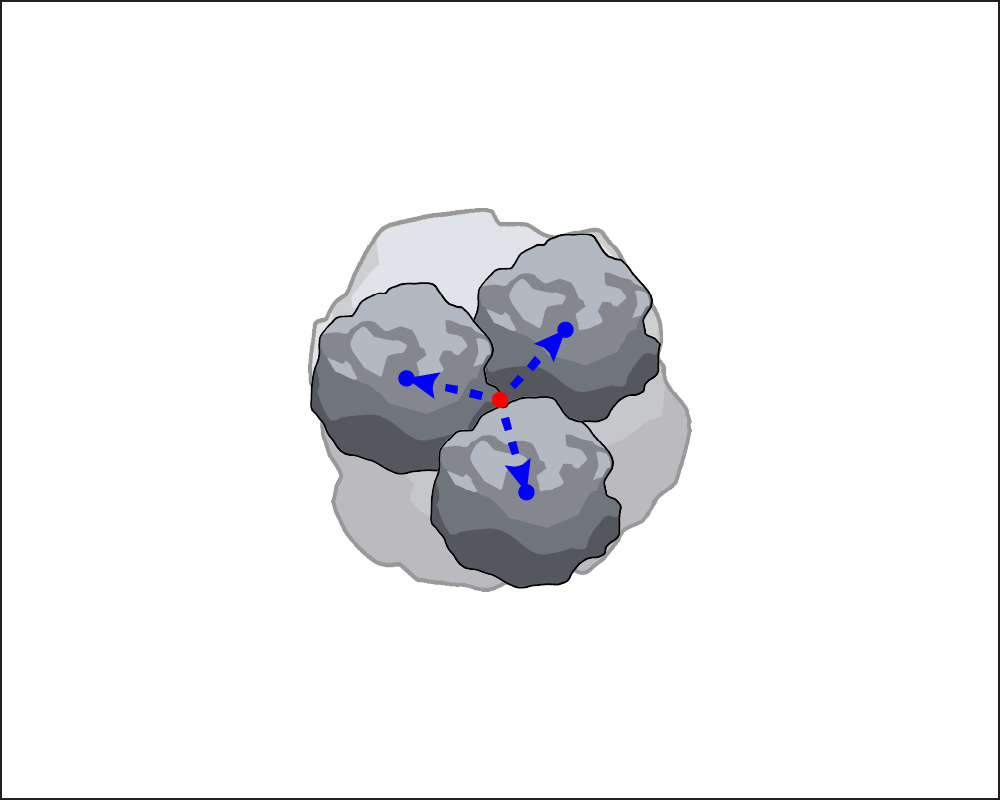
Each large or medium asteroid should be replaced with three asteroids of the next smaller size. So a large asteroid produces three medium asteroids, and a medium asteroid produces three small asteroids. To calculate the placement of these asteroids, you need the collision vector. If the collision is with a bullet, then this is the unit vector for the bullet velocity. If this collision is with the ship, it is the unit vector for the ship velocity, unless the ship is standing still. In that case, we use the facing vector of the ship instead.
Given the collision vector, we need to compute two other vectors. Each to these vectors should be a 120° rotation of the collision vector, in either direction. We call these three vectors the resultant vectors. They are shown below.

Resultant Vectors for a Collision
As we explained in the tutoral, we rotate a vector $v = \langle v_x, v_y \rangle$, we let $\theta$ be the angle of rotation in radians and compute
\[v_\theta = \langle v_x*\cos \theta - v_y*\sin \theta, v_x*\sin \theta + v_y*\cos \theta \rangle\]We working with this formula in Python, we need to convert 120° to $\frac{2\pi}{3}$ in radians. In addition, all of the resultant vectors are unit vectors, so remember to normalize them if you have not done so.
Once you have the resultant vectors, it is time to place the three asteroids. Each asteroid is associated with one of the resultant vectors. The asteroid should be placed so that its center is the result of multiplying its (new) radius times the resultant vector and adding that to the center of the old asteroid. In addition, the velocity of the asteroid is the resultant vector times the asteroid speed. This is shown below.
Calculating the New Asteroid Positions
Once you have completed this, you are effectively done with the game.
Pacing Yourself
You should try to finish this part Saturday, December 3. This is the last hard part of the assignment. When you are done with this, the assignment is effectively over, and you can be confident that you will be able to turn in a working game.
However, you should test this part pretty thoroughly before moving on to the next part. Playing the game a lot can help you discover bugs in your code. The allowing an object to be involved in multiple collisions. But the flip side of this problem is deleting and object (asteroid, bullet, or ship) too soon. If ship dies at the same time its bullet collides with an asteroid, that asteroid should be destroyed before the game is paused.
Finish the Game
You now have a (mostly) working game. However, there are two minor details left for you to take care of before you can say that the game is truly finished.
Managing Player Lives
When the ship is destroyed, you were told to pause the game by changing the state in
Planetoids to STATE_PAUSED. But the game should not be over. The player should
have have three lives before losing the game. You will notice the class invariant
for Wave includes an attribute called _lives for managing these lives.
If the player still has lives left after losing a ship, Planetoids should display a
message (as you did on the welcome screen) that the player press ‘S’ to continue. As
soon as the player presses this key, you should switch the state back to STATE_ACTIVE
and start the game again. The wave will continue where it left off.
Ending the Wave
Eventually the wave of asteroids will end. Each time the player loses a life, you need
to check if there are any lives left. If not, the game is over. The game is also over
if all of the planetoids are destroyed. Both of the these need to be checked in the
update method of Wave.
When the wave ends, and the player has either won or lost, you should put up one last
message. Use a GLabel to put up a congratulating (or admonishing)
message. Finally, you should change the state one last time to indicate that the game
is over. This is the purpose of the state STATE_COMPLETE.
Pacing Yourself
This is the end of the basic game, and we expect you to finish it by Monday, December 5. If you want to add any additional features, you will either need to finish this early or get an extension on the assignment.
Additional Features
Our suggested timeline gives you just enough time to work on this assignment. But if you are able to finish early, then we will give you the opportunity to extend the game and try to make it more fun. While this is not required, this is an opportunity for extra credit. We will award up to 8 points for extra credit, according to how interesting your features are. However, you can only go above 100 if your features are truly extraordinary.
When you add new features, you might find yourself reorganizing a lot of the code above. You may add new methods or change any of the methods you have written. For example, you may want to add afterburner animations for the thrusters. You may even want to add new classes to support a UFO opponent.
You are allowed to change anything you want so long as you update the specifications to reflect the changes. There are only four things that you are not allowed to change.
- The game must be able to load
wave1.jsonwithout any modifications to the files. - Only cosmetic changes (graphics and sound) are allowed for
wave1.json - Any new game rules should only be present when a custom JSON file is loaded
- Constants may be changed, but the bullet fire rate is never allowed to be 0.
The second condition is the most important. If we load wave1.json, collisions work
as normal and the win condition (destroy all asteroids) and lose conditions (lose all
ships) remain the same. You can add animations or sound, and change the game assets.
But if you add new game features, like a UFO opponent, they cannot be present in that
level file (or in any of the level files provided). You will need to make a custom
level file. But you are allowed to change DEFAULT_WAVE to use your custom level
file.
Everything else is fair game. However, we highly suggest that you save a copy of the basic game in a separate folder before you start to make major changes. That way you have something to revert to if things go seriously awry when implementing your features. Also, we suggest that you make sure to comment your code well in order to keep track of where you are in the coding process. As we have said before, make sure your basic game is working properly before you start on new features.
Once again, addition features are simply for extra credit. You can earn full points on this assignment with just the basic game. The purpose of these new features to allow you to earn back any points that you might miss for implementing a feature incorrectly. However, you cannot get back any points lost for writing bad specifications or for violating the 30-line rule, no matter how good your extra features are. And again, your features must be truly exceptional to earn more than 100. You cannot exceed 100 just for implementing our suggestions below.
Possible Features
Here are some possible ways to extend the game, though you should not be constrained by any of them. Make the game you want to make. We will reward originality more than we will reward quantity. While this is a fairly simple game, the design space is wide open with possibilities.
Force Field
One of the most annoying things about the base game is that, if your ship respawns on top of an asteroid, it is immediately destroyed. This can cause you to get unlucky and lose the game after just one life lost. To get around this, most asteroid games start you with a temporary force field that protects your ship for a second or two. You can see this feature in the feature-complete video at the start of this assignment.
Indeed, this feature is so important that it was originally part of the assignment.
However, this feature significantly complicates the code for the Ship class, and so
we had to cut it during testing. It is not a hard feature to implement; it just made it
difficult to finish the assignment in time. And it is a obvious additional feature to put
in your game.
Multiple Waves
The easiest feature is to implement multiple waves. If the player completes a wave
without losing all the ship lives, it is time for a new wave of asteroids. This is really
easy, since all you have to do is make a new Wave object. The state STATE_CONTINUE
indicates the transition from one wave to another.
For this to count as a proper feature, you need some way to decide which file to use
for the new wave. One way to do this is to add a new entry to the JSON file. In addition
to the keys "ship" and "asteriods", you could have a key "nextwave" which contains
the name of the next JSON file to use.
One of the nice features of JSON files is that we can add new features to them without
breaking our code. The old features are still there and still work. However, for style
purposes, we recommend that you change the version number if you start adding
elements to a JSON file. This is a way of indicating that it is changed from the original
format. And remember that we require your game still be able to support wave1.json,
which does not have a next wave.
Sound Effects
Another easy feature is to add appropriate sounds for game events. We have provided several audio files with the source code. You will want to look at them, but you are not restricted to only those sounds. Remember that it is a violation of the Academic Integrity Policy to use unlicensed copyrighted material.
To load an audio file, you simply create a Sound object as follows:
pewSound = Sound('pew1.wav')Once it is loaded, you can play it whenever you want (such as when the ship fires the laser)
by calling pewSound.play(). The sound might get
monotonous after awhile, so make the sounds vary, and figure out a way to let the user
turn sound off (and on).
Read the online specification to see how to use Sound objects.
You cannot replay a sound until the current version of the sound stops. So if you
want to play the same sound multiple times simultaneously (such as if two aliens fire
simultaneously), you will need two different Sound objects for the same sound file.
Proper game audio can get really complicated and this is one of the professor’s active
areas of research.
Important: Loading sounds can take a while. We recommend that you load all sounds you plan to use at either the start of the game or the start of a wave. If a sound has not loaded properly, there will be noticeable lag the first time that you play it.
Player Score
A large part of the challenge of Asteroids is getting a high score. Each time you
break up or destroy an asteroid you get more points. You should display the score at
all times using a GLabel object. Where you display it is up to you,
but you should minimize its interferance with the game itself. Please do not make a
new GLabel object each time the score changes. This will slow down the
program tremendously. Simply change the text attribute in your GLabel object.
In classic Asteroids, this score carries over between waves. If you chose
to implement multiple waves, then each wave after the first should start with the score
from the previous wave. That would require you to track the score in Planetoids, as
that is the only object remains for the duration of the entire game.
Afterburner Animation
In the original game, we can see flames coming from the back of the ship when we fire
the thrusters. We have given you some files in Images for adding this feature to your
ship. The file flame.png is designed so that if it is drawn on top of the ship
centered, and at the same angle, it will put the flames at the back of the ship. Simply
turn this image on and off as the player fires the thrusters.
If you want even more interesting animations, you can use a sprite. A sprite is a
collection of images that you flip through to create an illusion of movement. You got
some experience with one of these in the GUI lab.
The file flames.png has flames of different sizes that you can cycle through to
give the flames some movement. To use this sprite sheet, you need to make a
GSprite object as follows:
alien = GSprite(source='flame-sprites.png',format=(4,1),width=...,height=...)The (4,1) indicate that the sprite has four rows of frames, each with only one column.
The GSprite class has an attribute called frame which tracks which frame in the
sprite sheet is currently displayed. At the start, the frame is always 0, showing
no flames. To fire the thrusters, simply change the frame attribute.
UFO Enemies
In classic Asteroids, an UFO will occasionally appear on the screen and shoot at the
player. The player needs to destroy the UFO or wait until it goes away. We have provided
an image of UFO in the Images folder if you want to add this feature. The UFO is
roughly circular, so you can handle collisions the same way you do with any object on
the screen.
You do not need to understand artificial intelligence to implement the UFO. The original game moves the UFO randomly, but makes sure that the UFO bullets always fire in the direction of the player’s ship. To move randomly, generate a random velocity vector and add it to the position. To keep the ship from moving too erratically, only generate a new velocity vector every few frames (like we do with the bullets), and make all of the UFO velocities have the same speed.
If you do add a UFO enemy, we recommend that you update the JSON files to specify how the UFO appears. Specify when the UFO comes on the screen, where it comes from, and when it will leave (if not destroyed). Doing it this way allows you to control the difficulty of the level by making the UFO harder or easier. This even allows you to put multiple UFOs on the screen at the same time.
Your Imagination
What else have you always wanted a game like this to do? Would you like it to be more of
a survival horror with crafting like Sinistar?
Do want power-ups or special combat maneuvers like the game
1942? With that said, do not go
too wild with power-ups or collectibles. We much prefer a few innovations that greatly
improve the play as opposed to a screen filled with gizmos.
You also are not restricted to the art assets that we have provided. You can add or replace whatever art you want provided that you respect copyright.
Again, you can make any modifications to the game you want, but the core gameplay
must be there. If we load the game on our wave1.json, it should play as normal
with nothing more than cosmetic differences.
Finishing Touches
Before submitting anything, test your program to see that it works. Play for a while and make sure that as many parts of it as you can check are working. Remember to check both of the lose conditions, not just the loss of three lives.
When you are done, reread the specifications of all your methods and functions (including those we stubbed in for you), and be sure that your specifications are clear and that your functions follow their specifications. If you implemented extensions, make sure your documentation makes it very clear what your extensions are.
As part of this assignment, we expect you to follow our style guidelines:
- You have indented with spaces, not tabs (VS Code handles this automatically).
- Classes are separated from each other by two blank lines
- Methods are separated from each other by a single blank line
- Class contents are ordered as follows: getters/setters, initializer, non-hidden methods, hidden methods
- Lines are short enough that horizontal scrolling is not necessary (about 80 chars is long enough)
- The specifications for all of the methods and classes are complete
- Specifications are immediately after the method header and indented
- No method is more than 30 lines long, not including the specification
We are serious about the last one. This is a potential 10 point deduction.
Turning it In
You are potentially modifying a lot of files in this assignment. At a bare minimum,
your are modifying app.py, wave.py, and models.py. You might be modifying consts.py.
You might have extra art and sound files.
To simplify the submission process, we are not asking you upload each individual file.
Instead, put all your files in a zip file called planetoids.zip and submit this instead.
We need to be able to play your game, and if anything is missing, we cannot play it.
In addition, you should create a text file called features.txt. In this file, you
should write a brief description of your additional feature(s). Tell us
what you were trying to do and how you did it. If you used any art or sound assets that
required an attribution license, you should put that attribution here. Include this in
the zip file you submit. If you do not include this file, we will assume that you
did not add an extra features, and you will not get extra credit.
Completing the Survey
One last time, we need you to do a survey. The survey should be done individually (even if you worked in a group). As always, the survey will ask about things such as how long you spent on the assignment and your impression of the difficulty. Please try to complete the survey within a day of turning in this assignment. Remember that participation in surveys comprises 1% of your final grade.