Computer graphics can be tricky, and you often need a lot of experience with programming before you can get started. However, for over fifty years, the LOGO Turtle has allowed elementary-school students to draw cool and interesting shapes on their computer. And if they can do it, so can you.
The Turtle is a cursor on the screen that uses a Turtle for its icon. To draw a line, you push the Turtle forward. The screen draws a line of the same color as the Turtle (which can be changed at any time) along its path of movement. To draw more interesting shapes, you simply change the direction of the Turtle. With a few more commands you can even draw solid shapes.
While programming languages have come a long way since the early days of LOGO, the graphics Turtle lives on. Every major programming language, from C/C++ to Java to Python, has a version of the Turtle. For today’s assignment you get to participate in this 50 year tradition, and hopefully have some fun in the process.
This assignment is a little harder than the previous one, but you have two full weeks to work on it. In the past we have found this to be more than enough time for this assignment. But get started early! If you do not know where to start, or if you are completely lost, please see someone immediately. A little in-person help can do wonders.
As before, remember to fill out the survey telling us how long you worked on this assignment.
Authors: D. Gries, W. White, L. Lee, and S. Marschner
Learning Objectives
This assignment is designed to help you understand the following concepts.
- It introduces you to the famous Turtle, allowing you to draw basic shapes.
- It gives you practice with writing simple for-loops
- It gives you practice writing recursive functions from an explicit definition.
- It gives you practice with complex objects having both attributes and methods.
- It gives you practice with using asserts to enforce your preconditions.
Table of Contents
- Academic Integrity and Collaboration
- Introduction to Turtle Graphics
- Assignment Source Code
- Assignment Instructions
- Finishing Touches
Academic Integrity and Collaboration
Academic Integrity
This is a classic assignment that is continuing because students really like it. But when we say classic, we mean really, really old. While we do make changes to the assignment every year (the fractals this year are brand new), there are guaranteed to be solutions to many of these problems in the wild. Please avoid looking at solutions online, or looking code from other students this semester, or semesters previous.
In this assignment, it is highly unlikely that your code for this assignment will look exactly like someone else’s. We will be using Moss to check for instances of plagiarism. We also ask that you do not enable violations of academic policy. Do not post your code to Pastebin, GitHub, or any other publicly accessible site.
Collaboration Policy
You may do this assignment with one other person. If you are going to work together, form your group on CMS as soon as possible. If you do this assignment with another person, you must work together. It is against the rules for one person to do some programming on this assignment without the other person sitting nearby and helping.
With the exception of your CMS-registered partner, we ask that you do not look at anyone else’s code or show your code to anyone else (except a CS1110 staff member) in any form whatsoever. This includes posting your code on Ed Discussions to ask for help. It is okay to post error messages there, but not code. If we need to see your code, we will ask for it.
Introduction to Turtle Graphics
Python actually has a built-in Turtle provided by the turtle module.
However, we find this module a bit confusing to use, particularly for a beginner.
In addition, it appears that Python 3 broke the Turtle on Windows. That is
why we provide an alternative Turtle, which we call the Introcs Turtle.
This Turtle is provided by the module introcs, which you should be well
familiar with now.
However, you cannot access the Turtle by importing introcs. Why not? Because
the Turtle uses a lot of memory and processing power and we did not want it to
start up every time you import introcs. Instead, it is contained in a module inside
of introcs (yes, modules can contain other modules) called introcs.turtle.
So to use this module, you would instead type
import introcs.turtleThis is a bit of a mouthful, because you will have to write introcs.turtle
before all the functions in this module as well. That is why, for this assignment,
we prefer the from syntax. You only need
three things from this module: Window,
Turtle, and Pen.
So you can import all of these as follows:
from introcs.turtle import Window, Turtle, PenWhile we describe these in detail below, you can get even more information from the official documentation. We wrote this version of the Turtle from scratch, and it is quite powerful.
Using a Window
To create a window, you use the constructor Window() and assign
the result to a variable. Try this command at the interactive prompt:
>>> from introcs.turtle import Window
>>> w = Window()
This will display a window on your screen. The window object has several attributes that you can change.
| Attribute | Meaning | Invariant |
|---|---|---|
| w.x | x-coordinate of top left corner | Must be an int |
| w.y | y-coordinate of top left corner | Must be an int |
| w.width | Width of the window in pixels | Must be an int |
| w.height | Height of the window in pixels | Must be an int |
| w.title | Title at top of window | Must be a string |
Try changing the values of these attributes (with assignment statements). For example, what happens when you type the following command:
>>> w.width = 100In addition, there are two important methods:
| Method Call | Result |
|---|---|
| w.clear() |
This method erases the contents of the Window. It also detaches any Turtles so that they no longer work. |
| w.dispose() | This method closes the Window permanently. |
Pixels inside of the window follow a rather intuitive coordinate system. The point (0,0) is the center of the window. The x-coordinates get larger to the east and the y-coordinates get larger going up.
Using a Turtle
The Turtle class is used to draw on your Window. Each Turtle object t
has the following important attributes:
| Attribute | Meaning | Invariant |
|---|---|---|
| t.x | x-coordinate of the Turtle | Must be an int or float. Cannot be altered directly |
| t.y | y-coordinate of the Turtle | Must be an int or float. Cannot be altered directly |
| t.heading | Turtle heading in degrees measured counter-clockwise from east. | Must be an int or float. |
| t.color | Current Turtle color | Must be a string, an RGB object, or an HSV object. |
| t.speed | The drawing speed of this Turtle. | Must be an int 1 (slowest) to 10 (fastest), or 0 (special) |
| t.visible | Whether the Turtle icon is visible. | Must be a bool |
| t.drawmode | Whether the Turtle should draw anything when it moves; if False, nothing is drawn. | Must be a bool |
To create a Turtle, you use the constructor Turtle() which takes a single
argument: the Window that you want to draw on. Assuming that you made a Window
object w in the previous section, try the following at the interactive prompt:
>>> from introcs.turtle import Turtle
>>> t = Turtle(w)
You should now see a (red) Turtle on your Window. The Turtle will always start at coordinate (0,0), which means it is centered in the window. It will also face east.
The fact that Turtle and Window are separate allows you to have as many Turtles as
you like so that you can draw different things with them. If at any time you have
too many Turtles, use the method w.clear(). This removes all Turtles from the
Window (which also means that attempts to do anything with any old Turtles will fail).
If you want to start drawing again, you will need to add a brand new Turtle.
Position and Orientation
The position and heading of the Turtle are maintained using floating point numbers. This is needed for accuracy. If integers were used, errors would be introduced after only a few calculations. However, whenever a point is to be drawn in the window, its x- and y-coordinates are rounded to the nearest integer because the pixel coordinates are represented as integers.
The direction of the Turtle is called its heading. It is a number representing the angle in degrees counterclockwise from east (to the right). Thus east is 0 degrees, north is 90 degrees, west is 180 degrees, and south is 270 degrees. Negative angles and angles greater than 360 are allowed; the remainder modulo 360 is used.
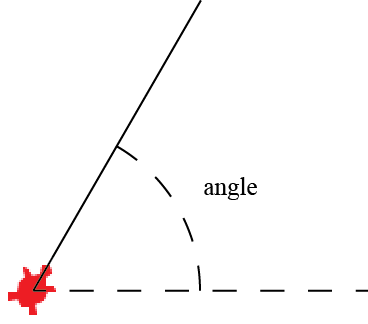
Measurement of the Turtle heading
While the heading attribute can be modified, the x and yattributes cannot.
You can only control the Turtle’s position via the methods listed below.
Important Methods
In addition to its attributes, a Turtle object t has several important methods:
| Method Call | Result |
|---|---|
| t.forward(dist) | Moves the Turtle dist pixels in the direction of its current heading. If the drawmode is True, a line is drawn; otherwise, no line is drawn. |
| t.backward(dist) | Moves the Turtle dist pixels in the opposite direction of its current heading. If the drawmode is True, a line is drawn; otherwise, no line is drawn. |
| t.left(a) | Rotates the Turtle in place a degrees counterclockwise. |
| t.right(a) | Rotates the Turtle in place a degrees clockwise. |
| t.move(x,y) | Moves the Turtle t to pixel (x,y) without drawing anything. |
Note that most of these methods are used to move the Turtle about the screen. This is why the attributes x and y cannot be altered directly (e.g. you cannot assign values to them). You should use these methods instead. All of these methods autoflush when the speed is not 0 (see below), and so you will see the Turtle draw as soon as they are called.
Colors
To change the Turtle color, you assign a new value to the color attribute.
You can use the RGB and HSV objects from the last assignment. You cannot
use a CMYK object with a Turtle; that color model is designed for printing,
and not for displaying on your screen.
The Turtle also supports strings as colors. Just put the name of the color that you want in quotes; make sure the name is all lower case. For example, to make your Turtle blue, try
>>> t.color = 'blue'If you are familiar with web colors, those
are also supported. Just remember to start the string with a hashtag (#), like this:
>>> t.color = '#0099CC'Speed
As you will discover with this assignment, the turtle can be quite slow. You can control the speed of the Turtle by setting is speed attribute. It is a number in the range 1 ≤ speed ≤ 10, with 1 slowest and 10 fastest. But even speed 10 can be quite slow. Speed 10 will draw a single line instantaneously. However, if the Turtle is drawing multiple lines, it will draw each one separately. For the radial shapes, this can take a while.
If you really want to draw quickly, you should set the speed to 0. This speed is
exactly what it sounds like: the Turtle does not draw at all. This seems
counter-intuitive; of course you want the Turtle to draw. But you can always tell
the Turtle to draw later by calling the flush method, like this:
>>> t.flush()When you call flush on a Turtle with speed 0, it instantaneously draws all the
lines that you asked the Turtle to draw. Hence, speed 0 remembers all the drawing
commands, but draws them only when you ask it to finish. This is really handy for
fast drawing (and we will rely on it for grading).
For this reason, you will need to remember to flush in many of your functions
in this assignment. But you should be careful how you use flush. If you call
it after each Turtle step, it will update the screen before you are ready. In this case,
your Turtle will be no faster than speed 10. You should only call flush at
the end of a function, and only in the main functions (i.e. not the helpers).
If the speed is 1 through 10, it is unnecessary to call flush. All of the
drawing methods above will autoflush (meaning they call flush for you). But it
is still safe to call flush for these speeds anyway.
Command Sequences
To draw shapes with the Turtle, you string together a sequence of drawing commands – method calls and attribute assignments. These commands move the turtle and change its colors. As a demonstration, start up the Python interactive shell and try these commands:
>>> from introcs.turtle import Window, Turtle
>>> w = Window()
>>> t = Turtle(w)
>>> t.color = 'green' # This will flush and show the turtle
>>> t.forward(100)
>>> t.color = 'red'
>>> t.right(90)
>>> t.forward(150)
As you type the lines up to and including
t.color = 'green',
you will see a window appear with a Turtle at the center facing east. As you type
the other commands, the Turtle will change color, move, and draw lines.
Using a Pen
Objects of type Pen are very similar to Turtle objects, except that they draw a bit
differently. You create a Pen just as you would a Turtle. At the interactive
prompt try
>>> from introcs.turtle import Pen
>>> w = Window()
>>> p = Pen(w)
The pen icon does not look like a turtle. Instead, it looks like a diamond on its side with two different colors. With that said, this Pen object has a lot of attributes in common with a Turtle object. It draws from the tip on the left, and the left-side color is the drawing color.
However, the Pen does not have a heading attribute. Instead, for a Pen object
p, you draw with the following methods.
| Method Call | Result |
|---|---|
| p.drawLine(dx,dy) | Draws a line starting from the current Pen position with distance dx pixels along the x-axis and dy pixels along the y-axis. |
| p.drawTo(x,y) | Draws a line starting from the current Pen position to the pixel (x, y). |
| p.drawOval(xrad,yrad) | Draws a oval of x-axis radius xrad (in pixels) and y-axis radius yrad centered at the current Pen position. |
| p.move(x,y) | Moves the Pen p to pixel (x,y) without drawing anything. |
Solid Shapes
The Pen also does not have a drawmode attribute. The four methods listed above either
always draw (drawLine, drawTo, drawOval) or never draw (move). What the
Pen does have is a solid attribute. When this attribute is True, the Pen will enter
into a “solid mode”.cAnything that is drawn between now and when the attribute becomes
False (or when a call to move is made) will result in a solid shape.
For example, to draw a solid square, try the following sequence of commands with your Pen.
>>> p.fillcolor = 'blue'
>>> p.solid = True
>>> p.drawLine(0,50)
>>> p.drawLine(50,0)
>>> p.drawLine(0,-50)
>>> p.drawLine(-50,0)
>>> p.solid = False
When you finish, the pen will fill the insides of the square with the color blue.
Because the pen can draw solid shapes, it actually has two color attributes:
fillcolor and edgecolor (there is no simple color attribute in Pen).
The fillcolor is the color it uses inside a solid shape, and edgecolor is the
color for hollow shapes as well as the border of solid shapes. When you look at the
pen icon, the edge color is the color on the left and the fill color is the color
on the right.
Assignment Source Code
Download the source code to this assignment before you do anything else.
This time there are only two files. There is a module a4.py and a test script a4test.py.
This time you only need to complete the file a4.py. The test
script is provided to help you, but you do not need to add anything to it. You will
not submit the test script and you will not be graded on your tests.
The module a4.py
The module a4.py contains all of the functions that you are to implement for this
assignment. You will see that there are a lot of functions. That is because some
are completed for you already and some are optional. See the
instructions for more information on what is required.
All of the functions that you must implement take a Window object as an input and
draw to that window. To test out one of these functions, navigate to the directory
containing the file a4.py and start up the interactive shell. Then type:
>>> from introcs.turtle import Window
>>> w = Window()
>>> import a4
>>> a4.draw_two_lines(w,2)
This will draw two lines in the window w, at speed 2. Study the body of draw_two_lines,
as it will help you with all of the tasks in this assignment.
Throughout this assignment, you will be writing procedures that draw shapes,
much like draw_two_lines. As you write a procedure, refer constantly to
the specification. Follow it carefully. If you have to call another procedure,
look at its specification and make sure you follow it. A huge number of
programming errors arise from not following specifications carefully.
The module a4test.py
Testing a graphical program is hard. You cannot automate tests with introcs.assert_equals.
You have to let the turtle draw, look at the picture, and see if it is what you were
expecting. This is why we have written the test script for you.
When you run the test script, it will pop up a window and ask you for a speed (we always like to use 0 or 10 to keep the tests moving). It will then procedure to draw pictures. After each picture it will wait until you type return in the Terminal window, giving you time to look at the picture.
This test script contains a test procedure for every function in the assignment (though function helpers are grouped together with their main functions). Each test procedure will draw a picture. If you are unsure if your picture is correct, post a screenshot on Ed Discussions and we will tell you. If your picture is right, you pass the test.
This test script is not guaranteed to be complete. Passing this script will not guarantee you a perfect on the assignment. However, you are not required to complete the script and you will not be graded on this file. This test script is simply provided as a convenience to make the assignment easier.
The turtle can take a long time to draw, so you may get tired of drawing the same
pictures over and over. All of the test procedures are called by the master test
procedure test_all at the bottom of the script. To disable a test, comment out
the call to the relevant test procedure.
The procedure assert_error
If you look at the test procedures, you will notice that they actually do more than
just draw a picture. They also have some calls to assert_equals. If you read the
specifications to the drawing methods, you see that they are supposed to restore certain
attributes (turtle position, heading, color) when they are done. These test cases
check that this is happening properly.
There is also a call to a new procedure, assert_error. This is a tool to check
whether or not a precondition is being enforced. For example, draw_two_lines must
have a speed that is an int in the range 0..10. Therefore the call
a4.draw_two_lines(w,-1)should crash, since the function enforces all preconditions. Since it is supposed to
crash, this makes it a little difficult to test (because we do not want the test
script to crash). Instead of calling the function ourselves, we get assert_error
to call it for us. The first argument of assert_error is the function name we
want to test and the remaining arguments are the arguments to use in that function.
To test that the code above crashes, we write
introcs.assert_error(a4.draw_two_lines,w,-1)This procedure now does the opposite of draw_two_lines. It crashes if the function call
does not crash and does nothing if it crashes. It will also crash if the function
call does not crash correctly, meaning that it crashes with an error other than
an AssertError (enforcing a precondition).
With this procedure, you can test that all of the preconditions are enforced. If you
look at the test procedures in a4test.py, you can see that we have done this for all
of the assignment functions. However, part of this assignment is to make sure
that all preconditions are enforced. If we omitted an
assertion in a4.py, then we also omitted its test in the script a4test.py. It is up to you
if you want add these tests to a4test.py.
Assignment Instructions
This assignment is broken up into five tasks. Each task corresponds to a
procedure stub (or collection of stubs) in a4.py. You will find this
assignment to be a lot easier if you complete and fully test one task
before moving on to the next.
Once again, we do not require you to modify or even submit the file a4test.py.
This test script is provided merely as a convenience.
Precondition Enforcement
As we saw in class, it is very helpful to assert your preconditions when you are using recursion or iteration. This keeps you from being caught in an (effectively) infinite loop.
Throughout the code in a4.py, we have placed assert statements
in the various function stubs. However, we do not guarantee that they are enough.
When you complete a function, we expect that you fully enforce your precondition with
assert statements. If the provided assert statements do not fully enforce your
precondition, then you must add more.
To help you with this process, we have provided you with several helper functions
at the very top of a4.py. All of these helper functions return a boolean
value: True or False. These helper functions are to be used inside of an assert
to check part of a precondition, as shown throughout the code.
One of the main reasons we have provided you with all these helper functions is
because the preconditions in this assignment can be quite complex. In particular,
look at the function for is_valid_color(). There are many ways for a color to
be valid. Using these functions allows us to simplify our assert statements a lot.
You will also notice that we have a helper function called report_error.
In the past, we discovered that students are quite prone to make coding mistakes in
their assert error messages (particularly adding a non-string to a string). This
function is a nice way to make error messages that is fairly foolproof.
Task 1. Triangles
Complete the procedure draw_triangle. This procedure is given a Turtle as a
parameter. In implementing the function do not need to make a new Turtle, nor a
new Window.
This procedure should draw an equilateral triangle of side length s and
color c using Turtle t. It should draw the triangle using the current position,
orientation, and speed of t. The Turtle should end its drawing at the same position
and orientation as when it started. Do not save the Turtle’s position and orientation
at the beginning and then restore them at the end. If you draw the triangle correctly,
following the instructions in the procedure specification, then this should happen
automatically.
Remember to flush the Turtle at the very end of the procedure. If you do not
do this, your Turtle will not draw anything when the speed is 0. However, only
flush once. Do not flush after each line drawn.
To try out the procedure, type the following in interactive mode.
>>> from introcs.turtle import Window, Turtle
>>> import a4
>>> w = Window()
>>> t = Turtle(w)
>>> a4.draw_triangle(t,200,'green')
Task 2. Hexagons
Complete the procedure draw_hex. This method should draw six equilateral
triangles using color 'orange' with side
lengths s. This triangles should form a hexagon, as illustrated to the right.
Follow the specification and hints carefully.

A cyan Hexagon
In particular, be sure to use the helper function suggested. Do not try to repeat code
already written. However, you should still remember to flush in this procedure after
you restore the Turtle attributes, even though you already flushed in draw_triangle.
For both draw_triangle and draw_hex, it is very important that you follow the
specifications. If you do not follow the specifications exactly, we will deduct points.
Pay close attention what we say about the state of the Turtle. Did you make any changes
to Turtle attributes that need to be changed back to what they were orginally?
Task 3. Radial Shapes
Choose two (and only two!) from the following three activities: spirals, polygons, and radiating petals. Once you have done two of these, you are free (but not required) to do the remaining one. These are pretty fun assignments. If you decide to do all three, we will grade you on the best two (though there is no extra credit beyond that).
Each of these tasks involves creating a helper procedure. In each case, the main procedure
does not have a Turtle as parameter, but its helper procedure does. The main procedure
clears the Window, creates a Turtle, calls the helper procedure to do the work, then hides
the Turtle. Note that some of these procedures are very particular about which way that
the newly created Turtle should start out facing. Remember that you can control the
facing of your Turtle via the heading attribute.
When one of these procedures completes, you should flush the Turtle to handle
speed 0 properly. However, you should only flush in the main procedure, and
at the end. Never flush in the helper functions.
When writing these procedures, write the main procedure first, then the helper, and
finally test both by calling the first one in python. If the main procedure is foo,
its associated helper is called foo_helper. We have created stubs for all of these
procedures in a4.py. Do not change the headers (either the names or the parameters),
as our grading software will be calling them by those names. Just fill in the bodies.
Once again, it is very important that you follow the specifications for all procedures below. If you do not follow the specifications exactly, we will deduct points. This includes the helper procedures as well. We are not just grading the main procedures. For each problem we grade the main procedure and the helper procedure.
Spirals
The procedure draw_spiral draws a spiral of alternating colors. The pictures below
show two different calls to draw_spiral. Both of them draw 10 lines with lengths
10, 20, 30, … In the first picture, the Turtle turns left 90 degrees after drawing
each line. In the second picture the Turtle turns left 75 degrees after each line.
 |
 |
| Turning 90 degrees | Turning 75 degrees |
|---|
Complete the procedures draw_spiral and draw_spiral_helper. Pay close attention
to how the lines grow at each step. Also pay close attention to how these change color.
These are all import parts of the specification.
While there is a test in a4test.py, these tests are not complete. If you want to
add your own tests, we recommend that you use 10 for the initial side length.
Try different angles, like 90 degrees, 92 degrees, 88 degrees, and so on.
You will be amazed at what these procedures do.
Here are some particular good tests to try out (after creating the Window w):
draw_spiral(w,  8,  90, 300, 10)
draw_spiral(w,  8, 135, 400, 10)
draw_spiral(w,  9,  60, 100, 10)
draw_spiral(w,  9, 121, 500, 10)
draw_spiral(w, 10,  89, 400, 10)
draw_spiral(w, 10, 150, 300, 10)
draw_spiral(w, 10,-144, 500, 10)
Polygons
The procedure multi_polygons draws one or more polygons on the screen, in alternating
colors. Each polygon is drawn starting at the same place (within roundoff errors),
but the turtle turns left 360.0/k degrees after each polygon.
The pictures below show two different calls to multi_polygons. The first is a single
10-sided polygon. The second image is series of 100 10-sided polygons, the first
starting at angle -90, the second at an angle of 360.0/100-90, the third at an angle
of 2*360.0/100-90, and so on. This demonstrates the kind of cool pictures you can draw
just with polygons (for those of a certain age, this is very reminiscent of a
Spirograph).
 |
 |
| One 10-sided polygon | 100 10-sided polygons |
|---|
Complete the procedures multi_polygons and multi_polygons_helper
so that your program can draw such designs. You should use the procedure draw_polygon,
which we have provided, to draw the individual polygons (do not modify this procedure).
You should also pay attention to the color alternation. As you can see in the
100 polygon picture, we alternate the colors green and blue. When your are finished,
experiment to see what neat designs come out. Once again, relying on a4test.py is
not enough.
Here are some particular good tests to try out (after creating the Window w):
multi_polygons(w, 45,  3, 100, 10)
multi_polygons(w, 60, 30,  20, 10)
Radiating Petals
The procedure radiate_petals draws a wheel of colorful petals. A petal is either
open (a diamond) or closed (a straight line). These petals are arranged with equal
angles between then, alternating between open and closed. If n petals are drawn,
the angle between them is 360.0/n.
The pictures below show two different calls to radiate_petals. The first is contains
eight petals of the same length. The second contains 60 petals. Note that the color
of each petal depends on the angle (i.e. the direction) of each petal. The angle of
an open petal is the angle of the line that goes through its center.
 |
 |
| 8 petals | 60 petals |
|---|
Note that the Turtle color attribute will accept HSV objects. A petal drawn at angle
ang uses the color HSV(ang, 1.0, 1.0). Just assign the object to the attribute and
start drawing. This should make this part of the assignment fairly straightforward.
Remember the invariants for an
HSV object when you are drawing.
Complete the procedures radiate and radiate_helper. When
finished, test them with small values of n, like 4 or 8. After the procedures are
completely tested, try them with 360 petals of length 200. Also try 2000 lines with
width 1 and Turtle speed 0 (which should be almost instantaneous if you wrote the procedure
correctly), and notice how much more filled in the disk becomes.
Task 4. Recursive Fractals
In the next two tasks you will draw some fractals. A fractal is a shape that has parts which (when you zoom in) look like the whole shape. This suggests that you will need to use recursion to draw them. The number of recursive steps (or depth) determines the resolution of the fractal drawn. Wikipedia has a wealth of information about these and other fractals.
This time you are to choose one (and only one) from the following two shapes: the Vicsek fractal or the cantor stool. Once again you are free (but not required) to complete them both. If you do both of them, we will grade the best one.
Throughout both of these tasks, we ask that you use a Pen instead
of a Turtle because (1) there is no need to maintain the direction and
(2) Pen methods can draw solid shapes. See the overview of the Pen
above for more information. We have also provided a procedure fill_rectangle, which
you can use to draw a solid rectangle with a pen. You should not modify fill_rectangle.
As with the radial shapes, for each of these recursive tasks, you will implement
two procedures, a main procedure and a helper. The main procedure clears
the Window and creates a new Pen. It also calls the helper to do the drawing, then
cleans up afterward. The main procedure does not have a Pen as a parameter
(though it does have the Window as a parameter), while the helper does. You should
flush at the end of the main procedure, but not in the helper.
The helper is the function that does all the real drawing. It is the function that is supposed to call itself recursively. The main procedure is not recursive. This is why flushing in the helper is particularly bad.
Once again, it is very important that you follow the specifications for all three procedures below. If you do not follow the specifications exactly, we will deduct points. Pay attention to when the Pen should and should not be visible.
Vicsek Fractal
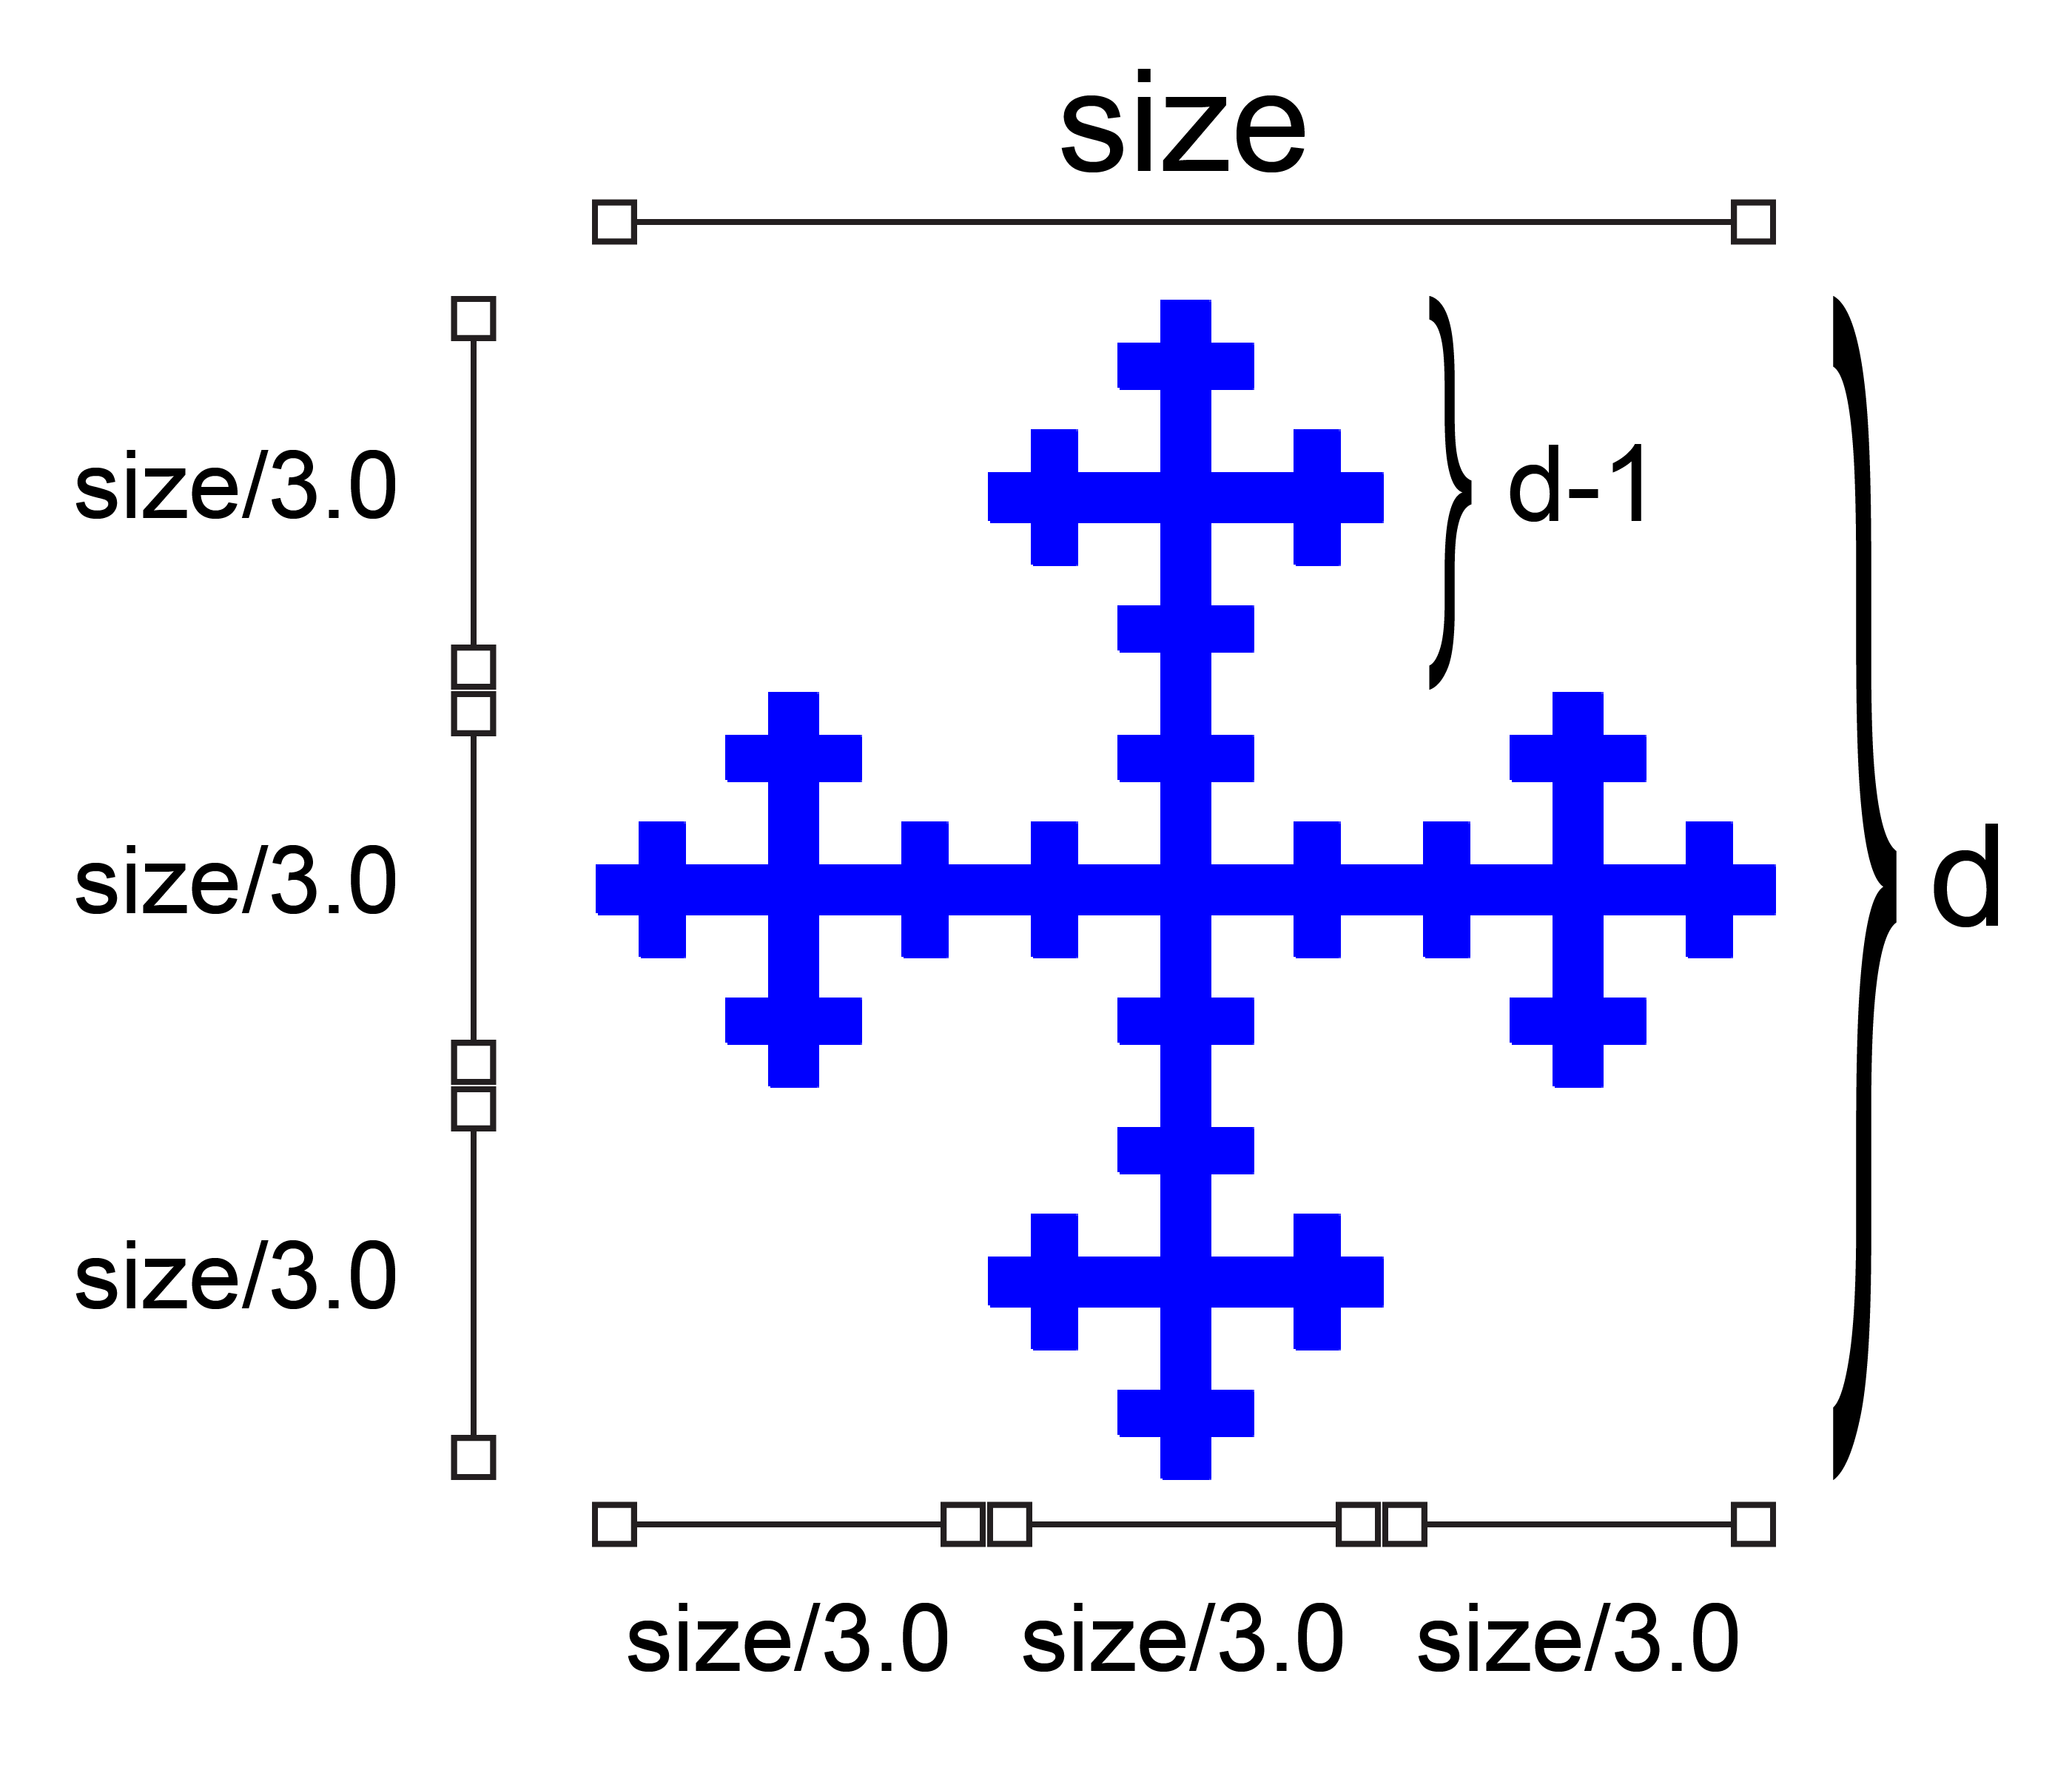
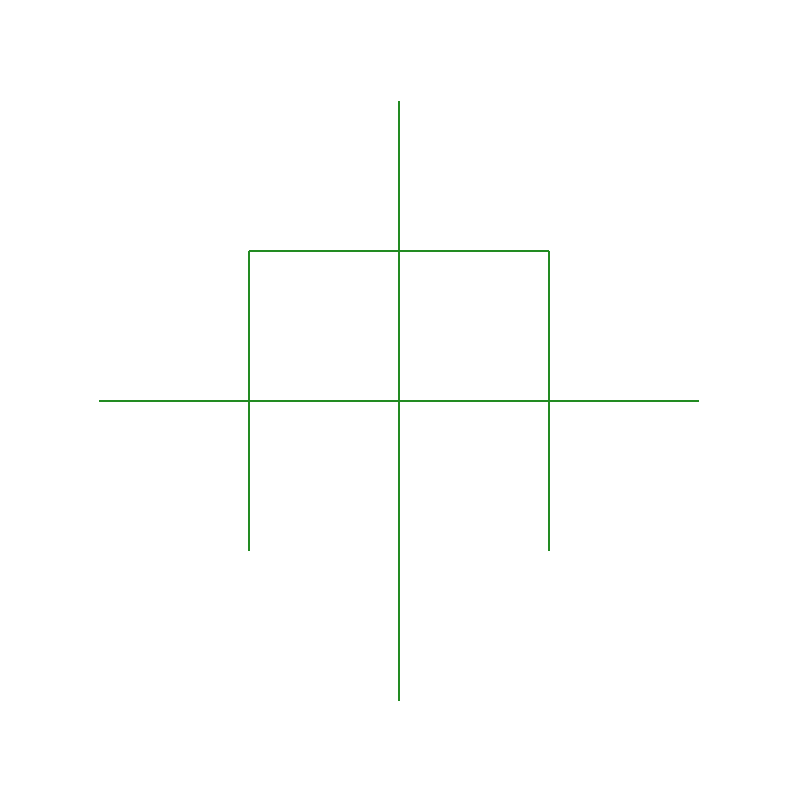
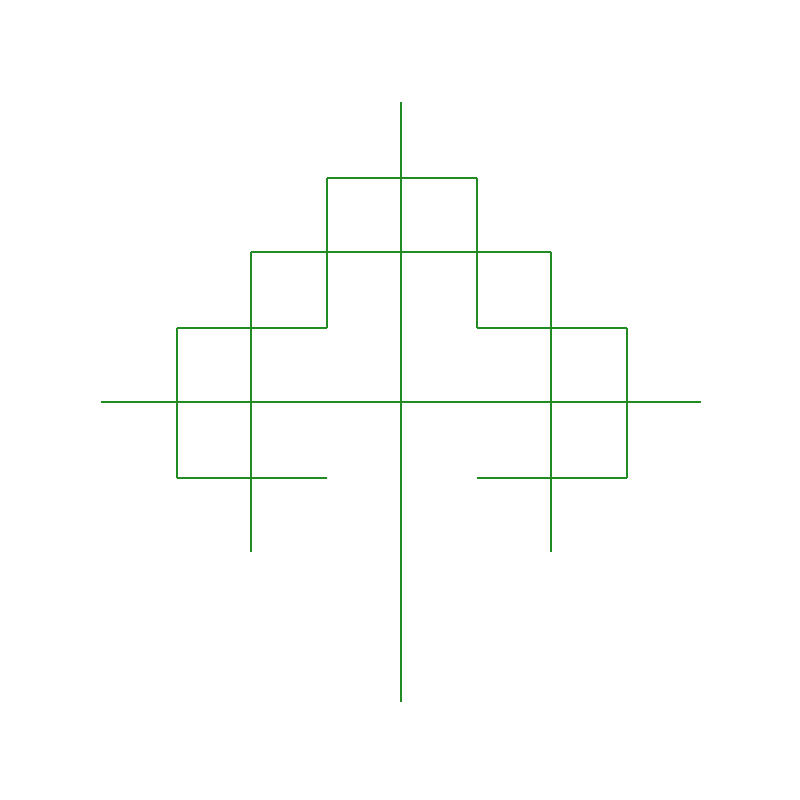
The Vicsek fractal is a cross-type structure that is used in designing compact antennas, particularly in cellular phones. This factal takes a square cross and replaces each of the arms and the center with copies of itself.
Below are Vicsek fractals for depths 0, 1, 2, and 3 respectively. The width
and height of the fractal is size. In depth 0, there is no recursive call and
so the fractal is a simple square. In depth 1, there is a single recursive call,
creating a cross out of five squares (the center and each arm). Each of these squares
is one-third of the size of the fractal. In depth 2, the center and arms of the
fractal are themselves fractals.
 |
 |
 |
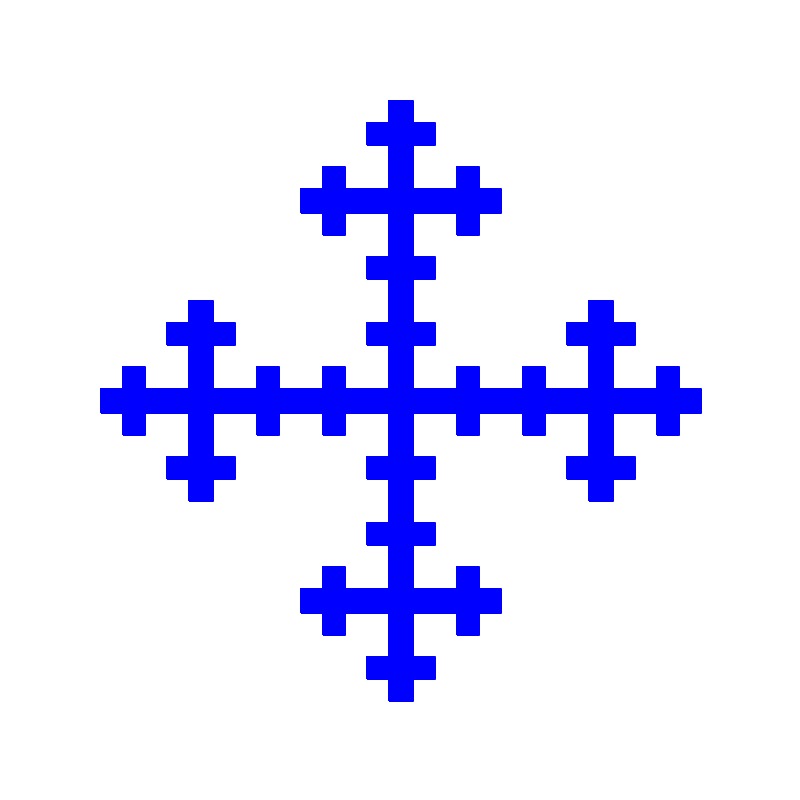 |
| Depth 0 | Depth 1 | Depth 2 | Depth 3 |
|---|
In general, we construct a Vicsek fractal as shown below. In the base case, we draw a simple square. For later depths, divide the square into three parts, leaving the corners blank, but filling in the center and the arms. Each of these five locations should contains a fractal of one less depth. You will need to reposition the fractals so that they go in the right location
We have stubbed in the procedures vicsek and vicsek_helper for you to complete.
Once again, you may find the procedure fill_rectangle useful for your implementation.
Cantor Stool
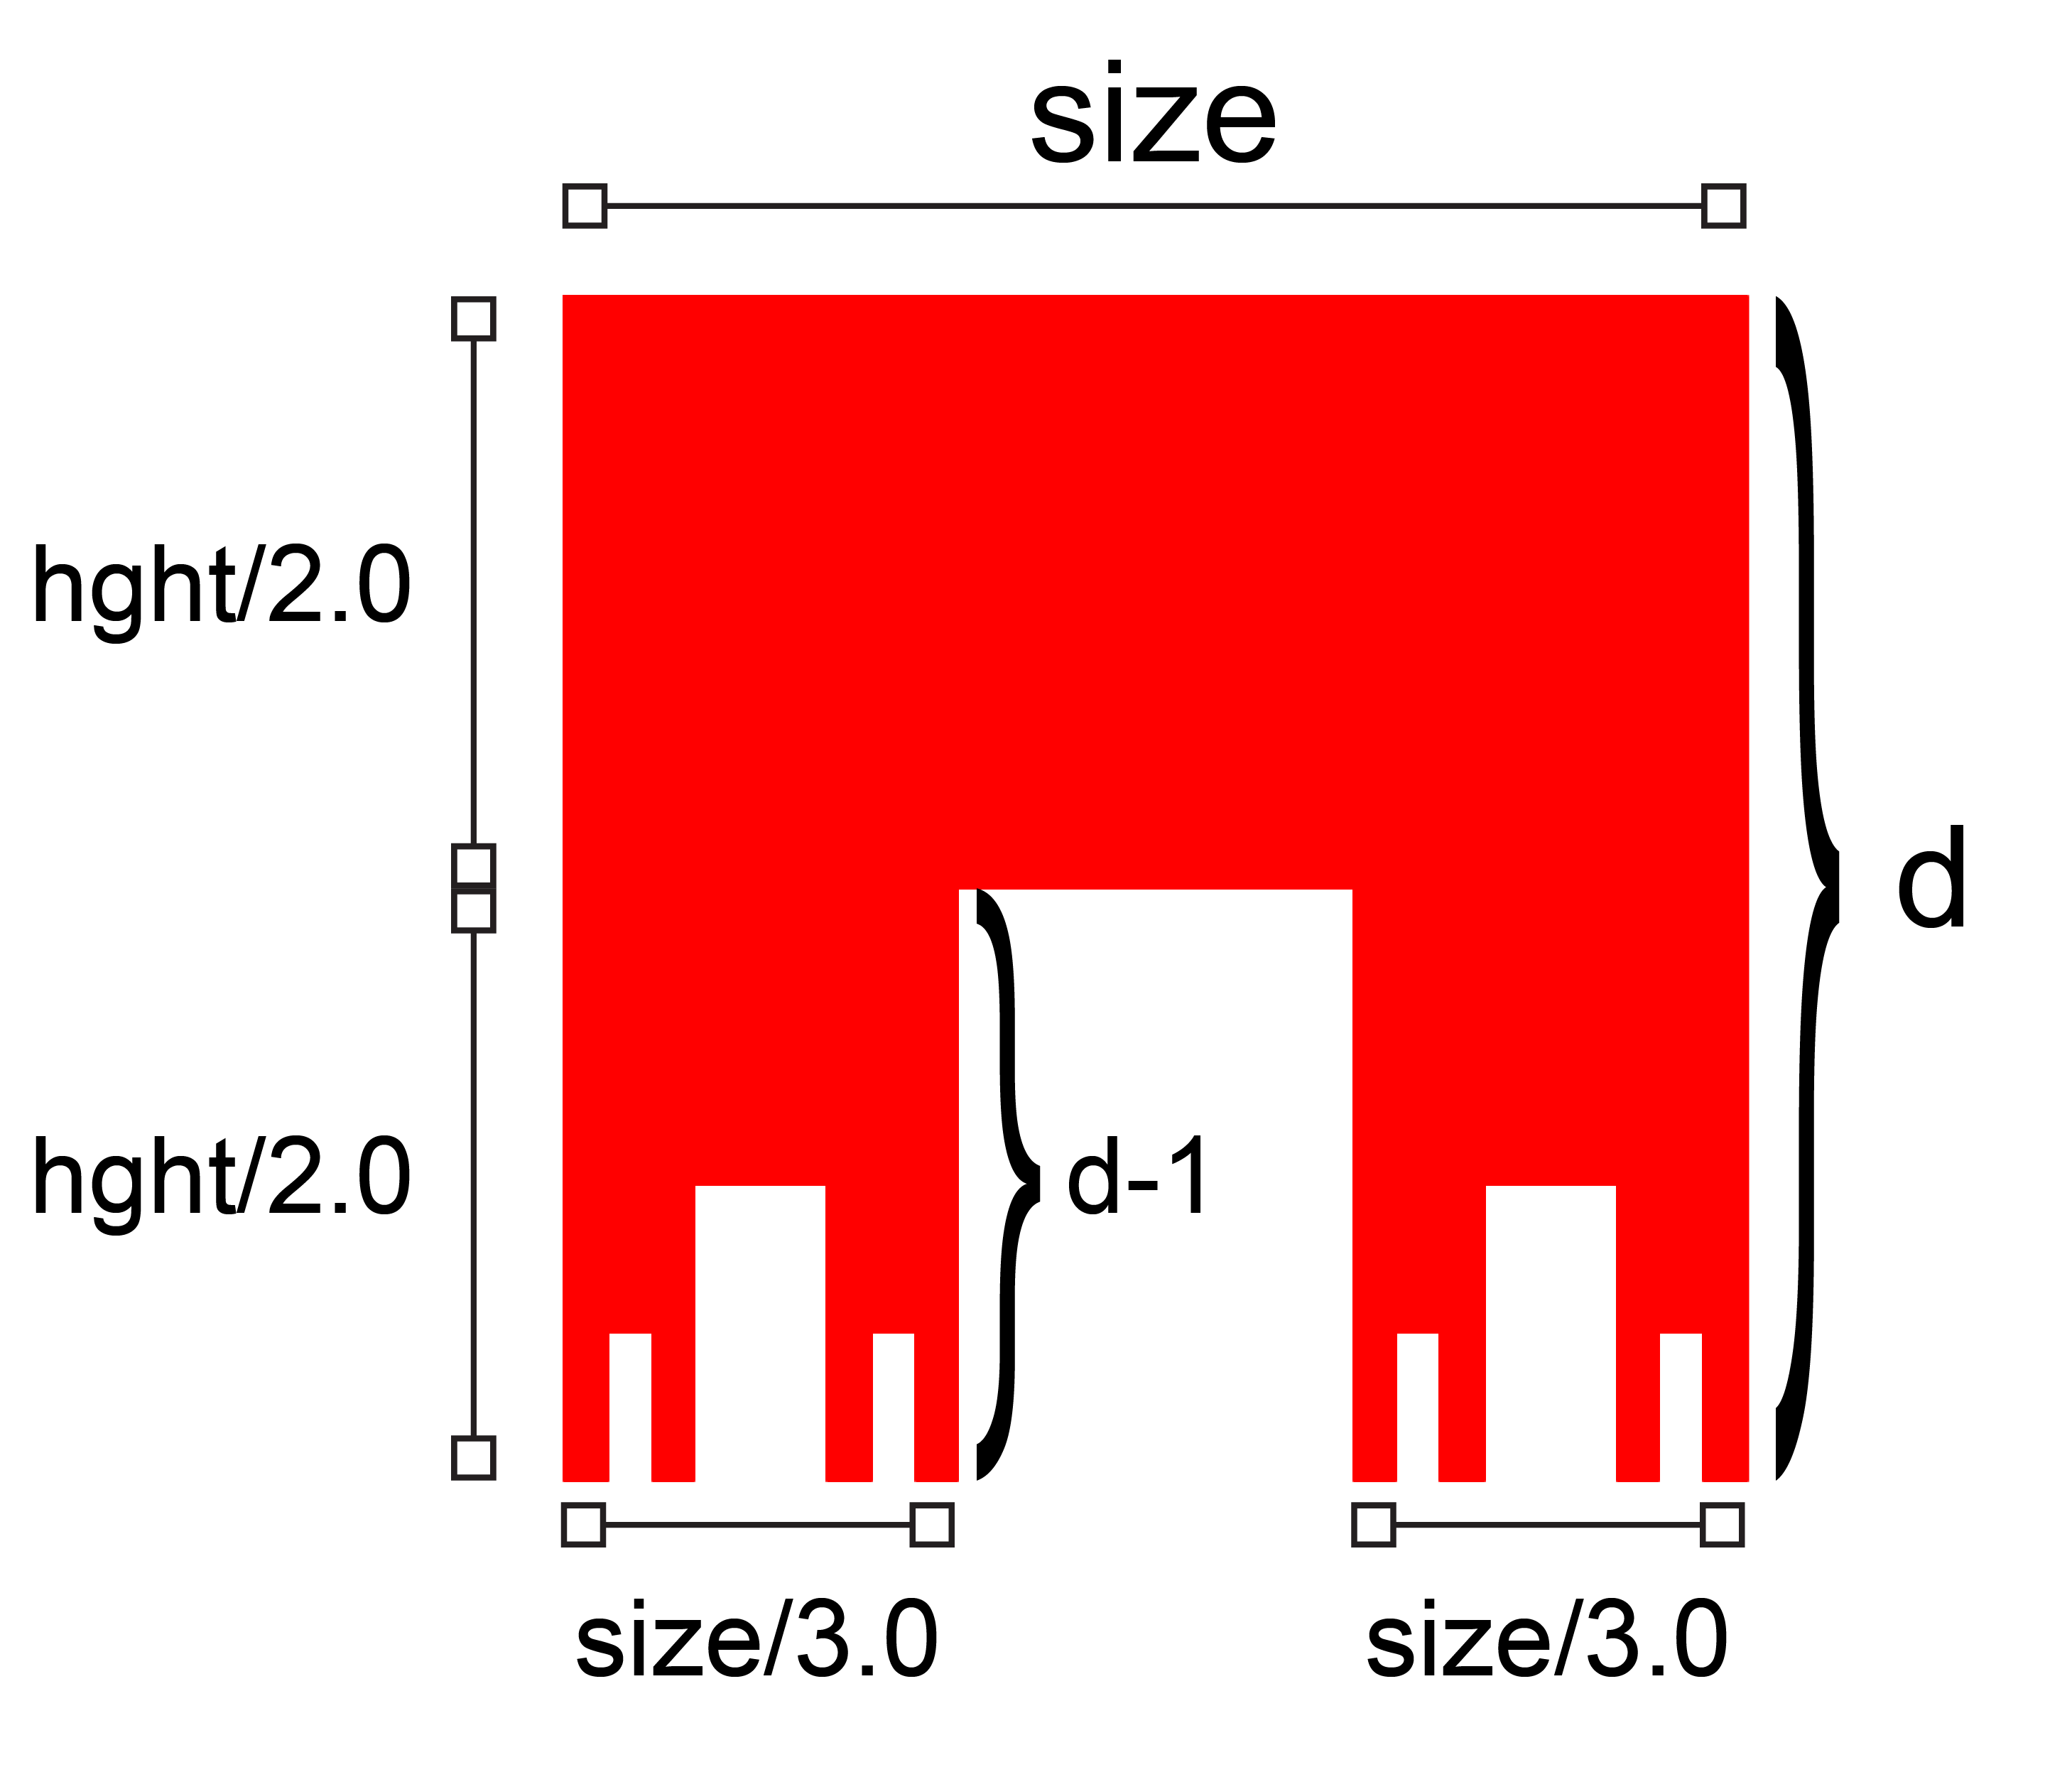
The Cantor stool is a 2-dimensional version of the Cantor set.
The legs of the stool are formed by the recursive calls beyond the base case. Below are
the Cantor stools for depths 0, 1, 2, and 3 respectively. The width of each stool stool
is side and the height of the stool is hght. In depth 0, there is no recursive call
and so the stool is a simple rectangle. In depth 1, there is a single recursive call, and
the stool was cut in half vertically. The horizontally, the legs take up the first and
last third of the width. In depth 2, the legs of the stool are themselves stools.
 |
 |
 |
 |
| Depth 0 | Depth 1 | Depth 2 | Depth 3 |
|---|
In general, we construct a Cantor stool as shown below. In the base case, we draw a simple
rectangle. For later depths, divide the rectangle in half vertically, drawing a rectangle
with width size and height hght/2. For the legs, draw stools of one less depth whose
width is size/3. You will need to reposition the stools so that they line up with the
edges of the top rectangle.
We have stubbed in the procedures cantor and cantor_helper for you to complete.
Once again, you may find the procedure fill_rectangle useful for your implementation.
Task 5. Three-Branches Tree
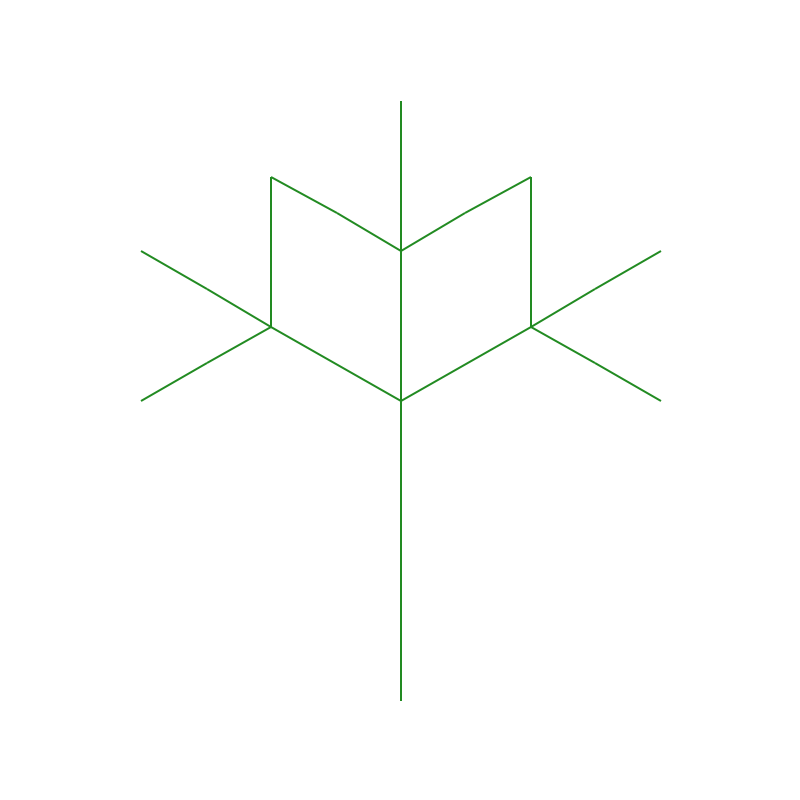
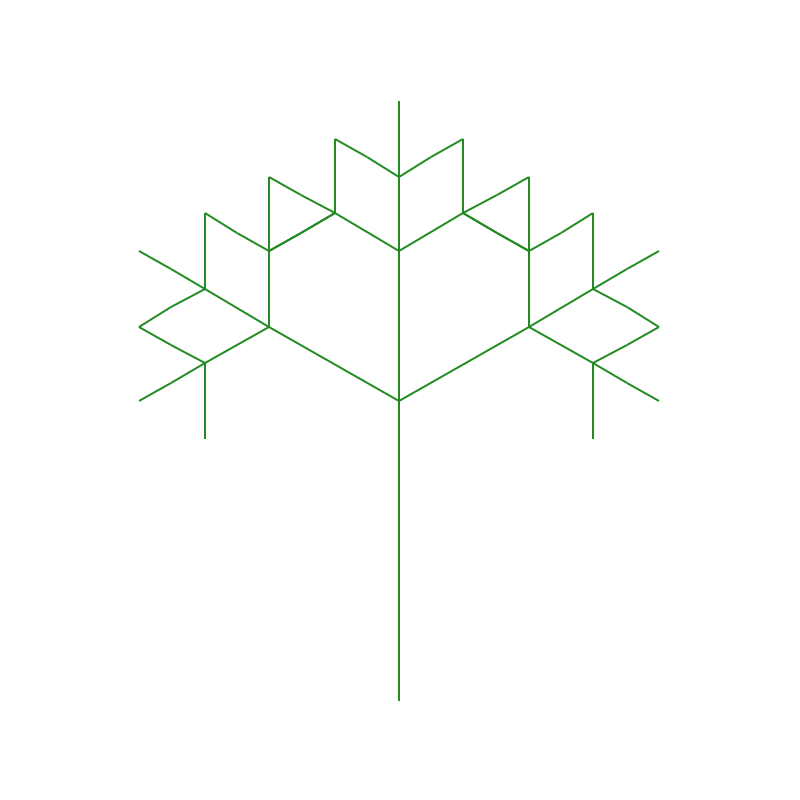
The 3-branches tree is different from the shapes in Task 4 in that it is a line drawing and not a solid shape. The basic shape is a single vertical line. Assuming that the branches are set to 90 degrees, later shapes branch to the west, east and north half-way up the vertical line. These branches are themselves 3-branches trees of one less depth.
 |
 |
 |
 |
| Depth 0 | Depth 1 | Depth 2 | Depth 3 |
|---|
However, the branches do not have to be set to 90 degrees. They can be any angle between 0 and 180 (exclusive). The center branch will always face straight north. However, the other branches will form an angle with the center branch. Below are the first few depths of a 3-branches tree with angle 60 degrees.
 |
 |
 |
 |
| Depth 0 | Depth 1 | Depth 2 | Depth 3 |
|---|
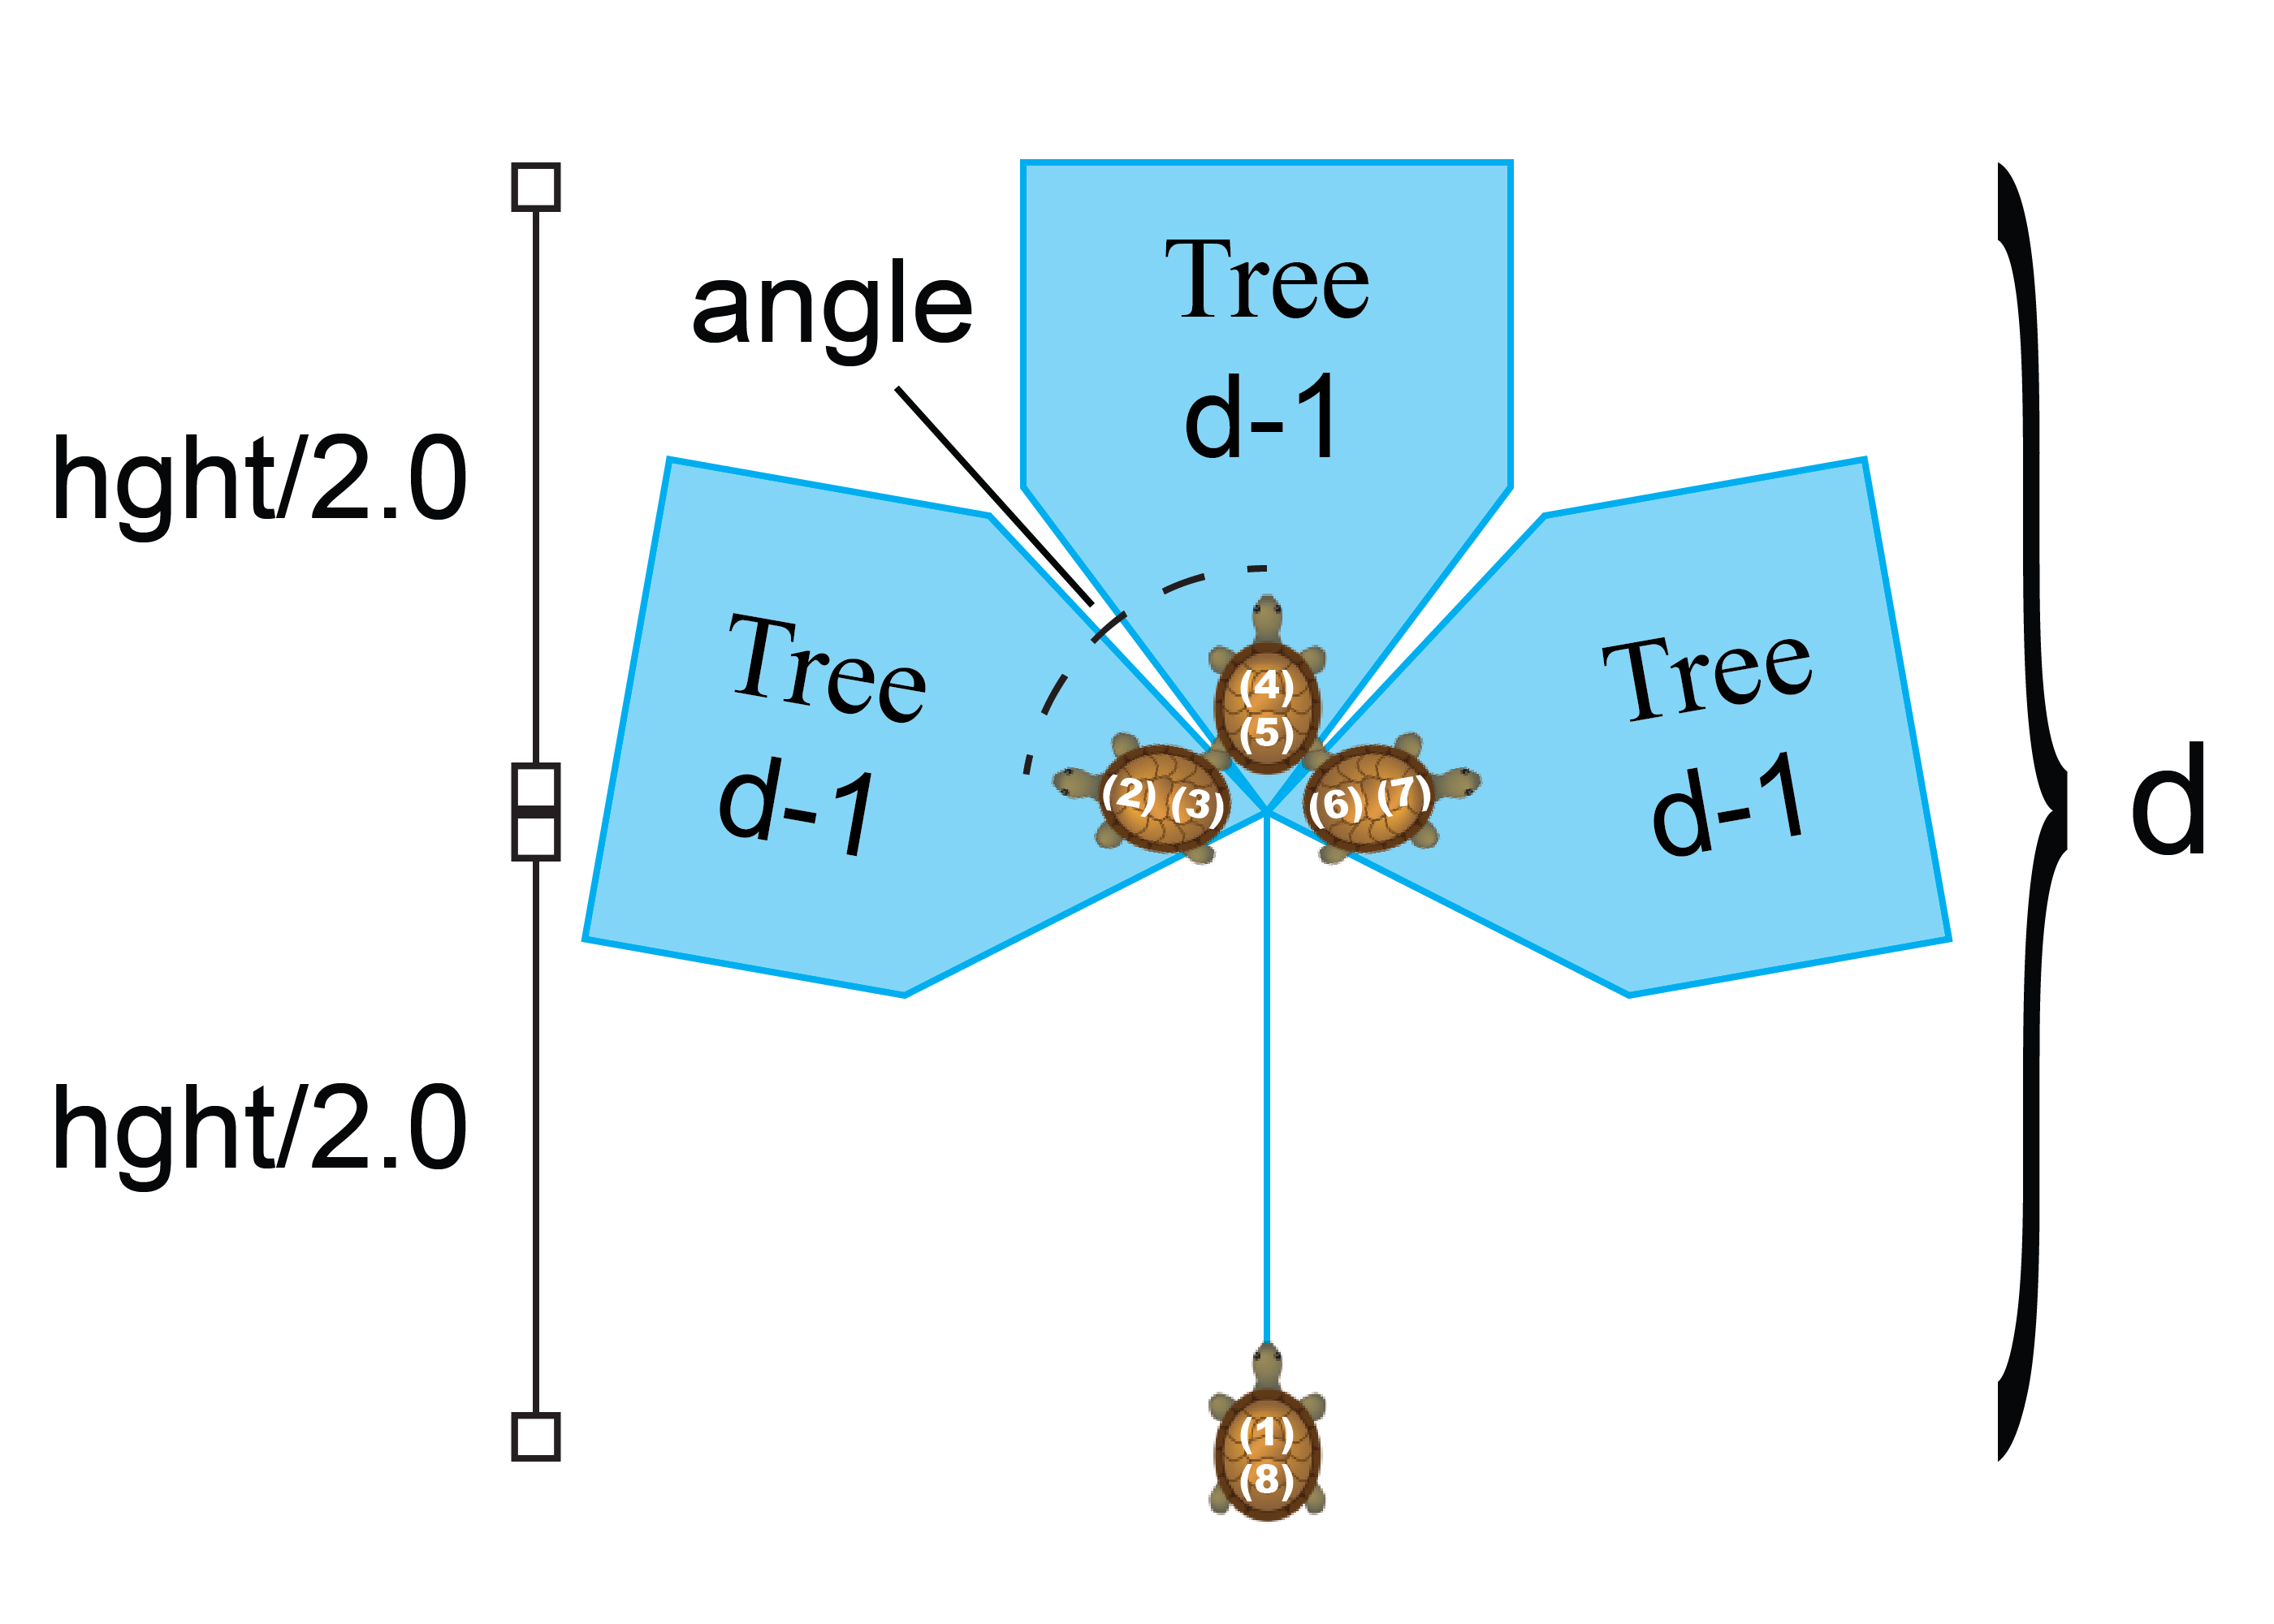
Because this is a line drawing, you will be using the Turtle once again. Using the Turtle to draw a recursive shape can be quite tricky because you have to pay very close attention to the orientation. This last task will demonstrate why we are so adamant about restoring the Turtle state at the end of a function. If you do not do that correctly, the Turtle will wander off screen and you will have no idea how to debug it.
The correct orientation of the Turtle is shown by the image below. The Turtle starts off at the bottom facing upwards (Step 1). Once it reaches halfway up the vertical line, it turns left by the given angle (Step 2) and draws a 3-branches tree of one less depth. When done, it returns to its position just after turning (Step 3). It then turns to the right (Step 4, straightening out, and draws another tree of one less depth. When done, it returns to its position (Step 5) and then turns right again (Step 6). It draws one last tree. Finally it returns to its position in the middle (Step 7) before going back to its initial position at the bottom (Step 8), remembering to turn facing the central branch.
We have stubbed in the procedures branches and branches_helper for you to complete.
You will notice that, while branches assumes the Turtle starts at the bottom facing up,
branches_helper does not. That is because branches_helper must be able to draw the
tree in several different orientations.
If you are unsure of how to approach this function, look at the Hilbert curve example from class. This example uses a Turtle to recursively draw a shape in much the same way.
3-branches trees are particularly spectacular for large recursion depths. For example, the pictures below is for depth 6. The left is angled at 60 degrees while the right is angled at 120 degrees. Note that it can take a long time to draw this shape, however. Each depth that you add effectively doubles the drawing time for the Turtle.
 |
 |
| 60° branches | 120° branches |
|---|
Finishing Touches
Before you submit this assignment, you should be sure that everything is working and polished. Unlike the first assignment, you only get one submission for this assignment. If you make a mistake, you will not get an opportunity to correct it. With that said, you may submit multiple times before the due date. We will grade the most recent version submitted.
Once you have everything working you should go back and make sure that your program meets the class coding conventions. In particular, you should check that the following are all true:
- You have indented with spaces, not tabs (VSCode handles this automatically).
- Functions are each separated by two blank lines.
- Lines are short enough (~80 characters) that horizontal scrolling is not necessary.
- Docstrings are only used for specifications, not general comments.
- Your name(s) and netid(s) are in the comments at the top of the modules.
Upload only the file a4.py to CMS by the due date:
Wednesday, October 26. We do not need any
other files. In particular, we do not want the file a4test.py.
Completing the Survey
In addition to turning in the assignment, we ask that you complete the survey posted in CMS. Once again, the surveys will ask about things such as how long you spent on the assignment, your impression of the difficulty, and what could be done to improve it. Please try to complete the survey within a day of turning in this assignment. Remember that participation in surveys is 1% of your final grade.