T-Th 9:05
or
T-Th 11:15
in Olin 155
CS 1110: Introduction to Computing Using Python
Spring 2016
(image source)
About:
Announcements
Staff
Times & Places
Calendar
Materials:
Texts/Clickers
Python/Komodo
Command Shell
Terminology
VideoNote
Learning:
Lectures
Assignments
Labs
Assessment:
Grading
Exams
Resources:
CMS
Piazza
AEWs
FAQ
Python reference
Python Tutor
Alternative classes
Style Guide
Academic Integrity
Python and Komodo Edit in CS 1110
Python comes in different versions by different makers for different operating systems. To make sure that everything works as we (and our grading programs) expect, we require that all students use the same major version of Python: ActiveState's ActivePython 2.7.x appropriate to your computer, where the "x" stands for any number (10 or higher for Macs). This applies even if you already have some other Python on your computer.
The computers in the lab rooms already have the required version, so you may use those computers for your coursework. If this is your choice, you need read no further!
Otherwise, please note: software setup can be frustrating, even for the experienced. Like giving birth, it can involve potential pain and bewilderment that is completely NOT representative of the next few months! If you have a laptop that you're having installation trouble with, best is to see any of the course staff, who'll be happy to help. Or, post questions to the course Piazza page.
Instructions in grey are footnotes giving more detail for some special situations or answers to questions some but not all students might have.
Table of Contents
- Installing ActivePython
- Testing Your Basic ActivePython Install: Tests 2(a), 2(b), 2(c)
- Installing Komodo Edit
- Adding necessary packages to Python
- Test the necessary packages
- Appendix: Mac aliasing instructions for problems with Test 2(b) on a mac
1. Installing ActivePython
1.W: Installing ActivePython on Windows
Supported Platforms: Windows 7, 8, 10. If your operating system is Vista or XP, then you will need to either upgrade or use the machines in the ACCEL lab.
This installation process will put Python in the directory C:\Python27.
If you already have a folder of that name (which could happen if you used Python
before taking this class), there are unfortunately only two options: move the older one or delete it. ActivePython has its advantages, but it is stubborn about its location.
Click this button:

which still start the download of the installer we want you to use. (Namely, the 32 bit Community Edition of Python 2.7.10.12. Yes, use it even if you have a 64 bit version of Windows, because we need the 32 bit version for compatibility with our add-ons, later.
Do not download the 64 bit version. Similarly, do not choose a version whose number starts with 3 instead of 2.)
The file that you download is an MSI installer. Right-click on it instead of the usual double-click. If you are asked to choose between "Run as administrator" or something about running just for yourself or for a single user, choose "Run as administrator"; but you might not be asked. Running as administrator adds C:\Python27 to your "path variable", so that your system knows where to find Python. If you aren't asked about the administrator option, the reason is probably because your account already has administrative privileges. Continue to follow
the directions that appear. At some point, you'll be asked in a dialog window similar to that depicted below what directory you want
to install in. By default, it will install in the location C:\Python27; leave this
alone and click Next.

Reboot your computer to ensure that your system updates its information about the location of ActivePython.
1.M: Installing ActivePython on a Mac
Supported Platforms: 10.9 (Mavericks), 10.10 (Yosemite), 10.11 (El Capitan). If you are using an older version of OS X, you will need to either upgrade or use the machines in the ACCEL lab. If you are unsure what version of OS X you are using, go to the Apple menu and select About This Mac. You will see a pop-up dialog that, among other things, lists a Version Number (e.g., "Version 10.10.4").
This installation process will put Python in the directory /Library/Frameworks/Python.framework/Versions/2.7/bin/python and create a "symbolic link" /usr/local/bin/python. If you already have files there (which could happen if you installed another Python before taking this class), unfortunately, the older one will be deleted. ActivePython has its advantages, but it is stubborn about its location.
Click this button:

which still start the download of the installer we want you to use.
The file that you download is a DMG. Double-click on it and it will turn into a virtual disk drive containing a package installer (a icon that looks like an open cardboard box). Control-click on the "cardboard box" instead of the usual double-click, select "Open", and in the next dialog box, also click "Open". The control-click operation circumvents the issue that Mac OS may complain about packages from unidentified developers.
If you have any command shell windows already open, these "old" windows will not "know" where to find ActiveState Python. The easiest way to deal with this is to reboot your computer, so all the windows become "new".
1.L: Installing ActivePython on Linux
Click on one of the two following links: Linux x86 (32 bit) AS 2.7.10.12 package or Linux x86_64 (64 bit)AS 2.7.10.12 package. Unlike Windows, it is not necessary to download the 32 bit version. You may download the 64 bit version of Python, should you desire. However, your installation must be consistent. That means that every single package that you install must be the same version (if there is a choice).
Install as you do other Linux packages.
2. Testing Your Basic ActivePython Install
Now that you have installed ActivePython, it is a good idea to test the installation out, using the command shell for your OS. The command shell is a text-based version of the Windows Explorer or Finder; you can use it to move and rename files and folders. It is also how we will run Python in this class.
Using the command shell requires a bit of practice, so we have created a separate page of instructions for this. But for right now, all you need to learn from that page is how to start up the command shell for your OS.
Test 2(a): can your system find any sort of Python?
Open a command shell window. Then, type
python
(and hit return). This should put you in the "Python Interactive Shell"; you can tell this succeeded because a Python "banner" message will be printed out.
If instead you get some sort of error message suggesting that python could not be found, first reboot and try Test 2(a) again.
If you still get this kind of error message after rebooting, record the following information in order to report your problem.
- The precise wording of the error messages you got. Copy-and-paste is best.
- Mac and Linux users: what is the exact output when you type exactly the following at the prompt?
echo $PATH
- Windows users: what is the "path" environment variable set to? Here's a page that explains how to find out on Windows 7 and 8; Windows 10 should be similar.
Test 2(b): does the "banner" mention "ActivePython" and a version number of the form 2.7.x?
The red highlight below shows what we're looking for. 
If this test fails, your system is running the wrong python for this class.
First, try rebooting, and run Test 2(a) and Test 2(b) again.
If you still aren't getting ActivePython, record the following information in order to report your problem:
- The precise wording of the "banner" that you see. Copy-and-paste is best.
- Windows users: what is the "path" environment variable set to? Here's a page that explains how to find out on Windows 7 and 8; Windows 10 should be similar.
- Mac and Linux users: what is the exact output when you type exactly the following at the prompt?
echo $PATH
If the output is something where the words "/usr/bin" (which is the directory where Apple's default python is) occurs before/usr/local/bin(which is where ActivePython is), then we need to explicitly tell your system to look in the ActivePython location, and you can do by following the instruction in the "Mac aliasing" appendix.
Test 2(c): can you interact with the Python Interactive Shell without it immediately crashing?
The > > > symbols are the prompt. To get the shell to do something, just type a Python command. For example, type
>>> 1+1
and hit Return (do not type the > > >; it is already there).
If anything other than the appearance of the numeral "2" happens, record the precise output, even if it's a very long error message (copy-and-paste is best) to report the problem to us.
Otherwise, you have a working installation of ActivePython.
To exit the Python Interactive Shell, type quit() or exit()and hit Return.
You can also exit by typing Control-D (that is, hold down the control key and then hit the D key).
3. Installing Komodo Edit
Next is to install is Komodo Edit. The purpose of Komodo Edit is to make it easy to create and edit modules/files that can be run by Python.
Technically, you can write Python modules in any text editor (word processor that only produces text, with no font or fancy formatting capabilities). NotePad and WordPad are text editors in Windows, while TextEdit is provided by OS X. The reason we use Komodo Edit is that it is the same across all platforms. That allows you to collaborate with partners who might be working on other operating systems.
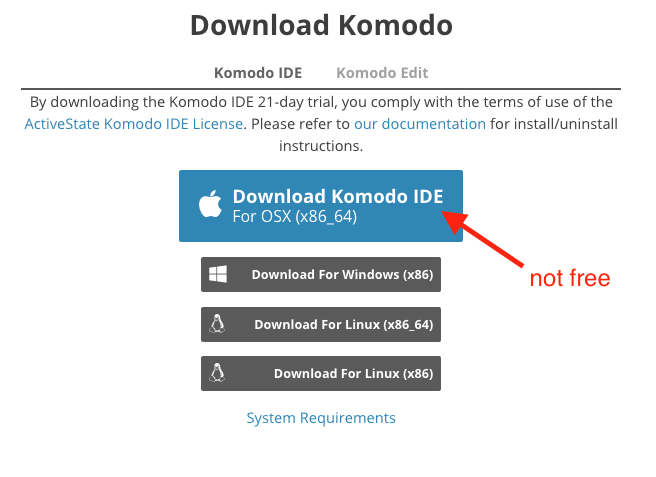
To install Komodo Edit, first download the installer appropriate for your computer from Active State's KomodoIDE website, using the URL http://komodoide.com/download/#edit . Make sure you have the #edit in the URL: it is easy to confuse the (free) Komodo Edit, which is what we will use, with the (non-free) Komodo IDE; here's what to watch for.
| URL: http://komodoide.com/download/ | URL: komodoide.com/download/#edit |
 |
 |
Make sure you are seeing something like the right-hand illustration above, and click the appropriate button for Komodo Edit for your computer. You'll be brought to a page that asks for your email address; you don't have to enter it. After a few seconds, a file will download. Double-click on it (or, for a Mac DMG, follow the directions about control-clicking rather than double-clicking mentioned earlier) to begin the installation process.
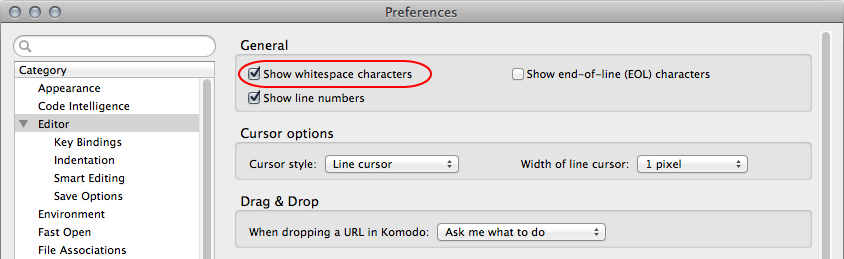
3.1 Configuring Preferences: Make whitespace characters visible
One of the most controversial aspects of Python is that it treats spaces and tabs very differently. If you accidentally put a tab in your program, it will cause your program will crash. And you will have a hard time finding it because both tabs and spaces look exactly the same.To solve this problem, you need to change your preferences to help you distinguish between the two. Open Komodo Edit and then select the Preferences menu option (under Edit on Windows, under the Komodo menu-bar option on Macintosh). Choose the Editor category and check the box Show whitespace characters, as shown below.
This will allow you to see both tabs and spaces, and to tell the difference between both. Spaces will look like light dots which are centered vertically on each line. Tabs will look like black arrows. These are illustrated in the examples below.
 |
 |
|
| Python with Tabs (Bad) | Spaces Only (Good) |
3.2 Configuring Preferences: Make Komodo Edit see ActiveState python
If you needed to use the "Mac-Alias" steps above, then you also need to explicitly tell Komodo Edit that you want it to use ActivePython, as follows. If you didn't need to do the "Mac-Alias" steps, you're done with configuring Komodo Edit!
- Open Komodo Edit.
- Under Preferences (in the "Komodo" item in the menu-bar menu, look for "Languages" on the left-hand sidebar, and then click on "Python" (not "Python 3").
- In the main (right-hand) pain of the Preferences window, you'll see the words "Use this interpreter" and a pull-down menu that probably right now is set to "Find on Path". But we didn't alter your path!
- So, change the pull-down menu item to say "/usr/local/bin/python" (since that's where ActivePython is).
- Click the OK button on the bottom right-ish.
4. Adding necessary packages
We're going to set things up so you can access some plotting packages.
4.W: Get matplotlib and associated files on Windows
In a command shell, type
pypm install matplotlib
If you get a message saying something about pypm not being found, it means you didn't install ActivePython correctly. Please retry the instructions above and/or get in-person or Piazza help.
4.M: Get XQuartz and CornellExtensions on Mac
Unfortunately, Active State doesn't distribute matplotlib for macs. We've gone with a more "heavyweight" solution that installs more than you need for this course, but doesn't have complex installation instructions.
- 4.M.1: Download the file XQuartz-2.7.7.dmg. Double-click on it and it will turn into a virtual disk drive containing a package installer (a icon that looks like an open cardboard box). Control-click on the "cardboard box" instead of the usual double-click, select "Open", and in the next dialog box, also click "Open". The control-click operation circumvents the issue that Mac OS may complain about packages from unidentified developers.
- 4.M.2: Download the file CornellExtensionsOSX.zip. (This is a big file, so downloading may take a while.) Double click on it to unzip the contents into a folder somewhere on your computer. Once again, you see will a package installer. Double click on the package installer and follow the directions.
5. Test the necessary packages
For any OS, at the command line, type (or just copy-and-paste):
python -c "import numpy; print numpy.__version__; import matplotlib; print matplotlib.__version__"
You should get some version numbers out, like "1.1.1".
6. Appendix: Mac aliasing instructions
Follow these instructions if even after rebooting, Test 2(b) above still fails (that is, your computer is defaulting to some python other than ActivePython).
Unlike other semesters, where we've changed the order of places where your computer looks for programs by modifying your PATH variable, in this semester we're going to change what your system thinks the command "python" refers to, by creating an alias for the word "python". This means we are doing less to silently alter your system's setup in a way you might not understand, at the cost of a few more manual steps for you. Follow steps "Mac-Alias" below
- Mac-Alias.1: Get the command
alias python=/usr/local/bin/pythoninto the .bashrc file in your home directory. In a command shell, type
The "tilde" (~) is a key in the upper-right of your keyboard. It's an abbreviation for your home directory. The period (.) hides the file from showing up in Finder.open ~/.bashrc- Mac-Alias.1.A: if a file opens, then enter as the last line of it:
Save the file and close it.alias python=/usr/local/bin/python # use ActivePython in CS 1110 Spring 2016
- Mac-Alias.1.B: if instead you get a message about the file not existing or not found, then do the following workaround to create a new hidden .bashrc file in your home directory.
- Mac-Alias.1.B.a:Create a new file in your Desktop called "my-bashrc", and put the following line into it
- Mac-Alias.1.B.b: In a command shell, type "
mv ~/Desktop/my-bashrc ~/.bashrc". This changes the name of the file you created to the name that your computer is expecting.
Save and close the file.alias python=/usr/local/bin/python # use ActivePython in CS 1110 Spring 2016
- Mac-Alias.1.A: if a file opens, then enter as the last line of it:
- Mac-Alias.2: Test whether the contents of ~/.bashrc are correct: Type
"cat" is the system's oddly-named command to print out the contents of a file. You should see somewhere in the output the line the "alias" line you entered above.cat ~/.bashrc
- Mac-Alias.3: Since Mac Terminal, idiosyncratically, runs .bash_profile instead of .bashrc, explicitly tell .bash_profile to run .bashrc. In a command shell, type
open ~/.bash_profile- Mac-Alias.3.A: if a file opens, then enter as the last lines of it (make sure to have the indent before the word "
source")# Suggested by CS 1110 Spring 2016: # Make readers of .bash_profile look into .bashrc # if a .bashrc file exists. if [ -f $HOME/.bashrc ]; then source $HOME/.bashrc fiSave the file and close it.
- Mac-Alias.3.B: if instead you get a message about the file not existing or not found, then do the following workaround to create a new hidden .bashrc file in your home directory.
- Mac-Alias.3.B.a: Create a new file in your Desktop called "my-bash_profile" (notice the underscore), and put the following lines into it:
# Suggested by CS 1110 Spring 2016:
# Make readers of .bash_profile look into .bashrc
# if a .bashrc file exists.

if [ -f $HOME/.bashrc ]; then
	source $HOME/.bashrc
fi
Save and close the file.
- Mac-Alias.3.B.b: In a command shell, type "
mv ~/Desktop/my-bash_profile ~/.bash_profile". (Again, note the underscores). This changes the name of the file you created to the name that your computer is expecting.
- Mac-Alias.3.B.a: Create a new file in your Desktop called "my-bash_profile" (notice the underscore), and put the following lines into it:
- Mac-Alias.3.A: if a file opens, then enter as the last lines of it (make sure to have the indent before the word "
- Mac-Alias.4. Test whether the contents of ~/.bash_profile are correct: Type
You should see somewhere in the output the lines you entered above.cat ~/.bash_profile
- Mac-Alias.5. Reboot your computer and start over from Test 2(a).