CS 5670: Computer Vision, Spring 2020
Project 4: Stereo
Brief
Synopsis
This assignment will exercise the concepts of two-view stereo and photometric stereo. The project contains three parts. You are expected to implement parts 1 and 2. For part 3, you are given a script, and would need to finish the assigned tasks.
- Photometric Stereo Given a stack of images taken from the same viewpoint under different, known illumination directions, your task is to recover the albedo and normals of the object surface.
- Plane sweep Stereo Given two calibrated images of the same scene, but taken from different viewpoints, your task is to recover a rough depth map.
- Depth map reconstruction Given a normal map, depth map, or both, reconstruct a 3D mesh.
Download the code base from our github repo. You are to implement your code in student.py. Inputs and outputs for each function are specified in student.py.
Getting Started
If you are on Linux or Mac, execute the following script to download the required datasets. This might take a while depending on your connection, so please be patient. We've commented out datasets that are irrelevant to this assignment in order to save download time, but we encourage you to download them to try out many different inputs. .
If you are working with Windows, open 'data/donwload.sh' with a text editor, copy the links to your browser, and downloading would start. Unzip the downloaded zip file to the 'data/' in the project directory.
This repository comes with the tentacle dataset inside 'input/'. You will need to execute the download script (or download via web browser) to get the other datasets. For visualizations of the other datasets, please visit these external sites:
You will implement this project in python3. You would need to install Meshlab on your computer.
- Meshlab: download page
Part 1: Photometric Stereo
Given a stack of images taken from the same viewpoint under different, known illumination directions, your task is to recover the albedo and normals of the object surface.
Quickstart
where dataset is in: ('tentacle', 'cat', 'frog', 'hippo', 'lizard', 'pig', 'scholar', 'turtle')
For example, if you use the tentacle dataset
the output will be in output/tentacle_{normals.png,normals.npy,albedo.png}.
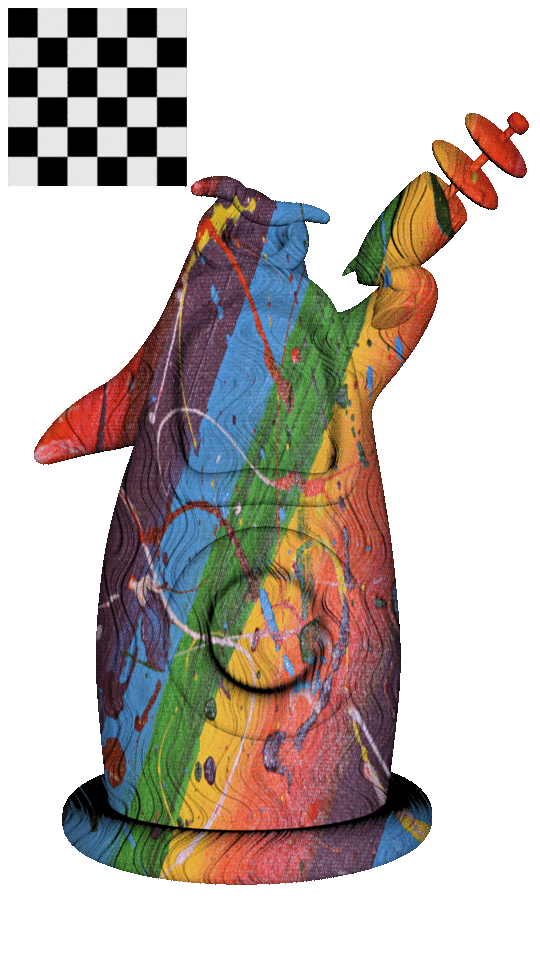
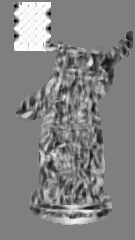
The first image illustrates the different illuminations for the tentacle dataset. The tentacle is a 3D mesh that has been rendered under 9 different directional illumination settings.
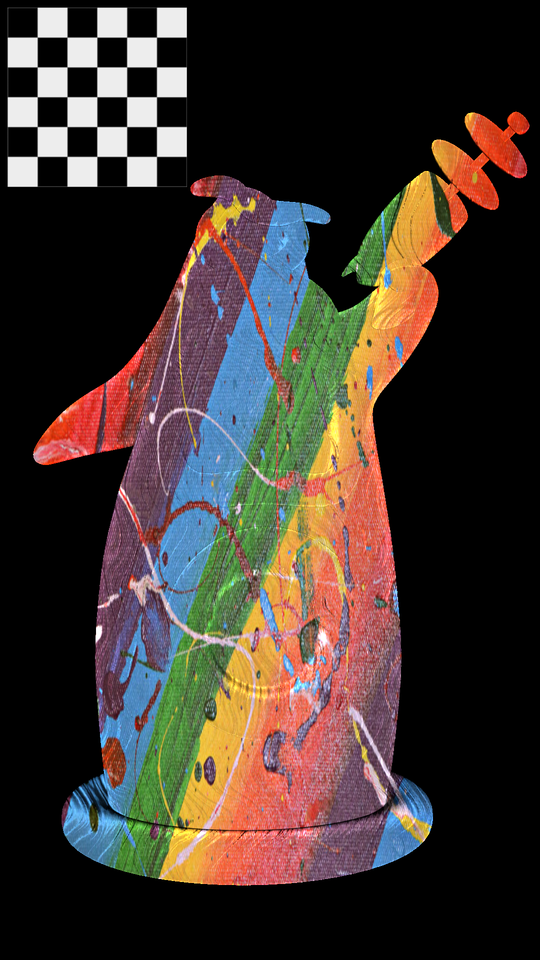
The correct outputs tentacle_normals.png and tentacle_albedo.png should look like the last two images shown.
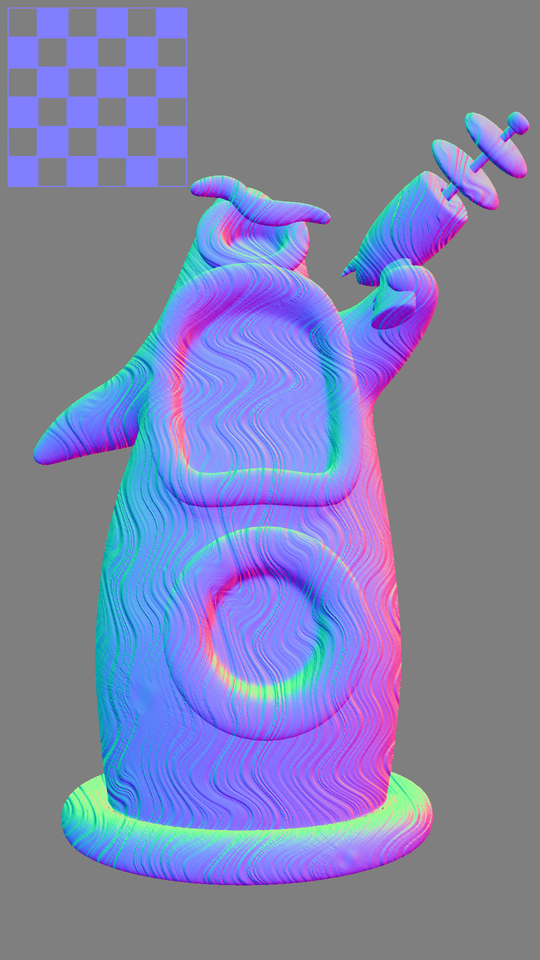
Red indicates the normal is pointing to the right (+x direction), green indicates the normal is pointing up (+y direction) and blue indicates the normal is pointing out of the screen (+z direction). We expect for you to format your normals in this coordinate frame. Failure to do so will result in incorrect meshes in part 3 of this assignment. The lighting directions we provide are already in this coordinate frame, so the simplest solution should be correct by default.
TODO
- Implement student.py:compute_photometric_stereo_impl. This function should take about 0.5-20 seconds to compute a result for the tentacle dataset depending on your implementation. Aim for at most 2 seconds.
- Points will be deducted if your code runs longer than 20 seconds. Vectorization in Numpy (as opposed to for loops everywhere) is essential for efficient implementation, and here are some helpful notes on debugging and vectorization in Python. The output for the tentacle dataset should match our solution.
- Your function should pass the testing.
- Run and record your output for the 'tentacle' dataset and the 'cat' dataset. Submit your output/{tentacle,cat}_normals.png and output/{tentacle,cat}_albedo.png to CMS.
Part 2: Plane-sweep Stereo
Given two calibrated images of the same scene, but taken from different viewpoints, your task is to recover a rough depth map.
Quickstart
where dataset is in: ('tentacle', 'Adirondack', 'Backpack', 'Bicycle1', 'Cable', 'Classroom1', 'Couch', 'Flowers', 'Jadeplant', 'Mask', 'Motorcycle', 'Piano', 'Pipes', 'Playroom', 'Playtable', 'Recycle', 'Shelves', 'Shopvac', 'Sticks', 'Storage', 'Sword1', 'Sword2', 'Umbrella', 'Vintage')
You will need to uncomment and download other datasets using "download.sh" (or download via your web browser).
For example, if you use the tentacle dataset
the output will be in output/tentacle_{ncc.png,ncc.gif,depth.npy,projected.gif}.
The following illustrates the two views for the tentacle dataset.
The outputs of the plane-sweep stereo for the tentacle dataset should look like:
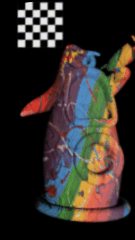
The first animated gif is tentacle_projected.gif, which shows each rendering of the scene as a planar proxy is swept away from the camera.
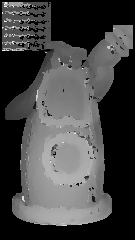
For this project, we use Normalized Cross Correlation (NCC) measure for matching scores. The second animated gif is tentacle_ncc.gif, which shows slices of the NCC cost volume where each frame corresponds to a single depth. White is high NCC and black is low NCC.
The last image shows the correct depth output tentacle_ncc.png for the tentacle dataset, which is computed from the argmax depth according to the NCC cost volume. White is near and black is far.
TODO
- Implement the following functions in student.py (We've configured the tentacle dataset such that it takes about 0.5-100 seconds to compute depending on your implementation. Aim for at most 10 seconds. In addition, we have implemented 3 fuctions for you: pyrdown_impl, pyrup_impl, unproject_corners_impl inside 'util_sweep.py'):
- project_impl: Project 3D points into a calibrated camera.
- preprocess_ncc_impl: Prepare normalized patch vectors according to NCC.
- compute_ncc_impl: Compute NCC between two images that already have normalized vectors computed for each pixel with preprocess_ncc.
- Points will be deducted if your code runs longer than 100 seconds.
- The output for the tentacle dataset should match our solution.
- Your function should pass the testing.
- Run and record your output for the 'tentacle' dataset and the 'Flowers' dataset. Submit output/{tentacle,Flowers}_ncc.png to CMS.
Pro tip: Debugging takes too long on the provided examples? Go into dataset.py where you can edit a couple arguments. You can decrease the number of depth layers in the cost volume. For example, the Middlebury datasets are configured to use 128 depth layers by default:
Alternatively, you can decrease the resolution of the input images. For example, the Middlebury datasets are downscaled by a factor of 4 by default:
The output image will be of dimensions (height / 2^stereo_downscale_factor, width / 2^stereo_downscale_factor).
Part 3: Depth Map Reconstruction
Given a normal map, depth map, or both, reconstruct a mesh.
Quickstart
You can directly use the provided combine.py as below.where dataset is in: ('tentacle', 'cat', 'frog', 'hippo', 'lizard', 'pig', 'scholar', 'turtle', 'Adirondack', 'Backpack', 'Bicycle1', 'Cable', 'Classroom1', 'Couch', 'Flowers', 'Jadeplant', 'Mask', 'Motorcycle', 'Piano', 'Pipes', 'Playroom', 'Playtable', 'Recycle', 'Shelves', 'Shopvac', 'Sticks', 'Storage', 'Sword1'i, 'Sword2', 'Umbrella', 'Vintage')
and mode is in: ('normals', 'depth', 'both')
For example, if you use the tentacle dataset
The tentacle dataset is the only one compatible with the both option. Other datasets are compatible with either the normals mode (photometric stereo integration) or the depth mode (mesh from depth).
The following video illustrates the expected output for the tentacle dataset. Use Meshlab to open and view the mesh.

Pro tip: Use the Import Mesh button in Meshlab to open your mesh.
TODO
- For the below dataset and mode combinations, run the code, view the mesh in Meshlab, take a screenshot, and briefly describe which parts of each mesh look good and which parts have clear mistakes. Try to give a brief description of why you think either the photometric stereo or plane sweep stereo algorithms make mistakes.
- tentacle dataset with mode set to both
- tentacle dataset with mode set to depth
- cat dataset with mode set to normals
- Flowers dataset with mode set to depth
Be patient when running combine.py. For reference, the whole thing should run on the tentacle dataset with the both option in under 20 seconds.
Testing
Execute the command 'nosetests -v' from the project directory to run the provided test cases in tests.py.
When you run 'nosetests -v' for the first time, you'll see that all the tests are skipped because the functions to be tested haven't been implemented by you.
As you work on implementing your solution, we recommend that you extend tests.py with whatever new test cases you feel will help you debug your code. You can use the resources provided in 'test_materials' folder.
Turn In
To recap, you must:
- Complete and submit student.py
- Make sure you pass the provided test cases and the total running time is within two minutes
- Submit the requested output images from part 1 and 2 as a zip file
- Submit the screenshots and brief descriptions from part 3 as a pdf file
To see exactly what to submit see instructions on CMS:
done 
