This tutorial explains how to run the simulator, initialize it with a topology, set up routes, and run simple networking programs. Follow each step carefully and you will have no problems. If you have problems completing any of the step it may sometimes be best to cleanup and start over.
You should open at least two console windows to babbage. One window is just to run the simulator. The other windows are for all other commands. If you connect to babbage from an NT machine, we recommend you use Exceed as your X server. For information on how to use exceed please contact adm.
In this documentation samples are shown in the Courier font. User supplied input is in bold. The '%' at the beginning of a command line is the command-prompt - this may vary between users. We assume that the tcsh shell is being used.
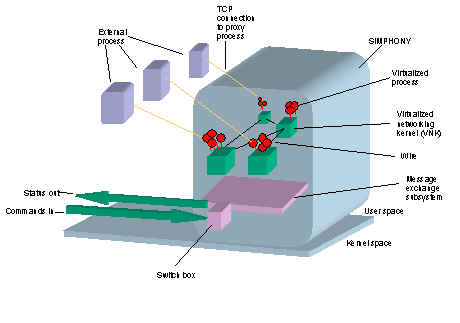
You can think of the simulator as a box where you have a number of virtual UNIX machines connected together on a virtual network. Even though the simulator is emulating many machines it runs as one program. For example if you have a virtual network with two nodes, m0 and m1. Inside the simulator program there are two instances of a UNIX kernel, one for m0 and one for m1. All programs that normally runs in the userspace runs as external processes in the simulator.
When you want to run a program on a machine inside the simulator you must tell that program two things. First you must tell the program how to communicate with the simulator and then you must tell it on which virtual machine it should run on.
For example if you want to run the program foo on the virtal machine m1 you first have to link the foo program to a simulator library (this is explained in some detail below). Whenever you call a system-call a message is sent to the simulator program with arguments and information on which virtual machine the system-call should be performed. For this to be possible foo must know how to communicate to simulator and must have the name of the virtual machine it is running on.
This is controlled through two environment variables:
NETEZ_PORT - is used to specify on which port the simulator is listening for messages.
NETEZ_MACHINE - is used to specify on which virtual machine a userspace program should run on.
Before you run the simulator you must set the NETEZ_PORT variable. If you have another window from where you run the userspace programs, you must set NETEZ_PORT as the same value. Before you run a userspace program you must set the NETEZ_MACHINE variable.
To prevent conflicts between students running the simulator at the same time, each student must pick a unique port number. Pick any port number between 4000 and 64000 randomly. If you detect a conflict with other students, pick another port number.
How you set environment variables depends on the shell you are using. If you are using csh or tcsh you can set the environment variables by using the setenv command (see the man page for more information). For sh, bash and ksh you can use the set command. For some shells set must be followed by export. Read the man page for the shell you are using for more information. To list all current environment variables use the env command.
For FAQ for shells:
ftp://rtfm.mit.edu/pub/usenet/news.answers/unix-faq/faq/part5
The environment variables are NOT global for the user. If you have two windows open on babbage and set environment variables in one window it will not change in the other.
Some shells support aliases. You can use this feature to save you some keystrokes. For example in the tcsh you can create an alias machine to set the NETEZ_MACHINE variable as follows.
% alias machine setenv NETEZ_MACHINE
Now you can set the NETEZ_MACHINE as m1 simply by typing
% machine m1
This is equivallent to typing
% setenv NETEZ_MACHINE m1
In this document we will assume you have an alias called machine to set the NETEZ_MACHINE variable. If you do not have an alias to do this then set the variable the standard way.
Run env and look up the variables. Do this in all windows you are using.
We assume you have set the NETEZ_PORT environment variable in all windows you are using. Run the simulator by typing
% /home/cs519/entrapid/bin/entrapid
======= Starting kernel at port <your port#> =======
Now the simulator should be running.
You can check the simulator by telnet-ing to it
% telnet localhost <your port#>
Trying 127.0.0.1...
Connected to localhost.
Escape character is '^]'.
Switch box console: >
If the simulator is running successfully you should be connected to the simulator console. One of the commands you can give is list to list all machines currently in the simulator.
Switch box console: >list
Switch box console: >
Currently there are no machines in the simulator so you get an empty list. Leave the switchbox console by using the exit command.
Switch box console: >exit
%
In this step you will create a simple network (see below) in the simulator. This simple network has six machines (m0 to m5) and five point-to-point wires (w0 - w4). The reason m2 has many IP addresses is that it is actually the interface card (Ethernet card) that has a network address and since m2 has five interfaces it has five addresses. You will learn more about that later in the course.
The network topology is originally created in a graphical network topology editor. The network topology initialization file needed to create the machines and wires in the simulator has been created for you.
To initialize the simulator using this file you need to run a script called simrun (before running this command make sure that your NETEZ_PORT variable has been set):
% /home/cs519/entrapid/bin/simrun /home/cs519/entrapid/topology/six_nodes.init
connecting to localhost, port <your port#>
Switch box console: >new machine m0
Switch box console: >connect m0
shell:>ifconfig lo0 inet 127.0.0.1 netmask 255.0.0.0
...
Switch box console: >new wire w4
Switch box console: >wireup m5 vx1 w4
Switch box console: >wireup m2 vx5 w4
%
Now six machines should have been created and connected successfully in the simulator.
Telnet to the simulator switchbox as in the previous step. Now list should give you a list of six machines.
% telnet localhost <your port#>
Trying 127.0.0.1...
Connected to localhost.
Escape character is '^]'.
Switch box console: >list
m0
m1
m2
m3
m4
m5
Switch box console: >exit
%
Before you can start sending packets between nodes in the network you must set up routing tables in the network. You will learn more about routing later in the course but for now you can set up the routes by running the six-nodes.routes program:
% /home/cs519/entrapid/topology/six_nodes.routes
Set up route for node m0
add net default: gateway 128.1.0.2
Set up route for node m1
add net default: gateway 128.2.0.2
Set up route for node m3
add net default: gateway 128.3.0.1
Set up route for node m4
add net default: gateway 128.4.0.1
Set up route for node m5
add net default: gateway 128.5.0.1
%
Now we have complete routing information in each node to be able to reach every node in the network. Note that there is no routes set up for m2. This is normal because m2 is neighbor of each node in the network.
In this step you will run networking programs in the simulator. The first program is ping. This programs sends a packet to some specified machine which sends a reply. This program is very useful to check if you can a reach some machine. You should always be able to reach yourself.
% machine m0
% /home/cs519/entrapid/bin/ping -c 2 m0
PING m0 (128.1.0.1): 56 data bytes
64 bytes from 128.1.0.1: icmp_seq=0 ttl=255 time=385.327 ms
64 bytes from 128.1.0.1: icmp_seq=1 ttl=255 time=383.943 ms
--- m0 ping statistics ---
2 packets transmitted, 2 packets received, 0% packet loss
round-trip min/avg/max = 383.943/384.635/385.327 ms
%
The argument -c 2 tells the ping to send only two ping packets. The argument m0 is the machine you are pinging.
Now you should ping a machine in the same subnet (directly connected). This should work, even if you did not set up the routing tables. Ping from m0 to m2.
% machine m0
% /home/cs519/entrapid/bin/ping -c 2 m2
PING m2 (128.1.0.2): 56 data bytes
64 bytes from 128.1.0.2: icmp_seq=0 ttl=255 time=389.076 ms
64 bytes from 128.1.0.2: icmp_seq=1 ttl=255 time=381.724 ms
--- m2 ping statistics ---
2 packets transmitted, 2 packets received, 0% packet loss
round-trip min/avg/max = 381.724/385.400/389.076 ms
%
Now try to ping a machine not in the same subnet as you. Ping from m0 to m4.
% machine m0
% /home/cs519/entrapid/bin/ping -c 2 m4
PING m4 (128.4.0.2): 56 data bytes
64 bytes from 128.4.0.2: icmp_seq=0 ttl=254 time=349.604 ms
64 bytes from 128.4.0.2: icmp_seq=1 ttl=254 time=382.909 ms
--- m4 ping statistics ---
2 packets transmitted, 2 packets received, 0% packet loss
round-trip min/avg/max = 349.604/366.256/382.909 ms
%
Now when you have finished the previous steps you need to stop the simulator. The simplest way to do this is to go to the window the simulator is running in and type Ctrl-C. Always check if you have processes running by listing all active processes. You can do this by using the ps command (see the man pages). For example:
% ps -u <your username>
PID TTY TIME CMD
10079 pts/4 0:00 entrapid
19871 pts/38 0:01 tcsh
18326 pts/46 0:01 tcsh
%
You can kill a process by using the kill command. For example to kill the entrapid simulator from the list above:
% kill -9 10079
%
Good luck