P2P Testbed Information
Ian Fung (if26) and I (dsc29) had finished the testbed is setup in Rm 330
of the CSUG Lab. The diagram below illustrates its topology. The
design was mostly done so that there is least amount of re-wiring of the existing
workstations. So as a result, our private/inside network is actually
implemented over the existing CSUG LAN, except it uses the internal address
space of 192.168.0.x and must go through the NAT boxes to contact any machine
out of this internal subnet.
Some info about testbed
- With two NAT boxes, we could emulate having two internal networks.
We do this by partitioning the 192.168.0.x address space into two equally
big subnets. The NAT boxes' private (inside) addresses are static and
are 192.168.0.1 and 192.168.0.129 for each subnet. Their global addresses
(or outside addresses) are also static.
- To configure a client to be on the Subnet 1, choose an address in from
192.168.0.2 to 192.168.0.126. For Subnet 2, choose from 192.168.0.130
to 192.168.0.254. The corrsponding subnet mask for both subnets
is 255.255.255.128.
- These boxes do NAT by the Routing and Remote Access functions within
Windows 2000 Server. You can read about it in this MS
Knowledge Base support article
. We have not setup any port mappings and do not know if the nature
of this NAT (i.e. full cone, symmetric, etc?). When we find out we will
update this page.
- The STUN servers have the static CSUG LAN addresses and port numbers
as indicated in the picture. They are configured to use each other
as alternate servers.
- In general, when we have any new info about the testbed we will update
this page.
Steps to setup a P2P client
1. Pick one of the CSUG PCs in the room and login.
2. Run ipconfig /all and note down the DNS servers' IP addresses.
3. Now modify this machine's network settings. As you know,
to modify do this you could go to Control Panel -> Network Connections
-> [The Ethernet connection that you want] -> Properties; OR you could
right click on My Network Places (on desktop) -> Properties -> [The
Ethernet connection that you want] -> Properties. Then you would
see this dialog below.
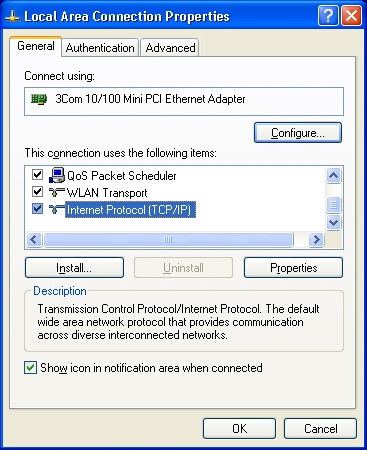
Scroll down to Internet Protocol (TCP/IP) and click properties. And
you would see this dialog box.
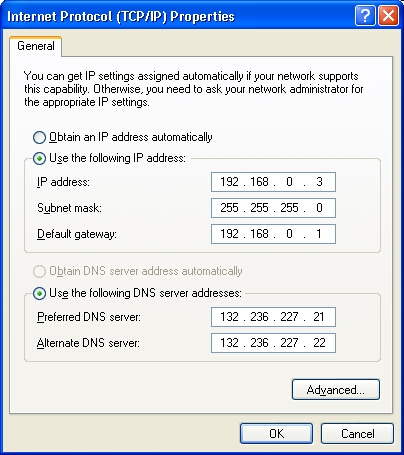
4. Now choose a Subnet that you would like this host to be on. For
Subnet 1, set the IP address of this machine to an address from 192.168.0.2
to 192.168.0.126. For Subnet 2, set it to an address from 192.168.0.130
to 192.168.0.254. Note that if the address you picked is already taken,
when you press OK, Windows would tell you so.
5. Set the Subnet mask to 255.255.255.128.
6. Set the Default gateway to the IP address of the NAT boxes corresponding
to your Subnet, i.e. either 192.168.0.1 or 192.168.0.129.
7. Set the DNS server addresses to the first two that appeared when
you ran ipconfig /all above in step 2. These are the DNS servers
on the CSUG LAN and usually don't change, so you chould usually safely put
the two address shown in picture above.
8. Press OK and OK again. The machine shouldn't need to be restarted.
Note that after you restart the machine, it would be reverted to the preset
CSUG PC settings.
Last update: 03/18/02. By Doug.