CS4670/5670: Computer Vision, Fall 2012
Project 5: Object Detection
Brief
- Assigned: Sunday, November 25, 2012
- Code Due: Friday, November 30, 2012 (by 11:59pm)
- Artifact Due: Saturday, December 1, 2012 (by 11:59pm)
- This assignment should be done in groups of 2 students.
Introduction
The goal of this project is to implement a simple, effective method for detecting pedestrians in an image. You will be working off of the technique of Dalal and Triggs (PDF) from 2005. This technique has three main components:- A feature descriptor. We first need a way to describe an image region with a high-dimensional descriptor. For this project, you will be implementing two descriptors: tiny images and histogram of gradients (HOG) features.
- A learning method. Next, we need a way to learn to classify an image region (described using one of the features above) as a pedestrian or not. For this, we will be using support vector machines (SVMs) and a large training dataset of image regions containing pedestrians (positive examples) or not containing pedestrians (negative examples).
- A sliding window detector. Using our classifer, we can tell if an image region looks like a pedestrian or not. The final step is to run this classifier as a sliding window detector on an input image in order to detect all instances of pedestrians in that image.
Downloads
- Skeleton code For this assignment we will distribute the skeleton code using git. (This should help make distributing any updates easier.) Please install git on your system; installed, you can download the code by typing (using the command-line interface to git)
- Solution executables: Mac, Linux, Windows
- Pedestrian dataset (18MB). You will use this dataset for training and testing your detector.
- Full negatives set (87MB, only for extra credit)
For those that are already using git to work in groups, you can still share code with your partner by having multiple masters to your local repository (one being this original repository and the other some remote service like github where you host the code you are working on); here's a reference with more information.
Compiling
Dependencies
- libjpeg
- CMake
Generating project files with CMake
This project uses cmake to generate compilation files from a set of project description files CMakeLists.txt. For those unfamiliar with cmake you can find out more about it in this wiki. cmake searches for dependencies and can automatically generate compilation instructions in the form of Make files, Visual Studio project files, XCode project files, etc (run cmake -h to see a full list of project formats). The basic procedure for generating these files is to first create directory where the compilation files will go>> mkdir build
>> cd build
>> cmake -DCMAKE_BUILD_TYPE=Release ..
Windows
The following suggestions assume that you are using the cmake GUI (cmake-gui) to generate a Visual Studio project. In our experience, cmake will likely fail the first time you try to run cmake because it will not be able to find the include and lib directories for libjpeg. If you don't already have the libjpeg library, it can be obtained fromC:\Program Files\GnuWin32\lib\jpeg.lib
Once these paths are corrected, click on configure and then generate to create Visual Studio files. You still might get compilation errors related to lib jpeg header files not being found. To fix this select the subprojects jpegrw, objectdetect, and image. Right click on them and select "Properties". In Configure Properties -> C/C++ set the search path in "Additional Include Directories" and click apply.
Using the software
This project has no GUI; all parts of the project can be run on the command line, executing the objectdetect binary with one of several modes as the first argument (including FEATVIZ, TRAIN, PRED, PREDSL, and SVMVIZ). The first TODO item you will implement consists of feature extraction, either TinyImage or HOG. You can test to see your code by running the following command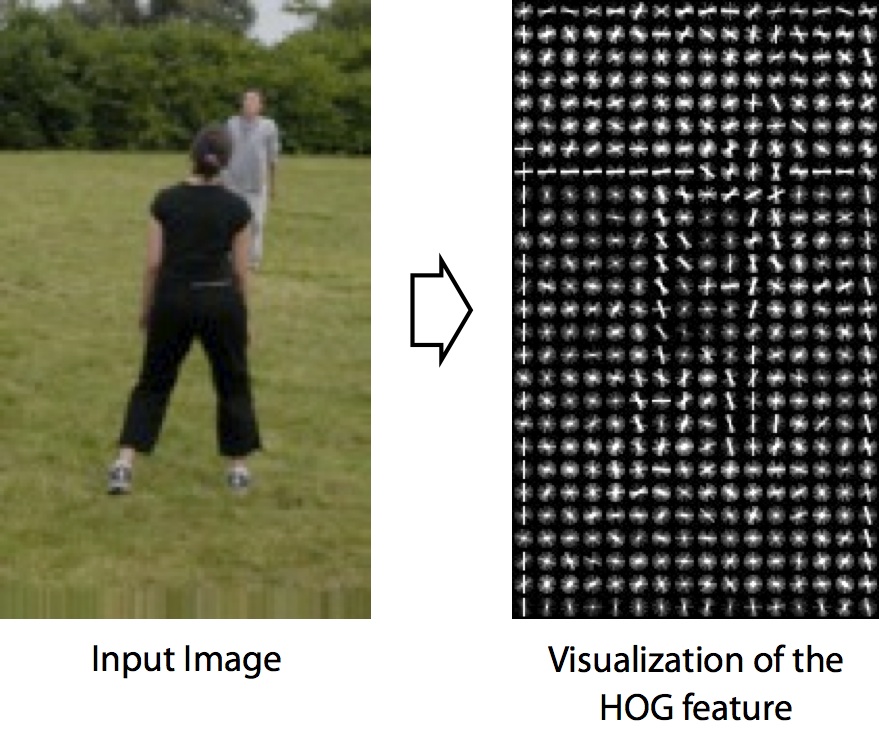
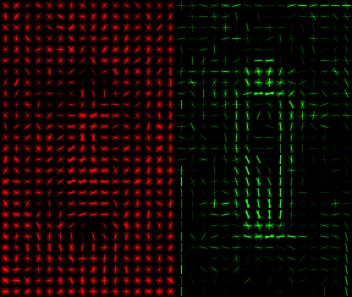
You can get an intuition to what the SVM model is doing by visualizing the set of weights it found. To do this you can run the command
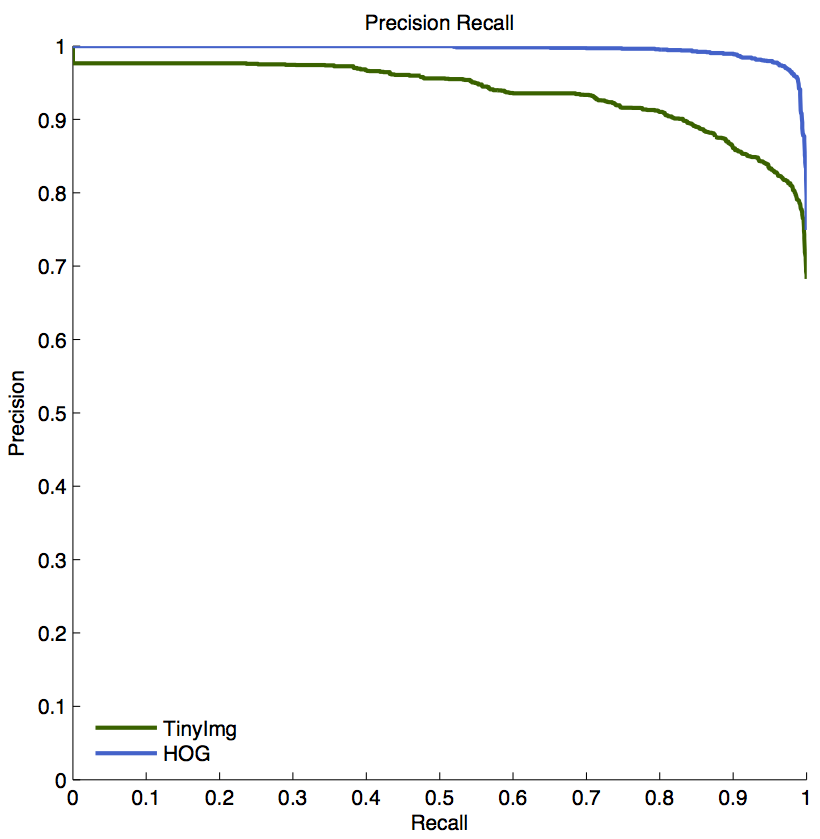
Once we train an SVM classifier, you will test it to measure how well it performs. You will do this by classifing a set of images that were not present in the set of images used for training; this will measure how well the model you trained generalizes to other images of the same class. We provide a second .dataset file with a separate set of images to use for testing. To test your classifier, run the command:
Sliding window detector
So far we have trained and tested the classifier on cropped images. A more realistic use is to run the classifier on an uncropped image, evaluating for every possible location (and potentially scale) wether there is an instance of the object of interests or not. You can do this by runnign the command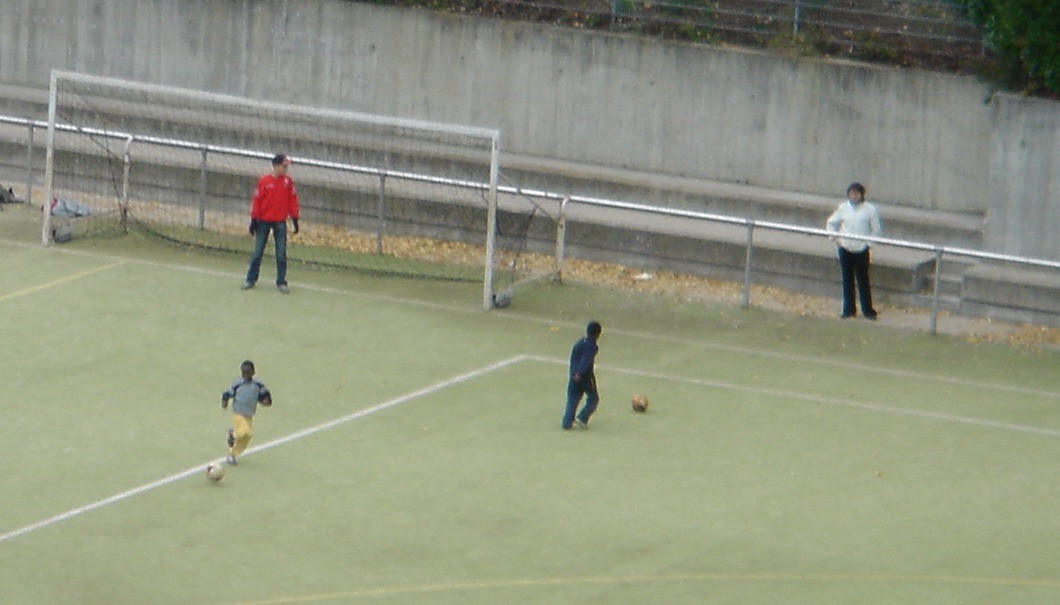

Todo
- Features.cpp
- TODO: TinyImageFeatureExtractor::operator()
- TODO: HOGFeatureExtractor::operator().
The HOG descriptor, as described in class, divides an image region into a set of k x k cells, computes a histogram of gradient orientations for each cell, normalizes each histogram, and then concatenates the histogram for each cell into a single, high-dimensional descriptor vector. Please see the lecture notes and the Dalal and Triggs paper for more information.
- SupportVectorMachine.cpp
- TODO: SVM Train
- TODO: SVM Sliding Window
Turnin
In addition to the code, you'll need to turn in a zipfile with your trained detectors, along with a webpage, as the artifact. Your zipfile should contain the following items:- The .svm files generated for your TinyImg and HOG features, named tinyimg.svm and hog.svm.
- A webpage containing
- The visualizations generated with FEATVIZ of a sample image for both features.
- The visualizations generated with SVMVIZ for both features.
- Precision recall curves computed with the test dataset containing results for TinyImg and HOG features. You can additionally show the PR curve for other variants of the feature descriptors you implement.
- On your webpage you will also include an svm score image with the PREDSL option for both TinyImg and HOG features. You should choose your own input image (one not provided by us) on which to run your sliding window detector.
- Please describe any extra credit items on your webpage.
Extra credit
Here are some ideas of things you can implement for extra credit (some of these are described in the Dalal and Triggs paper):- A better method for normalizing your HOG features
- A way to mine for hard negatives and improve your classifier (see the original paper for an explanation)
- A multi-scale detector
- Non-maxima suppression
- Invent your own crazy feature
Last modified on November 24, 2012