CS412/413
Part I due Friday, March 19
Part II due Monday, April 5
In this programming assignment, you will build a simple code generator for the language Iota. The latest version of the Iota language definition is at www.cs/cs412-sp99/05-iota.htm. Your program will determine whether a source file defines a legal interface or module. We expect you to build upon the code that you wrote for Programming Assignments 1 and 2, and to fix any problems with your lexical analysis, parsing, or semantic analysis that interfere with code generation for correct Iota programs.
Your program will have a main class, Iota.Compiler, that compiles Iota code to assembly code. When invoked from the command line, the compiler will implement at least the following minimal specification: it should expect to receive a single argument that is the name of a source file containing a module specification, with an extension of ".mod". The compiler will parse and type-check the program as in programming assignments 1 and 2. It will then perform the following steps:
".asm" fileWhen invoked on a source code with the command line "jview Iota.Compiler
foo.mod", the compiler will generate an assembly file "foo.asm"
that can be assembled using MASM to produce an object file "foo.obj".
We are supplying an object file "iota.obj" that implements the io
and conv interfaces described in the language definition.
Your compiler must support a number of dump options for debugging purposes:
-dump_ir" option prints to System.out a textual
representation of the (non-canonical) IR of each of the functions in the module.-dump_cir" option prints a representation of the canonical
IR of each function.-dump_aa" option prints the abstract assembly for each
function.You may choose to add additional options not mentioned here as long as they do not interfere with the required functionality. For example, your compiler might accept more than one source file on the command line or support more debugging options than those listed. You may allow multiple dump options to be specified; we require support for only a single dump option on a particular command invocation.
We expect that you will use a tree-based IR similar to the one described in class or the slightly different IR described by Appel. You may choose to add more IR nodes or modify some of the IR nodes; if you do so, you must describe the meaning of these new IR nodes and explain why you added them. We recommend that you carefully design and document all of the IR translation functions and the transformations that you use to convert the IR to canonical form, before coding. Canonical form for the IR must have the properties described in lecture. In other words, all side-effects, including function calls, are moved to top level as statements. All SEQ and ESEQ nodes must be removed as part of this process. Also, conditional jumps must be converted to one-way jumps by basic block reordering and the possible introduction of new jump statements.
You are free to implement this project in any order you see fit. However, we suggest that the first step is to carefully design your IR tree nodes and write the interfaces defining them. This will allow the IR translation and canonicalization phases to be attacked independently.
For IR translation, define an method on AST nodes that creates a corresponding IR node, as discussed in lecture. Write a placeholder method that generates an empty IR node or, even better, a special IR node that can contain the entire AST node that was to be transformed. When dumped, the special IR node uses your existing AST dumping facility. This placeholder method then can be implemented for each of the Iota language constructs in turn, so that you can test IR translation on simple programs and gradually add the functionality for translating all of the AST nodes to IR.
For canonicalization, you can take the same approach. First, attack the problem of bringing side-effecting nodes up to the top level. Elimination of two-way jumps can be worked on as a parallel problem. For the hoisting of side-effecting nodes, define a transformation method for each IR node that reduces it to a sequence of statement nodes plus an expression node in the case of canonicalizing expressions, as described in class. Again, you can use a placeholder method to allow incremental development and testing. The placeholder transformation method simply returns the statement node or expression node it is invoked on. This approach will allow you to test out your canonicalization functionality without having implemented all of the relevant code.
As in programming assignment 2, the printed IR representation should use parentheses to indicate tree structure. The output will be simpler because there is no need to print the types of the various nodes. Binary operation nodes may be indicated using the corresponding symbol. The non-canonical IR for each function will be a single item in the print-out; the canonical IR will be a list of parenthesized items, one for each statement in the canonical IR. For example, the Iota function
f(x: int) = x + g(x)
might be compiled to IR and printed out as follows:
MOVE(RV, MEM(FP + 12) + CALL(NAME(g), MEM(FP+12)))
For compactness, + nodes in the trees are
printed out in infix notation here; CONST nodes
are printed simply as the corresponding constant, and FP
and RV denote the frame pointer and return
value registers, respectively. During canonicalization, the CALL node must be hoisted to
the top of the tree, resulting in the following output if the -dump_cir
option is used:
MOVE(TEMP(t1), CALL(NAME(g), MEM(FP+12)))
MOVE(RV, MEM(FP + 12) + TEMP(t1))
To help you generate reasonable dumps of these IR trees, we are providing a simple
pretty-printing class PrettyPrinter that you may choose to use. The source code for this class is online. If you do not use PrettyPrinter,
you must do at least the minimal pretty-printing necessary to prevent the output from
wrapping excessively. PrettyPrinter automatically introduces newlines to
avoid excessively long lines, while also maintaining indentation levels:
class PrettyPrinter {

      PrettyPrinter(OutputStream o, int width);

          // Create a pretty-printer that formats text
  onto the

          // output stream o while
  keeping the width of the output

          // within width characters if
  possible

      void write(String s);

          // Print the string s on the
  output stream

      void begin(int n);

          // Start a new block with indentation increased

          // by n characters

      void end();

          // Terminate the most recent outstanding begin

      void allowBreak(int n);

          // Allow a newline. Indentation will be
  preserved.

          // If a newline is added, indentation will be

          // increased locally by n.

      void newline(int n);

          // Force a newline. Indentation will be
  preserved.

          // The argument n works as for
  allowBreak.

      void flush();

          // Send out the current batch of text

          // to be formatted, closing all

          // outstanding begin's and
  resetting

          // the indentation level to 0.

  }
In expected use, you will call begin(0) whenever you write a parenthesis
and end() whenever you write its closing parenthesis. allowBreak(0)
is called at every comma and after binary operators. With this usage, the IR expression
above will be formatted as follows with a narrow formatting width, resulting in a more
readable output than simply wrapping lines:
MOVE(TEMP(t1),

       CALL(NAME(g),

            MEM(FP + 12)))

  MOVE(RV, MEM(FP + 12) +

           TEMP(t1))
The example code shows how to achieve this kind of formatting, and others.
Part I of the programming assignment only requires that you reach canonical IR and be
able to output it with the -dump_[c]ir options. For Part II of the
programming assignment, you will take these canonical IR trees and convert them to
assembly code using tiling and the simple stack-frame register allocation scheme described
in lecture. When the example code above is converted to abstract assembly by tiling, the
following code might result:
push [ebp + 12]

  call g

  mov t1, eax

  mov t2, t1

  add t2, [ebp + 12]

  mov eax, t2
After the register allocation (t1 = t2=eax) and
elimination of unnecessary mov instructions, we might obtain the following efficient code:
push [ebp + 12]

  call g

  add eax, [ebp + 12]
However, for this programming assignment you will not make this final step. Instead,
all temporaries will be allocated on the stack. The registers eax and ebx
will be used for all instructions involving temporaries. Before the instruction, one or
both of these registers will be loaded from the appropriate stack location. After the
instruction, if necessary, the stack location will be updated from the corresponding
register. This register allocation strategy is not particularly efficient, but it is
simple and will result in working code. Assigning the temporary t1 to the
location [fp-4], and the temporary t2 to the location [fp-8],
the resulting code will look like the following:
push [ebp + 12]

  call g

  mov [ebp-4], eax        ; mov t1, eax

  mov eax, [fp-4]

  mov [ebp-8], eax        ; mov t2, t1

  mov eax, [ebp-8]

  add eax, [ebp + 12]     ; add t2, [fp + 12]

  mov [ebp-8], eax

  mov eax, [ebp-8]        ; mov eax, t2
Obviously there are many opportunities for even simple-minded optimization in this code, but the goal here is just to generate working code. In addition to temporaries, local variables and function arguments should be allocated on the stack relative to the frame pointer register, as discussed in lecture.
Your compiler will produce assembly files (with an .asm extension) from
correspondingly named files with a .mod extension. You then can use the
assembler to convert these assembly files into object files (.obj files) and
the linker to convert a set of such object files into an executable file (.exe
extension). The assembler and linker are invoked as follows.
To invoke the assembler, the following command line is used for an assembly file foo.asm:
ml /Zd /Zi /c /coff foo.asm
Supposing that this module is the only module in the program, it can be linked as follows:
link /pdb:none /debug foo.obj iota.obj
The object file iota.obj contains the code for the standard modules
io and conv that are defined in the language specification.
We are providing scripts asm.bat and ilink.bat that package up these operations for you, so
that the lines above could be typed simply as
asm foo.asm
ilink foo.obj
The first argument to ilink is the name of the module containing the
program's main function.
Examples of how to compile various Iota constructs are given in a companion handout, Pentium Code Samples. These examples show the extra assembler directives necessary to instruct the assembler to generate 32-bit code, and assembly code for some of the example programs found in the Iota language definition. You can work backward from this assembly code to help figure out what IR to generate for various programming constructs.
You will be generating 32-bit Pentium code, so all variables and registers will take a full 32 bits of storage. Although it would be possible to generate code that stores characters and booleans more compactly, these data types will be stored in 32-bit words as well. All stack locations and dynamically allocated objects will be aligned to 32-bit boundaries: the address of a variable or dynamically allocated object always will be divisible by four.
The object file iota.obj contains the code for the standard modules io
and conv that are defined in the language specification. It also contains
several additional routines that are useful when generating code. These routines are
described in the Pentium Code Samples
handout.
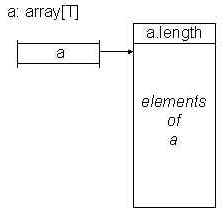
Arrays and strings will be stored in memory in the manner described in class. You to
create new arrays and strings, you will use the newstring and newarray
routines described in the Pentium Code
Samples handout. Note that these routines allocate space to store the length of the
array or string. For both arrays and strings, the array or string variable on the stack,
and the addresses returned by the creation routines, actually are pointers to the 32-bit
word following the length; that is, to the array elements or string characters themselves.
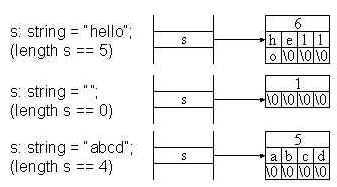
Strings are stored in a packed representation in which every character is placed in a
consecutive byte. The string is always terminated by an extra null character (0), and the
string is also padded out with nulls until it fills out a 32-bit word completely.
The Iota language specification requires that array and strings be bounds-checked. For
this programming assignment, we do not require implementation of bounds checking. However,
you may implement bounds checking if you wish. To implement such a feature, it is
necessary to have a way to halt the program in mid-execution. The procedure iota__abort(
) can be used to accomplish this.
An Iota program may comprise several Iota modules that must be linked together. When you generate code for an Iota module, you will generate assembler PUBLIC directives that expose publicly visible symbols in the Iota program so that the linker can link external references from other modules to these global variables or functions. The public variables and functions in the module are, of course, those declared in the interface file of the module.
Global variables and functions names in Iota are translated to assembler names as
follows. A global identifier I in module M is translated as an
assembler symbol _M__I; that is, two underscore characters are placed after the name of
the module, and one before. For example, if a call is made to a function F in another
module M, the following assembly instruction will be generated to perform the actual call,
even though the Iota program expression will look like F(...) :
call _M__F
These fully-expanded names are used even when the global function or variable is found within the same module as the call itself. This name mangling scheme is chosen for simplicity. Obviously you can create confusion by writing Iota programs in which double underscores appear in the identifiers. A better mangling would avoid this problem but be more complex to implement.
The only exception to this name-mangling strategy is the function main,
which is the first function executed in the program. To allow the run-time system to find
this function, it must be mangled as _iota__main regardless of what module it
occurs in.
The Iota return statement can be converted to IR in a number of ways. We recommend that a return statement be converted to a sequence of two IR statements. The first statement moves the returned expression (if any) into the return-value register (RV), and the second statement jumps to the label of the current function epilogue. This strategy allows the function epilogue to be shared by all possible return paths from the function. Of course, the epilogue must have a label for this to work.
Although this should not be an issue for this programming assignment, the various
general-purpose registers on the Pentium architecture are by convention considered to be
caller-save or callee-save as follows: eax-edx are caller-save, and esi, edi, ebp, esp are
callee-save. This means that a function can freely modify the registers eax-edx, but must
assume that their contents have been destroyed if it in turns calls a function.
Conversely, it may call another function and know that the callee-save registers have not
been modified; however, if it modifies these registers itself, it must restore them to
their original values before returning. Saving callee-save registers is usually done by
adding appropriate push instructions to the function prologue, and
corresponding pop instructions to the function epilogue. Caller-save
registers are usually saved and restored around every function call; before the arguments
are pushed onto the stack, any caller-save registers containing useful data are pushed
onto the stack. After the call, the stack pointer is popped to remove the arguments, and
the caller-save registers are then restored by popping them from the stack.