
A13: Parallel Raycasting
This assignment (A13) is due on May 5, 2025 at 11:59 PM. Late submissions will not be accepted.
Instructions:
Remember, all assignments in CS 3410 are individual.
You must submit work that is 100% your own.
Remember to ask for help from the CS 3410 staff in office hours or on Ed!
If you discuss the assignment with anyone else, be careful not to share your actual work, and include an acknowledgment of the discussion in a collaboration.txt file along with your submission.
The assignment is due via Gradescope at 11:59pm on the due date indicated on the schedule.
Submission Requirements
Submit these files to Gradescope:
raycaster.c, with your implementations for 3 functions:raycast_sequential, a sequential implementation of the 2D raycasting algorithm.raycast_parallel_lights, a version that parallelizes the algorithm by light source.raycast_parallel_columns, which parallelizes the algorithm by image column.
test_raycaster.c, with some tests for your implementations- Optionally,
images.zipwith the additional images to go along with those tests, if they use any. raycast_writeup.pdf, a report describing the results of some performance experiments.
Provided Files
You will find these files in your GitHub repository:
raycaster.handraycaster.c, which include function definitions for you to implement. It is OK to add helper functions here.test_raycaster.c, which includes some tests ofraycaster.c. You will extend these tests.main.c, a basic entry point that runs your raycaster on an input image and produces an output image file. This can be useful as a simple test so you can see visually what your implementation is producing.timing.c, which includes amainfunction that can time your implementations of raycasting. You can modify this file—in particular, consider changing the constants at the top—but you will not turn it in.raycaster_util.handraycaster_util.c, which include critical helper functions for the raycaster. Use these functions in your implementation! Resist the urge to re-implement any of this functionality—these math routines can be subtle to get exactly right, so using this provided code will help your code behave predictably and pass the tests. (There is also atest_raycaster_util.cprogram, which you do not need to modify.)image.handimage.c, which provide utilities to manipulate raw image files. Only pay attention toimage.hto understand how to use these utilities; you shouldn’t need to look at the implementation. (We also includestb_image_write.handstb_image.h, from a public-domain set of C utilities).
Getting Started
To get started, obtain the release code by cloning your assignment repository from GitHub:
$ git clone git@github.coecis.cornell.edu:cs3410-2025sp-student/<NETID>_raycast.git
Replace <NETID> with your NetID. All the letters in your NetID should be in lowercase.
Overview
Raycasting is a technique for rendering 2D and 3D graphics. Among many other uses, raycasting was the underlying technique that early 3D video games used to produce 3D scenes from 2D level maps. If you’ve ever played an old 3D game where you can move around but you can’t look up or down, it may have used raycasting.
One of the cool things about raycasting is that it is amenable to parallel implementation. Parallelizing the algorithm can be critical for getting it to render images quickly enough for real-time interaction.
Your task in this assignment is to implement the original sequential algorithm and then parallelize it to make it go faster. You will try two different parallelism strategies, measure their differences in performance, and report on your observations.
Background
To render an image, computer graphics techniques start with some data about the scene: light sources, the camera or viewpoint, objects in space. The general category of ray tracing algorithms works by imagining many rays projected in straight lines outward from the camera or from lights. You can then find the first object that each ray “hits” to determine what should be visible or illuminated along that ray.
In this assignment, we will trace rays emitted from light sources. Think of following the path of imaginary photons as they leave the light in all directions. For every light source and every other point in the scene, the light illuminates the point if there are no solid obstacles in between. Here’s a diagram showing the idea:
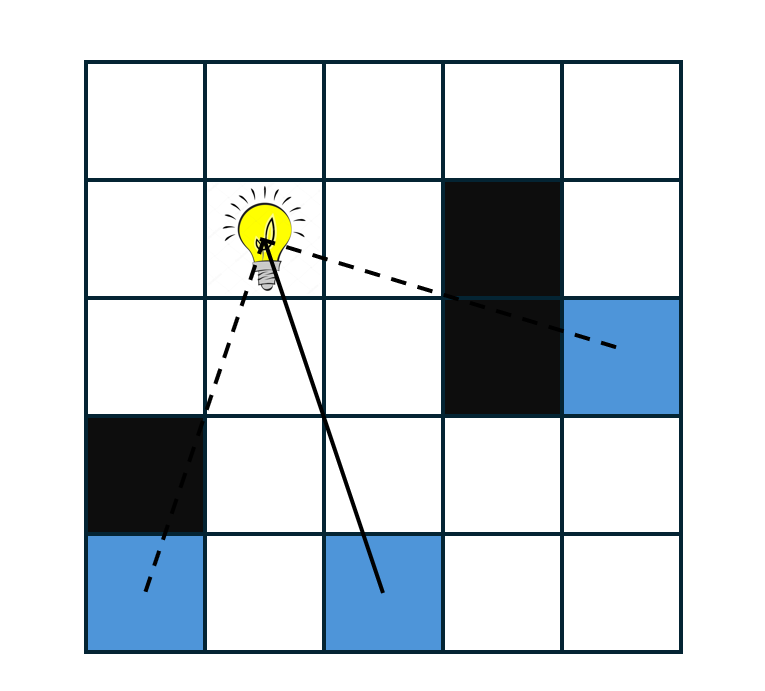
This diagram shows a grid of pixels, one of which has a light source. We have also highlighted three other pixels. Only one (the one with the solid ray) is illuminated; the other rays are occluded by objects in the scene.
In this assignment, we will implement an algorithm to compute the illumination of every point in a scene. We will only consider direct rays: so no reflections or other effects that would require simulating how light “bounces” off of objects.
The effect will look something like this:
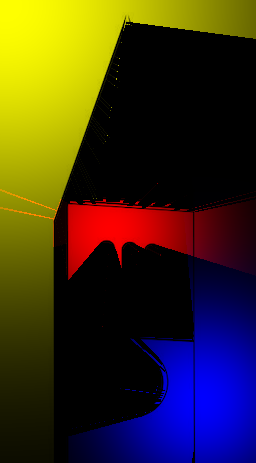
The left image is the input scene, where dark pixels are solid obstacles. The right image shows the result of lighting the scene with three lights of different colors in different positions. The light “passes through” lighter-colored pixels and stops at the obstacles.
Images
A raster image is a 2D array of pixels, each of which has a color. An extremely common way to represent colors is with three 8-bit integers for the red, green, and blue components.
See the image.h file for definitions of the Color and Image structs that reflect this strategy.
The Image struct is a wrapper around a row-major array of Colors.
We have also provided utilities to read and write images in the ubiquitous PNG format.
Illumination
Your work on this assignment will add lighting effects to raster images. The main task is to compute the illumination for every pixel in the image: how much the pixel is lit by the light sources in the scene.
For an unobstructed pixel (i.e., there is not a solid object between the pixel and the light source), here is a formula for the illumination of that pixel by that one light:
\[ \text{illumination} = (\text{light color}) \times e^{\frac{-(\text{distance to light})^2 }{ \text{light strength}}} \]
This formula makes illumination decay with distance.
The color and strength are intrinsic properties of the light source.
(The raycaster_util.h header defines a Light struct with these fields.)
Multiplying a color by a number scales its intensity by multiplying the red, green, and blue components by the same amount.
We have provided an implementation of this function as the illuminate function in raycaster_util.c.
Remember that this illumination formula is only relevant when there is no occlusion (no obstacle between the light and the given pixel).
A single pixel may be illuminated by multiple light sources.
Use the add_colors function from image.h to combine the illumination from multiple lights.
The Input Scene
In general, there are many ways to specify the scene data for a renderer. In our setup, the scene comes as an image, where light pixels represent free space and dark pixels are solid obstacles. Specifically, a pixel is a solid obstacle if:
\[ \text{red} + \text{green} + \text{blue} \lt 10 \]
We have provided an implementation of this formula as is_obstacle in raycaster_util.h.
Casting Rays
The core of the algorithm is the occlusion check: for a given destination pixel and a given light, check every pixel on a line segment between the destination and the light for a solid obstacle.
The idea is to iteratively move along this line segment by some distance, one step at a time:
\[ \text{next pixel} = \text{current pixel} + \text{direction} \times \text{distance} \]
This strategy requires the direction (i.e., angle) from the destination pixel and the light source. Let the destination pixel be \((i, j)\) and let the light be at \((x, y)\). Recalling our trigonometry classes, we can calculate the direction as:
\[ \text{direction} = \text{atan}\left(\frac{y - j}{x - i}\right) \]
We have provided an implementation of this formula as direction_pair in raycaster_util.h.
This step-by-step strategy also requires a distance.
We want to step in the calculated direction just far enough to reach the next pixel.
We have implemented the distance calculation in a function called step (also in raycaster_util.h), which moves from an input pixel in a given direction to a neighboring pixel.
To trace a ray, iteratively call step to test every pixel on the line segment between the light and the destination pixel.
The light-source pixel itself is always illuminated.
Pixels containing solid objects are never illuminated.
Task 0: Sequential vs. Parallel Summation
View the lab slides here.
In lab, you get hands-on practice using pthreads by writing a sequential and parallel implementation of a function which sums an array in integers. You’ll then run some experiments to compare the performance of your implementations.
A program skeleton has been provided for you in lab.c.
Part 0: Sequential Sum
First, write a control implementation which simply computes the sum of an array sequentially.
Replace the // TODO: Part 0 ... with your implementation.
You can compile your program using the command rv make lab. You can then run
the program like any other in this class using rv qemu lab. By defualt, the
program will print out what sequential_sum and parallel_sum are as well as
how long each of your implementations took to run. This will be especially
helpful in Part 2.
Part 1: Parallel Sum
Next, use pthreads to compute the sum of the array arr by spawning N_THREADS threads.
Each thread should work on separate chunk of the array.
Your implementation should be balanced, meaning that all threads have approximately the same amount of work to do.
Refer to the lecture notes on parallel programming and the lab slides for information about the pthread API.
Part 2: Performance Experiments
Once you have both implementations, run the program several times while varying N_THREADS.
How does is the performance impacted when you increase the number of threads to 10? 100? 1000?
Do these results align with your expectations? Why or why not? What factors might explain these results?
Task 1: Sequential Raycast Implementation
Your first task is to implement the 2D raycasting algorithm described above.
Implement the raycast_sequential function in raycaster.c:
Image* raycast_sequential(Image* scene, Light* lights, int light_count);
This function takes in an input image that describes the scene and an array of light sources. It produces a rendered image of the same size.
For every pixel \((i, j)\) in the image, compute the illumination of that pixel for every light. Remember to handle occlusion, i.e., do not include contributions from lights that have a solid obstacle “in the way.”
Let the original color of a given pixel in image be called orig.
Call the combined illumination color, across all lights, illum.
The final output color of that pixel in image should be mul_colors(illum, orig).
(The mul_colors function in image.h performs a normalized multiplication in each of the red, green, and blue channels.)
The result is an image that looks like the original but colors the “empty space” according to the illumination at that point.
Some Useful Functions
Please look through raycaster_util.h and image.h for many functions you can use to implement your algorithm.
Here are some particularly important ones, most of which we have already alluded to above:
Color illuminate(Light light, int x, int y)calculates our equation for illumination for a single point at a single non-occluded point.int is_obstacle(Color color)decides whether a given pixel is a solid obstacle.int adjacent_pixels(PixelLocation pixel1, PixelLocation pixel2)determines whether two given pixels are adjacent to each other.Pair direction_pair(PixelLocation start, PixelLocation end)finds the direction (angle) between two points.PixelLocation step(Pair* pos, Pair direction)moves a pixel position by one pixel in the given direction, which is useful for tracing the line segment representing each light ray. The in/out parameterposis a floating-point position that can represent fractional coordinates; it is mutated to reflect the new location. See the documentation comment inraycaster_util.hfor more details.Color add_colors(Color color1, Color color2)adds two color values together, for combining the effects of multiple lights.Color mul_colors(Color color1, Color color2)multiplies two colors, for applying the illumination color to the original pixel.Image* new_image(int width, int height)allocates a new, empty image. Use this to create the output image for all your raycaster implementations.Color* image_pixel(Image* image, int x, int y)gets a pointer to one pixel in an image at the given coordinates. This is just a one-liner that does the row-major index math (which some might prefer to write themselves).
Running and Testing
For a quick-and-dirty smoke test, use main.c.
This program uses a hard-coded input image and light arrangement;
you should experiment with different images and lights by manually modifying main.c.
Use rv make raycaster to produce the raycaster executable.
Running this executable produces raycast.png, which you can open in any image viewer.
We have also provided a more systematic testing framework in test_raycaster.c.
Use rv make test_raycaster to build a test_raycaster executable.
This tool uses inputs from your images/ directory and compares the results against reference outputs in images/test_references/.
It also saves the actual output images from your raycaster in images/sequential_results/ so you can inspect them visually if you like.
Expand the Test Suite
You must add at least 5 new tests to the test suite in test_raycaster.c.
For the sequential implementation, this means adding new input image files (scenes) and corresponding lines in test_raycast_sequential, possibly with different light positions.
Here are some ideas for kinds of tests you might add:
- Very small images that act as “unit tests” for specific edge cases.
- Different light positions for the existing images in the
images/directory. - New input scenes that you draw yourself using an image editor.
Make sure your implementation passes the given tests and your own new tests. It is important to be confident that your sequential implementation is correct before moving on to the parallel versions.
If you add new image files to go with your tests, you can optionally turn these in alongside your test code.
Task 2: Light-Parallel Raycast Implementation
In this and the next task, you will implement parallel versions of the raycaster. The first strategy uses parallelism over the light sources. The insight is that it is possible to independently compute the illumination due to each light. So we can use multiple threads to process subsets of the lights. The threads will then need to somehow coordinate to combine the contributions from separate lights and to produce the final image.
Complete this function in raycaster.c:
Image* raycast_parallel_lights(Image* scene, Light* lights, int light_count, int max_threads);
Your implementation may use up to max_threads parallel threads.
If there are fewer lights than max_threads, then you can use light_count threads (with one light per thread).
If there are more lights than max_threads, then each thread will have to process more than one light.
Use the pthreads library for all your thread creation, management, and synchronization needs.
Some useful functions include: pthread_create, pthread_join, pthread_mutex_lock' and 'pthread_mutex_unlock. Refer to lab 13 for background on how to use these functions and threads in general.
The exact strategy for how to distribute work among threads and when to synchronize is up to you.
But be sure to unsynchronize accesses to shared data:
if two different threads might write the same variable, for example, use some pthreads synchronization construct to enforce exclusive access.
This parallel function, as well as the following one in Task 3, can be correctly implemented either with or without a mutex. Consider how the order of logic in these two functions may differ based on your implementation choice.
Test your implementation with test_raycaster.c.
Your parallel implementation should produce the same results as your sequential implementation.
Task 3: Column-Parallel Raycast Implementation
Next, we will use a different strategy to parallelize the same work. The idea is to parallelize the computation for different parts of the image. Namely, we will divide the columns (\(x\)-coordinates) of pixels among threads.
Implement this function in raycaster.c:
Image* raycast_parallel_columns(Image* scene, Light* lights, int light_count, int max_threads);
Again, the max_threads parameter describes how many threads your implementation can use.
You must divide the image’s columns among max_threads threads (unless the height is less than max_threads, in which case you will have one thread per column).
And once again, test your work using test_raycaster.c to ensure that your new implementation matches your sequential implementation.
Task 4: Performance Analysis
Your final task is to measure and compare the performance of your three implementations. There are many factors that can influence which raycaster implementation is fastest:
- The size of the image.
- The number of lights.
- The fraction of pixels containing solid obstacles.
- The number of threads. (Of course, only the parallel implementations support more than one thread.)
Conduct performance measurements to understand how your implementations’ running time changes as these parameters vary. You will examine how the number of threads along with two other parameters chosen from the above list affect performance (i.e. you have a total of 3 parameters to examine). For each of the 3 parameters, select at least 3 different values.
Compare the running time of your three implementations on each of these 3 different values.
For each of the three parameters (number of light threads, and two others), produce a single overlapping plot comparing the 3 implementations (sequential, parallel lights, and parallel columns) over your different values. You will have a total of 3 plots.
For example, if you choose the two other parameters to be image size and light count, you would have a plot comparing the implementations’ performance on at least 3 image sizes, a plot comparing performance with at least 3 light counts, and the required plot with performance for at least 3 thread counts.
Write a short report consisting of these sections:
- Implementation: A brief summary of your implementation strategies for the three styles.
- Experimental setup: What parameters did you choose, and why?
- Results: Three plots examining the impact of the parameters you chose above. (And any other data collect that you think is helpful.)
- Analysis: Attempt to explain what the results mean and why they look the way they do.
Submit your report as a PDF named raycast_writeup.pdf.
There is no minimum length, but please keep it to 3 pages or fewer.
Collecting Timing Data
It will be a good use of your time to partially or completely automate the data collection process. The strategy is up to you.
To help you get started, we have provided a basic data-collection program timing.c that you can adapt to your needs.
Modify this as much as you like; you will not turn it in.
You can start by changing the constants at the top of the file:
FILENAME (the input image),
LIGHT_NUMBER (the program generates lights in a grid pattern),
ITERATIONS (how many times to repeat the raycasting execution to measure an average execution time), and
THREAD_COUNT.
The current program only measures one parameter configuration at a time; you might consider extending it to try multiple configurations in a single run.
Use rv make timing to build the timing executable from timing.c.
Submission
On Gradescope, submit raycaster.c, test_raycaster.c (with your 5 additional tests), and raycast_writeup.pdf.
Rubric
- Implementation: 60 points
raycast_sequential: 20raycast_parallel_lights: 20raycast_parallel_columns: 20
- Performance Analysis: 20 points
- Additional Tests: 10 points