Assignment 6: Pac-Mann
Tired of wandering his usual haunted halls in search of the same five fruits, Pac-Man has ventured to the hills of Ithaca to pursue a degree in Horticulture at Cornell. Unfortunately, he was not alone on his journey; his four ghostly adversaries Blinky, Pinky, Inky, and Clyde are hot on his trail. Will Pac-Man (who goes by Pac-Mann now in honor of his favorite study spot) have the skills to evade the ghosts in this unfamiliar, hilly terrain?
In this final assignment, you’ll build a variation of the classic Pac-Man game, which will provide many opportunities to practice graph traversals and GUI programming. While we have provided you with most of the base code to set up the game View, you will be responsible for designing a large portion of the game’s Model and Controller and stitching these pieces together into a cohesive application. The latter portion of the of the assignment focuses on programming the four ghosts, whose unique chasing behaviors work in synergy to trap and capture Pac-Mann.
Learning objectives
- Navigate and modify a large codebase containing over 3000 lines of code across over 20 files.
- Create and interact with object-oriented graph representations.
- Write event-driven code involving multiple types of event listeners.
- Implement a decreasing-key priority queue data structure.
- Implement a variant of Dijkstra’s shortest path algorithm.
- Leverage object-oriented features such as abstract classes, inheritance, and polymorphism to minimize redundant code.
Recommended timeline
- Day 1: Graph construction Carefully read through the assignment handout and skim all of the provided code. Sketch out the responsibilities of the different classes in the final GUI application. Write the code that constructs the game’s maze graph from an array of tiles. Verify that your graph construction works through unit testing and View testing.
- Day 2: PacMann control Add a PacMann character to the game who is controlled by the keyboard and who scores points by eating dots.
- Day 3: Pathfinding Implement a priority queue and a variation of Dijkstra’s algorithm (these will power the ghosts’ AI). Write thorough unit tests.
- Day 4: Ghosts Add the four ghost subclasses, implementing each ghost’s unique personality. At this point, you will have a fully working application that you can play-test
- Day 5: End-game dialogs, PacMann AI (Challenge Extension) Add pop-up dialogs when the game is lost or won.
Then, if time allows, write a
PacMannAIsubclass that uses the current state of the game model to determine the best edge for PacMann to take. Watch your AI play the game and tinker with it to get the highest score you can to claim your place on the class leaderboard.
Assignment overview
By the end of the assignment, you will build a fully-featured implementation of the classic Pac-Man game. If you choose to complete the challenge extension, you will also write an AI that will allow PacMann to navigate around the game without user inputs.
The rules of Pac-Man
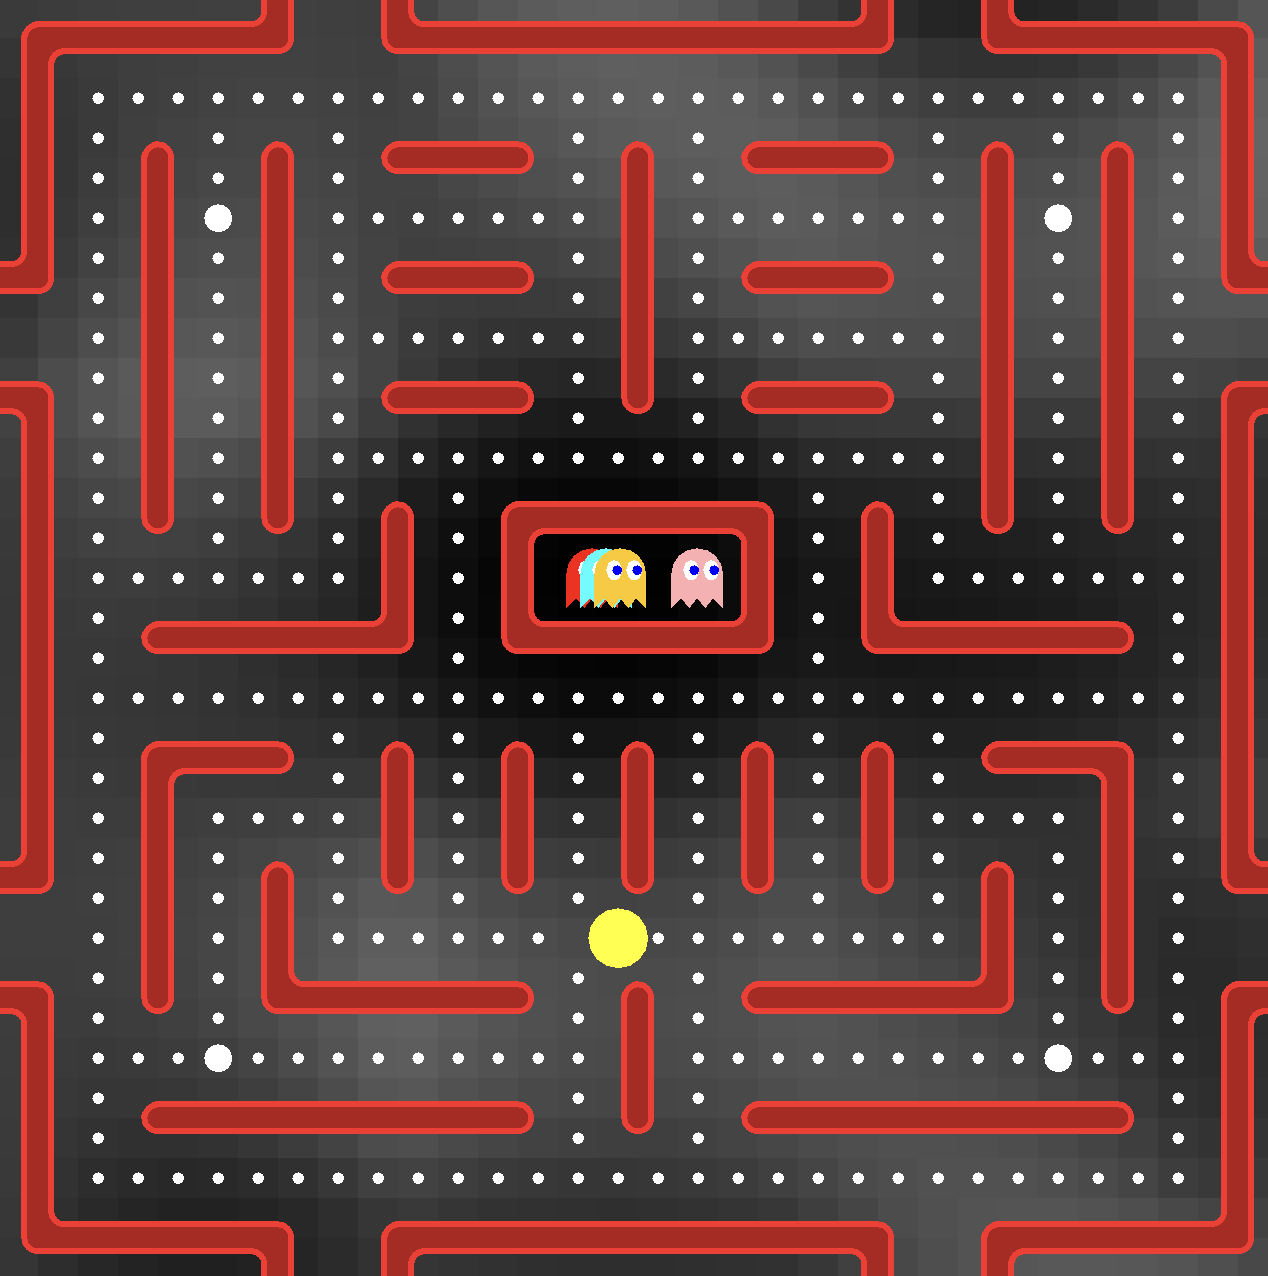
The game Pac-Man takes place on a 2-dimensional grid of tiles, which form a maze. Each of the tiles is a “path” tile (visualized in black/gray) or a “wall” tile (visualized as contributing to a red wall). There are gaps in the exterior walls of the board which act like tunnels that directly connect to the other size of the board (a mathematician would say that the board has “toroidal topology”).
The player is in control of the yellow Pac-Man character and uses the arrow keys to dictate the direction of Pac-Man as he navigates the board. At the start of the game, there is a “dot” on most of the path tiles. When Pac-Man arrives on a path tile, he “chomps” the dot that it contains and scores some points. The goal of the game is for Pac-Man to clear the board by chomping all of the dots.
Unfortunately, Pac-Man has enemies: the four colored ghosts waiting in the central box. After a few seconds, the ghosts exit this box one at a time into the maze and begin to chase after Pac-Man, each adopting their own strategy in this chase. If the ghosts collide with Pac-Man, it ends that round and the player loses one life (the game ends after three lives).
At the corners of the board (and in additional positions on larger boards) there are larger dots called pellets. When PacMan eats one of the pellets, the roles reverse. For a period of time, the ghosts all turn blue and try to run away from Pac-Man. If Pac-Man collides with the ghosts during this period, the player scores many points and the ghost is sent back to the central box and must wait a few seconds before returning to the maze.
The game is won when the final dot or pellet is removed from the board.
Adding elevation
There is one major addition that we have made to Pac-Mann in our implementation. Notice that in the above figure that the path tiles have different background colors, ranging from gray to black. This is a visual representation of the elevations of the tiles, where darker tiles have lower elevations. Elevation affects the game by changing the speed that the actors (PacMann and the ghosts) can travel between neighboring tiles. Traveling uphill is slower, and traveling downhill is faster. The speed depends on the steepness (i.e., elevation difference) between the tiles. This addition is meant to model traveling across the hilly terrain of Ithaca. It must also be accounted for in the path planning of the ghosts and of the PacMann AI.
Assignment flow
We have divided the assignment into a series of tasks which each add a layer of visible functionality to the game. The game should compile and show throughout, which will allow you to track the progress that you are making. Since GUI applications involve the integration of many different code classes (representing various aspects of the model, view, and controller), incremental building and thorough testing will be important. While unit testing will suffice for much of the game’s model, you will also need to rely on play testing to confirm that pieces of the view and the controller are working as intended.
At a high level, the main assignment proceeds in three primary phases.
- Construct a directed graph representation of the game’s maze. This will be the principle component of the game’s model, as it will be used to track the movement of the actors.
- Add the PacMann character to the game. While we have provided you with the code that paints PacMann in the correct position in each game frame, you will be responsible for incorporating PacMann into the model (by encoding how PacMann affects the board state and score as he reaches certain path tiles) and the controller (by allowing the player to control the direction of PacMann using the arrow keys).
- Add the ghosts to the game. The navigation of the ghosts through the maze is determined using shortest path computations. You’ll need to add back-end support for this by implementing a priority queue data structure and a variant of Dijkstra’s algorithm. This code will allow you to write relatively compact descriptions of the ghost’s unique navigation behaviors.
The fourth, open-ended phase of the assignment (an optional challenge extension) asks you to create a PacMann AI that will automatically navigate around the maze, eat dots, avoid ghosts (and chase them down when they are scared), and try to earn the highest score possible. A class leaderboard will allow you to compare the performance of your AI against those of other students.
As usual, you should complete the assignment’s TODOs one at a time, in order. These tasks are explained in greater detail below.
Navigating the assignment files
As is the case with many GUI applications, there are a lot of files in this assignment split across multiple packages. We’ll provide an overview of the provided files here, but we encourage you to read through them for more details.
- The
uipackage includes the two runnable applications, many component classes, and the main controller class.- ui/GraphicalApp.java is what you will use for end-to-end testing throughout most the assignment, as this is the file that creates and shows the main application window. Note that it accepts several program arguments to customize your gaming experience.
- If you complete the challenge extension, ui/BatchApp.java can be used to run a suite of non-interactive games of PacMann and obtain a summary of your AI’s performance. By running with asserts enabled, this is also a good way to find “corner case” bugs.
- ui/GameFrame.java is the custom
JFramesubclass for our PacMann application. - ui/ScoreLabel.java and model/PlayPauseButton.java contain two custom Swing widgets that are added to the
GameFrame. - ui/GameBoard.java is a custom Swing component that is responsible for redrawing the game every time that the model updates. The board view principally consists of a grid of
Tileobjects (see ui/Tile.java), which encapsulate logic for properly rendering different parts of the maze. - ui/InteractiveController.java includes code for handling events in the GUI mode of the game, particularly key presses (for PacMann’s navigation) and periodic timer events (to redraw the view each frame).
- The
utilpackage includes some utility classes for the application. You should not modify these classes, and the only one you need to understand isGameMap.- util/MazeGenerator.java and util/ElevationGenerator.java are used to randomly generate a “blueprint” for the game’s maze that is used to create the view and the
MazeGraphin the model. The 2-dimensional arrays that comprise this “blueprint” are packaged into a record class in util/GameMap.java - util/Randomness.java allows us to create reproducible randomess through “seeds” that are derived from components’ names, which offers consistency for debugging and testing.
- util/MazeGenerator.java and util/ElevationGenerator.java are used to randomly generate a “blueprint” for the game’s maze that is used to create the view and the
- The
graphpackage includes some general-purpose code for modeling graphs and graph operations.- In graph/MinPQueue.java, you will complete an implementation of a priority queue, which will be used in an implementation of Dijkstra’s algorithm that you will write in graph/Pathfinding.java
- graph/Vertex.java and graph/Edge.java define interfaces for vertices and edges of a graph.
- Finally, the
modelpackage includes classes that define the PacMann game model.- model/GameModel.java is the main model class that keeps track of the overall state of the game (time, lives, score, etc.), its actors (ghosts and PacMann), the game maze graph, and the items (dots and pellets). It also implements the core game rules. This is a large and important file (fortunately, you can ignore the bottom third of it, which is dedicated to detecting collisions).
- graph/MazeGraph.java specializes the general graph interfaces from the
graphpackage to model the paths in a PacMann maze. - The abstract
Actorclass in model/Actor.java is the base class of the game’s actors (PacMann and the ghosts). It is inherited by the abstractPacMannandGhostclasses, which you will extend to model the unique behaviors of each actor.
Some Java features used in this assignment
While most of the assignment is built using the same Java language features that you have seen all semester, there are some additional constructs that are too convenient to not take advantage of in a large program like this:
Record classes
We first introduced these in A5, and we make heavy use of them here. Record classes are a convenient way to define immutable classes that aggregate data in fields. They are defined using a special syntax replacing the word class in the declaration with the word record and additionally supplying a parameter list as you would for a constructor. For example,
public record Location(Edge edge, double progress) { ... }
in the Actor class. Because of their rigid requirements (in particular, immutability), record classes provide many methods automatically, including the constructor, accessor methods for each of the fields (with the same names as the parameters from the record declaration), equals, hashCode, and toString. For more information, see Java language updates.
Enumerated types
Enumerated types (or “enums”) are a principled way to model types that have a finite (and small) number of possible values. The syntax for an enum is
public enum Direction {LEFT, RIGHT, UP, DOWN}
using the enum keyword, followed by the name of the enum type, followed by a comma-separated list of all possible values (conventionally written in all uppercase) in curly braces.
Variables can have an enum type, and the values are expressed using syntax such as Direction.UP (for example, Direction dir = Direction.UP).
Importantly, even though enum values are objects, they are guaranteed to be singletons, so it is okay to compare them with ==.
For more information, see the Java Tutorial.
Switch expressions
Switch expressions are a concise way to run different code based on the value of a variable, similar to a chain of if/else statements.
They are a natural choice when a variable can only have a small number of possible values (like an enum).
And since they are expressions rather than statements, they evaluate to a value.
For example, the return statement in the method Actor.getBoundingBoxUL() is
return switch (currentEdge.direction()) {
    case Direction.LEFT -> new DPair(x - distanceAlongEdge, y);
    case Direction.RIGHT -> new DPair(x + distanceAlongEdge, y);
    case Direction.UP -> new DPair(x, y - distanceAlongEdge);
    case Direction.DOWN -> new DPair(x, y + distanceAlongEdge);
};
which constructs and returns a different DPair object (another record class!) depending on which of the four values currentEdge.direction() (an expression with an enum type!) has. We prefer the “switch expression” notation (with the ->s) since it is more streamlined than the clunkier C-style “switch statement” notation (with lots of colons and breaks). For more information, see Java language updates.
With all that preliminary information out of the way, we’re finally ready to begin the assignment!
Part 1: Graph Construction
- Files to modify
- model/MazeGraph.java
- Other relevant files
- model/GameModel.java, util/GameMap.java
- Tests
- tests/model/MazeGraphTest.java
Complete the constructor for the MazeGraph class (TODO 1).
This constructor takes in a GameMap object, which consists of two 2-dimensional arrays representing a game’s tile grid.
The first, map.types(), is a TileType[][], where a TileType is either a WALL, a PATH, or a GHOSTBOX.
Since the actors can only traverse the PATH tiles of the maze, there will be a vertex in a MazeGraph corresponding to each location $(i,j)$ with map.types()[i][j] == TileType.PATH, and no others.
The second, map.elevations(), is a double[][] representing the height of each tile, which will determine edge weights in the graph.
Note that the coordinates used on the tile grid are a bit atypical. The pair $(i,j)$ refers to the tile in column $i$ and row $j$. So $i$ corresponds to the horizontal direction (right positive), and $j$ corresponds to the vertical direction (down positive). (This is not the usual convention for 2D arrays in Java, but as long as we’re consistent within the assignment, it’ll all work out.)
Connectivity-wise, there is a directed edge between each (ordered) pair of orthogonally adjacent tiles; that is, tiles in locations $(i_1,j_1)$ and $(i_2,j_2)$ with either:
- $i_1 = i_2$ (same column) and $|j_1 - j_2| = 1$ (above/below) or $|j_1 - j_2| = \textrm{height} -1$ (tunneling between top and bottom)
- $j_1 = j_2$ (same row) and $|i_1 - i_2| = 1$ (left/right) or $|i_1 - i_2| = \textrm{width} -1$ (tunneling between right and left sides)
The weight of the edge is determined using the MazeGraph.edgeWeight() method.
Intuitively, an edge with a lower source and a higher destination has a steeper incline, which will result in a larger weight, which will in turn cause the actors to traverse it slower.
Within the constructor, you will need to systematically locate all of the PATH tiles in the graph to construct the vertices and add all of their incident edges.
One approach for this is to carry out a BFS or DFS-style traversal from a starting vertex, using the coordinates of a vertex to compute its neighboring tiles’ locations, querying whether they are also PATH files, and then constructing corresponding vertices and edges.
An alternative strategy is to iterate over the tile grid directly; either approach will work.
In case it is helpful, you are guaranteed that map.types()[2][2] is a PATH tile, and that all of the PATH tiles form a single connected component (that is, you can reach any PATH tile from any other PATH tile by taking orthogonal steps to intermediate PATH tiles).
There are a lot of details to get right here, so testing is essential. Complete the testing task (TODOs 2a-d) in tests/model/MazeGraphTest.java, which has you fill in the body of three test cases to match their DisplayNames and write some additional tests of your own. As an additional form of verification, you can check that your constructor has located the vertices by running ui/GraphicalApp.java. You should see that dots have been added to all of the path tiles on the board except for the tunnel tiles. Four tiles toward the corners of the board should display larger pellets.
Part 2: PacMann
- Files to modify
- ui/InteractiveGameController.java, model/GameModel.java
- Files to create
- model/PacMannManual.java
- Tests
- Play testing using ui/GraphicalApp.java
- Other relevant files
- model/PacMann.java, model/Actor.java
In this part of the assignment, you will add the PacMann character to the game that will navigate based on the player’s key presses. PacMann is one of the game’s “actors”, so we can
start to understand how he is modeled by looking at the Actor abstract class. You’ll see that
most of this class is devoted to modeling the actor’s location. Primarily, this is done through a Location class, which keeps track of the current Edge that this actor is traversing, along with their progress along that edge. From this information, we can derive the nearestVertex() to the actor, which will be useful for defining the ghost’s navigation behavior below.
Additional methods relate to to drawing actors and simulating their motion, but these are not relevant to your tasks.
The Actor class delegates the implementation of five abstract methods to its subclasses:
baseSpeed(), nextEdge(), guidancePath(), visitVertex(), and reset().
Subclasses may also override its default implementation of other methods if required.
The Actor class is refined by the PacMann abstract class, which defines four of these abstract methods. Most notably, when PacMann visits a vertex, he calls the processPacMannArrival() method of the model to update its state. Open up this method in GameModel. You’ll see that right now, all it does is initialize a variable to PacMann’s nearestVertex(). Complete the specification of this method according to the comment (TODO 3). You’ll want to read through the other methods of the GameModel class to see which ones will be appropriate to call.
The only method that remains abstract in the PacMann class is nextEdge(). Since we are writing a PacMann class that will respond to user commands, we will need a place to keep track of these as they arrive.
Since not all PacMann implementations are meant to be controlled interactively (see challenge extension), we’ll save this command in GameModel, where actors can query it if they wish.
Add (and document) a field to GameModel that will store the most recent Direction command that was entered by the user (TODO 4). In addition, create a playerCommand() accessor and an updatePlayerCommand() mutator method that will allow other classes to interact with this field.
Next, let’s have PacMann make use of this new field. We’ll do this by creating a new subclass of the PacMann class called PacMannManual (TODO 5). Place this class in a file model/PacMannManual.java. This class should have one constructor that takes in one argument, a GameModel. In this class, define nextEdge() with the following behavior:
- Check if there is an edge from PacMann’s nearest vertex in the direction of the most recent player command.
- If there is, return that edge.
- If there is not, check if there is an edge from PacMann’s nearest vertex in the same direction that he was just traveling.
- If there is, return that edge.
- If there is not, return
null, which will signify that PacMann should not advance to a new edge.
We are left to write code to listen for player key presses. We do this with a KeyListener, an interface that is implemented by the InteractiveGameController. Note that the controller is registered as an listener of the GameBoard, which maintains focus throughout the application. This ensures that the KeyEvents will be dispatched appropriately. The KeyListener interface has three methods: keyTyped(), keyReleased(), and keyPressed(). We will only need to take action in keyPressed(). Implement this method according to its specification (TODO 6).
Tip: The Swing Tutorial has a very helpful section on KeyListener.
Once you have completed these TODOs successfully, uncomment the line actors.add(new PacMannManual(this)); in the GameModel constructor and rerun the GraphicalApp. You should see PacMann character drawn on the GameBoard, in the center around three quarters of the way down. Starting the game (either with the button, or by pressing one of the keys your controller is now listening for) should set PacMann moving, and you should be able to control his motion with the arrow keys. As PacMann moves, he should eat the dots that he travels over (meaning that they should permanently disappear from the board), and this should cause the score to increase.
Part 3: Ghosts
In the next part of the assignment, you will add the four ghosts to the game. Ghosts are a second type of actor in the game, so the Ghost abstract class extends the Actor abstract class. Just like PacMann, they inherit fields and behaviors for tracking and updating their location on the maze graph from Actor. However, the four ghosts have additional common behaviors that can be defined in this new abstraction layer.
Primarily, the ghosts all exist in one of three different states (defined in the GhostState enum type): WAIT, CHASE, and FLEE.
- Ghosts are in their
WAITstate when they are in the central box. They are not actively navigating the maze, but instead float from side to side in the box waiting to enter. When in theWAITstate, the fieldwaitTimeRemainingrepresents the number of milliseconds before this ghost can enter the maze and transition into itsCHASEstate. TheGhostconstructor takes in aninitialDelay, the length of time (in milliseconds) before the ghost enters the maze at the start of each game life. Since the central box is not accessible to PacMann, there cannot be any collisions in theWAITstate. - Ghosts spend most of their time in the
CHASEstate, in which they are trying to collide with PacMann. Whenever a ghost reaches a vertex of the maze graph and must decide upon the next edge to follow (i.e., whenever it calls itsnextEdge()method), it computes atarget()vertex and selects the first edge in the shortest path to this target (subject to the constraint that it cannot turn around and retrace the edge that it had just finished traversing). Note thattarget()is an abstract method ofGhost, since different ghosts have different targeting behaviors. If a ghost collides with PacMann when in theCHASEstate, the game stops and the player loses one of their lives. - Whenever PacMann eats a pellet, all ghosts in the
CHASEstate transition to theFLEEstate, characterized by their blue color and scared mouths. Rather than trying to collide with PacMann, ghosts in theFLEEstate attempt to avoid a collision by heading toward their designated corner of the maze (i.e., the return value oftarget()becomes a corner vertex when the ghost is in theFLEEstate). If PacMann collides with a a ghost in theFLEEstate, that ghost transitions to theWAITstate with a delay of 3 seconds. Otherwise, thefleeTimeRemainingfield represents the number of milliseconds before this ghost transitions back to itsCHASEstate. Ghosts move at half their normal speed in theFLEEstate.
Part 3A: Pathfinding
- Files to modify
- graph/MinPQueue.java, graph/Pathfinding.java
- Tests
- tests/graph/MinPQueueTest.java, tests/graph/PathfindingTest.java
- Other relevant files
- graph/Vertex.java, graph/Edge.java
The basic primitive used for all of the ghosts’ navigation is shortest path calculations. To support this, you’ll implement a variation of Dijkstra’s algorithm, which will leverage a decreasing-key priority queue to manage its frontier. This data structure is contained in graph/MinPQueue.java. The MinPQueue class has two fields: heap, a dynamic-array representation of a binary min-heap, and index, a map that associates keys with their current index in heap. The index permits fast lookup in support of an efficient update() operation. Carry out the following steps to complete the definition and testing of this class.
- Write an
assertInv()method that asserts theMinPQueueclass invariant (TODO 7). Make sure that you callassertInv()before returning from each method that modifies state of this queue. - Complete the implementation of the private helper method
swap()(TODO 8a) and use this to define two addition private helper methodsbubbleUp()andbubbleDown()as defined in lecture (TODO 8b). - Complete the implementations of the remaining priority queue operations,
add(),update(), andremove()(TODOs 9a-c). - Complete the testing task (TODOs 10a-d) in tests/graph/MinPQueueTest.java, which has you fill in the body of four test cases to match their DisplayNames. You are welcome to add additional test cases to this file if you’d like; just make sure to document them.
Next, let’s use this priority queue to implement a variant of Dijkstra’s algorithm, Pathfinding.shortestNonBacktrackingPath(). This method restricts its attention to non-backtracking paths, which disallow the inclusion of two consecutive edges between the same pair of vertices ($v \to w \to v$). This method delegates its computation to two package-private (to enable unit testing) helper methods, pathInfo() and pathTo(). pathInfo() (TODO 11a) uses a Dijkstra-style traversal to build up a Map associating each vertex with its shortest (non-backtracking) path distance from the source vertex and a “backpointer” of the last edge in this shortest path. pathTo() (TODO 11b) uses this map to construct the a list representation of the shortest path to a particular destination vertex. Complete these methods according to their specifications. As you do this, it will be helpful to look at the Vertex and Edge interfaces to see what operations are supported by types V and E.
Complete the testing task (TODOs 12a-g) in tests/graph/PathfindingTest.java, which has you fill in the body of seven test cases to match their DisplayNames. These test cases take advantage of an alternate graph implementation that is much simpler than the MazeGraph, which is provided in tests/graph/SimpleGraph.java. You are welcome to add additional test cases to this file if you’d like; just make sure to document them.
Part 3B: The Ghost subclasses
- Files to create
- model/Blinky.java, model/Pinky.java, model/Inky.java, model/Clyde.java
- Files to modify
- model/GameModel.java
The four ghosts are differentiated by their color, their initialDelay, and their strategy for selecting a target() vertex.
Add four Ghost subclasses, Blinky, Pinky, Inky, and Clyde (TODOS 13-16), to model the behaviors described below.
Note: Blinky, Pinky, and Inky should have one constructor that takes in one argument, a GameModel, whileClyde should have one constructor that takes in two arguments, a GameModel and a Random object.
Blinky

Blinky is the red ghost who enters the game after an initial delay of 2 seconds.
Blinky directly targets PacMann; specificlaly, in the CHASE state, Blinky targets PacMann’s nearestVertex().
In the FLEE state, Blinky targets the northwest corner of the board, which is the vertex with coordinates (2,2).
Pinky

Pinky is the pink ghost who enters the game after an initial delay of 4 seconds.
Pinky aims to get in front of PacMann.
In the CHASE state, Pinky targets the vertex that is closestTo() the coordinates 3 units away from PacMann in the current direction that PacMann is facing.
It is possible that these coordinates will not be within the bounds of the maze; fortunately, MazeGraph.closestTo() still works with out-of-bounds arguments.
In the FLEE state, Pinky targets the northeast corner of the board, which is the vertex with coordinates (model.width()-3,2).
Inky

Inky is the cyan ghost who enters the game after an initial delay of 6 seconds.
Inky wants to trap PacMann between himself and Blinky.
In the CHASE state, Inky chooses to target the coordinates such that PacMann’s nearestVertex() is the midpoint between Blinky’s nearestVertex() and this target.
As with Pinky, this may imply that Inky’s target is out-of-bounds or not a path tile, but closestTo() will accept such coordinates and give you the appropriate nearest target vertex.
In the FLEE state, Inky targets the southwest corner of the board, which is the vertex with coordinates (2,model.height()-3).
Clyde

Clyde is the orange ghost who enters the game after an initial delay of 8 seconds.
Clyde really wants to catch PacMann, but tends to crack under pressure.
When deciding his next target() in the CHASE state, Clyde first computes his Euclidean distance between his nearestVertex() and PacMann’s nearestVertex().
Recall that the Euclidean distance between points $(x_1,y_1)$ and $(x_2,y_2)$ is given by $\sqrt{(x_2-x_1)^2 + (y_2-y_1)^2}$.
If this distance is 10 or greater, then Clyde has the same CHASE behavior as Blinky.
Otherwise, if this distance is less than 10, Clyde chooses random coordinates on the maze grid and targets the vertex closestTo() these (use the Random object passed to Clyde’s constructor).
In the FLEE state, Clyde targets the southeast corner of the board, which is the vertex with coordinates (model.width()-3,model.height()-3).
As you complete these TODOs, uncomment the corresponding lines that add the ghost actors to the model in the GameModel constructor and rerun the GraphicalApp.
Running the application with the “paths_on” program argument will visualize the ghosts’ navigation paths and help you to debug their behaviors.
(Mini) Part 4: End Game Messages
- Files to modify
- ui/GameFrame.java
- Tests
- Play testing using ui/GraphicalApp.java
Right now, at the end of the game, the view freezes with no information presented to the user describing what has happened. Let’s add some pop-up dialog messages that either tell the user that they have won or lost the game and report to them their final score. We’ll leverage the observer pattern to do this. Notice that our GameFrame class implements the PropertyChangeListener interface. Complete the propertyChange method (TODO 17a), which should detect a “game_result” event and call either showWinMessage() or showLoseMessage() based on whether the game result was a VICTORY or a DEFEAT. Then, implement these methods (TODOs 17b-c) to create and show a JOptionPane with the game result and player’s score (the exact text and look of the dialog is up to you, as long as the information is communicated clearly). When these pop-ups are closed, a new game should be created and shown.
Tip: The Swing Tutorial has an excellent guide on making dialogs.
Test the functionality of these dialog pop-ups by playing the game. If you’re anything like us, reaching a DEFEAT should not be too hard, but achieving good coverage of this method will require you to win a game of PacMann :)
Challenge extension: PacMann AI (5 points)
- Files to create
- model/PacMannAI.java
- Files to modify
- model/GameModel.java
Create a class PacMannAI that extends the PacMann abstract class.
This class should not leverage user-typed commands for its navigation, but rather should use the current state of the GameModel to calculate its preferred next moves in the nextEdge() method.
The PacMannAI constructor must accept only a GameModel as an argument.
We will compile this class against our reference solutions, meaning you must conform to the interfaces and visibility as presented in the assignment (no cheating!).
To test your PacMannAI implementation, first replace the PacMann creation line in GameModel’s constructor with the second version provided in the release code (actors.add(withAI ? new PacMannAI(this) : new PacMannManual(this))').
Then, you can run ui/GraphicalApp.java with the “ai_on” program argument and watch the AI take over and navigate PacMann after starting the game.
Additionally, you can run ui/BatchApp.java which will quickly simulate multiple games and report the score of each game and whether it ended in VICTORY or DEFEAT.
The credit that you earn for this challenge extension will be based on your average score over a number of random games, and we plan to set up a leaderboard on Gradescope soon where you can complete with your classmates (and TAs) for the best score.
Submission
In “reflection.txt”, estimate the amount of time you spent on this assignment, and answer the verification and reflection questions. Then submit the following files to Gradescope:
- reflection.txt
- MazeGraph.java
- MazeGraphTest.java
- GameModel.java
- PacMannManual.java
- InteractiveGameController.java
- MinPQueue.java
- MinPQueueTest.java
- Pathfinding.java
- PathfindingTest.java
- Blinky.java
- Pinky.java
- Inky.java
- Clyde.java
- GameFrame.java
- PacMannAI.java* (if completing challenge extension)
Some Gradescope Submission Reminders
- Only one member of each group should create a submission in Gradescope. The person who submits should add their partner to the submission group by clicking on the submission and then selecting “View or edit group” in the right menu.
- You may submit to Gradescope multiple times, but only your most recent submission will be graded. Note that you must re-upload all files each time you submit, and you must ensure that you re-form your submission group for your final submission.
- While Gradescope allows you to upload zip files of your entire IntelliJ project, we recommend that you individually upload the files enumerated by the list in the preceding section to build your submission. While we have attempted to make the autograders robust to different submission folder structures, we only guarantee proper behavior when the files are uploaded in this way. The smoketester should confirm that you have uploaded all of the required files and alter you to any that are missing/extra.
Collaboration Policy
On this assignment you may work together with one partner. Having a partner is not needed to complete the assignment: it is definitely do-able by one person. Nonetheless, working with another person is useful because it gives you a chance to bounce ideas off each other and to get their help with fixing faults in your shared code. If you do intend to work with a partner, you must review the syllabus policies pertaining to partners under “programming assignments” and “academic integrity.” Remember to form a group with your partner when you submit to Gradescope.
As before, you may talk with others besides your partner to discuss Java syntax, debugging tips, or navigating the IntelliJ IDE, but you should refrain from discussing algorithms that might be used to solve the problems, and you must never show your in-progress or completed code to another student who is not your partner. Consulting hours are the best way to get individualized assistance at the source code level if you get stuck diagnosing an issue on your own.
Frequently asked questions
If needed, there will be a pinned post on Ed where we will collect any clarifications for this assignment. Please review it before asking a new question in case your concern has already been addressed. You should also review the FAQ before submitting to see whether there are any new ideas that might help you improve your solution.