Assignment A5 CS100J Spring
2008 See CMS for deadline
This assignment introduces you to graphics. You will write procedures that
draw interesting designs, bouncing balls, and a recursive design in
a JFrame. You may work with one other person. If you do so, form your
group on the CMS WELL BEFORE YOU SUBMIT YOUR FILES. Remember,
partners should work together and not independently.
You need not use a JUnit
testing class. You will (partly) be looking at visual output (graphics) to
determine correctnesss.
Please keep track of the time you spend on this assignment. You will be asked to put it in a comment at the top of file A5.java.
To save time and effort, we give you complete specifications
of most of the methods you write. Please study them carefully. Note how precise and
thorough they are. You should aim for this quality of specification when
you write your own specifications. At the end of this document, we tell you
what to submit.
Download file A5.zip, unzip it, and put everything in it into a
new directory. It contains:
1. A file A5.java,
which extends
class Turtle.
2. Several .class files. These are machine language versions of .java files.
Do NOT load them into DrJava. The only thing you should load into DrJava
is file A5.java. It will automatically use the .class files.
3. A directory doc, which contains specifications of class Turtle.
You will use these specs when writing method calls to make turtles
do what you want.
A Turtle is
a pen of a certain color at a pixel (x,
y) that is pointing in some direction given by an angle
(0 degrees is to the right, or east; 90 degrees, north; 180 degrees, west;
and 270 degrees, south). When the turtle is moved to another spot using procedure moveAhead or moveBack,
a line is drawn if its pen is currently "down" and
nothing is drawn if its pen is "up". The
pen is initially black, but its color, of class java.awt.Color,
can be changed. A footnote on page 1.5 of the ProgramLive CD contains information
about class Color.
Open doc/index.html in your favorite browser and study the specifications
of methods in class Turtle (the
javadoc files). Here are some important
points:
- Class
Turtle uses the Graphics object that is
attached to a JPanel.
It builds on class Graphics by maintaining the "turtle",
which has a position and an angle and holds a pen of a color; the pen is up
or down. You can use many turtles at the same time; they all use the
same JPanel.
- The coordinates and angle of the turtle are maintained using type double. This is needed for maximum accuracy. If we used int, errors might crop up after many calculations. However, whenever a point is to be placed in the window, its x- and y-coordinates are rounded to the nearest integer because the graphics space works with ints.
- Function
intColor allows you to use an integer in the interactions
pane to obtain an object of class Color, for various oft-used colors.
- Manually resizing the
JFrame window also changes the size
of the panel on which the drawing occurs. But you
have to move the mouse inside the panel to see this.
- Procedure
jumpTo(ang, x, y) can be used to move the turtle,
without drawing, to
(x, y) and face it at angle ang.
- Call
pause(p) to pause execution for p milliseconds.
Judicious use of this method will allow you to watch something being drawn
in slow motion.
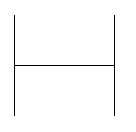
Class A5.java contains procedure drawTwoLines to show you how graphics
works. After compiling class A5, in DrJava's interaction
pane, create an instance of class A5 and execute a call
on drawTwoLines. A JFrame should be created
and two lines should be drawn on it. Notice how the body of the procedure saves the initial color of the pen and ends by changing the pen back to its initial color. Generally, methods will attempt to leave things the way they were when they started, and this indicates how to do that.
In the interactions pane (or in a method in class A5), draw
some lines, rectangles, circles, etc, to familiarize yourself with class Turtle.
After that, perform the tasks given below.
Task
1. Complete function A5.toString. Follow
the instructions given in the function itself. You will see
why in Task 2. Here is an example of what our toString function
produces, and yours should be similar:
pos. (250, 250), facing 0.0
degrees, pen is down and has color java.awt.Color[r=0,g=0,b=0].
Your output does not have to be precisely like
this, but it should contain the same information. Note that
class Color has its own toString function.
Task 2 . Complete procedure drawGreenTriangle.
Then follow the instructions in the comment in the body to learn about rounding
errors when using type double and why they don't really matter here.
 Task
3. Complete
Task
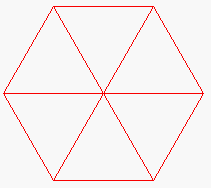
3. Complete drawGreenHex to draw a red hexagon,
as shown to the right of this paragraph. It should call procedure drawTriangle 6
times. Some lines will be
drawn twice, but that is OK. Of course, when the procedure call terminates,
the turtle's
properties (position, angle, pen color, and whether the pen is up or down)
should be the same as when the procedure call began.
The procedure should draw the shape at the turtle's current position
and at the turtle's current angle. Don't move the turtle before beginning.
Also, note that THIS PROCEDURE DOESN'T HAVE TO DRAW ANY EXTRA LINES OR JUMP AROUND AT ALL. Just use calls on drawGreenTriangle and addAngle.
Task
4. Do either 4A, 4B, or 4C. After you have completed the assignment,
if you are interested, do the other two! It is fun, seing how easy it
is to do these neat things.
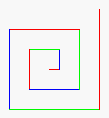 Task
4A: Draw a spiral. The first picture to the right is done
by drawing 10 lines. The first line has length 5; the second,
10; the third, 15, etc. After each line, 90 degrees is added to the
angle. The second diagram to the right shows a similar spiral but with
60 degrees added to the angle after each line.
Task
4A: Draw a spiral. The first picture to the right is done
by drawing 10 lines. The first line has length 5; the second,
10; the third, 15, etc. After each line, 90 degrees is added to the
angle. The second diagram to the right shows a similar spiral but with
60 degrees added to the angle after each line.
Complete procedure spiral. When you first test your method, use
5 for d and 0 for sec.
Try different angles, like 90 degrees, 92 degrees, 88 degrees, etc. You can
also use msec = 500 or msec
=1000 (which is 1 second) in order to see the lines drawn one at a time.
You will be amazed at what method spiral does. Find out by trying
these calls, assuming that x is an instance of A5. Use
procedure placeInCenter() to erase the panel and place the turtle in the middle before each one:
x.spiral(0, 500, 90, 1); x.spiral(0, 500,
135, 1); x.spiral(0, 500,
60, 1);
x.spiral(10, 500, 121, 1); x.spiral(0, 500,
89, 1); x.spiral(5, 500,
150, 1);
x.spiral(0, 500, 120, 1); x.spiral(10, 500,
119, 1);

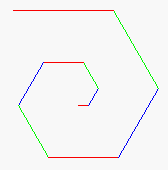
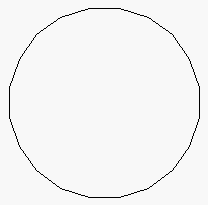 Task
4B: Draw many polygons. The first image to the right is a 20-sided
polygon, drawn using procedure
Task
4B: Draw many polygons. The first image to the right is a 20-sided
polygon, drawn using procedure drawPolygon, which we give you. The second
image to the right is a series of 90 such polygons, the first started at
angle 0, the second started at angle 4, the third at angle 8, and so on.
The polygon colors alternate between blue and green.
Complete
procedure multiPolygonVariation so that your program can
draw such designs. When finished, experiment, to see what neat designs
come out. Try, for example,
multiPolygonVariation(20, 4, 200) and multiPolygonVariation(30, 7,
50).
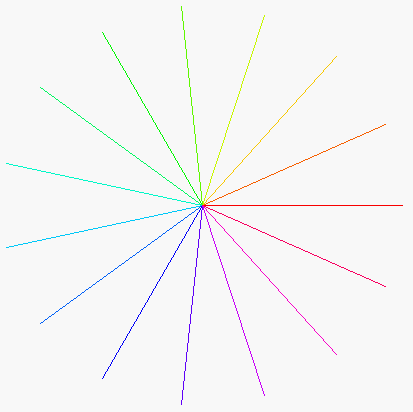 Task
4C: Draw radiating lines. The picture to the right is
done by drawing 15 lines of the same length, radiating out from the current
turtle position. The angle between the lines is the same. If n lines are
drawn, the angle between them is 360.0/n. Note the colors of the lines.
Each line is drawn in the HSV color (hue, 1, 1) [translated, of course,
to the RGB system; class A5 containis our function HSV2RGB to make this easy.],
where hue is the hue given by the angle at which it is drawn. So, what
you see is part of the color disk of the HSV system!
Task
4C: Draw radiating lines. The picture to the right is
done by drawing 15 lines of the same length, radiating out from the current
turtle position. The angle between the lines is the same. If n lines are
drawn, the angle between them is 360.0/n. Note the colors of the lines.
Each line is drawn in the HSV color (hue, 1, 1) [translated, of course,
to the RGB system; class A5 containis our function HSV2RGB to make this easy.],
where hue is the hue given by the angle at which it is drawn. So, what
you see is part of the color disk of the HSV system!
Complete procedure radiate. As you write it, test it with small
values of n, like 4 or 8. After the procedure is completely tested, try it
with 360 lines of length 200, pausing 50 milliseconds between each. Isn't that
neat?
Task 5: Bouncing balls. Procedure Turtle.fillCircle draws
a disk —a filled-in circle. You can use this procedure to draw
a bouncing ball. Suppose the ball is at some position (x, y).
To make it look like the ball is moving, repeat the following process over
and over again:
1. Move the ball: (1) Draw the ball at its current position using color
white, thus erasing it, (2) change the position of the turtle, and (3) draw
the ball in its own color.
2.
Pause for 100 milliseconds.
(a) Add to class A5 three private double fields: radius gives
the radius of the ball and fields vx and vy describe
the speed of the ball; when the ball is moved, it moves vx pixels
in the horizontal direction and vy pixels in the vertical direction.
Write getter methods for these fields.
(b) Complete constructor A5(x, y, r, c, vx, vy), which initializes
a new A5 object.
You know the constructor works
properly when you see the ball in the panel. Be sure you follow the principle to initialize inherited fields first, using a call on as superclass constructor.
To
make things easier, also complete constructor A5(vx,
vy, r), which
creates a black ball at the midpoint of the panel with speed (vx,
vy) and radius r. Then, create several balls, with different
starting points, radii, and colors, before going on to the next step.
(c) Complete procedure moveOnce(), following these directions:
- Before moving the ball: if the vertical motion is negative and
the ball just touches or goes partially over the top of the panel, then negate
the
y-coordinate
speed (using vy= –vy;) so that the next move will be in
the opposite direction. You have to do the same kind of thing for the other
three walls, one wall at a time.
- Move the ball: (1) draw the ball with a white pen; (2) move the turtle; and
(3) draw the ball in its original color. (So, the program must remember the original
color. Have a local variable
originalColor to
contain the original color and, after drawing the ball white, set the turtle
color back to the value of variable originalColor.)
Test method moveOnce() carefully, as follows. In the interactions
pane, create a ball of radius
45 that starts in the middle of the panel and has velocity (0, –35).
Then, repeatedly execute d.moveBallOnce() and watch what happens.
Makes sure that it bounces properly off the top and bottom walls. Then do the
same kind of test for the left and right walls.
(d) Complete procedure perpetualMotion(). Its body should be
a loop that does not terminate and that has a repetend that (1) moves the ball
once and then (2) pauses for 100 milliseconds. In the interactions pane, create
a new Ball d, call d.perpetualMotion();,
and watch the ball move. Stop this execution by hitting the
DrJava reset button.
Task 6. Recursive graphics. We now ask you to develop a recursive procedure to draw some graphics, recursively. We discuss one example, the Koch snowflake. Then, we ask yu to develop some recursive procedure of you own choosing or of your own design. We give you some examples.
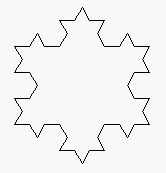
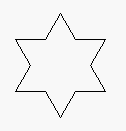
 Directly to the right is a triangle. It is called a "Koch snowflake " of level 0. Replacing each line of this
Koch snowflake by four lines as drawn in the second diagram gives the Koch snowflake of depth 1, which is the third figure. And, replacing each of the lines of this Koch snowflake by the same four lines gives the Koch snowflake of depth 2 shown on the extreme right. This can be continued to any depth.
Directly to the right is a triangle. It is called a "Koch snowflake " of level 0. Replacing each line of this
Koch snowflake by four lines as drawn in the second diagram gives the Koch snowflake of depth 1, which is the third figure. And, replacing each of the lines of this Koch snowflake by the same four lines gives the Koch snowflake of depth 2 shown on the extreme right. This can be continued to any depth.
Doing this is extremely easy using recursion! This is done using procedures Koch and KochL, which appear in the class A5 that we give you. Procedure Koch is always the one to call (KochL is private), for it clears the window, etc., in preparation for drawing the Koch flake. Koch calls KochL.
We can explain in a simple way what Koch and KochL using the following two patterns:
Koch: L – – L – – L -
KochL: L + L - - L + L
Here's how to interpret each of them. Each symbol is a command to do something, as follows.
L: If d (depth of recursion) is 0, draw a line of length F; otherwise, call KochL(d-1, F, s).
+: add 60 degrees to the turtle's angle.
–: subtract 60 degree from the turtle's angle.
So, the patterns are simply a simple, terse, way of describing what each of the method bodies should do.
Compare these sequences of commands to the bodies of the method bodies, and you will see what we mean. Such a system of patterns is called a "Lindenmayer System", after Aristid Lindenmayer,
who co-authored a book titled The Algorithmic Beauty of Plants (Springer Verlag, 1990).
In this task 6, your job is to write some procedures that draw a recursive graphical design. We give you some examples. You can do one of these; you can also be creative and do something of your own choosing. For example, you could try variations of the H-Tree (see below), using other letters or shapes. The only restriction is that it be recursive in nature, like all the others you see here.
Before we begin, make careful note of these ground rules:
1. Following the Koch-snowflake pattern, write two procedures, a public one that will initialize as procedure Koch does and a private one, which is recursive.
2. Be sure to give complete and precise specifications of both procedures.
3. Our examples below show you output for depths 0, 1, and 2. We expect you to test your procedures with greater depth than that! And we are sure you will, because it's fun to see the graphic output appear.
3. Do not search the web to find procedures already written in other languages; that is dishonest. Instead, use the material given below to help you and do some problem solving of our own. Ask Gries, a TA, or a consultant for help if you need it.

 1. Square flakes. Directly to the right is a square. It is called a "flake" of depth 0. Replacing each line of this flake by four lines as drawn in the second diagram yields a flake of depth 1, which is the third figure. Replacing each of the lines of this flake by the same four lines yields the flake of depth 2 shown on the extreme right. It looks like there are loops in this diagram, but that is only because two corners touch at the same point.
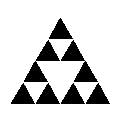
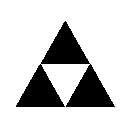
 2. Sierpinski triangles. Directly to the right is a filled-in equilateral triangle. We call it a Sierpinski triangle of size
 s (the length of a side) and depth 0. Next to it is a Sierpinski triangle of size s and depth 1. It is created by filling in 3 Sierpinski triangles of size s/2.0 and depth 0, in each of the corners of what would be a Sierpinski triangle of size s and depth 0. All the way on the right is a Sierpinski triangle of size s and depth 2; it is created by drawing 3 Sierpinski triangles of size s/2.0 and depth 1. In the same way, draw a Sierpinski triangle of size s and depth d by drawing three Sierpinski triangles of size s/2.0 and
depth d-1 in appropriate places. It's a really simple recursive procedure.
Here are some hints. (1) You can write the Sierpinski procedures with (at least) two parameters (x, y) that give the position of the left point of the base line of the triangle. Or, you can let the turtle indication this position. It is up to you.
(2) Use procedure fillTriangle (in class A5) to draw a triangle —it is needed only at depth 0! (3) The most difficult part may be finding the height of the triangle with side length s. Knowing that the triangle is an equilateral triangle, you can make use of the pythagorean theorem to figure this out. Using h for the height, you should be able to visualize a triangle that is 1/2 of the equilaterial triangle, with side lengths s, s/2.0, and h.
Solve the formula s**2 = (s/2)**2 + h**2 for h.
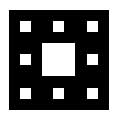
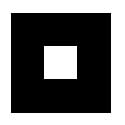
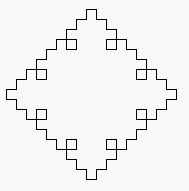
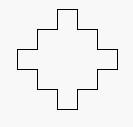
 3. Sierpinski carpet. To the right are three Sierpinski carpets of depth 0, 1, and 2. Here's how you draw them: (0) Draw a black filled-in square of side length
 s.
(1) To change it into a Sierpinski carpet of depth 0, don't do anything.
(2) To change it into a Sierpinski carpet of depth d (d > 0), think of the square of size s as a grid of 9 black squares of size s/3.0. Make the middle square white. In each of the other 8 black squares of size s/3.0, draw a Sierpinksi carpet of depth d-1.
Here are some hints. (1) You can write the Sierpinski procedures with (at least) two parameters (x, y) that give the position of the top left point of the carpet to draw —yes, work with the top-left point as defining where the square is. Or, you can let the turtle indication this position. It is up to you. (2) Turtle procedure fillRect(w, h) can be used to fill a square. However, the turtle's position gives the center of the square, not its top-left position. So, before you can call fillRect, you have to move the turtle to the middle of the square. It may be best to write your own procedure
fillSquare(s), which will draw a square of length s with its top-left position given by the turtle —this procedure will call fillRect.
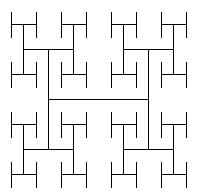
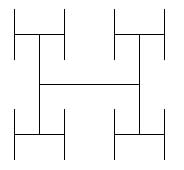
 4. H-trees. To the right are three H-trees of size
 s and depths 0, 1, and 2. Here's how you draw them:
(1) Draw an H, with all three lines being of length s.
(2) If d>0, draw four H-trees of size s/2 and depth d-1. The centers of the four H-trees are at the top and bottom of the two vertical lines drawn in step (1).
H-trees are useful in designing microprocessor chips. The lines are wires that connect circuit components in a tree of interconnections, witout wires crossing.
Here are some hints. (1) We suggest having as parameters of your procedures the center (x,y) of the H-tree to be created, the depth d, and the length s of each line in the H-tree. Draw the lines drawn using procedure
jumpTo (to move the turtle) and moveAhead (to actually draw the line).
What to submit. Put a comment at the top of the page that contains the following information. (0) your name and netid, (1) The name of your public recursive procedure. (2) What you thought of this assignment (an integer in 1..10, with 10 being "outstanding"); (3) the time you spent on this assignment.
Make sure class A5 is indented properly. Submit file A5.java on
the CMS.