External Users
External users to CMSX can be added using CMSX Users
page, available from the linkbar at the top:

(Only CMSX Admins and Domain Subadmins will be able to see this link.)

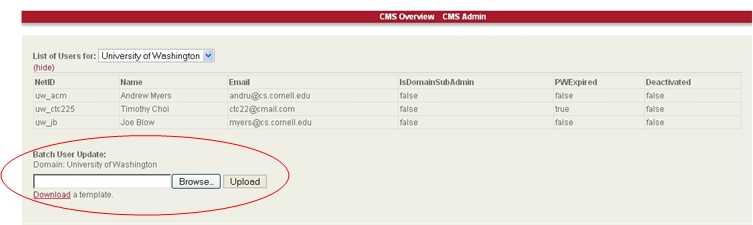
Once you are at the page, you will be able to see the list of users for a selected domain.
If you are a full CMSX Admin, you will able to select between the existing
domains, otherwise domain subadmins can only see their own default domain.

External domain prefix must be 2-4 characters.
The “Cornell” domain, the default domain for all regular
Cornell users, will not be visible on this page.
Creating and Editing Users
At the bottom of that page is the option to add or modify users using a
CSV upload.
For CMSX Admins, the effective domain is controlled by the drop-down at the top.
Again, for domain subadmins, only their own default domain is editable.
You will also be able to download a template CSV file to use for the
upload. The template contains all the necessary columns (including
proper column headers) required for an upload file, and it is
recommended that you use it.
Necessary columns:
- UserID
– The ID of the user you want to add or modify. These need to
be unique, and you will be notified during the upload process if they
are not. A domain prefix will also be added to the front of each
ID during creation, and there is a maximum length requirement
(20 characters including the prefix) that must be met; you will also be
notified of any character violations during the upload.
- FirstName –
First name of user. Editable after creation if necessary.
- LastName
– Last name of user. Editable after creation if necessary.
- Email
– Email address of the user. There is no data validation for
proper email addresses, so please check these carefully. Editable after
creation if necessary.
- IsDomainSubAdmin
– Whether or not the user is a subadmin for the domain.
True/False or Yes/No, only. Editable after creation if
necessary.
- Action
– the requested action for the line.
- ADD –
this action will add the user with the supplied information. All columns
must contain information. The user will be sent a welcome email which
includes their initial temporary password, which they will need to
reset to a new password of their choosing at first login.
- DELETE –
this action will delete the user with the given UserID. A user can only
be deleted if they have not been added to any courses. If the user has
already been added to a course, you can only DEACTIVATE them. Only the
UserID column needs to have information for this action.
- DEACTIVATE
– this action will deactivate the user, and not allow any
more logins for that user. Only the UserID column needs to have
information for this action.
- MODIFY –
this action will modify information for the user with the given UserID.
FirstName, LastName, Email, and IsDomainSubAdmin are editable. Please
only include info for the columns you want to change. Any blank columns
will be left as is.
- RESET PW
–
this will reset a user’s password to a randomly generated
one, and email it to them. They will be able to change the password to
a new password of their next login. Used in case of forgotten
passwords, or to reactivate a deactivated account.
- Once you have created an upload file containing all the
changes you want to make, choose and upload the file.
- Once the file is uploaded, the system will parse the file and
take you to the confirmation page.
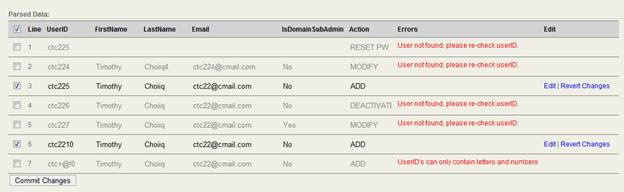
Here you will be shown a list of all the lines parsed from the csv file. It
will also alert you of any errors that may be present in the action you are
trying to commit; e.g. if a user with the given UserID does not exist, or
if a userID you are trying to create is not valid, etc.
You can de-select any lines you do not wish to commit (any lines with errors
will automatically be de-selected). If there are mistakes that you wish to fix,
check the line, and then you will able to edit the fields in it.
(Please note there will be no further data validation
of any changes you make on this page, so please make sure they are
correct.)
Once you have made all the changes and properly selected all the lines
you want to commit, click “Commit Changes”.
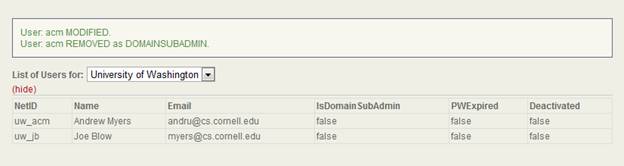
- Once you commit changes, you will be re-directed to the first
CMSXX Users
page where you will see a list of all the changes and errors that may
have occurred from the commit:
 External User Login
- When the user first gets to the CMSX homepage, they will see
3 login options:
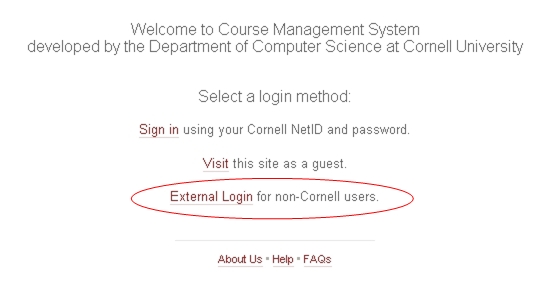
External users should select the third option,"
External Login for non-Cornell users".
- They will then be taken to the login page:
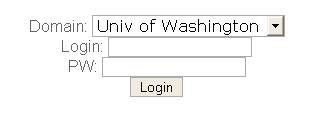
Here they should select their proper domain, and enter in their
username and password. When users are first created, they will be sent a
welcome email with a direct link that should bring them directly to this page,
with their proper domain already selected.
- Current users will be then sent to the
CMSX Overview page;
first time users will be prompted to change their password:
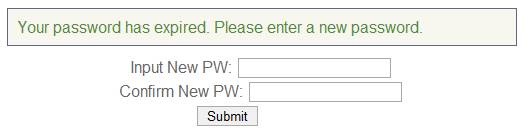
Passwords need to be at least 8 characters long. Users will be
notified if the entered pw does not meet the criteria. Once they submit a
successful password, they will also be redirected to the
CMSX Overview page.