EXTRA CREDIT: Create Reverse Perspective
A reverse perspective is an optical illusion where the 3D geometry is transformed so that depths are inverted--concave scenes become convex and vice versa. However, it is done in such a way that the inverted 3D model appears correct from a certain viewpoint (or range of viewpoints), and it is not until you move your head that you notice that something is wrong. The scene appears to move in the opposite way that it should, and serves to exaggerate the perception of 3D. The artist Patrick Hughes produces stunning examples of this illusion.
While creating reverse perspectives is more of an art than a science, we propose the following approach. First, we must choose the viewpoint from which we want the scene to appear "correct", i.e., identical to the photo from which it was created. One option would be to choose to use the viewpoint from which the photo was actually taken (computed as above). However, this tends not to work well, since the model is typically reproduced at a smaller scale than the original scene, which also scales down the distance from the viewer to the model, requiring the viewer to stand uncomfortably close (the effect works best if you stand a few feet back).
Instead, we assume the viewer far enough away to approximate an orthographic projection, i.e., (X, Y, Z) is projected to (X, Y). We therefore wish to transform the shape of the 3D model so that it appears correct under an orthographic projection. To see how to accomplish this transformation, the perspective projection formula:

can be re-written as follows:

The leftmost matrix above is the orthographic projection matrix. Hence, we can accomplish the reversal by applying the rightmost three matrices to the original shape, as follows:
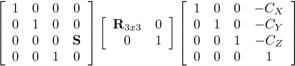
Here, (CX, CY, CZ) is the camera position (we described above how to compute this), and R is the camera rotation. We will provide you with a function that computes R from the projection matrix. We've also added a scale factor S--entry (3,4) in the leftmost matrix--that controls the depth scale of the result. Changing this value stretches the model along the Z direction. This doesn't change the appearance under orthographic projection when looking down the Z axis, but will affect it's appearance when the observer moves. You might want to experiment with different S values to find the one that produces the best illusion. Patrick Hugues constructs his models so that sides meet at 45 degree angles--this may be a good rule of thumb to shoot for and will avoid models that are too shallow or too deep.
Apply this transformation to your 3D model. Then create a physical replica of your reverse perspective by printing out the texture images onto paper, glue-sticking to cardboard, cardstock, or another stiff material, and folding/taping into a 3D recreation of your scene. In general, the larger the physical replica, the more convincing the illusion. Consider using a large format printer.
Note that not all scenes will produce good reverse perspectives. Relatively simple scenes composed of one or more simple box primitives tend to work quite well (use the box tool in the UI).
TODO: invertScene() in camera.cpp
Invert the scene in order to create a reverse perspective image. You'll need to compute a transformation for inverting the scene. The parameter zScale controls how deep the inverted scene will be. Before inverting the scene, you first need to compute the camera parameters.