Introduction to Computer Vision
CS4670, Fall 2010
by Aaron Chuang (acc269 at cornell dot edu), Tsung-Lin Yang (ty244 at cornell dot edu), Yong-Way Chee (yc563 at cornell dot edu)
Panoramas give the viewers a wider view of the scene, allowing them to feel more immersed in the scene. By extending the range of the panorama to 360o, users can become totally immersed and simulate turning their heads by viewing different parts of the panorama. The project aims at allowing the user to capture and recreate the scene.
Creating a panorama from a few images would require feature matching, calculating a homography, and stitch the images together using the homography. Creating a 360o panorama would require the same procedure but instead of solving the homography that would match one image with another, the translation between images mapped using spherical coordinates will need to be solved.
The user will not need to manually take the images required for the panorama but the phone will be able to determine where images should be taken. The user will be given visual indicators as to where they should aim the camera to allow the phone to take pictures that will be used in the 360o panorama creation. The phone will use the inbuilt orientation sensor as well as employing optical flow to determine where to aim and take pictures as well as when a full 360o pan has been completed. The phone will then map each image into spherical coordinates and stitch them together during post processing. The image is also cropped so that the majority of white space will not be shown in the final image.

1. Samsung Captivate S Galaxy Phone
2. Laptop with web-camera for development
In order to program with an Android phone, we need to setup our environment
1. Eclipse with ADT plug-in
2. Cygwin
3. Android NDK to cross compile OpenCV codes
4. OpenCV 2.2
More information on how to setup OpenCV for android can be from http://opencv.willowgarage.com/wiki/Android
Android Application has to be written in Java. The base program and GUI is coded using JAVA, and the computer vision algorithm is coded using C++. In order to make these two languages talk to one another, Cygwin is used to compile our computer vision codes into a library, and we use Java to call our libraries. By using this method, we just treat our computer vision codes as a black box, and we can just pass in the input image to get the output panorama.
As a proof of concept that our algorithm is actually working, we setup Visual Studio 2008 with OpenCV 2.1 with a webcam. This is to reduce the time spent on debugging on the phone, as it is difficult to debug two different languages using Eclipse at a time.

In this application, there are two main thread running – the Android GUI thread and the Computer vision code. The main functionality of the GUI Thread is to capture image and orientation from the camera and sensor and displaying onto the GUI. The computer vision thread gets the input image and does all the computations.
First, a 640x480 color image is captured and is converted into grayscale. FAST corner detection is performed to extract the features. The corners are stored as a vector and it is passed into the optical flow. The optical flow takes the current and previous image and the previous FAST corners and output a vector of current corners, and corner scores. Low corner scores are removed using thresholding. Each optical flow vector is converted to an angle and displacement. RANSAC is then performed to obtain the optimal angle and displacement from the series of vectors. This would in turn give the overall translation of the current image over the previous image.
The pose estimator takes in both camera orientation and the overall translation. It is able to estimate how much the camera has rotated, and makes a decision to capture and store images automatically with sufficient overlaps. It also determines whether the camera has made a full 360 degree panning so that it can instruct to begin the stitching process.
Stitching is done by firstly decide how big the canvas would be, by accumulating the translations. Each photo is taken out from the image storage and pasted onto the canvas with alpha blending. After stitching is done, the panorama photo is saved and displayed on the phone.
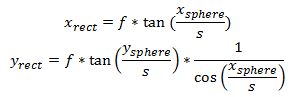
After taking all the appropriate images, the coordinate system is first shifted so that (0, 0) represents the center of the images instead of the top left hand corner of the image. This is required so that the mapping is done correctly. Each image is then inversely mapped from the rectangular coordinates to the spherical coordinates with the equations:
X|Ysphere – The coordinate within the spherically mapped image that
we want to find the pixel value for.
X|Yrect – The coordinate within the rectangular image where we would
need to sample the pixel values from.
f
– The focal length of the camera, as found from calibration, also obtainable via
android APIs
s
– Arbitrary
scaling factor, set to equal to f to minimize distortion due to scaling near the
center of the image.
Each
pixel within the spherically mapped image is obtained via linear interpolation
if X|Yrect is not an integer
Each optical flow vector is represented by
![]() and
and
![]() .
.
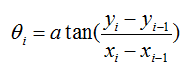
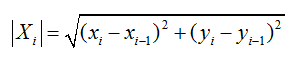
The flow vectors are converted to the angle and magnitude before RANSAC is performed, using
 and
and
RANSAC is used to select the
![]() and
and
![]() which minimize the sum of
errors, and the corresponding vector to be the amount of translation of the
current image to the previous image.
which minimize the sum of
errors, and the corresponding vector to be the amount of translation of the
current image to the previous image.
The
translation vector between 2 images is already obtained during optical flow. The
horizontal component of the vector is mapped into the spherical coordinates as
the translation obtained during optical flow represents translation in
rectangular coordinates. The mapping is the equation used for forward mapping
from rectangular coordinates to spherical coordinates.
![]()
Stitching is performed by using alpha blending and feathering. The blending
occurs within a 30 pixel column centered around the horizontal line drawn at the
center of the overlap between 2 images. The weighting used is not a simple
linear weighting, weighting using the Fermi-Dirac distribution was used. Using
the Fermi-Dirac distribution would allow a smoother blend to occur as the
changes of the weight gradually increases as the pixel gets closer to the
centerline of the blend. The weight of both images at the center would be
exactly 0.5, 0.5 and the value of x is chosen to be 4 so that the weight closely
approximates 1 or 0 at the border of the 30 pixel column.

The resulting panorama looks good most of the time, while some of the time, the
translation obtained will be off by a fairly noticeable amount.
Strength:
·
Automatically calculate where the next image should be taken from and presents a
visual indicator to show where the user should be pointing the camera to obtain
the next image.
·
Able to create a 360o panorama in under a minute (not including time
to take images)
Weakness:
·
Image borders is clearly seen when 2 images have a different luminosity.
·
Requires users to pan the camera slowly when taking the images
·
The orientation sensor is not very accurate, so it can only be used as a rough
indicator to see if 360o has already been achieved or not.
·
The IplImage will need to be 4 channels to allow the data to be more easily
passed from the ported C code to Java so that the images can be saved
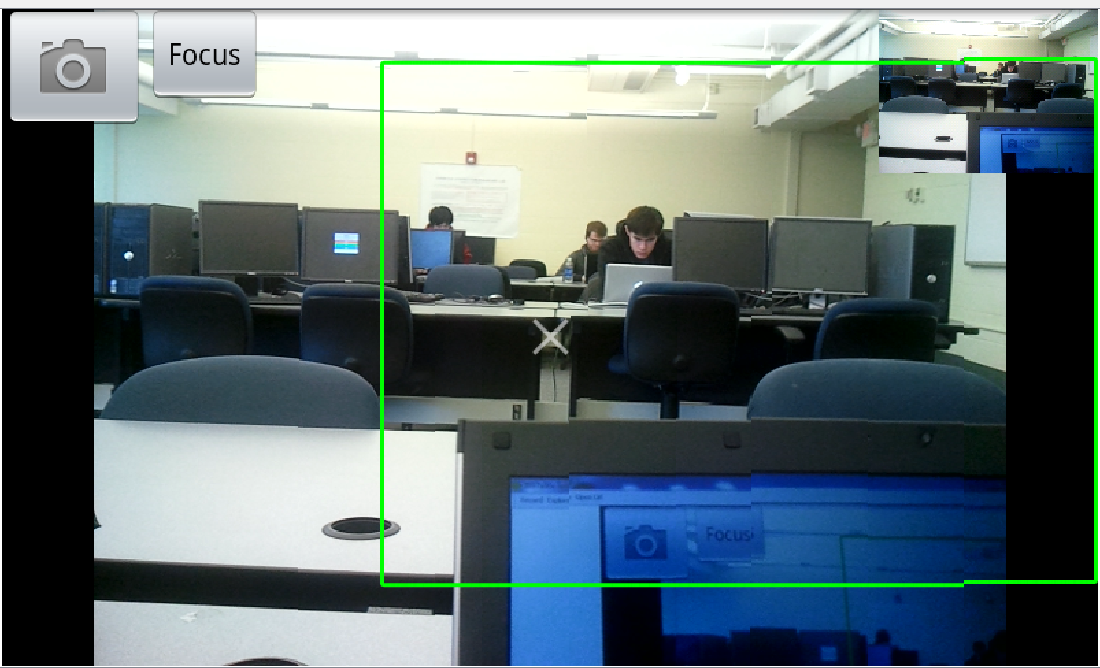
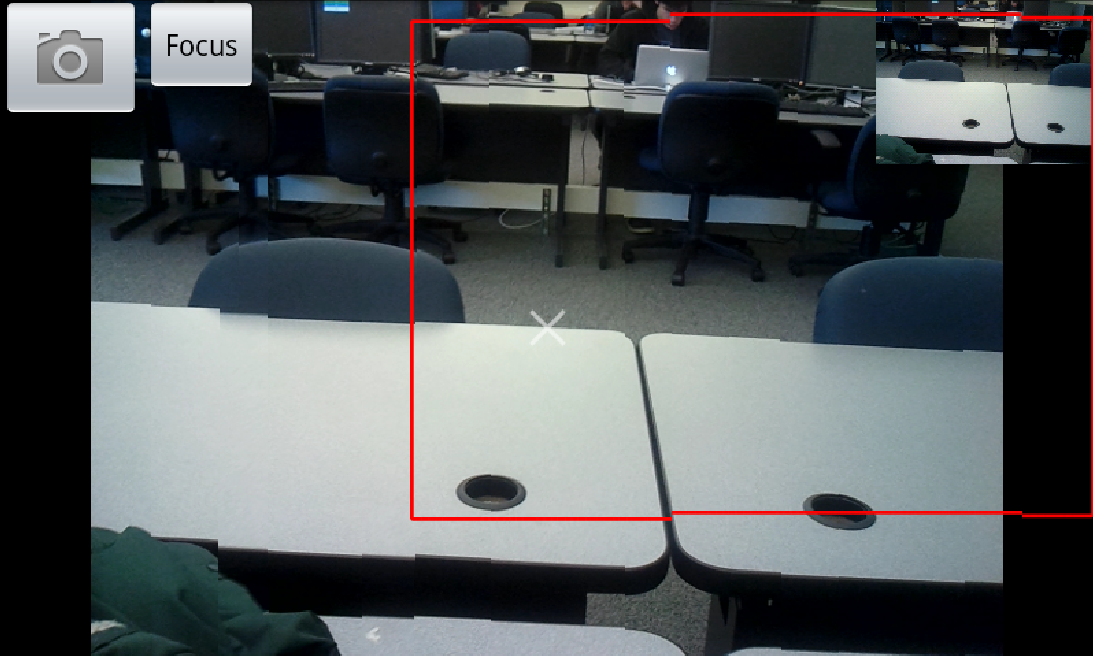
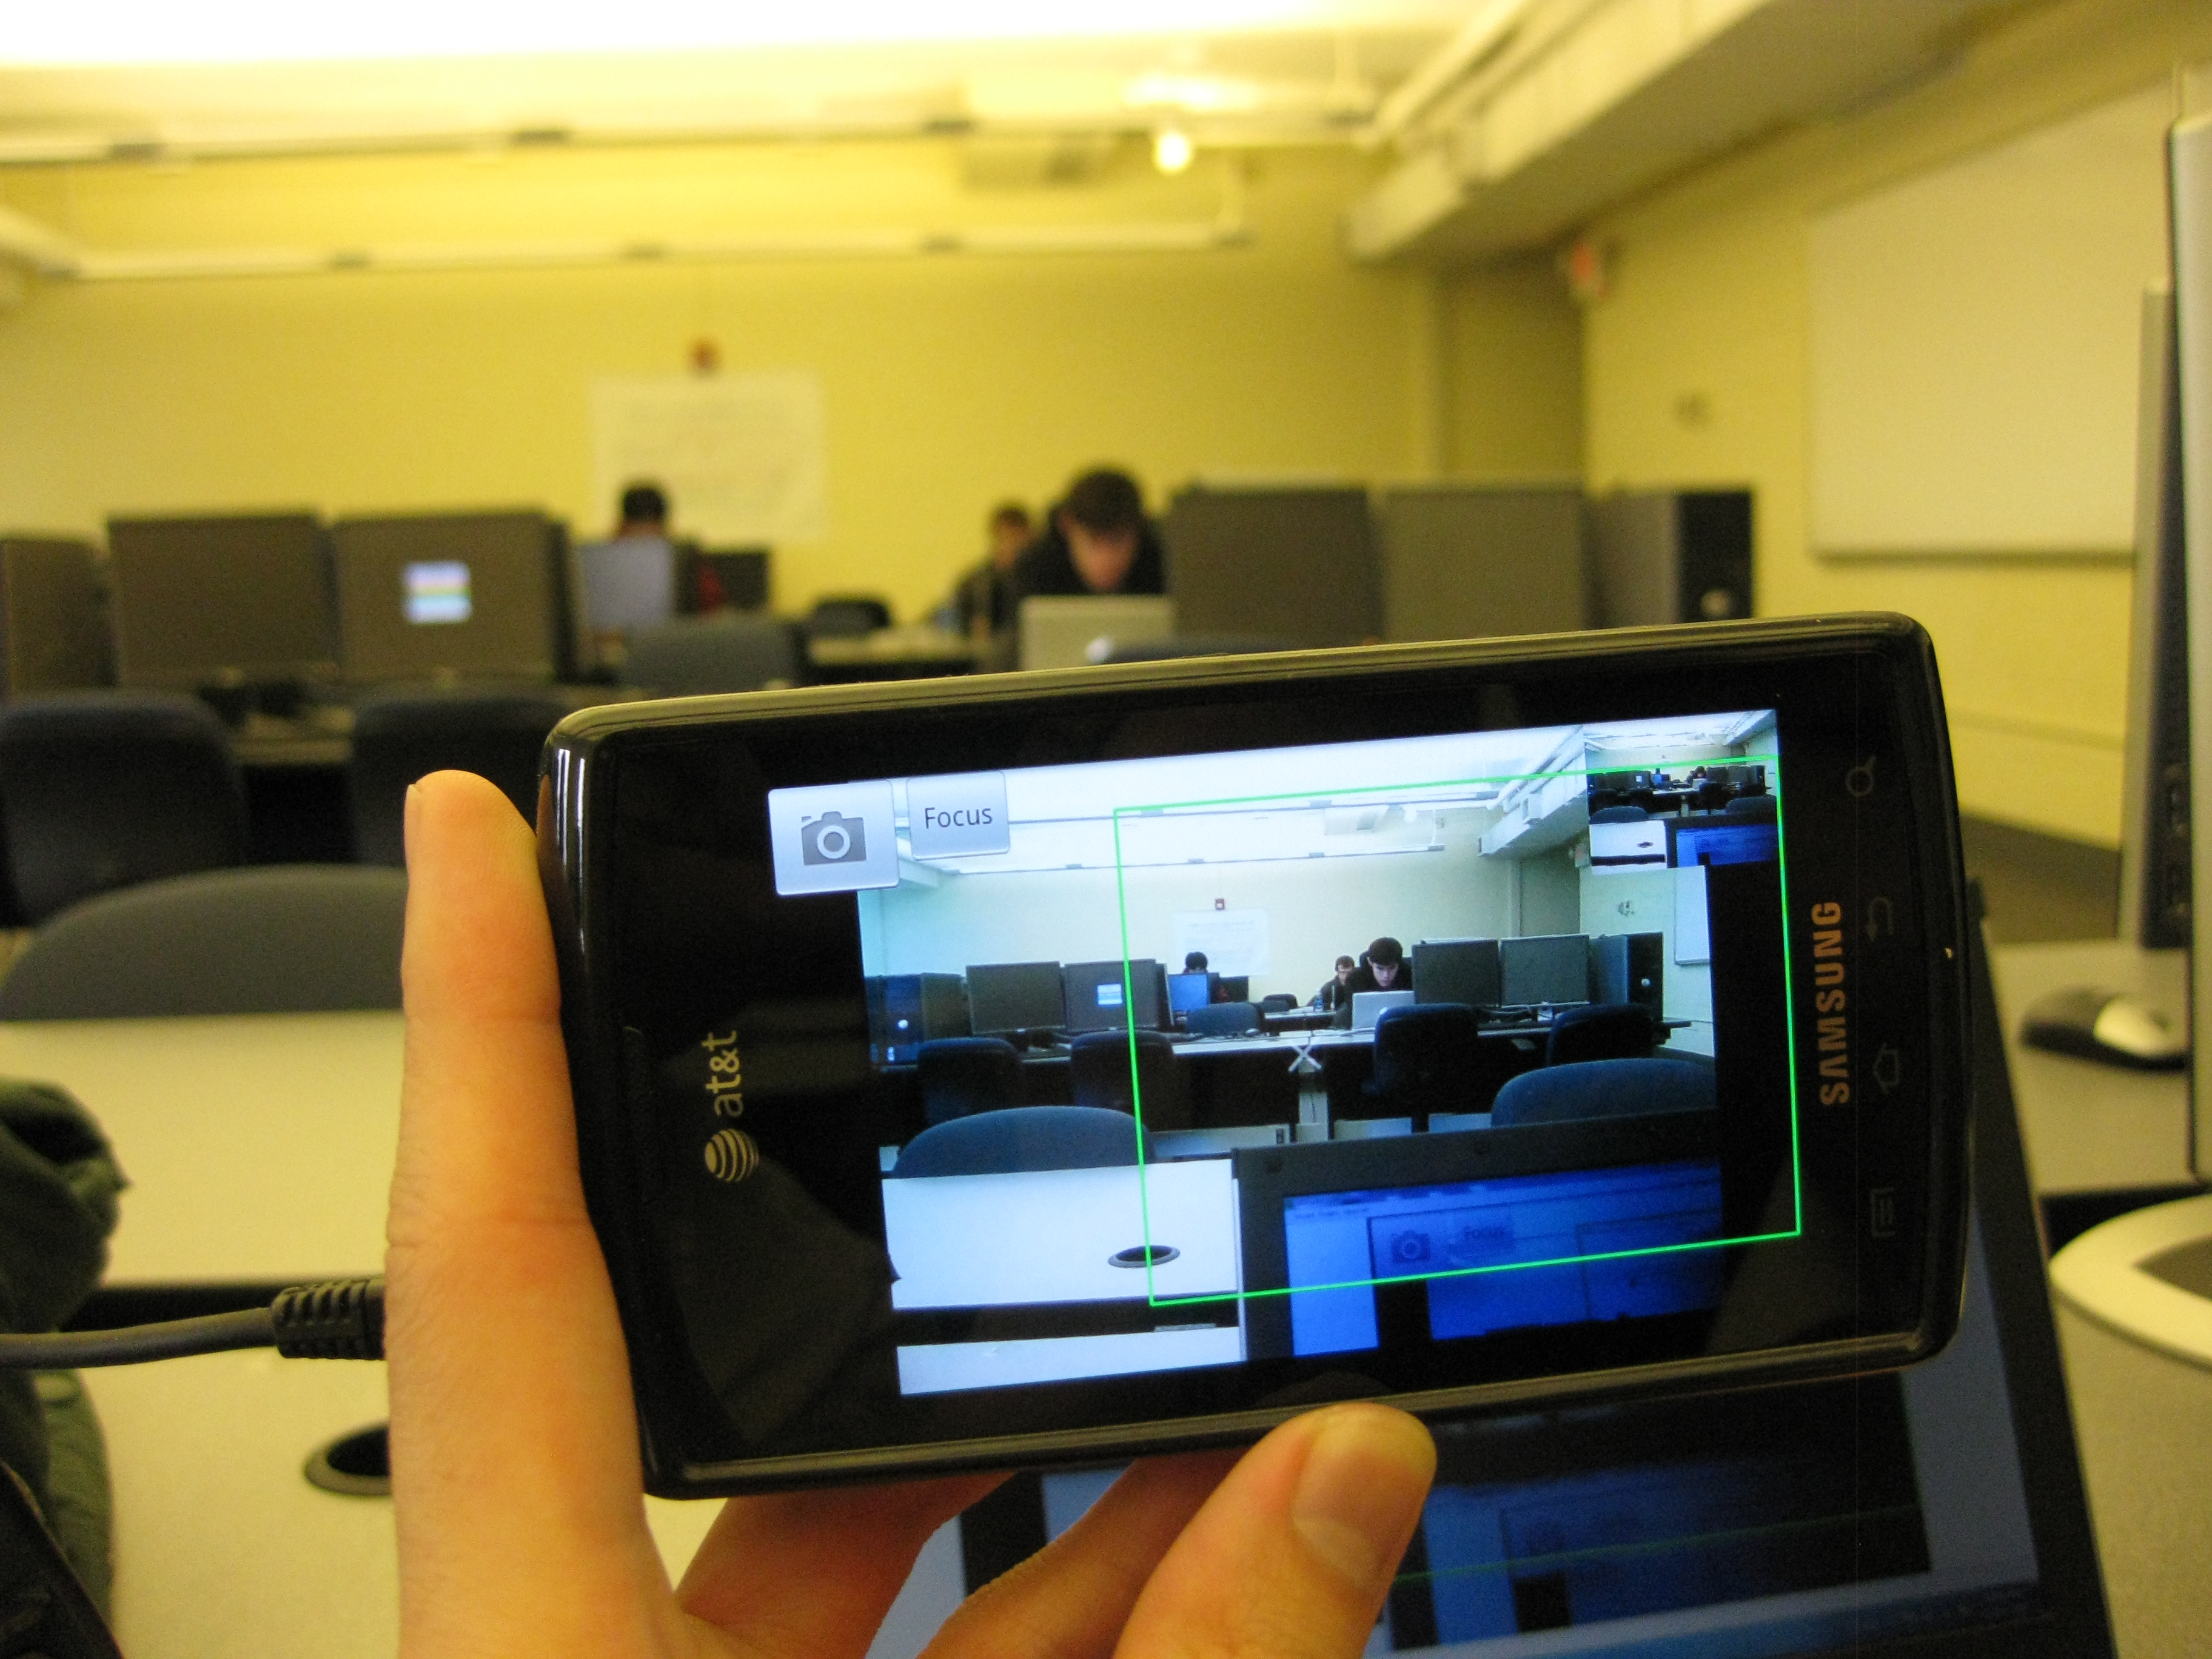
A Bounding box is used to guide the user when capturing photos. A green box indicates that the camera is at the correct pitch and the user should move the camera so as to keep the box in the centre. If the camera pitches up or down, a red bounding box will show, and no pictures will be captured until the camera is properly leveled.
All result images are cropped on the phone to have height of 350 pixel.
![]()
Panorama captured in the lab. The result is decent when the scenes are at a distance away from the user.
![]()
Panorama captured during the classroom demo. Note that the tracking for camera capture trigger is bad when the camera is pointed at the blackboard where there is no good feature for optical flow.
The source code for our computer vision algorithm is located in \360pano\jni. To build from source, checkout the OpenCV repository and place the entire \360pano folder under opencv\android\apps\. Note that you also need to have opencv\android\android-jni compiled and added into Eclipse project in side the same workspace. Then, create a new Android project from existing \360pano code in Eclipse to import the project.
The compiled android .apk file is here. Note that this has only been confirmed to work on Samsung Captivate.
A spherical to rectangle image transformation when displaying the photo. This is to remove undistort the image so that the image looks natural
Extend the 360 degree panorama to capture the whole spherical view of the environment including the sky and ground
Making the stitching done concurrently when capturing the image, so that the panorama picture can be created faster
Make use of Bundle Adjustment and Fundamental Matrix to calculate the camera translation for more accurate stitching while user is moving around and taking the panorama photo
We have successfully written a program to do a 360 degrees panorama on an Android phone in real-time. Stitching would be otherwise perfect if we use SIFT feature points to compute the translation instead of estimating the translation using optical flow. However, the design choice of using optical flow was due to the ability to run the program on the phone and generate 360 degree panorama within a reasonable generation time.