
About: Schedule
Staff
FAQ
News
Materials:
Sessions
Discussion
Engine
Reading
Writing Style
Project:
Assignments
Groups
Requirements
Showcase
Resources:
Code Samples
C++ Online
Piazza
GitHub
GameDevNet
Submissions:
CMS
CATME
![]()
Playtest 4
Beta
Today's playtesting session is for your beta release. Because of the success we had last time, we will once again be playtesting in Discord. The only challenge from last time was that we had too many iPhones and not enough iPhone games. If you want to help us playtest Android games, please download the BlueStacks emulator for your computer.
Once again,it is incredibly important that everyone have a working release for beta. The TAs will be checking well before class and will contact you if everything is not in working order. We will post these games on the Discord server so that everyone can play them.
Preparation
In preparation for this playtest, you should write a 5-10 minute test plan, as discused in the online lecture on player testing. We do not want an in-depth user study experiement. All we want is a script that outlines what the person manning your game station should be doing. This plan should include the following elements:
- Your artifacts (what are you testing?)
- A brief welcome script (what do you say to the player?)
- A task or two (what should the player do?)
- A few of questions to ask of the player
Here are some resources to help you with this format.
- Testing The Design With Users
- This is a chapter from an online text about the basic principals of user testing
- Cognitive Walkthrough
- This wikipedia entry describes a basic tenant of user testing.
Lab Format
In the past, conducting user-test script involved you explaining your game to someone in front of you, and then they sat down and played the game. That is obviously not going to happen this time. Instead, we are going to repeat the playtesting process that we pioneered in the previous release.
Once again you need to get volunteers to stream their game over Discord. Use the same procedures you had last time to manage people and get volunteers. Once the person shares their screen and starts the game, then you can start up the welcome script. Orient them to the game and give them the tasks to do.
Sharing your iOS Screen
For iOS (either iPhone or iPad), you can share your screen without installing any new software (on both MacOS and Windows). However, the way to do it is a bit unusual in each case. You have to use a piece of software in a way that you did not expect.
iOS to MacOS
To share your iOS screen with Mac, you need to use Quicktime Player. This is an application that comes with all Macs and is in your Applications folder. It is primarily used to playback videos, but it can also be used to record videos. This is the application I used to record the lectures.
Even though you do not necessarily want to record a video of your gameplay, the recording option allows you to launch a preview window. And that preview window is what you want to share. Go into Quicktime Player and choose New Movie Recording (not Screen). This will launch a window with a record button. That record button has a drop down menu. Select that button and you will see something like the option below:

As you can see, there are a lot of options -- one for each camera attached and one for each microphone attached. The item called Ascolais is my iPad. It was recognized because it is plugged into my laptop with a USB cable. You must plug your device into your computer for this to work.
Once you select your device from this menu, it will pop up a preview window showing the screen of your device. No need to hit record! Just keep this window open as you stream.
iOS to Windows
This one is a little trickier, but still doable. If you Google for iOS screen sharing options on Windows, there are a lot of applications that cost a non-trivial amount of money to use. Fortunately, you already have a free solution installed: Zoom!
You might be surprised. We said that we wanted you to stream your game with Discord, not Zoom. Just like the solution on MacOS, you just want to use Zoom to preview your phone on your PC. You are not going to use any other features of Zoom.
To share your screen, the first thing to do is to start a Zoom meeting. Where is the Zoom link, you ask? There is none. You will host the Zoom meeting. This will be a lonely meeting. It will only have you and no one else in it. The only purpose of this meeting is to connect your phone to your screen.
Once you start the meeting, share your screen. In Zoom you have the option to share a connected iPad or iPhone, as shown in the picture below:

Select the option that we have shown here. We you do that, your Windows machine will turn into an Airplay Receiver. It will give you the following instructions to connect to this receiver.

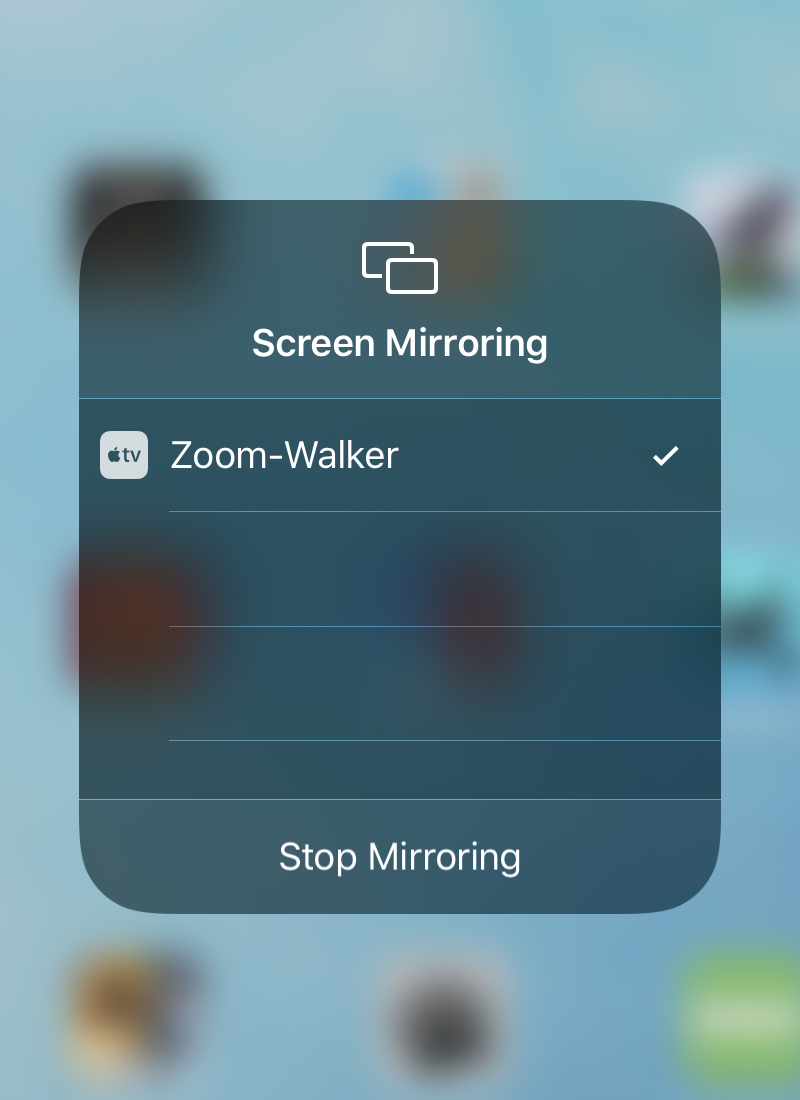
Now it is time to connect to your device. Access the top-level pulldown menu -- the one that you use to turn on Bluetooth. This is illustrated on the left below. The screen mirroring button is the one with two rectangles overlayed on top of each other. Press that button and choose your device as shown on the right below.

|
|
When you do this, you should see your device in the screen share window of Zoom. You are ready to start streaming on Discord.
Sharing your Android Screen
For both MacOS and Windows, you must install a third-party application to shared your screen. There are A LOT of sketchy options out there. Or if they are not sketchy, they charge subscription rates. We have found one option that is not sketchy and is mostly free: Vysor. Yes, they have a pricing model. But the free option (well, free with ads) is good enough for class. It also runs on Linux for the handful of you that use that OS.
Keep in mind that if you do not pay, it will play an ad on your Android screen once every 15 minutes (this is not sketchy; we promise). So you should budget this into your playtesting.
For both MacOS and Windows, you must enable debugging on your Android device. However, you already had to do this to load onto the device from Android Studio. So this is not a big deal.
Android to MacOS
Launch Video and make sure that the Android device is plugged into your computer with a USB cable. You should see your device at the top of the window, as shown below:

Here the SM TM800 is my Android device. Press View to start viewing. The first time that you do this it will install a new APK on to your device. Let that finish, and they your screen should appear.
Android to Windows
The instructions for Windows are much the same as they are for Mac. The only difference is that you have to install some ADB libraries, as shown in the illustration below.

Click on the link. Then follow the instructions for MacOS above.