For this problem set, you are to turn in an overview document covering Part 2.
The overview document should be composed as described in
You may work on this problem set with a partner. We strongly recommend discussing, critiquing, and agreeing on specifications before doing any implementation. You can also bring specs to office hours to get feedback. When critiquing a spec, think about the spec both from the standpoint of the client who is going to use the spec, and the developer who must implement it. It is also a good idea to discuss and agree on abstraction functions and rep invariants for your data structures. You will also need to think about how to divide your program into modules.
We will be holding 20-minute design review meetings during March 10–13. Your group is expected to meet with one of the TAs or the instructor during their office hours, or with consultants during consulting hours. A signup schedule is available on CMS. You should be able to explain your design in about 15 minutes, leaving 5 minutes for questions. However, the course staff may interrupt and ask questions! In your design review, plan to talk about at least:
Explain briefly how equipping a collection abstraction (such as lists, set, or
maps) with a fold operation or operations (e.g.,
foldl, foldr) promotes loose coupling. Compare to
the alternatives.
Prove the following statements using only the inference rules provided in Lecture 11: Natural Deduction.
Prove the following statements using the inference rules for propositional logic in Lecture 11: Natural Deduction and the rules for quantifiers in Lecture 12.
Suppose we have a function max with the following spec:
(* Requires: ⊤
 * Returns: r = max(x,y) where (r=x∨r=y) ∧ r≥x ∧ r≥y *)
Now we implement a function that takes the maximum of three numbers as follows:
(* Requires: ⊤
 * Returns: r = max3(x,y,z) where (r=x∨r=y∨r=z) ∧ r≥x ∧ r≥y ∧ r≥z *)
fun max3(x,y,z) =
  if x <= y then max(y,z) else max(x,z)
max3
meeting its spec.
It might help to play around with the system in any one of many available implementations online to obtain a better grasp of the consequences of these rules.
All state transitions occur across the entire board at the same time. That is, if we consider the current state of the game to be represented as the state of each cell on the board, then the next state of the game is one in which the above transition function is applied once to each cell simultaneously. We call this board transition a tick. One can imagine a slight variation on this game in which live cells also contain an RGB color represented as a 3-tuple of integers, each between 0 and 255. For this variation, the transition rules given above need to be slightly modified. When a dead cell is brought to life by its three neighbors, it gets the average color of those neighbors. When a live cell is kept alive by its 2 or 3 neighbors, its color remains unchanged.
Your main task is to implement structure GameOfLife,
for which we've provided a skeleton in gameOfLife.sml. The
structure GameOfLife instantiates signature
GAMEOFLIFE which we also provide in gameOfLife.sig.
As will be discussed in greater detail below, we've given you an
interface to a GUI that will allow you to display the state of
your game graphically. The way you use your functions to update
the GUI is intrinsically tied to your design, and you should
consider this carefully when defining type state. The
GAMEOFLIFE is defined as follows:
signature GAMEOFLIFE = sig
(* Your representation of the current state of Conway's Game of Life *)
type state
(* A single 24-bit color. Each channel may range from 0 to 255, with
0 being lowest intensity and 255 being the highest. In order, the
color channels are Red, Green, and Blue. *)
type color = int * int * int
(* A cell (x,y,c) is alive at position (x,y) on the board, with
color c *)
type cell = int * int * color
(* an instance of board = n represents a board with
range [0,2^n - 1] in both the x and y dimensions *)
type board_size = int
(* The initial state of the game: a board, and a list of live cells *)
type config = board_size * cell list
(* Initialize the game state, from a provided configuration *)
val startConfig: config -> state
(* Advances the game of life by one tick, and updates the GUI with any
visible changes to the state of the board. *)
val tick: state -> state
(* zoom i sets the current zoom to level i - initial value is 0 When
i<0, each pixel drawn is equivalent to a 2^(~i) square cell block
When i=0, each pixel corresponds exactly to a single cell When
i>0, each cell is drawn as a 2^i pixel square block in the GUI *)
val zoom: (state * int) -> state
(* pan x y centers the view at (x+0.5,y+0.5) - initial value is set
to be x=y=2^(n-1)-1 - that is, located at the center of the 2^n
x 2^n board. For higher levels of magnification, this offset
should be displayed exactly, but for zoomed-out views it is
acceptable to adjust the center by sub-pixel increments if the
implementation is simpler or faster *)
val pan: (state * int * int) -> state
(* autozoom b sets the Auto-Zoom state to enabled or disabled. When
it is enabled, at every tick the pan and zoom values are adjusted
internally to ensure that all live cells are in view for the GUI,
and the level of zoom is as close as is reasonably possible. *)
val autozoom: (state * bool) -> state
end
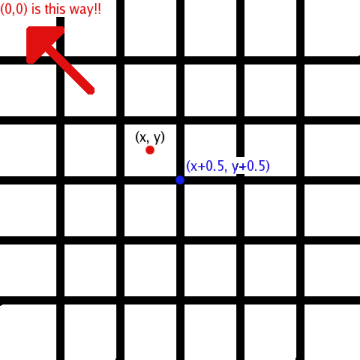
The GAMEOFLIFE specification has some subtleties.
The game's universe is square,
with a power-of-2 number of cells in each dimension.
Cells themselves occur at integer locations in our space.
The upper left cell is (0,0) and the
bottom right is (2n - 1, 2^n - 1)
for board size n. However, the
GUI is always centered between cells, and thus pan x y
centers the view at (x+0.5,y+0.5). The following picture demonstrates
this:
Note that because the viewing window is always centered between cells, we
cannot zoom indefinitely. The viewing window is limited to
512 x 512 pixels, so zooming in further than zoom 8
does not make much sense.
When the level of zoom is such that each viewing window pixel represents
several cells in the game of life, the color of the cell in the GUI should be
displayed as the average color of all cells that fall within
that window pixel, including dead cells, which are black (0,0,0).
It is of the utmost importance that you come up with a good representation for the game state. Your representation should allow for efficient zooming at powers of two as described above and accommodate very large boards as long as they are sparsely populated; your implementation should handle sparse populations on board sizes as large as 224×224 efficiently. To assure this, run time must not grow linearly with the size of the board. Be sure that you have a good understanding of what is required for all parts of the assignment before you design the state representation.
You will compile multiple structures at once using the Compilation Manager (CM). We are providing a file sources.cm that contains a list of all files that need to be compiled. Use the compilation manager by typing CM.make("sources.cm"); at the SML command prompt. This command will automatically compile all of the files that have changed since the last time CM was invoked. Add your own files to the sources.cm file to have them compiled automatically.
To set-up our provided GUI, download the appropriate package for your computer:
Linux Executable (with source - requires SDL and SDL_net libraries)
Windows Executable (with source and required dlls)
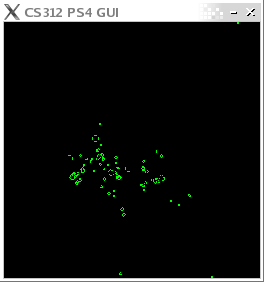
When run, the GUI should open a 512×512 display window, as well as a console for displaying status messages.
To connect to an already-running instance of the GUI, invoke
NetGraphics.setup with a list of pairs (host, port) as arguments. For
example, NetGraphics.setup [("localhost", 3124)] will
connect to the GUI running on port 3124 (the GUI's default) on the local
machine. Once the connection has been established, you program will
interact with the GUI using one command: NetGraphics.report( msg
) where msg is a string containing a drawing command
or commands, each of which is followed by a newline. The commands
understood by the GUI are as follows:
Since the GUI only relies upon the first letter of the command to identify
its type, it is perfectly acceptable and encouraged to shorten the command
words to "C", "P", "R" and "F", respectively. To experiment with the
effects of the different commands, you can also connect to the GUI outside of SML with
telnet localhost 3124. Any commands you type in will executed by the
GUI exactly as if they had been reported by your SML code -- remember to
hit "F" and press enter to update the display!
We've provided you with a tool, called the debug loop, to
manipulate the Game of Life from the command line. After
compiling the code (CM.make("sources.cm")), you can enter
the debugging mode using the command Debug.debug s; where s is a valid
state in your game. You will see a prompt (>). From here you have
access to the follow commands:
So long as you have correctly implemented all of the functionality in gameOfLife.sml, the debug loop should run smoothly and require no changes on your part.