Overview
Computer graphics can be tricky, and you often need a lot of experience with programming before you can get started. However, for over fifty years, the LOGO Turtle has allowed elementary-school students to draw cool and interesting shapes on their computer. And if they can do it, so can you.
The Turtle is a cursor on the screen that uses a Turtle for its icon. To draw a line, you push the Turtle forward. The screen draws a line of the same color as the Turtle (which can be changed at any time) along its path of movement. To draw more interesting shapes, you simply change the direction of the Turtle. With a few more commands you can even draw solid shapes.
While programming languages have come a long way since the early days of LOGO, the graphics Turtle lives on. Every major programming language, from C/C++ to Java to Python, has a version of the Turtle. For today's assignment you get to participate in this 50 year tradition, and hopefully have some fun in the process.
This assignment is a little harder than the previous one, but you have two full weeks to work on it. In the past we have found this to be more than enough time for this assignment. But get started early! If you do not know where to start, or if you are completely lost, please see someone immediately: either the instructor, a TA, or a consultant. A little in-person help can do wonders.
Again, please remember to fill out the survey telling us how long you worked on this assignment.
IMPORTANT
Ensure that you have the right version of introcs for this assignment. To do this open the command shell and type:
pip install --upgrade introcs
You may see a warning that you do not have permission to do this. If that is the case, you will need to run this command in administrator mode. In Windows, right-click on the PowerShell icon to run it in Administrator mode. On MacOS, you will need to use the sudo command. Type
sudo pip install --upgrade introcs
This will ask you for your password before continuing. If this does not work, talk to a consultant to help you upgrade.
Learning Objectives
This assignment is designed to give you practice with the following skills:
- It introduces you to the famous Turtle, which is a great way to learn a new language.
- It gives you experience with writing simple for-loops.
- It gives you experience with recursion.
- It gives you experience with complex objects that have both attributes and methods.
- It gives you experience with using asserts to enforce your preconditions.
This is a classic assignment that is continuing because students really like it. But when we say classic, we mean really, really old. While we did mix it up a bit this year, there are guaranteed to be solutions to many of these problems in the wild. Please avoid looking at solutions online, or looking code from other students this semester, or semesters previous.
In this assignment, it is highly unlikely that your code for this assignment will look exactly like someone else's. We will be using Moss to check for instances of plagiarism. We also ask that you do not enable violations of academic policy. Do not post your code to Pastebin, GitHub, or any other publicly accessible site.
Table of Contents
Before You Get Started
Academic Integrity
With the exception of your CMS-registered partner, we ask that you do not look at anyone else's code, seek solutions online or from students of past offerings of this course, or show your code to anyone else (except a CS1110 staff member) in any form whatsoever. This is in keeping with the the Academic Integrity Policy for CS 1110. It is okay to post error messages on Piazza, but not code. If we need to see your code, we will do that in person.
Partner Policy
You may do this assignment with one other person. Form your group on CMS as soon as possible. This can only be done after the assignment is released on CMS, but it must be completed before you submit the assignment. Both people must do something to form the group. The first person proposes, and then the other accepts. CMS does not allow you to form groups once grades are released. Once you have grouped on CMS, only one person needs to submit the files.
If you do this assignment with a partner, you must work together. It is against the rules for one person to do some programming on this assignment without the other person sitting nearby and helping. Furthermore, this assignment is not designed for you to split the work cleanly between partners. Sit together and take turns "driving" (using the keyboard and mouse) and "navigating" (guiding the code that's being typed, spotting errors, keeping track of what's done and what's still on your todo list).
Development Environment
To do this assignment, Python must be set up properly. If you have not already done this, follow the installation instructions to set it up on your computer. Alternatively, you can just work in the ACCEL lab.
You should also create a folder on your hard drive that is dedicated to this assignment and this assignment only. Every time that you work on a new assignment, we want you to make a new folder, to keep things organized and avoid problems with naming collisions. Make sure that the command shell and Atom Editor are both open in the current folder before you start.
Turtle Graphics
Python actually has a built-in Turtle provided by the turtle module. However, we find this module a bit confusing to use, particularly for a beginner. In addition, we discovered last year that Python 3 broke the Turtle on Windows. Instead, we provide an alternative Turtle, which we call the Introcs Turtle. This Turtle is provided by the module introcs, which you should be well familiar with right now.
However, you cannot access the Turtle by importing introcs. Why not? Because the Turtle uses a lot of memory and processing power and we did not want it to start up every time you import introcs. Instead, it is contained in a module inside of introcs (yes, modules can contain other modules) called introcs.turtle. So to use this module, you would instead type
import introcs.turtle
This is a bit of a mouthful, because you will have to write introcs.turtle before all the functions in this module as well. That is why, for this assignment, we prefer the from syntax. You only need three things from this module: Window, Turtle, and Pen, which you can import as follows:
from introcs.turtle import Window, Turtle, Pen
While we describe these in detail below, you can get even more information from the official documentation. We wrote this new Turtle from scratch and are quite proud of how powerful it is.
Assignment Source Code
This assignment is much more bare-bones than previous ones. There is only one file to download:
a4.py- This is file contains stubs for all the functions in this assignment, and is the file you will submit for a grade.
To save you time, we have given complete specifications of most of the functions you are to write. Study them carefully. Note how precise and thorough they are. You should aim for this level of quality when you start to write your own specifications.
You will not be creating a test script this time. Writing test cases for graphics is almost impossible. Therefore, you will be looking at the the drawings produced by your functions to determine correctness.
However you will notice that you can actually run a4.py as a script.
Run it as a script by typing
python a4.py
You will see that it asks you yes/no questions. Answer 'y' to this first question. The turtle will draw two lines for you. In general, answering 'y' will call the specific drawing function so that you can test it. Any other answer will skip over that drawing function. Since drawing can take a long time, this gives you a nice way to test only the specific drawing function that you are working on. However, right now it does not do much. That is because you have not started on the assignment.
If you want more control over your testing, you will need to import the functions
of a4.py manually. To do this, you need to understand the
introcs.turtle module a bit more. This module provides three classes:
Window, Turtle, and Pen.
Window
To create a window, you use the constructor Window() and assign
the result to a variable. Try this command at the interactive prompt:
>>> from introcs.turtle import Window
>>> w = Window()
This will display a window on your screen. The window object has several attributes that you can change.
| Attribute | Meaning | Invariant |
|---|---|---|
| w.x | x-coordinate of top left corner | Must be an int |
| w.y | y-coordinate of top left corner | Must be an int |
| w.width | Width of the window in pixels | Must be an int |
| w.height | Height of the window in pixels | Must be an int |
| w.title | Title at top of window | Must be a string |
Try changing the values of these attributes (with assignment statements). For example, what happens when you type the following command:
>>> w.width = 100
In addition, there are two important methods:
w.clear()- This erases the contents of the Window. It also detaches any Turtles so that they no longer work.
w.dispose()- This closes the Window permanently.
Pixels inside of the window follow a rather intuitive coordinate system. The point (0,0) is the center of the window. The x-coordinates get larger to the east and the y-coordinates get larger going up.
Turtle
The Turtle class is used to draw on your Window. Each Turtle object t
has the following important attributes:
| Attribute | Meaning | Invariant |
|---|---|---|
| t.x | x-coordinate of the Turtle | Must be an int or float. Cannot be altered directly |
| t.y | y-coordinate of the Turtle | Must be an int or float. Cannot be altered directly |
| t.heading | Turtle heading in degrees counter-clockwise from east. | Must be an int or float. |
| t.color | Current Turtle color | Must be a string, an RGB object, or an HSV object. |
| t.speed | The drawing speed of this Turtle. | Must be an int 1 (slowest) to 10 (fastest), or 0 (instantaneous) |
| t.visible | Whether the Turtle icon is visible. | Must be a bool |
| t.drawmode | Whether the Turtle should draw anything when it moves; if False, nothing is drawn. | Must be a bool |
To create a Turtle, you use the constructor Turtle() which takes a single
argument: the Window that you want to draw on. Assuming that you made a Window object
w in the previous section, try the following at the interactive prompt:
>>> from introcs.turtle import Turtle
>>> t = Turtle(w)
Assuming that you upgraded introcs, You should now see a (red) Turtle on your Window! The Turtle will always start at coordinate (0,0), which means it is centered in the window.
The fact that Turtle and Window are separate allows you to have as many Turtles as you
like so that you can draw different things with them. If at any time you have too many
Turtles, use the method w.clear(). This removes all Turtles from the
Window (which means that attempts to do anything with any old Turtles will fail),
so you will need to add a brand new Turtle to start drawing again.
Position and Orientation
The position and heading of the Turtle are maintained using floating point numbers. This is needed for accuracy. If integers were used, errors would be introduced after only a few calculations. However, whenever a point is to be drawn in the window, its x- and y-coordinates are rounded to the nearest integer because the pixel coordinates are represented as integers.
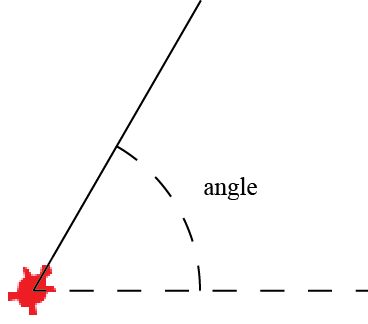
The direction of the Turtle is called its heading. It is a number representing the angle in degrees counterclockwise from east (to the right). Thus east is 0 degrees, north is 90 degrees, west is 180 degrees, and south is 270 degrees. Negative angles and angles greater than 360 are allowed; the remainder modulo 360 is used.
While the heading attribute can be modified, the x and y
attributes cannot. You can only control the Turtle's position via the methods listed below.
Important Methods
In addition to its attributes, a Turtle object t has several important methods:
t.forward(dist)-
Moves the Turtle
distpixels in the direction of its current heading. If the drawmode is True, a line is drawn; otherwise, no line is drawn. t.backward(dist)-
Moves the Turtle
distpixels in the opposite direction of its current heading. If the drawmode is True, a line is drawn; otherwise, no line is drawn. t.left(a)-
Rotates the Turtle in place
adegrees counterclockwise. t.right(a)-
Rotates the Turtle in place
adegrees clockwise. t.move(x,y)-
Moves the Turtle
tto pixel(x,y)without drawing anything.
Note that most of these methods are used to move the Turtle about the screen. This
is why the attributes x and y cannot be altered directly
(e.g. you cannot assign values to them). You should use these methods instead.
All of these methods autoflush when the speed is not 0 (see below), and so you will see
the Turtle draw as soon as they are called.
Colors
To change the Turtle color, you assign a new value to the color attribute. You can use the RGB and HSV objects from the last assignment. You cannot use a CMYK object with a Turtle; that color model is designed for printing, and not for displaying on your screen.
The Turtle also supports strings as colors. Just put the name of the color that you want in quotes; make sure the name is all lower case. For example, to make your Turtle blue, try
>>> t.color = 'blue'
If you are familiar with web colors, those are also supported. Just remember to start the string with a hashtag (#), like this:
>>> t.color = '#0099CC'
Speed
As you will discover with this assignment, the turtle can be quite slow. You can control the speed of the Turtle by setting is speed attribute. It is a number in the range 1 ≤ speed ≤ 10, with 1 slowest and 10 fastest. But even speed 10 can be quite slow. Speed 10 will draw a single line instantaneously. However, if the Turtle is drawing multiple lines, it will draw each one separately. For the radial shapes, this can take a while.
If you really want to draw quickly, you should set the speed to 0. This speed is exactly what it sounds like: the Turtle does not draw at all. This seems counter-intuitive; of course you want the Turtle to draw. But you can always tell the Turtle to draw later by calling the flush method, like this:
>>> t.flush()
When you call flush on a Turtle with speed 0, it instantaneously draws all the lines that you asked the Turtle to draw. Hence, speed 0 remembers all the drawing commands, but draws them only when you ask it to finish. This is really handy for fast drawing (and we will rely on it for grading).
For this reason, you will need to remember to flush in many of your functions in this assignment. But you should be careful how you use flush. If you call it after each Turtle step, it will update the screen before you are ready. In this case, your Turtle will be no faster than speed 10. You should only call flush at the end of a function, and only in the main functions (i.e. not the helpers).
If the speed is 1 through 10, it is unnecessary to call flush. All of the drawing methods above will autoflush (meaning they call flush for you). But it is still safe to call flush for these speeds anyway.
Drawing with the Turtle
Throughout this assignment, you will be asked to draw shapes with a Turtle.
There are three ways to do this. The first is to type Turtle commands
directly in the Python interactive shell. You should do this right now to
familiarize yourself with the Turtle class and its methods.
For example, try these commands:
>>> from introcs.turtle import Window, Turtle
>>> w = Window()
>>> t = Turtle(w)
>>> t.color = 'green'
>>> t.forward(100)
>>> t.color = 'red'
>>> t.right(90)
>>> t.forward(150)
As you type the lines up to and including t = Turtle(w), you will
see a window appear with a Turtle at the center facing west. As you type the other
commands, the Turtle will change color, move, and draw lines.
The second way to draw is to add new procedures to the module a4.py and
call them from the interactive prompt. If you look at the file, you will notice that
it contains a procedure draw_two_lines. We gave you this procedure to
show you how to write a graphics procedure. Note that it takes the Window object as
an argument, so it does not create a new window. It also does not clear the Window,
though we might want our other functions to do that. All it does is create a Turtle,
and use that Turtle to draw two lines.
To try out this function, navigate to the directory containing the file a4.py and
start up the interactive prompt. Then type:
>>> from introcs.turtle import Window
>>> w = Window()
>>> import a4
>>> a4.draw_two_lines(w,2)
This will draw two lines in the window w, at speed 2. Study the body of draw_two_lines,
as it will help you with all of the tasks in this assignment.
For the remainder of this assignment, you will be writing procedures that draw shapes,
much like draw_two_lines. As you write a procedure, refer constantly to
the specification. Follow it carefully. If you have to call another procedure, look
at its specification and make sure you follow it. A huge number of programming errors
arise from not following specifications carefully.
Pen
Objects of type Pen are very similar to Turtle objects, except that they draw a bit differently. Creating a Pen is similar to creating a Turtle. At the interactive prompt try
>>> from introcs.turtle import Pen
>>> w = Window()
>>> p = Pen(w)
The pen icon does not look like a turtle. Instead, it looks like a diamond on its side with two different colors. With that said, this Pen object has a lot of attributes in common with a Turtle object. It draws from the tip on the left, and the left-side color is the drawing color.
However, the Pen does not have a heading attribute. Instead, for a Pen object p, you draw with the following methods.
p.drawLine(dx,dy)-
Draws a line starting from the current Pen position with distance
dxpixels along the x-axis anddypixels along the y-axis. p.drawTo(x,y)-
Draws a line starting from the current Pen position to the pixel (
x,y). p.drawOval(xrad,yrad))- Draws an oval of x-axis radius xrad (in pixels) and y-axis radius yrad centered at the current Pen position.
p.move(x,y)-
Moves the Pen
pto pixel(x,y)without drawing anything.
Solid Shapes
The Pen also does not have a drawmode attribute. The four methods listed above either always draw (drawLine, drawTo, drawOval) or never draw (move). What the Pen has is a solid attribute. When this attribute is True, the Pen will enter into a "solid mode". Anything that is drawn between now and when the attribute becomes False (or when a call to move is made) will result in a solid shape.
For example, to draw a solid square, try the following sequence of commands with your Pen.
>>> p.fillcolor = 'blue'
>>> p.solid = True
>>> p.drawLine(0,50)
>>> p.drawLine(50,0)
>>> p.drawLine(0,-50)
>>> p.drawLine(-50,0)
>>> p.solid = False
When you finish, the pen will fill the insides of the square with the color blue.
Because the pen can draw solid shapes, it actually has two color attributes: fillcolor and edgecolor (there is no simple color attribute in Pen). The fillcolor is the color it uses inside a solid shape, and edgecolor is the color for hollow shapes as well as the border of solid shapes. When you look at the pen icon, the edge color is the color on the left and the fill color is the color on the right.
Color Objects
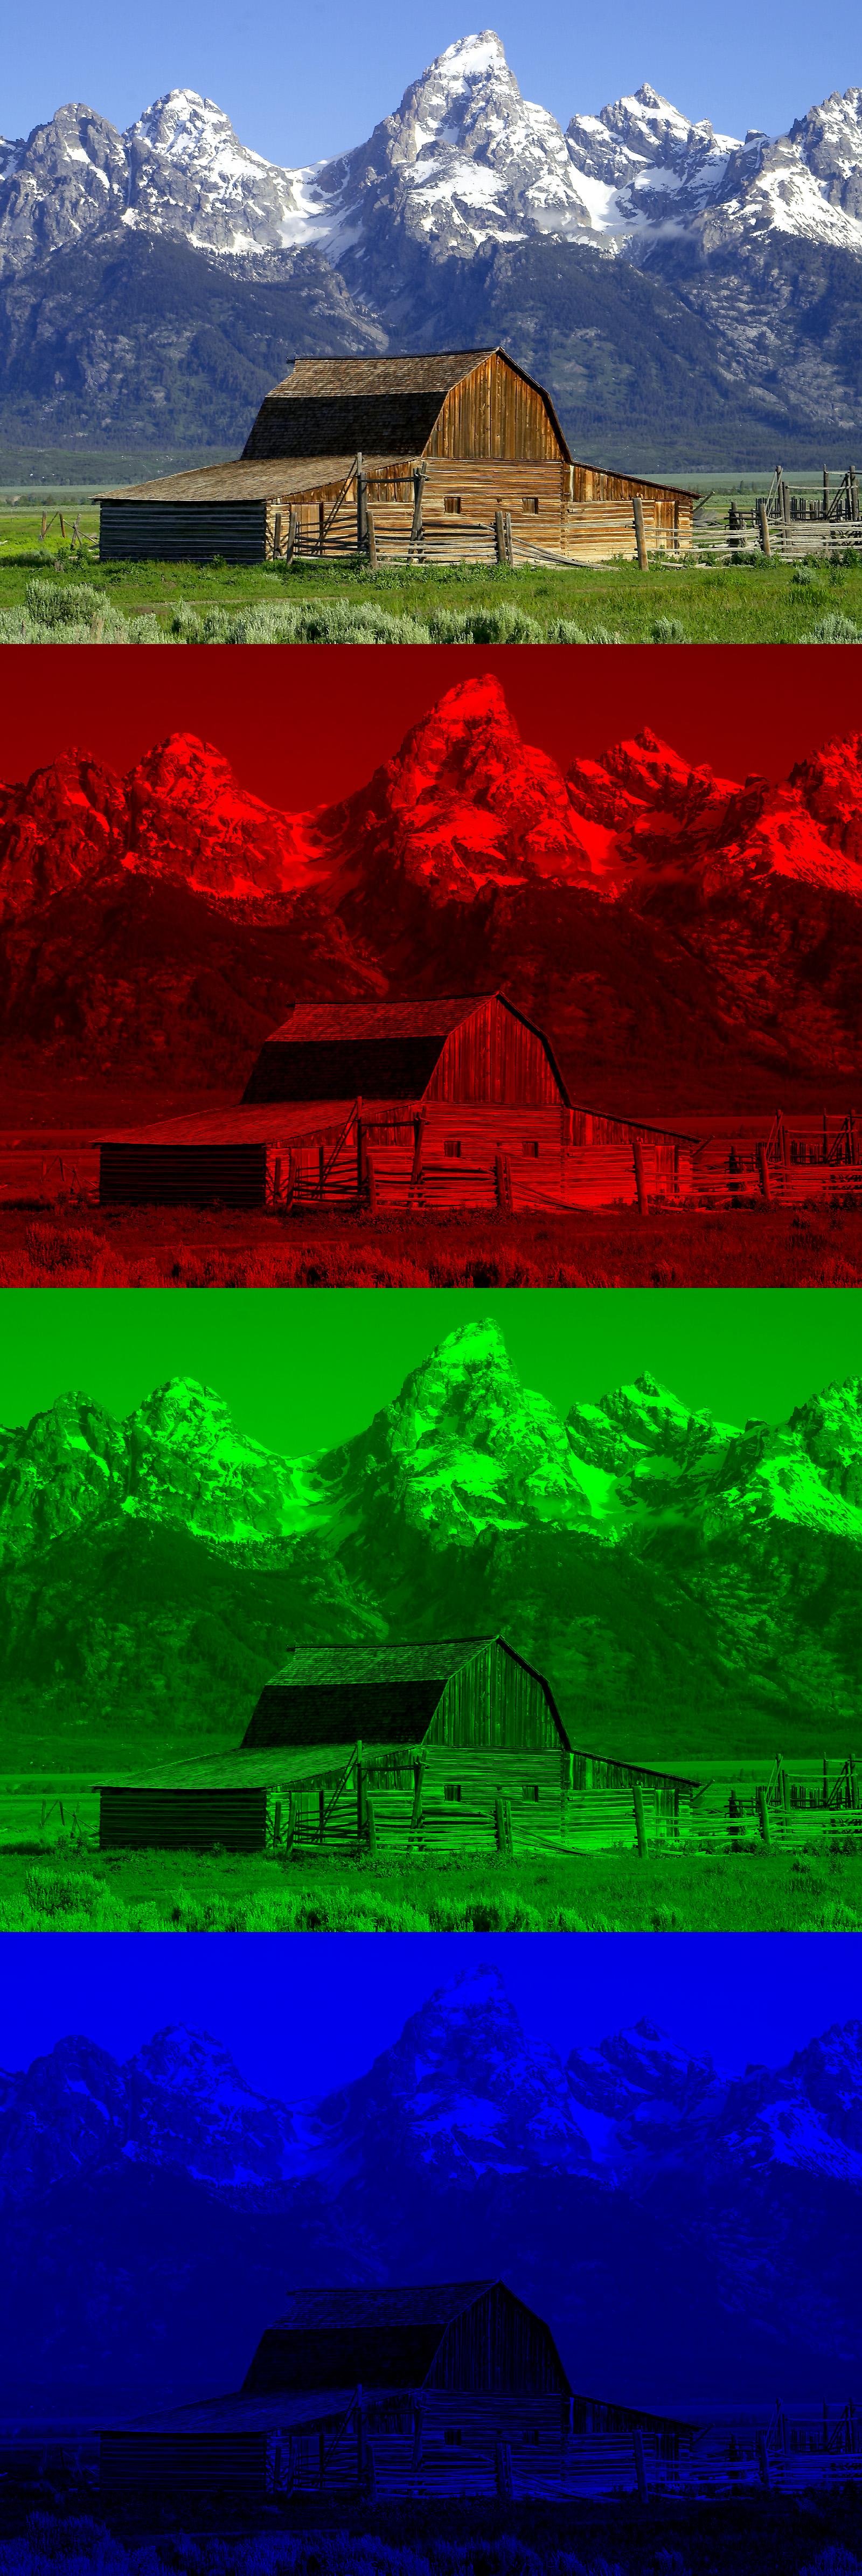
The RGB system is named after the initials of the three color names: red, green, and blue. In this color model, light from these three colors are mixed to produce other colors, as shown in the image to the left. Black is the absence of color; white the maximum presence of all three.
In the upper right is a colored image. Below it is its separation into red, green, and blue (here is a high resolution version). In the three separation panels, the closer to black a point is, the less of that color it has. For example, the white snow is made up of a large amount of all three colors, whereas the brown barn is made up of red and green with very little blue. Because it works by adding colors to black, the RGB system is “additive”.
The color model RGB is used in your TV and computer screens, and hence on web pages. Its roots are in the 1953 RCA color-TV standards. But the idea has been around longer; see this exhibit for some amazing full-color images taken with an RGB camera over 100 years ago. In the RGB model used in most systems, the amount of each of red (R), green (G) and blue (B) is represented by a number in the range 0..255. Black, the absence of color, is [0, 0, 0]; white, the maximum presence of R, G, and B, is [255, 255, 255]. This means that there are 16,777,216 different colors.
In some graphics systems, RGB is used with float numbers in the range 0.0..1.0 instead of int values 0..255. The reasons for this discrepancy is that the mathematical formulas for color require real numbers 0.0..1.0, but it takes a lot less memory to store ints instead (and images require a lot of memory). In your program, you may have to convert each number in the integer range 0..255 to a float in 0.0..1.0, calculate a mathematical formula, and then convert back to 0..255.
The introcs Color Classes
All of the color models of the previous section are provided by the module introcs, which was installed with Cornell Extensions. This module provides three different classes: RGB, CMYK, and HSV.
In addition, introcs also has some constants (e.g. global variables that should not be altered) that you can use for the various colors. All of these colors are in the RGB color space. For example, introcs.MAGENTA is [255, 0 , 255] and introcs.ORANGE is [255, 200, 0]. There is a Wikipedia page with a list of colors that gives (non-Python) names to many RGB colors.
The Class RGB
The class RGB is the type of objects that represent RGB color. Objects of type RGB have three attributes: red, green, and blue (they also have a secret attribute alpha which will not be used in this assignment). For example, if c is a variable containing a (name of) an RGB object, you would use the expression c.red to access the red value.
The RGB constructor function takes three arguments, assigning these values to the attributes in the order red, green, and blue. For example, to create an RGB object representing the color red, use the assignment:
red = introcs.RGB(255,0,0)
The Class CMYK
The class CMYK is the type of objects that represent CMYK color. Objects of type CMYK have four attributes: cyan, magenta, yellow, and black. For example, if c is a variable containing a (name of) a CMYK object, you would use the expression c.cyan to access the cyan value. The CMYK constructor function takes four arguments, assigning these values to the attributes in the order cyan, magenta, yellow, and black. For example, to create a CMYK object representing the color red, use the assignment
red = introcs.CMYK(0.0,100.0,100.0,0.0)
The Class HSV
The class HSV is the type of objects that represent HSV color. Objects of type HSV have three attributes: hue, saturation, and value. For example, if c is a variable containing a (name of) a HSV object, you would use the expression c.hue to access the hue value. The HSV constructor function takes three arguments, assigning these values to the attributes in the order hue, saturation, and value. For example, to create an HSV object representing the color red, use the assignment
red = introcs.HSV(0.0,1.0,1.0)
Assignment Instructions
This assignment is broken up into four tasks. Each task corresponds to a procedure stub in a4.py. You will find this assignment to be a lot easier if you complete and fully test one task before moving on to the next. We do not require that you make a unit test this time. To test our your function, simply comment out or add commands to the body of the function main().
The function main() is what is executed when you run this module as an application. It is there to help you with your testing. Feel free to change it however you wish. We will not look at the body of this function in testing your solution.
Asserting Preconditions
As we saw in class, it is very helpful to assert your preconditions when you are using recursion or iteration. This keeps you from being caught in an (effectively) infinite loop.
Throughout the code in a4.py, we have placed assert statements in the various function stubs. However, we do not guarantee that they are enough. When you complete a function, we expect that you fully check your precondition with assert statements. If the provided assert statements do not fully check your precondition, then you must add more.
To help you with this process, we have provided you with several helper functions at the very top of a4.py. All of these helper functions return a boolean value: True or False. These helper functions are to be used inside of an assert to check part of a precondition, as shown throughout the code.
This strategy of using helper functions to check preconditions is a common one
in programming. Many of these functions have the same or similar preconditions.
Furthermore, these preconditions can be quite complex (particularly the one shown
in valid_color()). Instead of writing the same complex boolean expression over and
over again, we write it once in the body of a helper function and call the helper
function each time.
Part 1. Triangles
Complete the procedure draw_triangle(t,s,c). This procedure is given a Turtle as a
parameter. You do not need to make a new Turtle, nor a new Window.
This procedure should draw an equilateral triangle of side length s and color c using Turtle t. It should draw the triangle using t's current position and orientation. The Turtle should end its drawing at the same position and orientation as when it started. Do not save the Turtle's position and orientation at the beginning and then restore them at the end. If you draw the triangle correctly, following the instructions in the procedure specification, then this should happen automatically.
To try out the procedure, type the following in the interactive prompt.
>>> from introcs.turtle import *
>>> from a4 import *
>>> w = Window()
>>> t = Turtle(w)
>>> draw_triangle(t,200,'green')
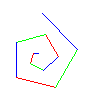
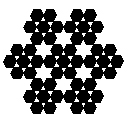
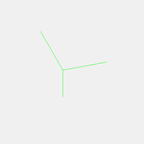
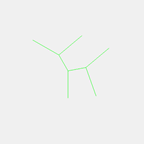
Part 2. Hexagons
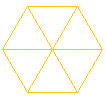
Complete the procedure draw_hex(t,s). This method should draw six equilateral
triangles using color 'orange' with side lengths s. This triangles should form a
hexagon, as illustrated to the right. Follow the specification and hints carefully.
In particular, be sure to use a helper function.
For both draw_triangle and draw_hex, it is very important that you follow the specifications. If you do not follow the specifications exactly, we will deduct points.
Part 3. Radial Shapes
Choose two (and only two!) from the following three activities: spirals, polygons, or radiating lines. Once you have done two of these, you are free (but not required) to do the remaining one. These are pretty fun assignments. If you decide to do all three, we will grade you on the best two.
Each of these tasks involves creating a helper procedure. In each case, the main procedure does not have a Turtle as parameter, but its helper procedure does. The main procedure clears the Window, creates a Turtle, calls the helper procedure to do the work, then hides the Turtle. Note that some of these procedures are very particular about which way that the newly created Turtle should start out facing. Remember that you can control the facing of your Turtle via the heading attribute.
When writing these procedures, write the main procedure first, then the helper, and finally test both by calling the first one in the interpreter.
If the main procedure is foo, its associated helper is called foo_helper. We have created stubs for these procedures in a4.py. Do not change the headers (either the names or the parameters), as our grading software will be calling them by those names. Just fill in the bodies.
Once again, it is very important that you follow the specifications for all three procedures below. If you do not follow the specifications exactly, we will deduct points.
Spirals
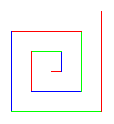
The first picture to the right is done by drawing 10 lines. The lines have length 10, 20, 30, ... . After each line, the Turtle turns left 90 degrees. The second diagram to the right shows a similar spiral but with the Turtle turning left 75 degrees after each line.
Complete the procedures draw_spiral and draw_spiral_helper. When you first test
them, use 10 for the initial len. Try different angles, like 90 degrees, 92
degrees, 88 degrees, etc. Use sp = 1 to see the lines drawn slowly.
You will be amazed at what these procedures do. Find out by trying these calls (after creating window w):
draw_spiral(w, 1, 90, 8, 0)
draw_spiral(w, 1, 135, 8, 0)
draw_spiral(w, 1, 60, 9, 0)
draw_spiral(w, 1, 121, 9, 0)
draw_spiral(w, 1, 89, 10, 0)
draw_spiral(w, 1, 150, 10, 10)
draw_spiral(w, 1, -144, 10, 5)
Polygons
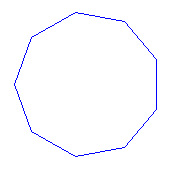
The first image to the right is a 9-sided polygon. The second image to the right is a series of 40 5-sided polygons of side length 35, the first started at angle 90, the second at an angle of 90 + 360.0/40, the third at an angle of 90 + 2*360.0/40, and so on. This demonstrates the kind of cool pictures you can draw just with polygons.
Complete the procedures multi_polygons and multi_polygons_helper so that your program can draw such
designs. You should use the procedure draw_polygon, which we have provided, as a helper function.
When finished, experiment to see what neat designs come out. For example, try the following
(after creating window w):
multi_polygons(w, 10, 6, 3, 10)
multi_polygons(w, 10, 180, 30, 0)
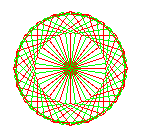
Radiating Lines
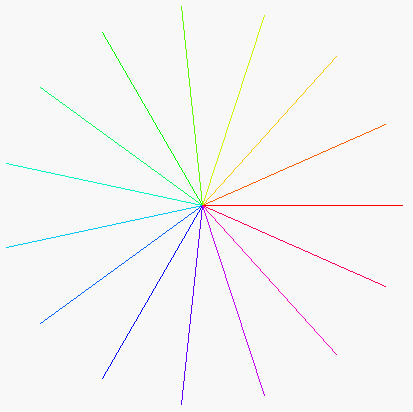
The picture on the left consists of 15 lines of the same length radiating out from the initial Turtle position. The angle between the lines is the same. The second picture has 720 lines. If n lines are drawn, the angle between them is 360.0/n. Furthermore, the color of each line depends on the angle (i.e. the direction) of each line. A line drawn at angle ang is drawn with HSV color HSV(ang, 1.0, 1.0).
Up until now, we have been using strings for our color names. However, the Turtle color attribute will take an HSV object as well. Just assign the object to the attribute and start drawing. This should make this part of the assignment fairly straightforward. Remember the invariants for an HSV object.
Complete the procedures radiate and radiate_helper. When finished, test them with small values of n, like 4 or 8. After the procedures are completely tested, try them with 360 lines of length 200. Also, try 3000 lines and Turtle speed 0 (which still takes a while because of how the Turtle draws), and notice how much more filled in the disk becomes.
Part 4. Recursive Graphics
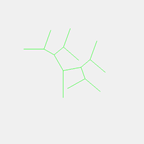
Part 4.1 Solid Recursive Shape: Grisly Snowflakes


To the right are three grisly snowflakes of depth 0, 1, and 2. A depth-0 snowflake is simply a filled-in hexagon. A depth-1 snowflake of side length s consists of seven depth-0 hexagons, each of side length s/3.0. In general, a grisly snowflake of side length s and depth d > 0 consists of seven grisly snowflakes, each of side length s/3.0 and depth d-1.
The difficulty with grisly snowflakes of depth d will be calculating the placement of the seven grisly snowflakes of depth d-1. (Hint: the distance between the centers of the depth d-1 snowflakes on the same horizontal row is 2*s/3.0. Try to figure it out for yourself, but if you run into trouble, please get help from the course staff.)
We have stubbed in the procedures grisly and grisly_helper
for you to complete.
The first does not have a Pen as a parameter; the second one does. We have also
supplied the procedure fill_hex for you to use to draw a solid hexagon.
Part 4.2 3-Branches Tree or Binary Tree
For this task, we ask you to choose one (and only one) from the following two shapes: the 3-Branches Tree or the Binary Tree. You are free (but not required) to complete them both. If you do both of them, we will grade the best one.
3-Branches Tree
The basic shape is a single vertical line. Later shapes branch to the west, east and north half-way up the vertical line. These branches are themselves 3-branches trees of one less depth.
 |
 |
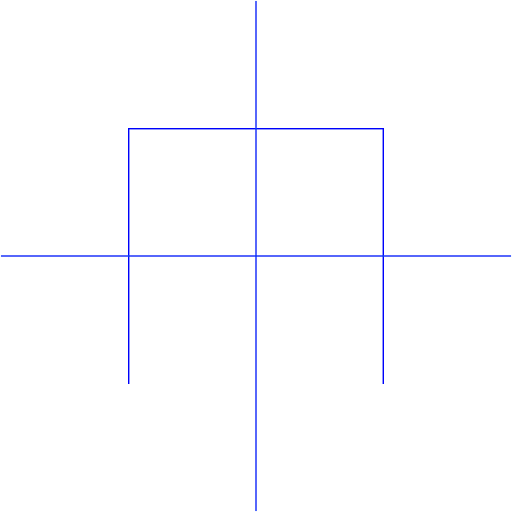 |
 |
| Depth 0 | Depth 1 | Depth 2 | Depth 3 |
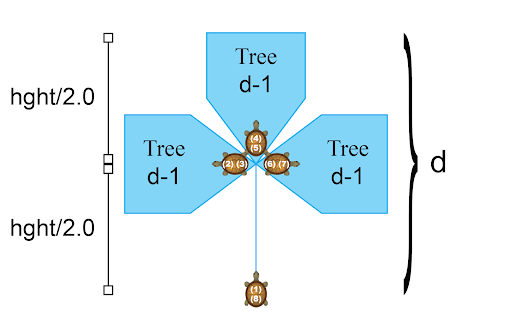
Because this is a line drawing, you will be using the Turtle once again. Using the Turtle to draw a recursive shape can be quite tricky because you have to pay very close attention to the orientation. This last task will demonstrate why we are so adamant about restoring the Turtle state at the end of a function. If you do not do that correctly, the Turtle will wander off screen and you will have no idea how to debug it.
The correct orientation of the Turtle is shown by the image below. The Turtle starts off at the bottom facing upwards (Step 1). Once it reaches halfway up the vertical line, it turns left (Step 2) and draws a 3-branches tree of one less depth. When done, it returns to its original position (Step 3), which is in the center facing left. It then turns 90 degrees right (Step 4) and draws another tree of one less depth. When done, it returns to its position (Step 5) and then turns 90 degrees right again (Step 6). It draws one last tree. Finally it returns to its position in the middle (Step 7) before going back to its initial position at the bottom (Step 8)
We have stubbed in the procedures branches and branches_helper for you to complete.
You will notice that, while branches assumes the Turtle starts at the bottom facing up, branches_helper does not. That is because branches_helper must be able to draw the tree in several different orientations.
3-branches trees are particularly spectacular for large recursion depths. For example, the picture below is for depth 6.
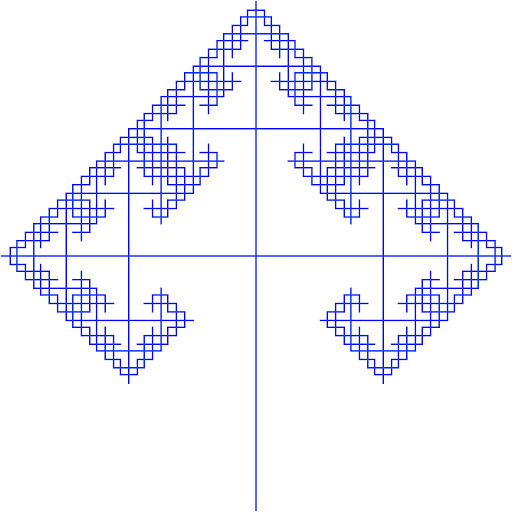 |
| 3-Branches Tree (Depth 6) |
Binary Tree
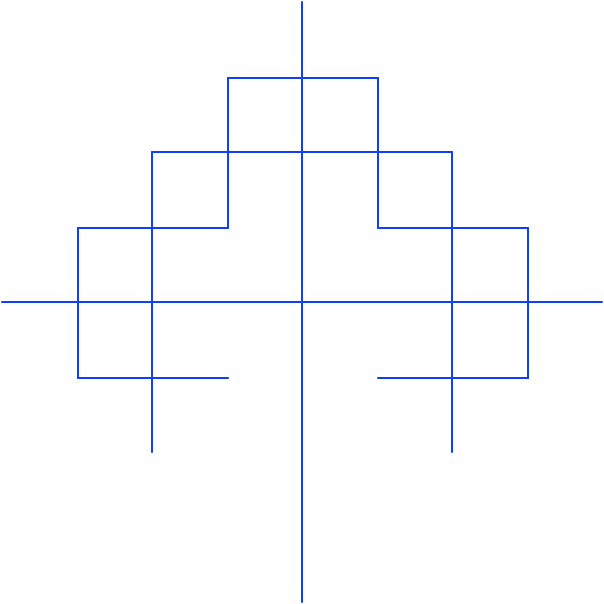
The binary tree is similar to the three-branches trees as it is a line drawing and not a solid shape. The basic shape is a single vertical line.
The basic shape is a single vertical line. Later shapes branch out from the trunk. These branches are each a binary tree themselves of one less depth.
 |
 |
 |
 |
| Depth 0 | Depth 1 | Depth 2 | Depth 3 |
Because this is a line drawing, you will be using the Turtle once again. Using the Turtle to draw a recursive shape can be quite tricky because you have to pay very close attention to the orientation. This last task will demonstrate why we are so adamant about restoring the Turtle state at the end of a function. If you do not do that correctly, the Turtle will wander off screen and you will have no idea how to debug it.
The Turtle starts off at the bottom facing upwards (Step 1). Once it reaches 2/5’s up the vertical line, it turns left 30 degrees (Step 2) and draws a binary tree of one less depth. When done, it returns to its original position (Step 3), which is in the center facing 30 degrees left. It then turns 110 degrees right (Step 4) and draws another binary tree of one less depth. When done, it returns to its position (Step 5) before going back to its initial position at the bottom (Step 6)
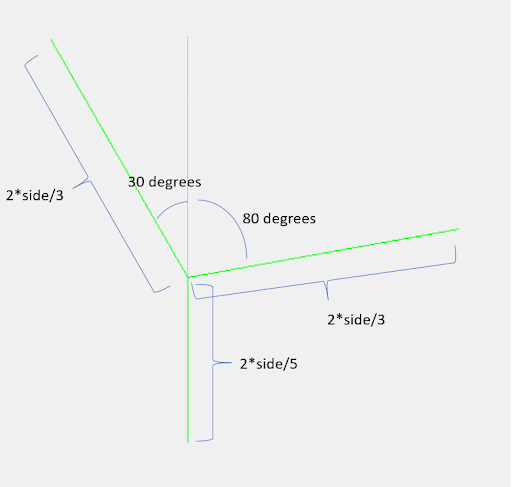
We have stubbed in the procedures binary and binarytree_helper for
you to complete. You will notice that, while branches assumes the Turtle starts
at the bottom facing up, binarytree_helper does not. That is because binarytree_helper must be able to draw
the tree in different orientations.
 |
| Depth 9 |
Finishing the Assignment
Once you have everything working you should go back and make sure that your program meets the class coding conventions, including the following:
- You have indented with spaces, not tabs (this is not an issue if using Atom Editor).
- Functions are each separated by two blank lines.
- Lines are short enough (~80 characters) that horizontal scrolling is not necessary.
- The specifications for all of the functions are complete.
- Function specifications are immediately after the function header and indented.
- Your name(s) and netid(s) are in the comments at the top of the modules.
One of the things that you may have the biggest difficulty with is breaking up long lines. First, you may not be aware when your lines are too long. If you are using Atom Editor, you should see a vertical line on the right side of the window. This is the wrap guide. If you go past this, you have gone too far; it is time to break up your lines.
As for breaking up long lines, there are two solutions. First, Python allows you to "hit Return" within any expression inside of parentheses. So if you are adding together several expressions together, like
a = 'Hello ' + name + ', it is good to meet you'
you can break it up over several lines, using parentheses, as follows:
a = ('Hello ' + name +
                  ', it is good to meet you')
Another solution is to use the backslash symbol \. Remember that this is the escape character for making special characters in strings. It also has a special effect outside of a string. If you type this symbol, immediately followed by a return, then Python will know to continue to the next line. So you can rewrite the addition above as
a = 'Hello ' + name + \
                  ', it is good to meet you'
Turning It In
If you worked in a pair, remember to Pair up on CMS. Due to a barrage of recent requests to retroactively pair students after the deadline, if we have to pair you up, we will assign a 4 point deduction to the partnership (yes, to both of you) for your assignment grade.
Upload the file a4.py to CMS by Monday,
March 25, 2019 @ 11:59pm. Do not submit any files
with the extension/suffix .pyc. It will
help to set the preferences in your operating system
so that extensions always appear.