T-Th 9:05
or
T-Th 11:15
in Olin 155
CS 1110: Introduction to Computing Using Python
Spring 2018

Main
About: Announcements
Staff & Hours
Lectures & Labs
Materials:
Texts/Clickers
Python/Komodo
Command Shell
Terminology
VideoNote
Handouts:
Lectures
Assignments
Labs
Assessment:
Grading
Exams
Resources:
CMS - direct link
CMS usage
Piazza
AEWs
FAQ
Python Docs
Python Tutor:
Classic CS1110 version
Other Courses
Academic Integrity
Python in CS 1110
There are 2 popular versions of Python: Python 2 and Python 3. We require that everyone in the course use not only Python 3 but a specific version of Python 3 called Anaconda (a free version that is quickly becoming standard on this campus). You are free to either work in the ACCEL or Phillips 318 labs or to use your own laptop. Wherever you work, you should be using Anaconda Python 3.
If you are not using your own machine, you can skip all of the installation instructions and use the computers in the ACCEL or Phillips 318 labs when they are free (Blue room schedule; Green room schedule; Orange room schedule; Red room schedule; Phillips 318 schedule).
If your are using your own machine, even if you already have Python installed on your computer, we ask that you follow these installation instructions because Python 2 and Python 3 are not compatible with each other. In other words, code written for Python 2 but run with Python 3 (or vice versa) will not have the intended functionality or (more likely) not run at all. But you don't have to uninstall your pre-existing Python! It is OK to have multiple versions of Python on your computer.
Table of Contents
Installation
These instructions are a bit long; do not let this scare you!
Using Python is much easier than installing it, we promise!
Unlike the rest of this course, you are not expected to
understand what many of these steps are doing.
You
should be able to finish the installation in 15-20 minutes.
If you have problems at any point, and if you have a laptop, the
best thing to do is to bring it in to someone to look at. Any of the
course staff
can help you with this. If you cannot bring in your
computer, please email
cs1110-staff@cornell.edu.
Before you install anything, be sure to completely read the installation instructions on this page for your particular operating system. While you are unlikely to make any mistakes, it is best for you to do things in exactly the order we tell you to.
Important Note About Python 2: In previous years, this course used Python 2. If you have the 2.7 version of Anaconda already installed, this may conflict with the installation process below. In that case you will either need to remove the old version of Anaconda, or (if you think you still need it for another class or project) set up a special environment in which you can still reach this older version. Ask one of the course staff to help you if you need to do this.
Installing on Windows
The version of Python that we are using for this class is only compatible with Windows 7, 8 or 10. We do not support Vista or XP. We prefer that you use Windows 10, and recommend that you upgrade now if you have not done so already. If your machine cannot support one of these versions of Windows, then you will need to work in the ACCEL or Phillips 318 labs.
For this class, we need to use Anaconda Python version 3.6. This is the most recent version of Python for Anaconda.
|
Windows 32-bit Anaconda 3.6 |
Windows 64-bit Anaconda 3.6 |
Click on one of the two blue rectangles above to install the correct version for your operating system. If you are unsure whether your operating system is 32 or 64 bit, download the 32-bit version, which is guaranteed to work on all systems.
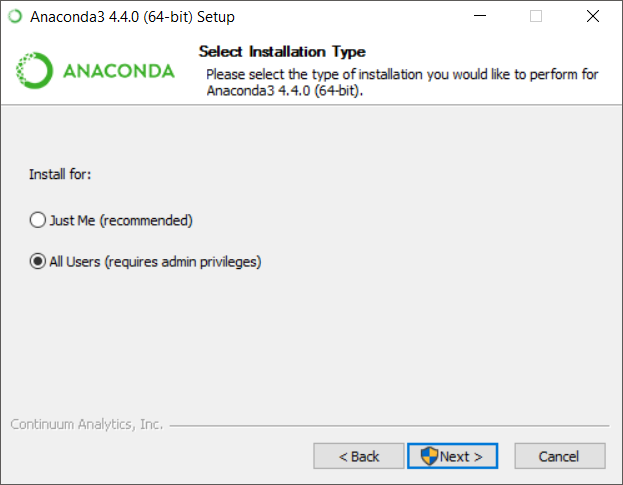
The file that you download is an installer app. Simply double click on it and follow directions. At one point in the installer, it will ask you whether you want to install for yourself or for all users. Select the option "All Users (requires admin privileges)", as shown below:
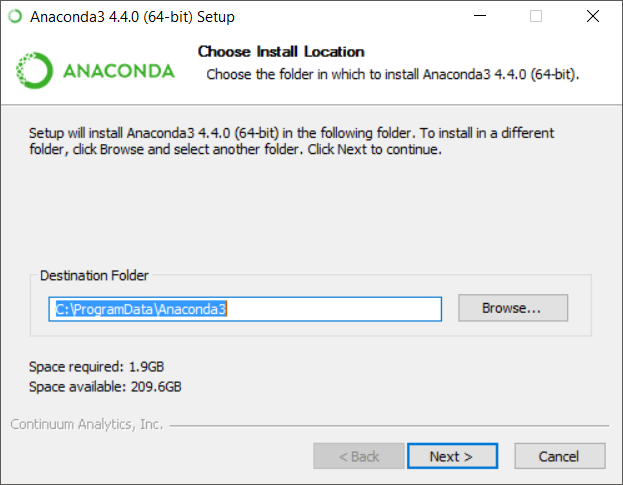
On the next page it will ask you what directory you want to
install in. By default, it will install in
C:\ProgramData\Anaconda3. Leave this alone and click
Next:
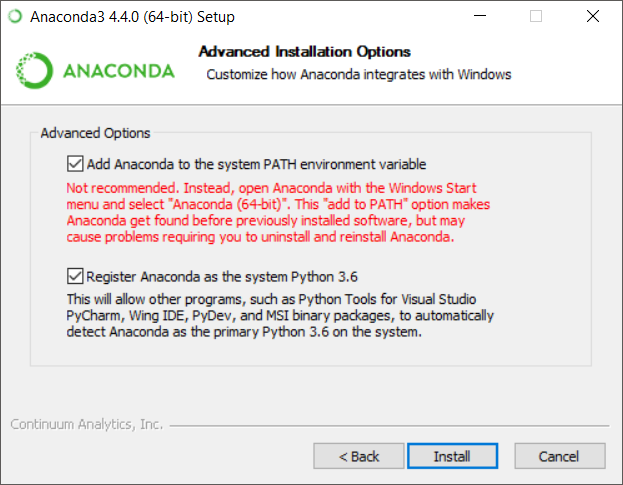
Finally, you will see a page with check boxes talking about your Path. You must select the top box, even though it warns you not to. If you do not check this box, you will not be able to use Python from the Command Prompt. Now click "Install". The installer may ask for your password, which is its way of asking for permission to install Anaconda. Installation may take a minute.
Congratulations, Windows user! You did it! Now you can skip to Getting Started with Python.
Installing on Macintosh
The version of Python that we are using for this class is only compatible with Mavericks (10.9) or higher. If you have an older version of OS X, we recommend that you upgrade to El Capitan (10.11) immediately. Otherwise, you should work in the ACCEL or Phillips 318 labs for the semester.
|
Mac OS X 64-bit Anaconda 3.6 |
Clicking on the above rectangle will download the installer app
into your Downloads directory. It may up to a minute to complete the
download. When it's done, it will look like this:  Double click on this and follow
directions. There is a slight chance that you will see a warning
telling you that this is not an official installer (because it was not
verified with Apple). If that happens, you will need to
control-click the installer and select Open from the drop-down
menu.
Keep clicking "Continue" and Agree to the License Agreement until you reach the "Installation Type". The default installation location for Anaconda allows it to be used only by a single user. However we would prefer that you install it for all users instead. You can do this by clicking the following button:
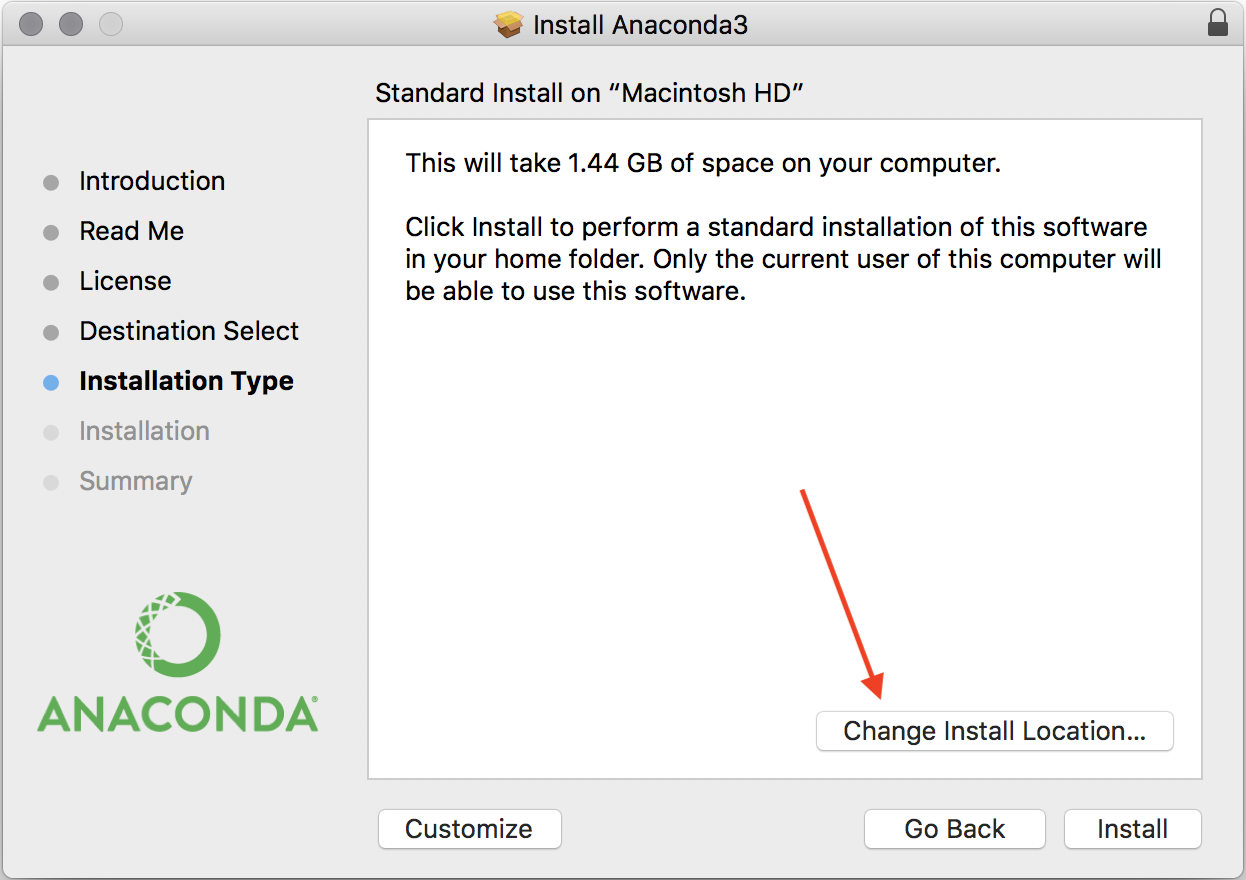
At this point, you may see the following error:

This problem is easy to solve. Click the hard drive icon below the house. When you are done, it should look like this.

Select the button Choose Folder to the right. This will tell it where to put Anaconda. We recommend that you put it in the Applications folder. Now click Continue and Install. The installer may ask for your password, which is its way of asking for permission to install Anaconda. Installation may take a minute. If successful you'll see this:
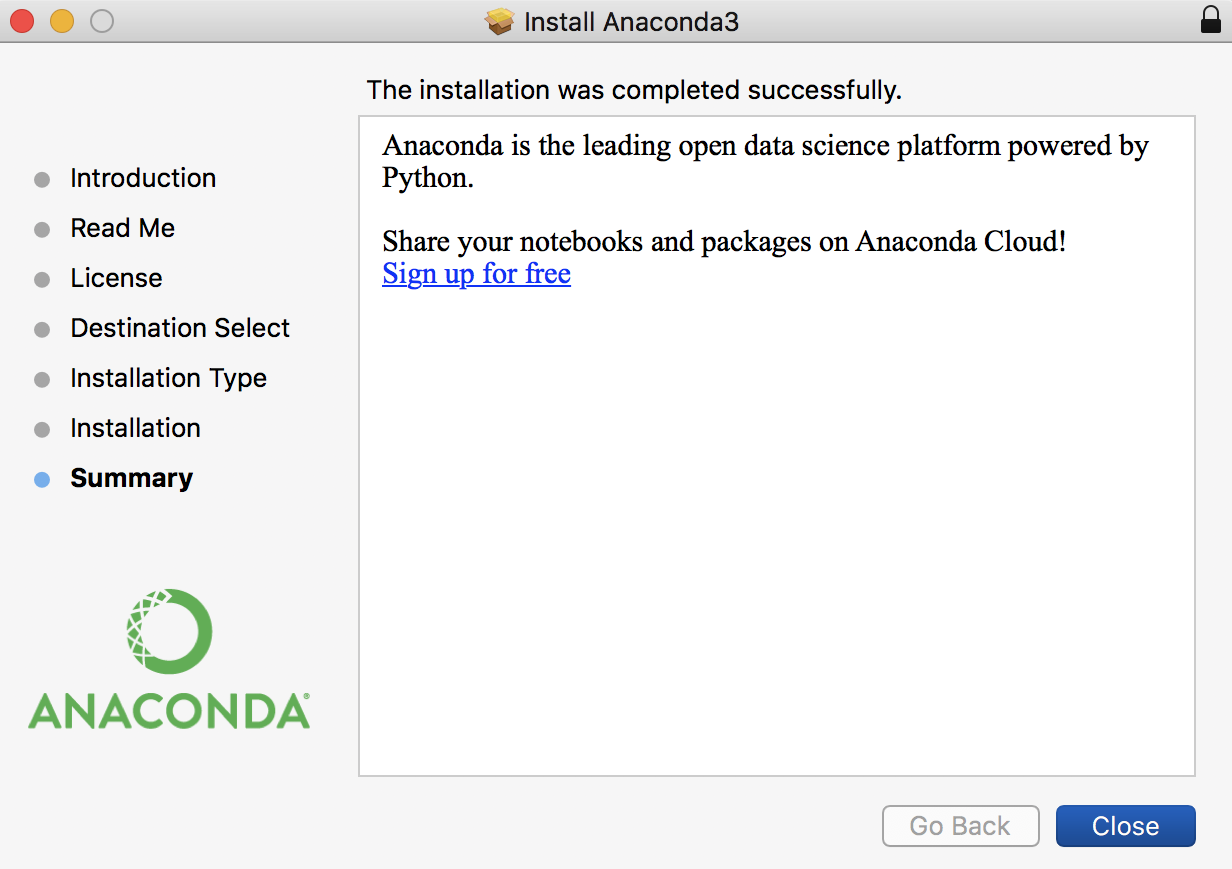
Click Close and that's it! Congratulations, Mac user! You did it! Now you can skip to Getting Started with Python.
Installing on Linux
Linux installation is possible, but it is not as straight-forward as the two main OS options. In particular, to install on Linux, you have to be comfortable with command shell and be ready to install files with a package installer. If this sounds daunting to you, you might want to rethink whether you want to use Linux just yet.
In the past, we have had install parties for Linux users. We have worked to make the instructions more self-sufficient this year. However, if there is still demand for a Linux install party, post your request on Piazza.
|
Linux 32-bit Anaconda 3.6 |
Linux 64-bit Anaconda 3.6 |
Click on one of the two blue rectangles above to install the correct version for your operating system. If you are unsure, download the 32-bit version. The 32-bit version is guaranteed to work on all systems.
This is not a graphical installer. To install it, you must navigate to the folder with the downloaded file and run it with bash. For example, if you downloaded the 64-bit version, you would type
bash Anaconda3-4.4.0-Linux-x86_64.sh
You must use the "bash" command even if you are not using the bash shell.
You may install Anaconda whereever you wish. By default, it installs in your home directory. We prefer to install it in /usr/local, but the choice is yours.
Congratulations, Linux user! You did it! Now you can begin Getting Started with Python.
Getting Started with Python
Now that you have installed Anaconda (or are sitting down at an ACCEL or Phillips 318 lab computer for the first time), it is a good idea to test the installation out, using the command shell for your OS. The command shell is a text-based version of the Windows Explorer or Finder; you can use it to move and rename files and folders. It is also how we will run Python in this class.
Using the command shell requires a bit of practice, so we have created a separate page of instructions for this. But for right now, all you need to learn from that page is how to start up the command shell for your OS.
Sanity Check #1: Can your system find Python?
Open a command shell window. Then, type
python
(and hit return). This should put you in the "Python Interactive Shell"; you can tell this succeeded because a Python "banner" message will be printed out.
If instead you get some sort of error message suggesting that python could not be found, first reboot and try Check #1 again.
If you still get this kind of error message after rebooting, record the following information in order to report your problem.
- The precise wording of the error messages you got. Copy-and-paste is best.
- Mac and Linux users: what is the exact output when you type exactly the following at the prompt?
echo $PATH
- Windows users: what is the "path" environment variable set to? Here's a page that explains how to find out on Windows 7 and 8; Windows 10 should be similar.
Sanity Check #2: does the "banner" mention "Anaconda" and a version number of the form 3.6.x?
The yellow underline below shows what we're looking for. 
If not, your system is running the wrong python for this class.
First, try rebooting, and run Checks #1 and #2 again.
If you still aren't getting Anaconda, record the following information in order to report your problem:
- The precise wording of the "banner" that you see. Copy-and-paste is best.
- Windows users: what is the "path" environment variable set to? Here's a page that explains how to find out on Windows 7 and 8; Windows 10 should be similar.
- Mac and Linux users: what is the exact output when you type exactly the following at the prompt?
echo $PATH
If the output is something where the words "/usr/bin" (which is the directory where Mac's default python is) occurs before/Applications/anaconda/bin(which is where Anaconda is), then we need to explicitly tell your system to look for Python where Anaconda was installed. Please contact a staff member for help.
Sanity Check #3: can you interact with the Python Interactive Shell without it immediately crashing?
The > > > symbols are the prompt. To get the shell to do something, just type a Python command. For example, type
>>> 1+1
and hit Return (do not type the > > >; it is already there).
If anything other than the appearance of the numeral "2" happens, record the precise output, even if it's a very long error message (copy-and-paste is best) to report the problem to us.
Otherwise, you have a working installation of Anaconda.
To exit the Python Interactive Shell, type quit() or
exit()and hit Return. You can also exit by
typing Control-D (that is, hold down
the control key and then hit the D key).
Komodo Edit
The last program to install is Komodo Edit, which is what we will use to create and edit Python files.
Technically, you can write Python modules in any text editor (e.g., a Word processor that only produces text and does not have fonts or fancy formatting). NotePad and WordPad are text editors in Windows, while TextEdit is provided by OS X. The reason we use Komodo Edit is that it is the same across all platforms. That allows you to collaborate with partners who might be working on other operating systems. Some people prefer Sublime Text, but that program is not free.
Installing Komodo Edit |
All Platforms Komodo Edit |
To install Komodo Edit, click the button above to go to ActiveState's website. You will see a grey "Download Komodo Edit" button. Click on that button. Do not click on the red "Download Komodo IDE" button; that brings you to a different product.
You may be taken to a page asking you to evangelize. By making you use of this software, we are already evangelizing, so just click "Just let me download your software" to start the download. You will be asked for an e-mail address but you do not have to give it.
The file that you download will either be a MSI installer for Windows or a DMG for Macintosh. Double click on it and follow directions.
Configuring Preferences
One of the most controversial aspects of Python is that it treats spaces and tabs very differently. If you accidentally put a tab in your program, it could cause your program to crash; and it's hard to track down stray tab characters because tabs and spaces look exactly the same.
With Komodo Edit, this problem does not occur because it automatically converts each tab press to 4 spaces. However, if you have a partner using another program (like Sublime Text), they might put tabs in the file.
To make sure that you never get any stray tabs, you need to change your preferences to help you distinguish between tabs and spaces. Open Komodo Edit and then select the Preferences menu option (under Edit on Windows; under Komodo on Macintosh). Choose the Editor category and check the box Show whitespace characters, as shown below.

Once you've done this, spaces will look like light dots which are centered vertically on each line, whereas tabs will look like black arrows. These are illustrated in the examples below.
 |
 |
|
| Python with Tabs (Bad) | Spaces Only (Good) |
Opening and Saving Files Using Komodo Edit
We recommend that you interact with Python modules during the semester through Komodo Edit. Although the Mac and Windows versions are basically the same, we separate the instructions below by OS for maximum clarity. (First Macintosh, then Windows.)
Opening and Saving Files on a Mac
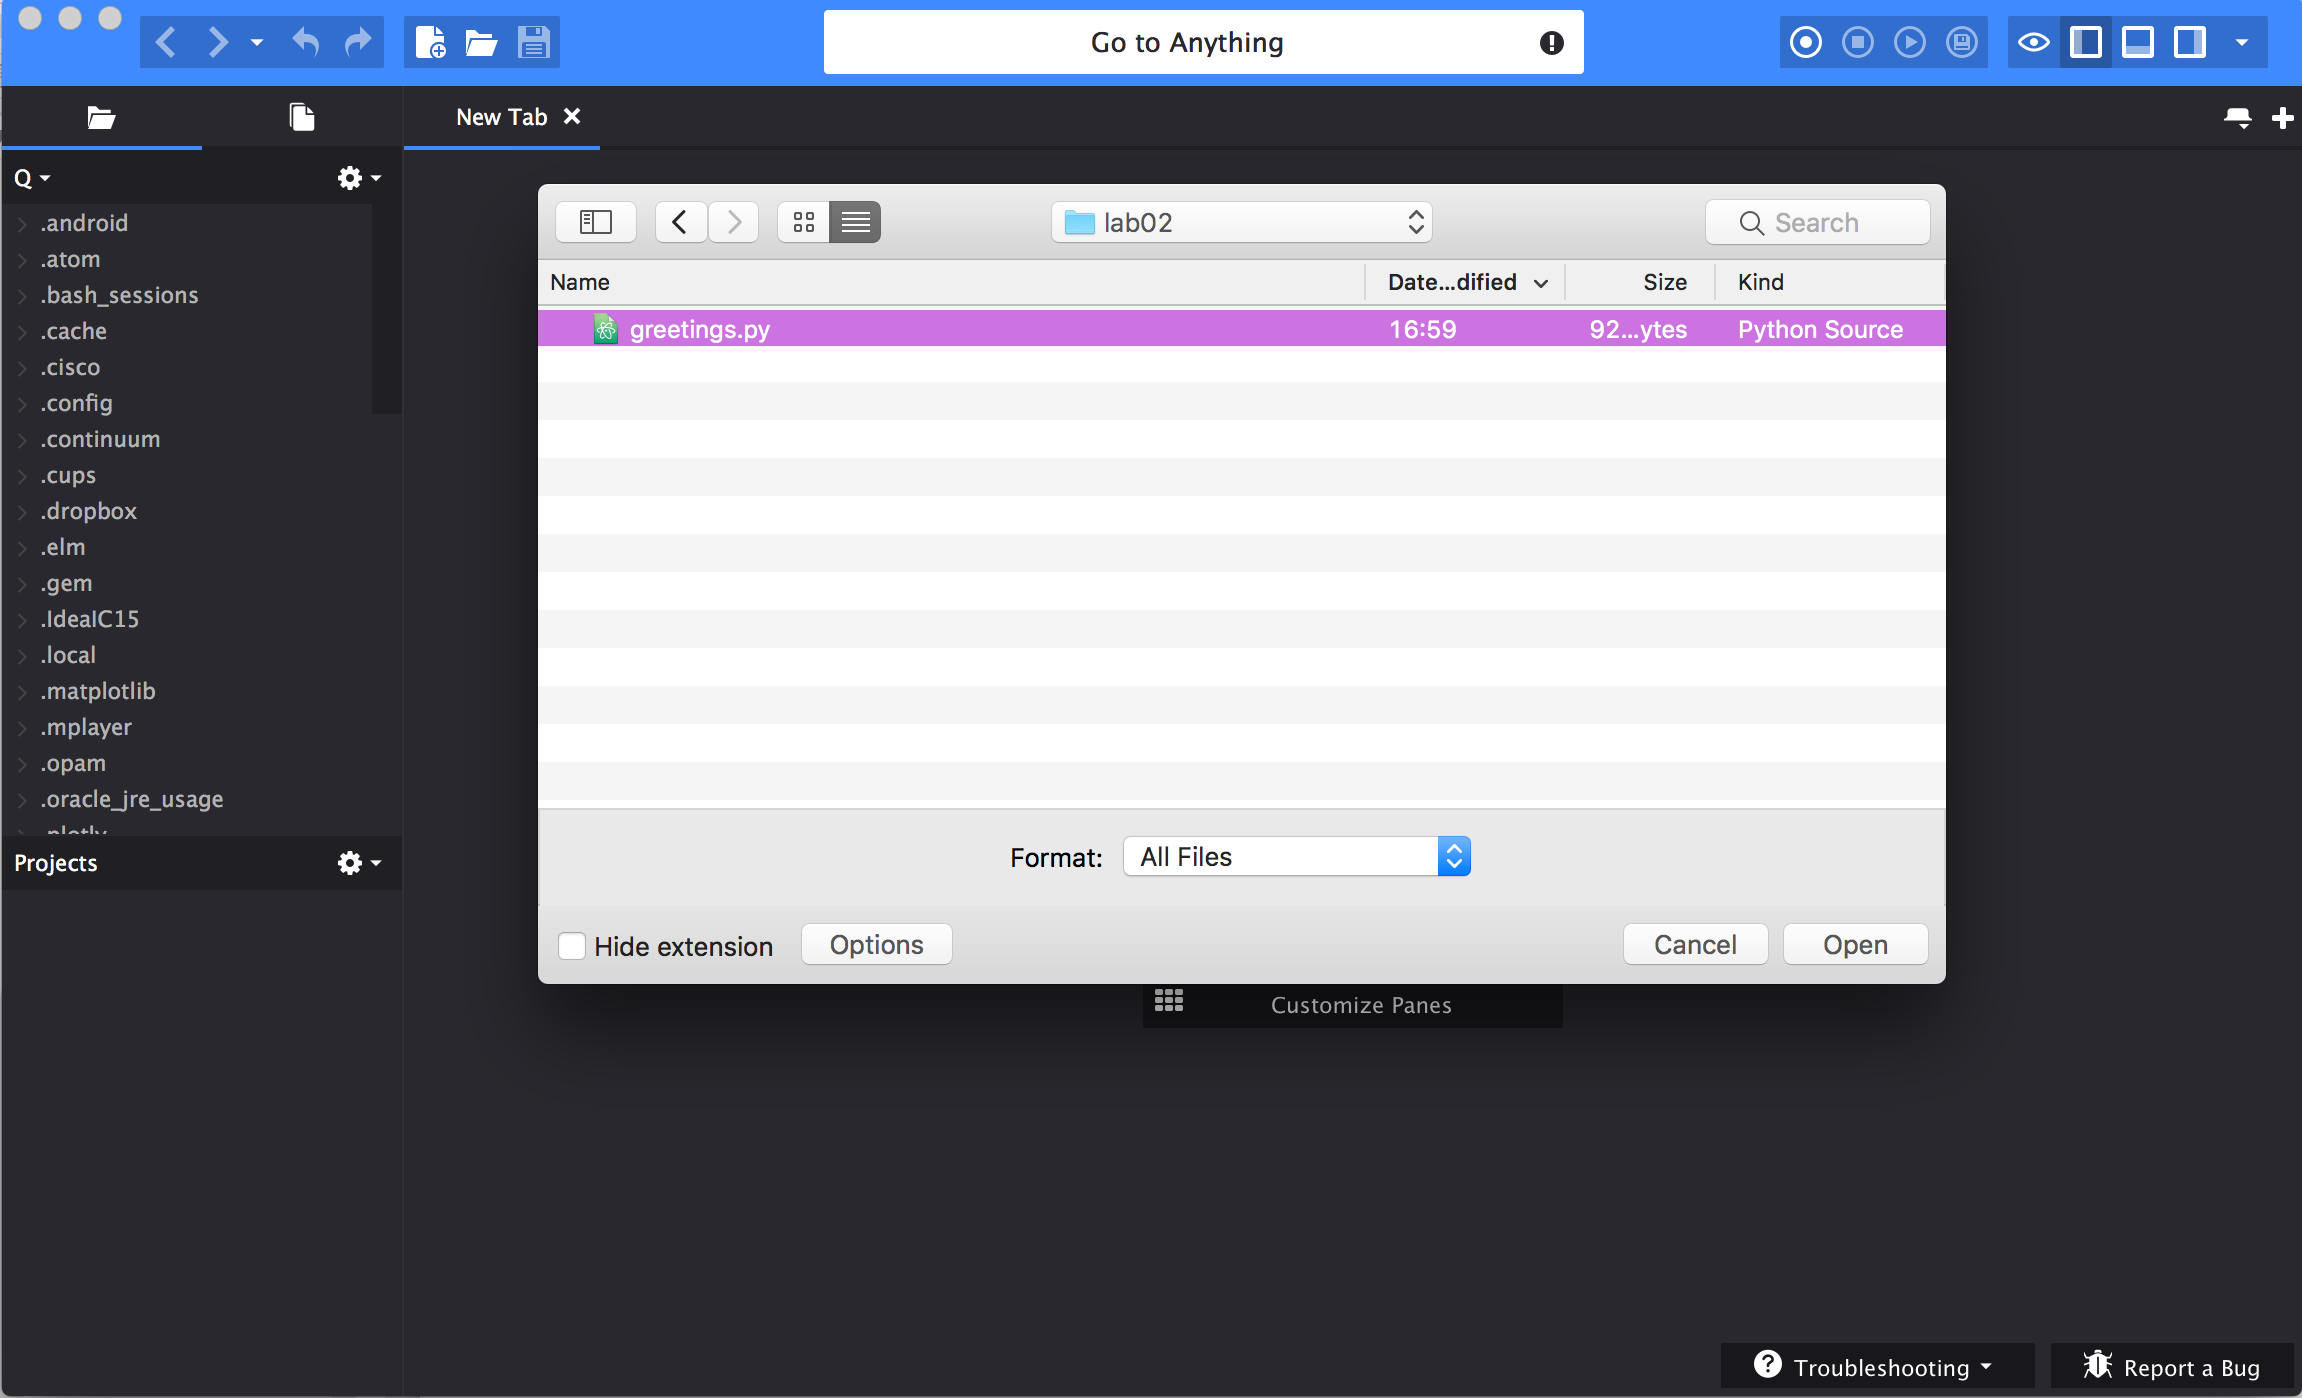
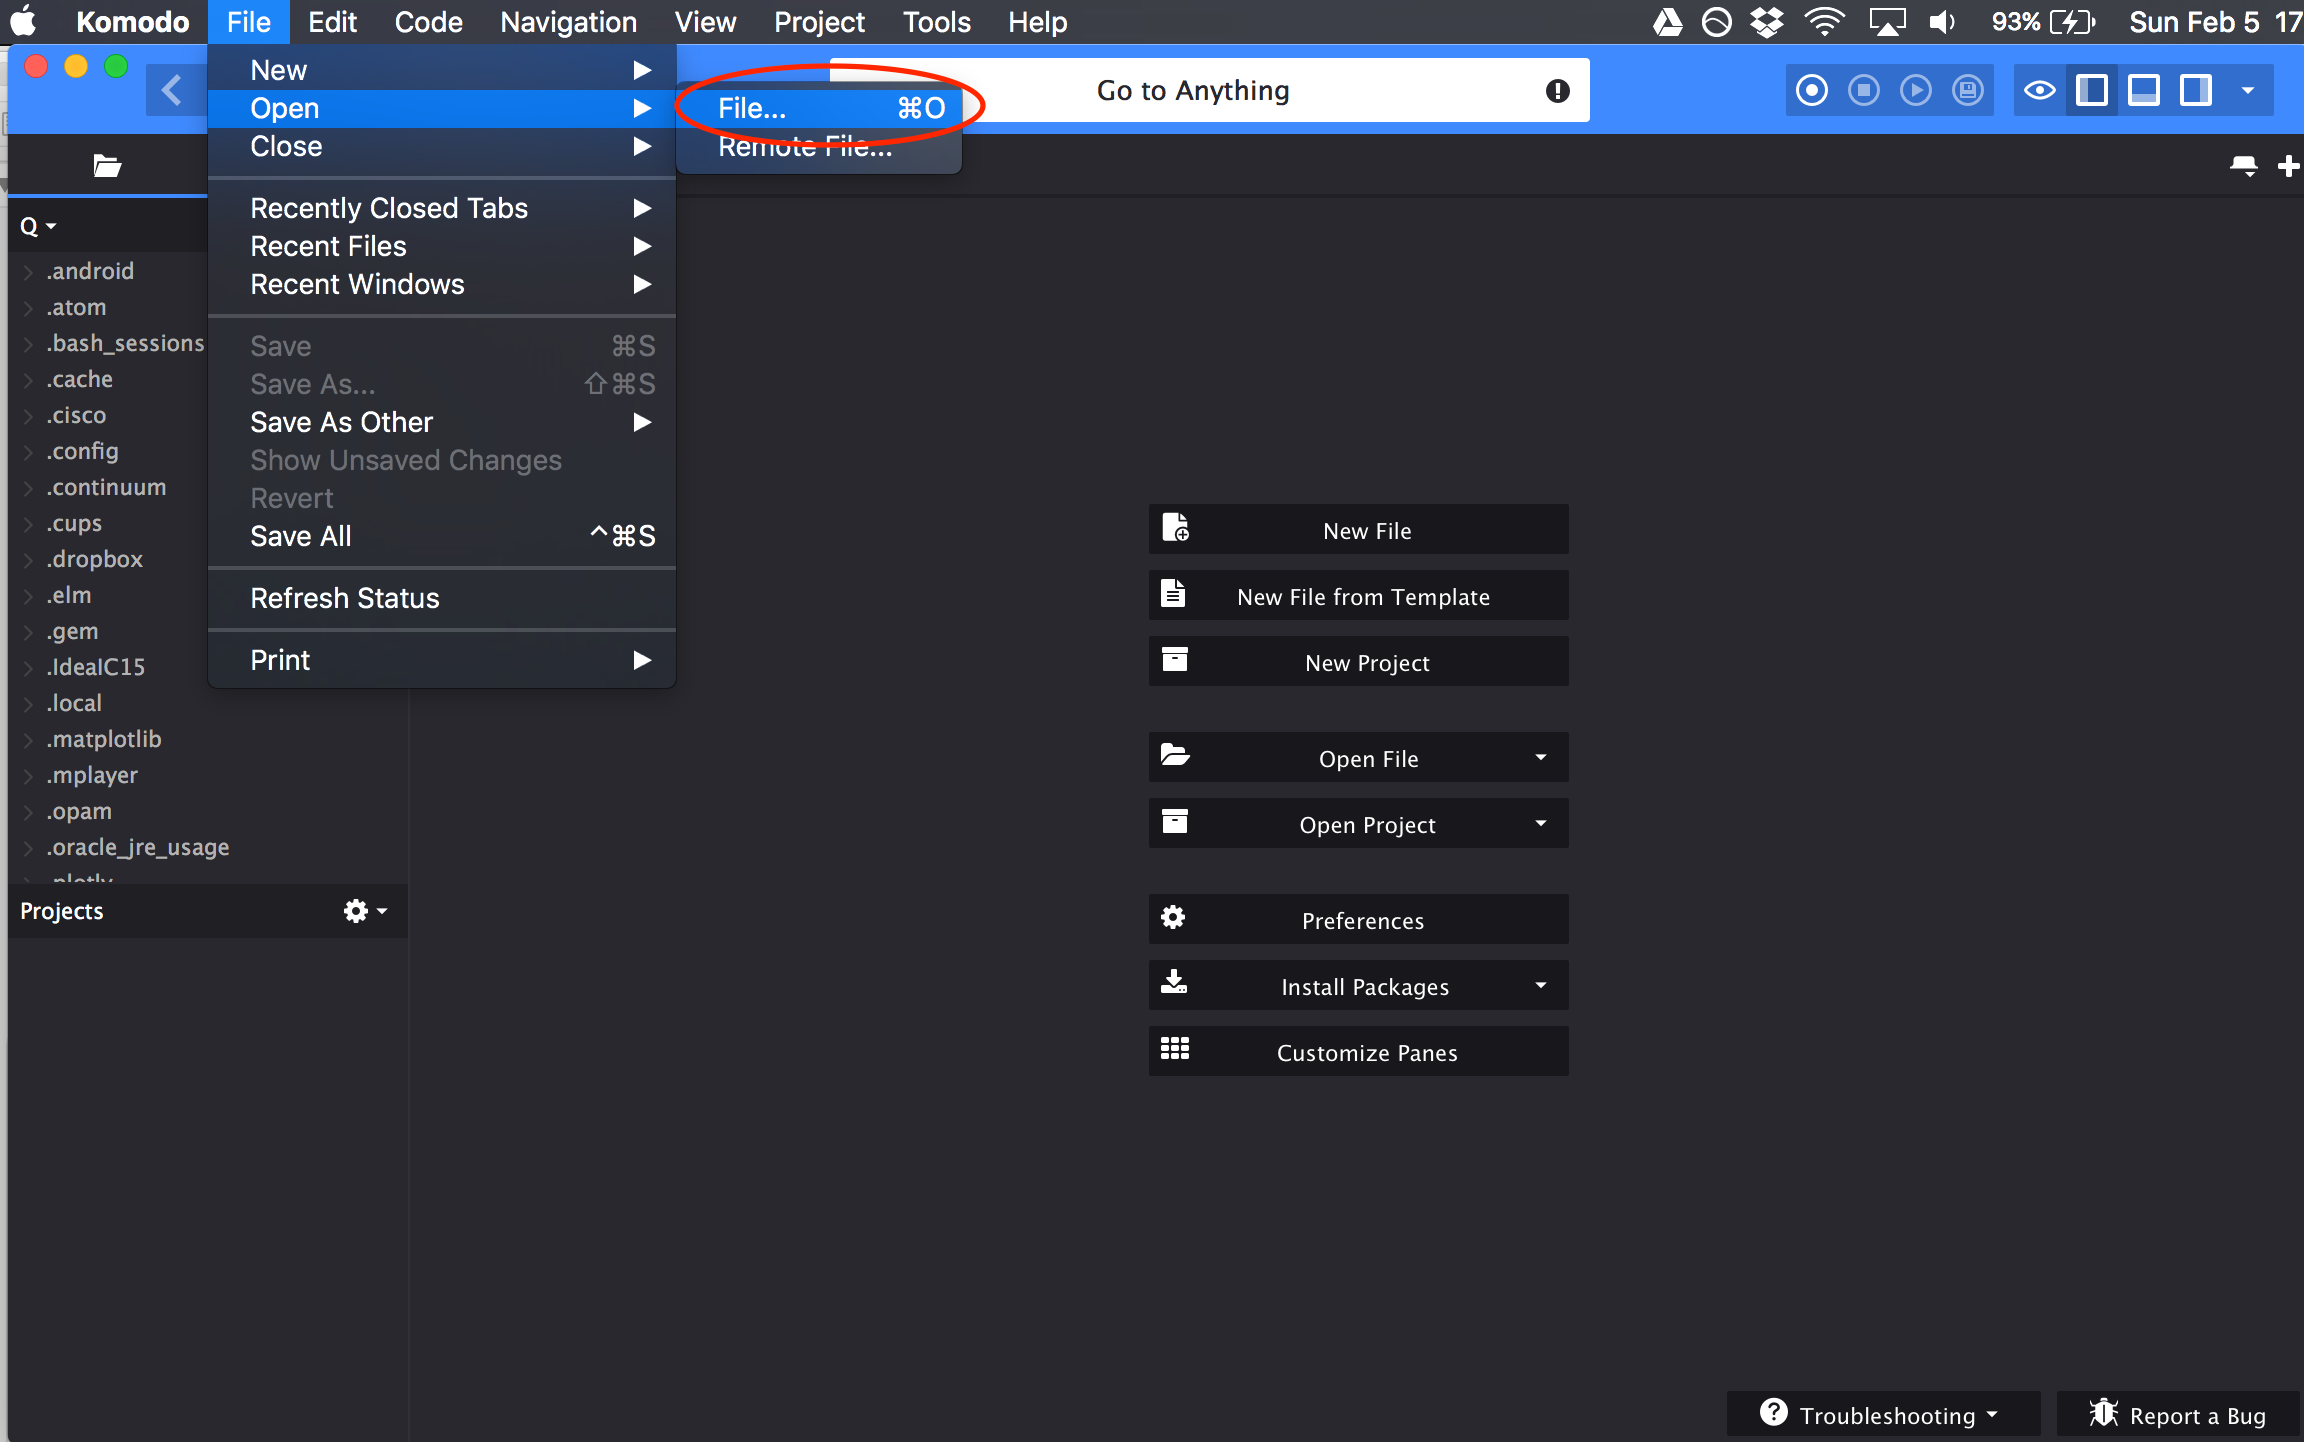
If you do not have a file already open in Komodo Edit, the easiest way to open one is clicking "Open File" from the start page.

For Lab 02 in particular, you then want to navigate to the "lab02" folder on your Desktop and select greetings.py as below:
Once you have successfully opened the file it should look like this:

What about saving files after you've made changes? If you made a change (for instance, adding your name and NetID) you will see that the filename now has an asterisk (i.e. the * symbol) following it, as shown below:

To save, you can either press the save symbol (circled in red below) or press "⌘S" (Apple Command + S):
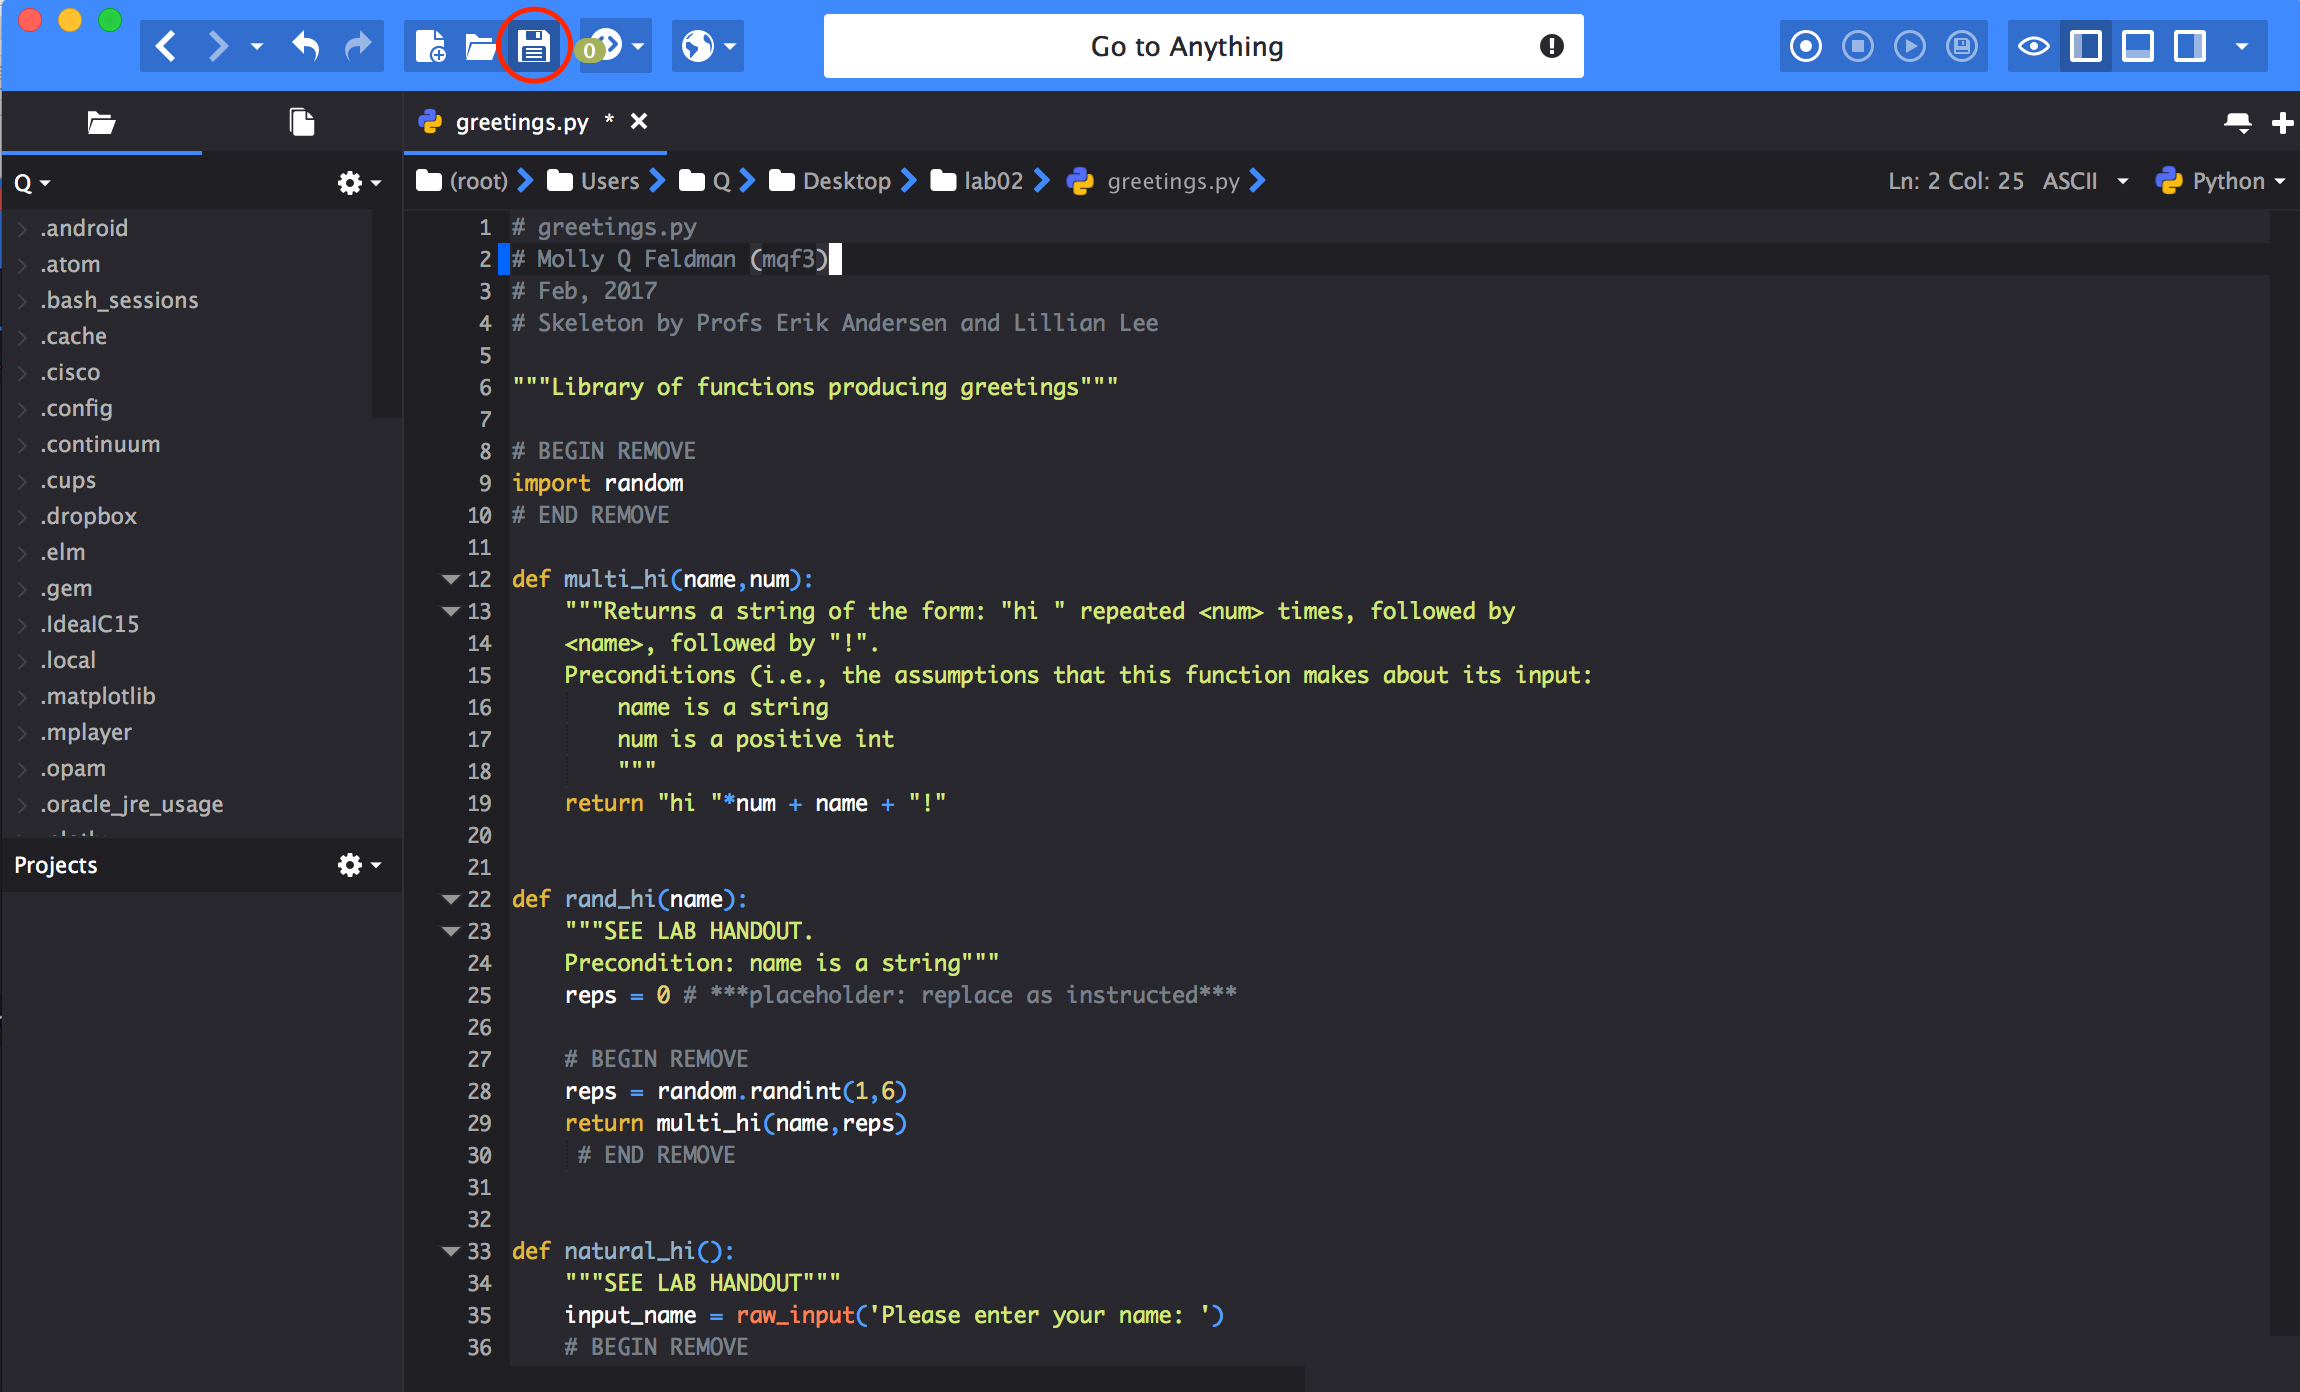
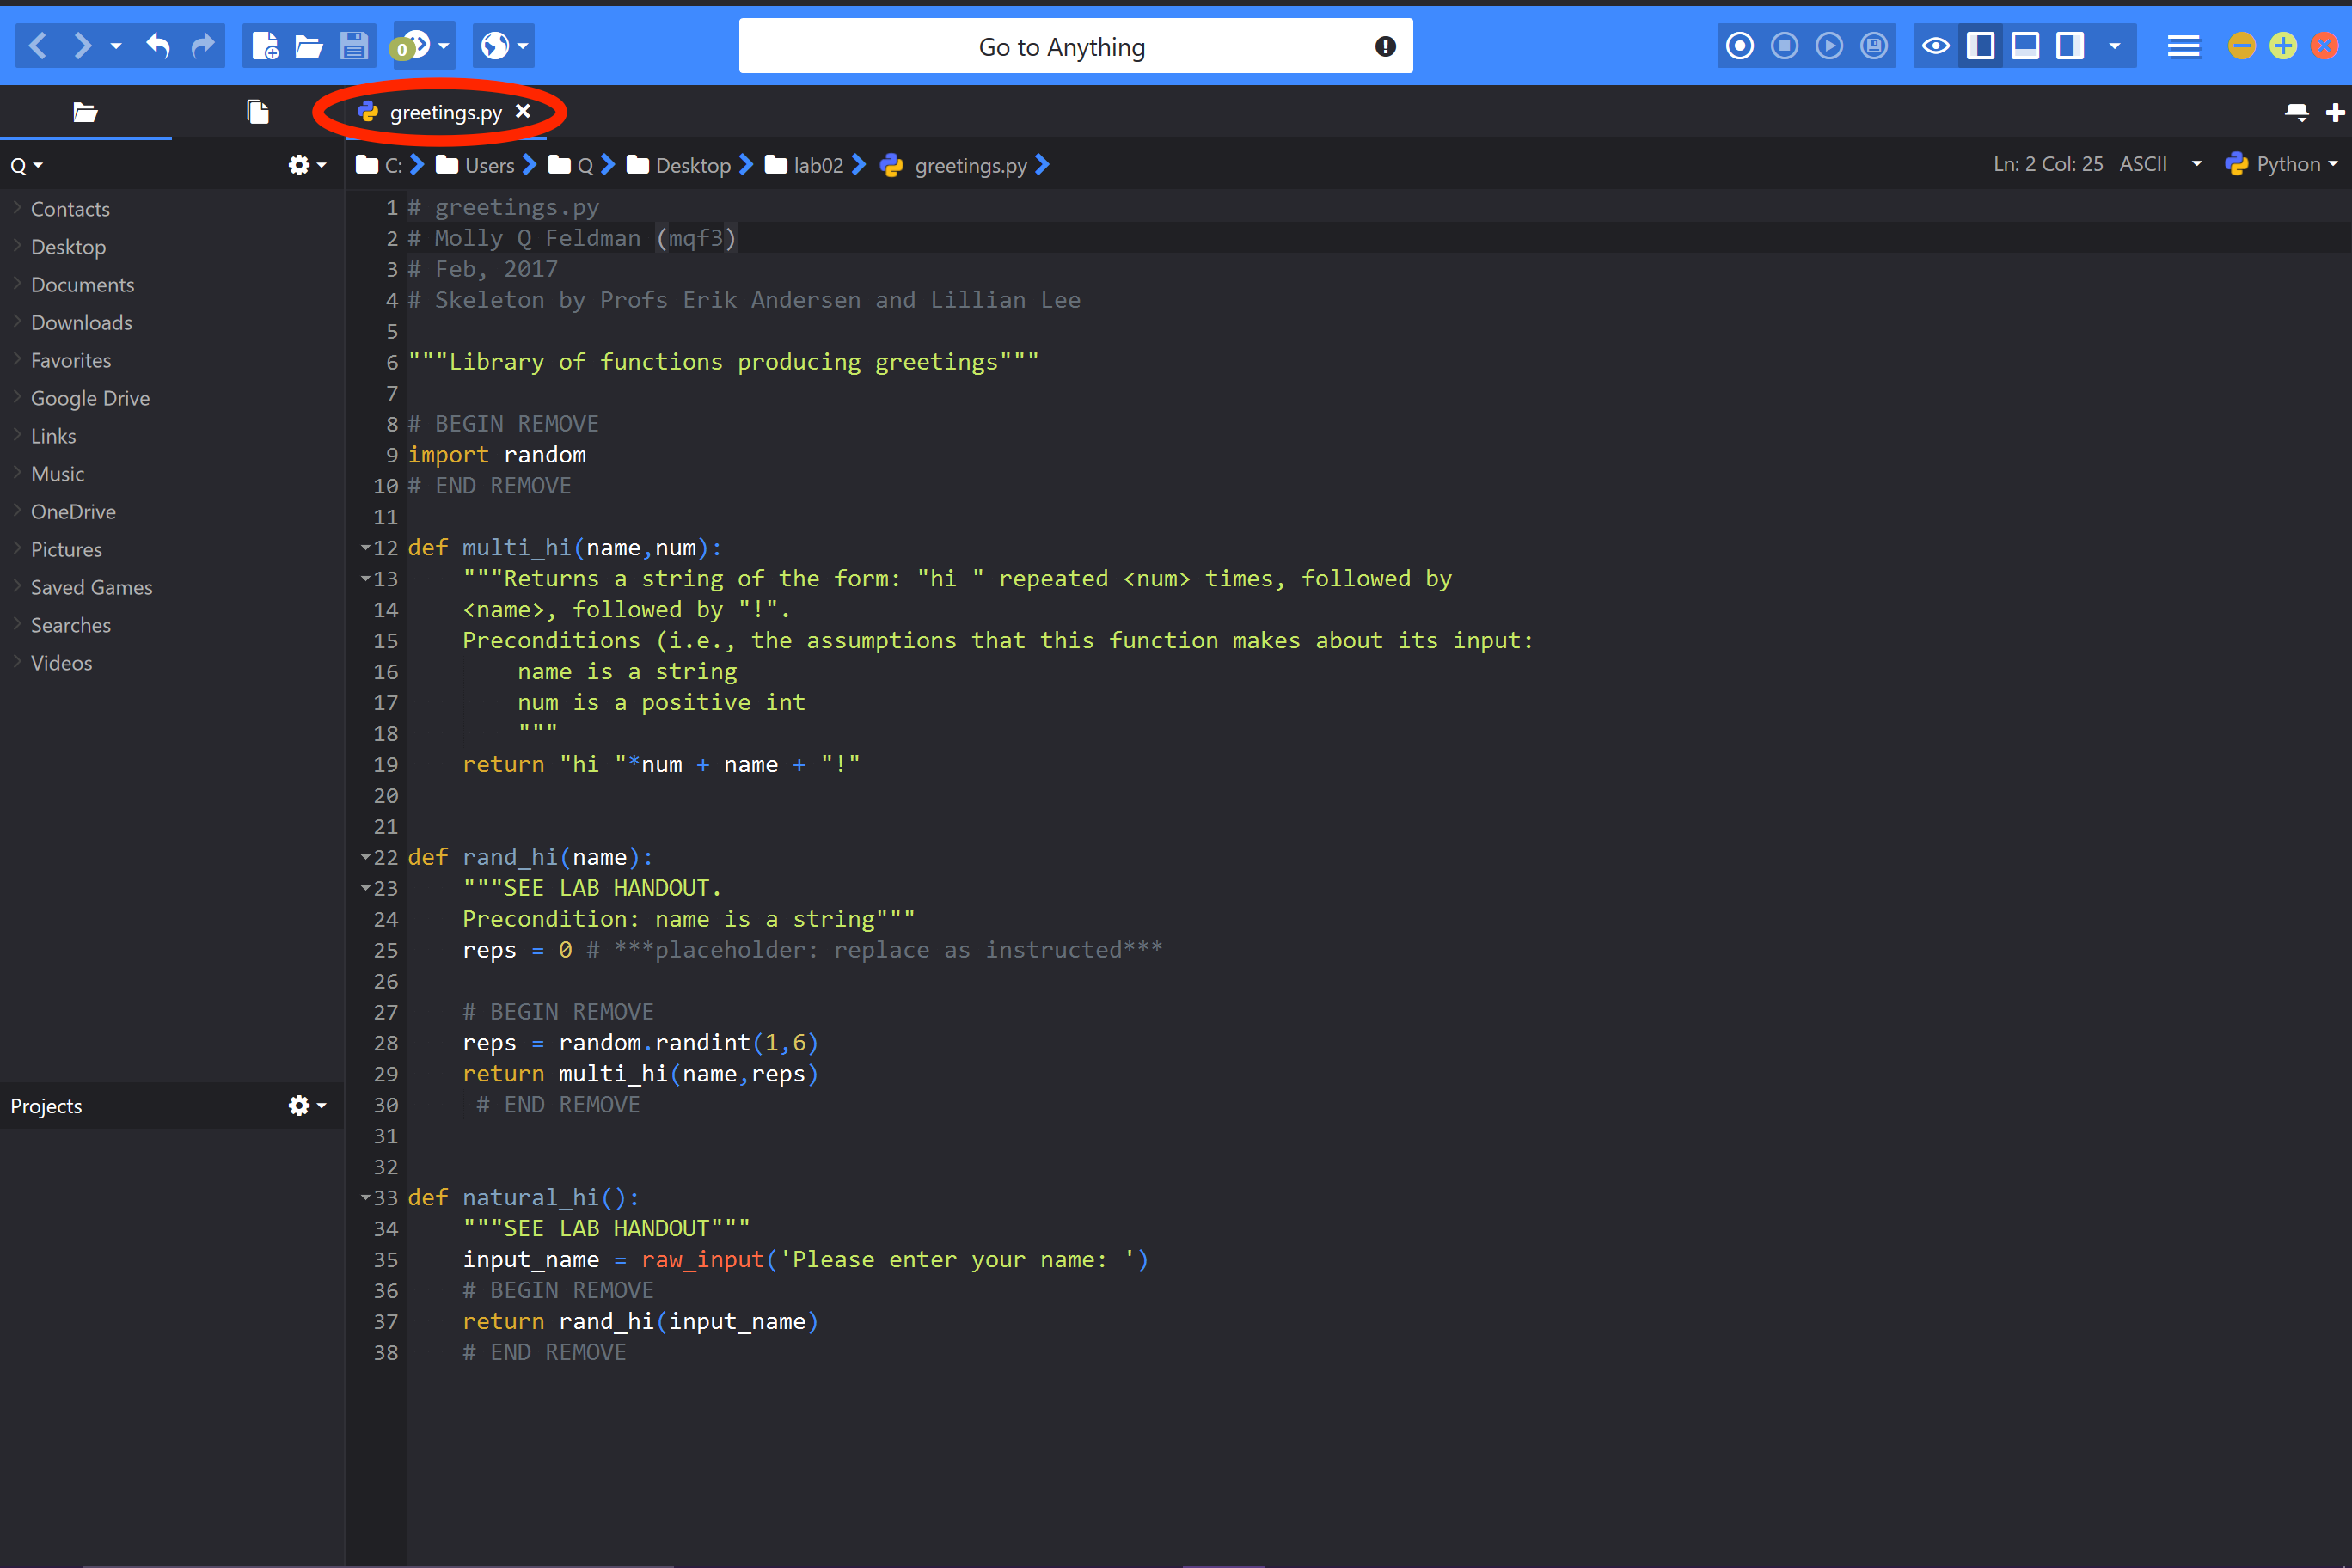
If the save was successful, the asterisk disappears and the filename will appear as normal:

Opening and Saving Files on Windows
If you do not have a file already open in Komodo Edit, the easiest way to open one is clicking "Open File" from the start page.

For Lab 02 in particular, you then want to navigate to the "lab02" folder on your Desktop and select greetings.py as below:

Once you have successfully opened the file it should like this:


This should bring you to the same correct page as above.
What about saving files after you've made changes? If you made a change (for instance, adding your name and NetID) you will see that the filename now has an asterisk (i.e. the * symbol) following it, as shown below:
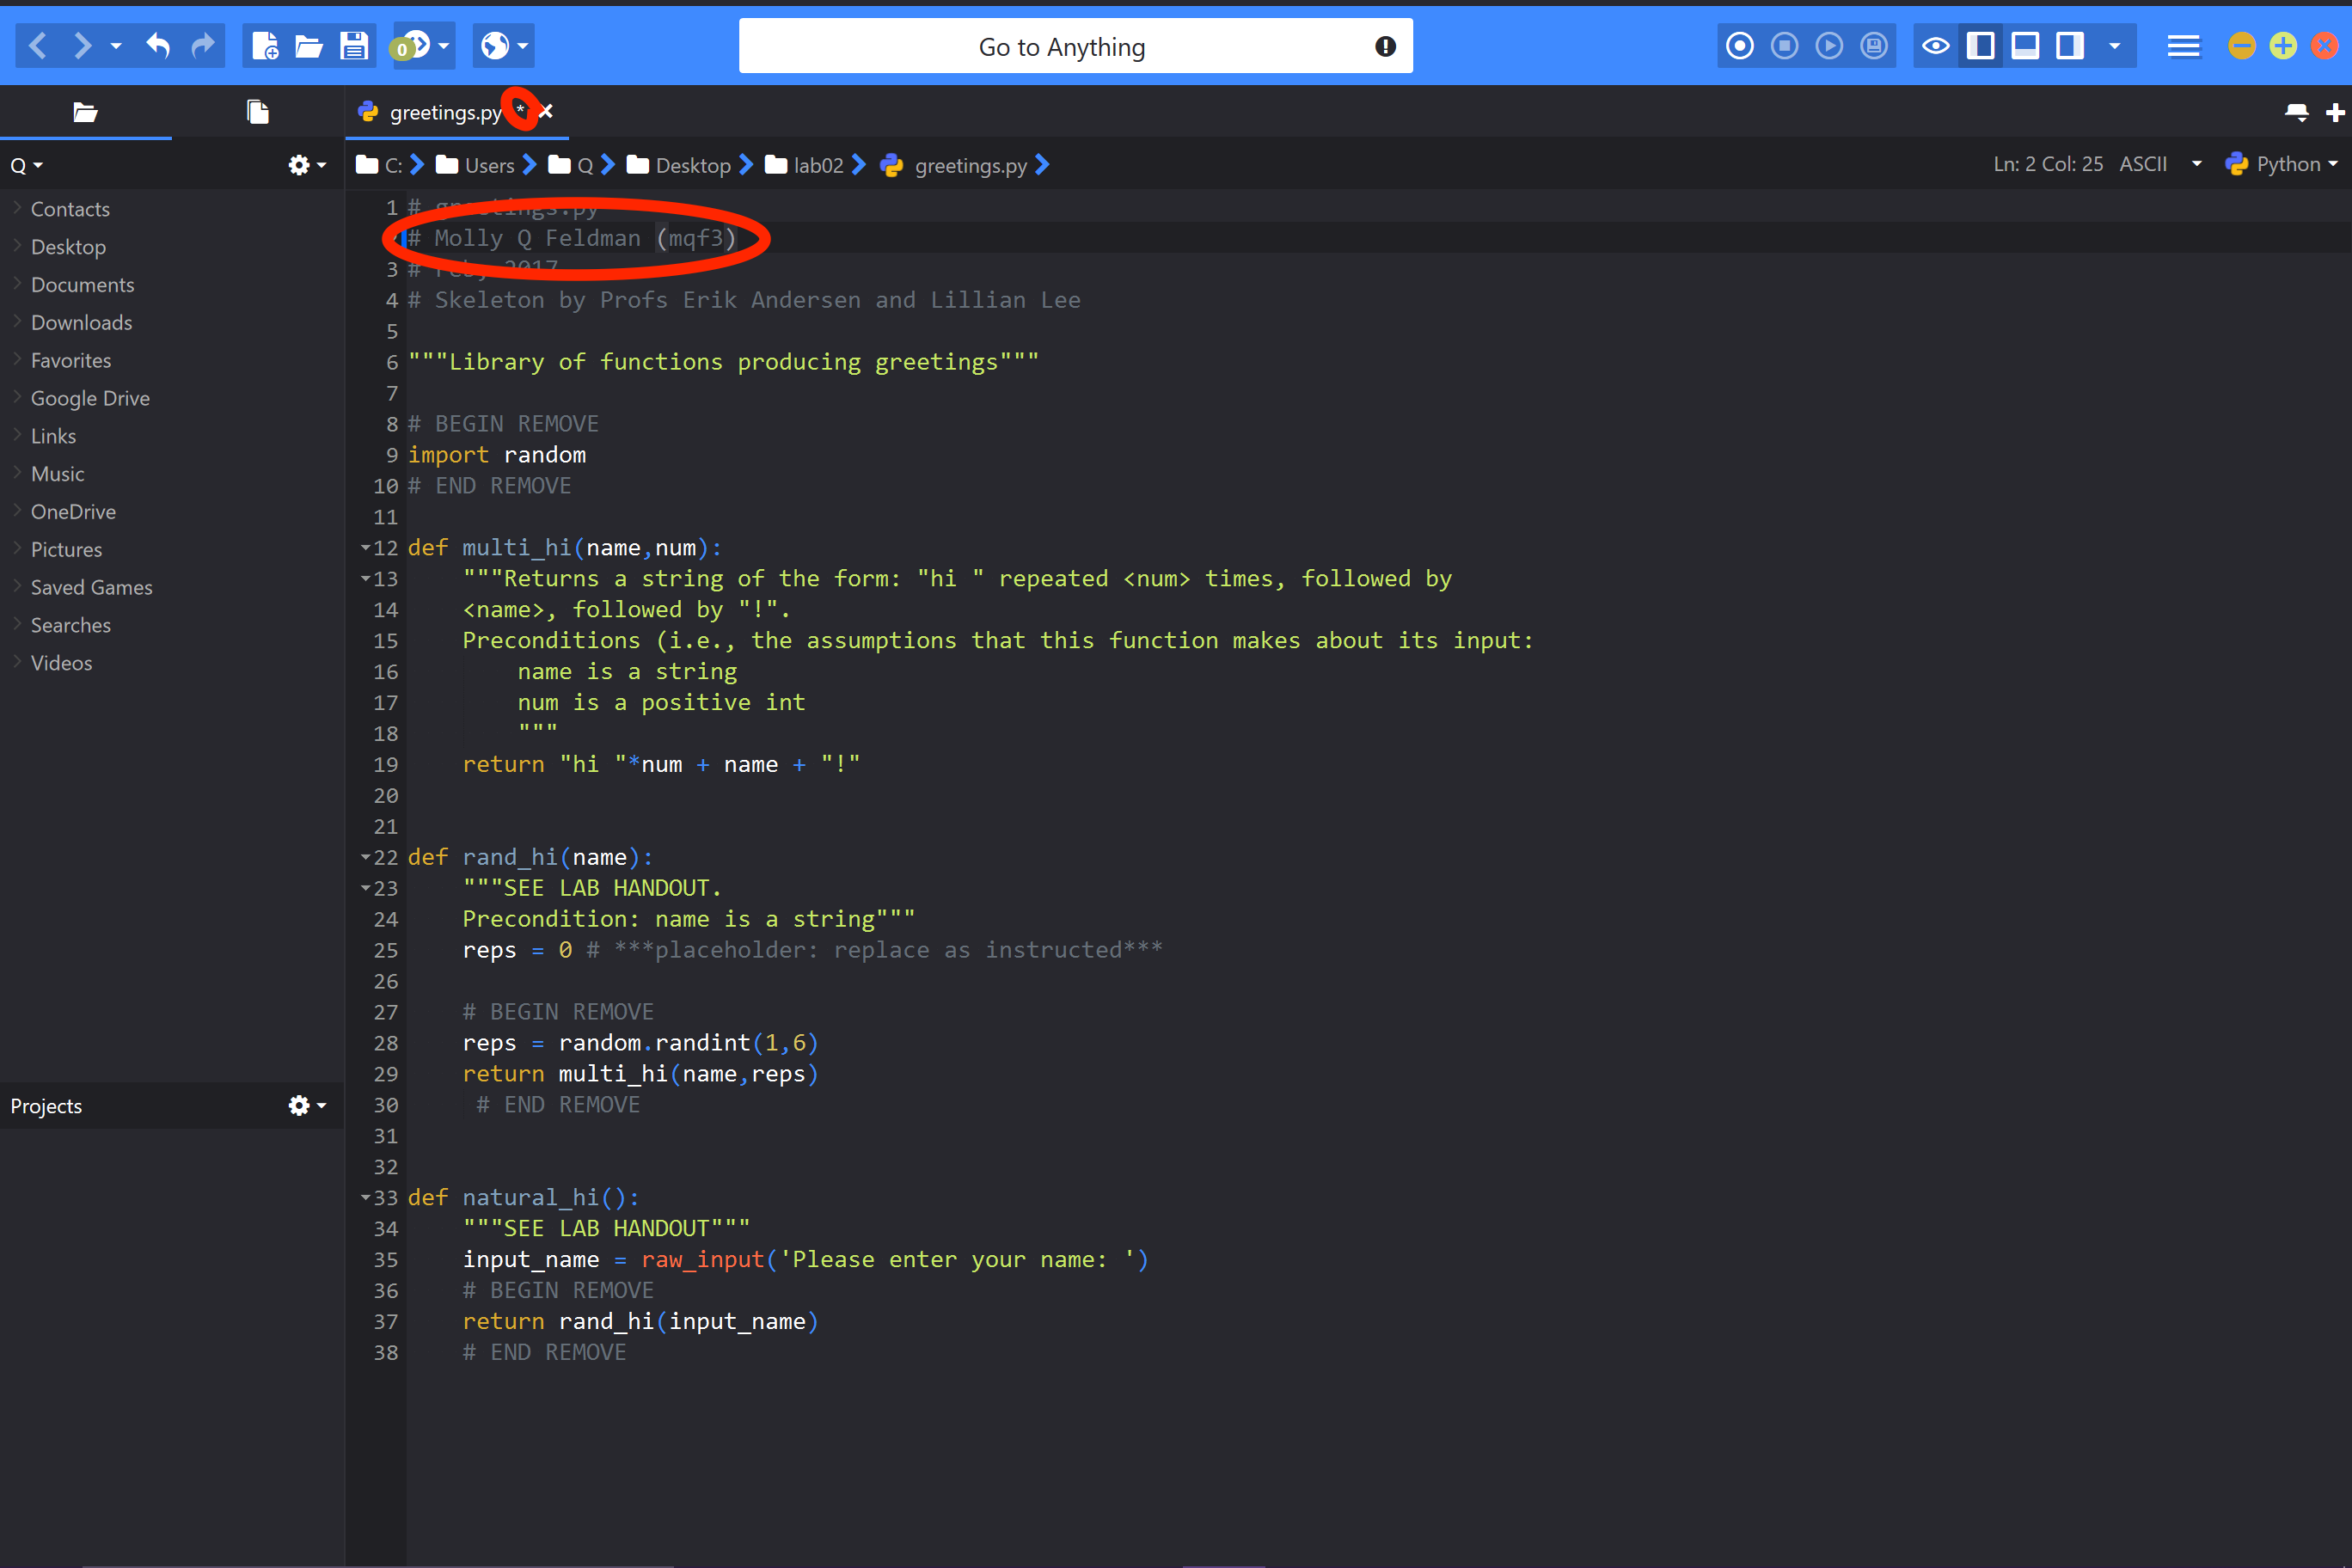
To save, you can either press the save symbol (circled in red below) or press "Ctrl + S":

If the save was successful, the asterisk will disappear and the filename will appear as normal:
