T-Th 9:05
or
T-Th 11:15
in Olin 155
CS 1110: Introduction to Computing Using Python
Fall 2017
About: Announcements
Staff
Times & Places
Calendar
Materials:
Texts
Python
Command Shell
Terminology
VideoNote
Coursework:
Lectures
Assignments
Labs
Assessment:
Grading
Exams
Resources:
CMS
Piazza
AEWs
FAQ
Python API
Python Tutor
Style Guide
Academic Integrity
Assignment 6:
Images
Due to CMS by Wednesday, November 15th at 11:59 pm.

Instagram claims that it is site for sharing photos online with friends. But what really made Instagram popular was its easy to use photo editing tools and image filters. In this assignment, you will learn how to make your own own image filters. While they may not be as fancy as the ones provided by Instagram, this assignment will still teach the basic principles to help you with your own start-up someday.
As we have seen in class, an image is just a 2-dimensional list of pixels (which are themselves RGB objects). So most of the functions/methods that you write in this assignment will involve nested for-loops that read a pixel at a certain position and modify it. You will need to use what you have learned about multi-dimensional lists to help you with this assignment.
One major complication is that graphics cards prefer to represent images as a 1-dimensional list in a flattened presentation instead. It is much easier for hardware to process a 1-dimensional list than a 2-dimensional one. However, flattened presentation (which we explain below) can be really confusing to beginners. Therefore, another part of this assignment is learning to use classes to abstract a list of pixels, and present it in an easy-to-use package.
Finally, this assignment will introduce you to a Python package. This application is a much more complex GUI than the one that you used in Assignment 3. While you are still working on a relatively small section of the code, there are a lot of files that go into making this application work. Packages are how Python groups together a large number of modules into a single application.
Important: We know that this assignment straddles the exam. This is unfortunate timing of the semester. In addition, it is the only assignment in which you will get practice writing classes before we ask you to write classes on the exam. We highly recommend that you follow the recommended strategy. This puts micro-deadlines on each of the assignment, and ensures that you have finished enough of the assignment before the exam.
Learning Objectives
This assignment has several important objectives.
- It gives you practice working with for-loops
- It gives you practice with writing your own classes.
- It illustrates the importance of class invariants.
- It gives you practice with using classes to provide abstractions.
- It gives you practice with both both 1-dimensional and 2-dimensional lists.
- It gives you experience with designing helper functions to structure your code properly.
- It gives you practice with manipulating images at the pixel level.
Table of Contents
- Academic Integrity and Collaboration
- How to Work on the Assignment
- Assignment Source Code
- Pacing Yourself
- Running the Application
- Using the Test Cases
- Using the Filter Application
- Using the Encoder Application
- Debugging the Application
- Assignment Instructions
- Task 0: Understanding the
PixelsClass - Task 1. The
ImageClass - Task 2. The
ImageHistoryClass - Task 3. The Basic Filters
- Task 4. The Advanced Filter
- Task 5. Steganography
- Finishing the Assignment
Academic Integrity and Collaboration
Please review CS1110's academic integrity policies. If you talk to other students, please cite the collaboration in your source code. In addition, if you look at other sources online on image filtering and use that to help with your code, please cite that as well. We have given a variation on this assignment before (though not for many, many years), so please do not look online for previous years solutions.
Depending on the amount of collaboration, we may or may not take off points. We generally reserve point deductions for sharing large amounts of code, not just a few lines. However, we are not going to explain our deductions ahead of time. The only way to guarantee that you do not lose points is if you do not look at anyone else's code.
The bigger problem is if you do not cite your sources or collaborators at all. If we discover large similarities between two submissions, and neither of you cited the other, we will be forced to hold an Academic Integrity Hearing. Neither of us wants that.
Collaboration Policy
You may do this assignment with one other person. If you are going to work together, then form your group on CMS as soon as possible. If you do this assignment with another person, you must work together. It is against the rules for one person to do some programming on this assignment without the other person sitting nearby and helping.
With the exception of your CMS-registered partner, is not a good idea to look at anyone else's code or show your code to anyone else, in any form whatsoever. If you do see someone else's code, and it affects how you write your own, then you must cite the source in your submission.
How to Work on the Assignment
This assignment involves implementing several things before you will have the whole application working. As always, the key to finishing is to pace yourself and make effective use of all of the unit tests and the visualizers that we provide.
Assignment Source Code
This assignment is packaged up into two different zip files.
- imager.zip
- The package for the assignment application code
- samples.zip
- Sample images for testing your code
You should download the zip archive imager.zip from the link above. Unzip it and put the contents in a new directory. This time, you will see that this directory contains a lot of files. Most of these files are not all that important; they are similar to a3app.py in that they drive a GUI application that you do not need to understand. In fact, you only need to pay attention to four files:
a6image.py-
This module contains the
Imageclass. You will need to complete it to be able to display an image in the GUI application. a6history.py-
This module contains the
ImageHistoryclass. You will need to complete it to be able to apply filters in the GUI application. Some of the filters, such as invert will work as soon as this class is finished. a6editor.py-
This module contains the
Editorclass. This is where you will implement all of the image filters as well as the code for processing secret messages.
There are two other files that you should read, even though they are not intended to be modified.
a6test.py- This module contains test cases for Parts 1 and 2. It is described below.
pixels.py- This module contains the Pixels class that we discussed in lecture. It is also described below.
Pacing Yourself
This assignment has a problem: there is an exam in the middle of the assignment. There is not much we can do about this. In alternating years, either this assignment or the color model assignment would have a prelim in the middle. This year it is this assignment.
To make matters worse, parts of this assignment will be covered by the exam. In particular, both the classes Image and ImageHistory are fair game. You should do everything that you can to finish these parts of the assignment before you study for the exam. In addition, the exam is likely to have a 2-dimensional list function, so it would be helpful to finish at least one of the image filters.
At the end of each part of the assignment, we have a suggested completion date. While this is not enforced, we recommend that you try to hit these deadlines. If you cannot make these deadlines, it might be a sign that you are having difficulty and need some extra help. In that case, you should see a staff member as soon as possible.
Running the Application
Because there are so many files involved, this application is handled a little differently
from previous assignments. To run the application, keep all of the files inside of the
folder imager. Do not rename this folder. To run the program, change the
directory in your command shell to just outside of the folder imager
and type
python imager
In this case, Python will run the entire folder. What this really means is that
it runs the script in __main__.py. This script imports each of the other
modules in this folder to create a complex application.
The script __main__.py is actually quite sophisticated. If you look at the
code in this file, you will see that actually manages multiple applications underneath
one roof. Try typing
python imager --encode
This command launches a completely different application that is used in Part 5 of the assignment. This flexibilty allows us to define minimal GUIs that only focus on what is needed for the task at hand.
Finally, if you type
python imager --test
the application will run test cases (provided in a6test.py) on the classes
Image and ImageHistory. This is valuable for Parts 1 and 2
of the assignment, since you cannot get any visual feedback until these classes are
complete.
Using the Test Cases
As we said, executing the application with the --test option will run
test cases on the classes Image and ImageHistory. These
are the classes that absolutely must be finished before the exam, so we want to give
you as much help as possible.
These test cases are designed so that you should be able to test your code in the order
that you implement it. However, if you want to "skip ahead" on a feature, you are
allowed to edit a6test.py to remove a test. Those tests are simply there
for your convenience.
This unit test script is fairly long, but if you learn to read what this script is doing, you will understand exactly what is going on in this assignment and it will be easier to understand what is going wrong when there is a bug. However, one drawback of this script is that (unlike a grading program) it does not provide a lot of detailed feedback. You are encouraged to sit down with a staff member to talk about this test script in order to understand it better.
With that said, this unit test is not complete. It does not have full coverage
of all the major cases, and it may miss some bugs in your code. It is just enough to
ensure that the GUI applications are working. You may lose points during grading even
if you pass all the tests in this file (our grading program has a lot more tests).
Therefore, you may want to add additional tests as you debug. However, we do not want
you to submit the file a6test.py when you are done, even if you made
modifications to the file.
Using the Filter Application
Once you have passed all of the tests, you have completed enough of the assignment to move on to the filter application. The filter application is the one that launches when you type
python imager
This will open up a windowed application with two pictures of your instructor's photo (from 10 years ago), as shown below.
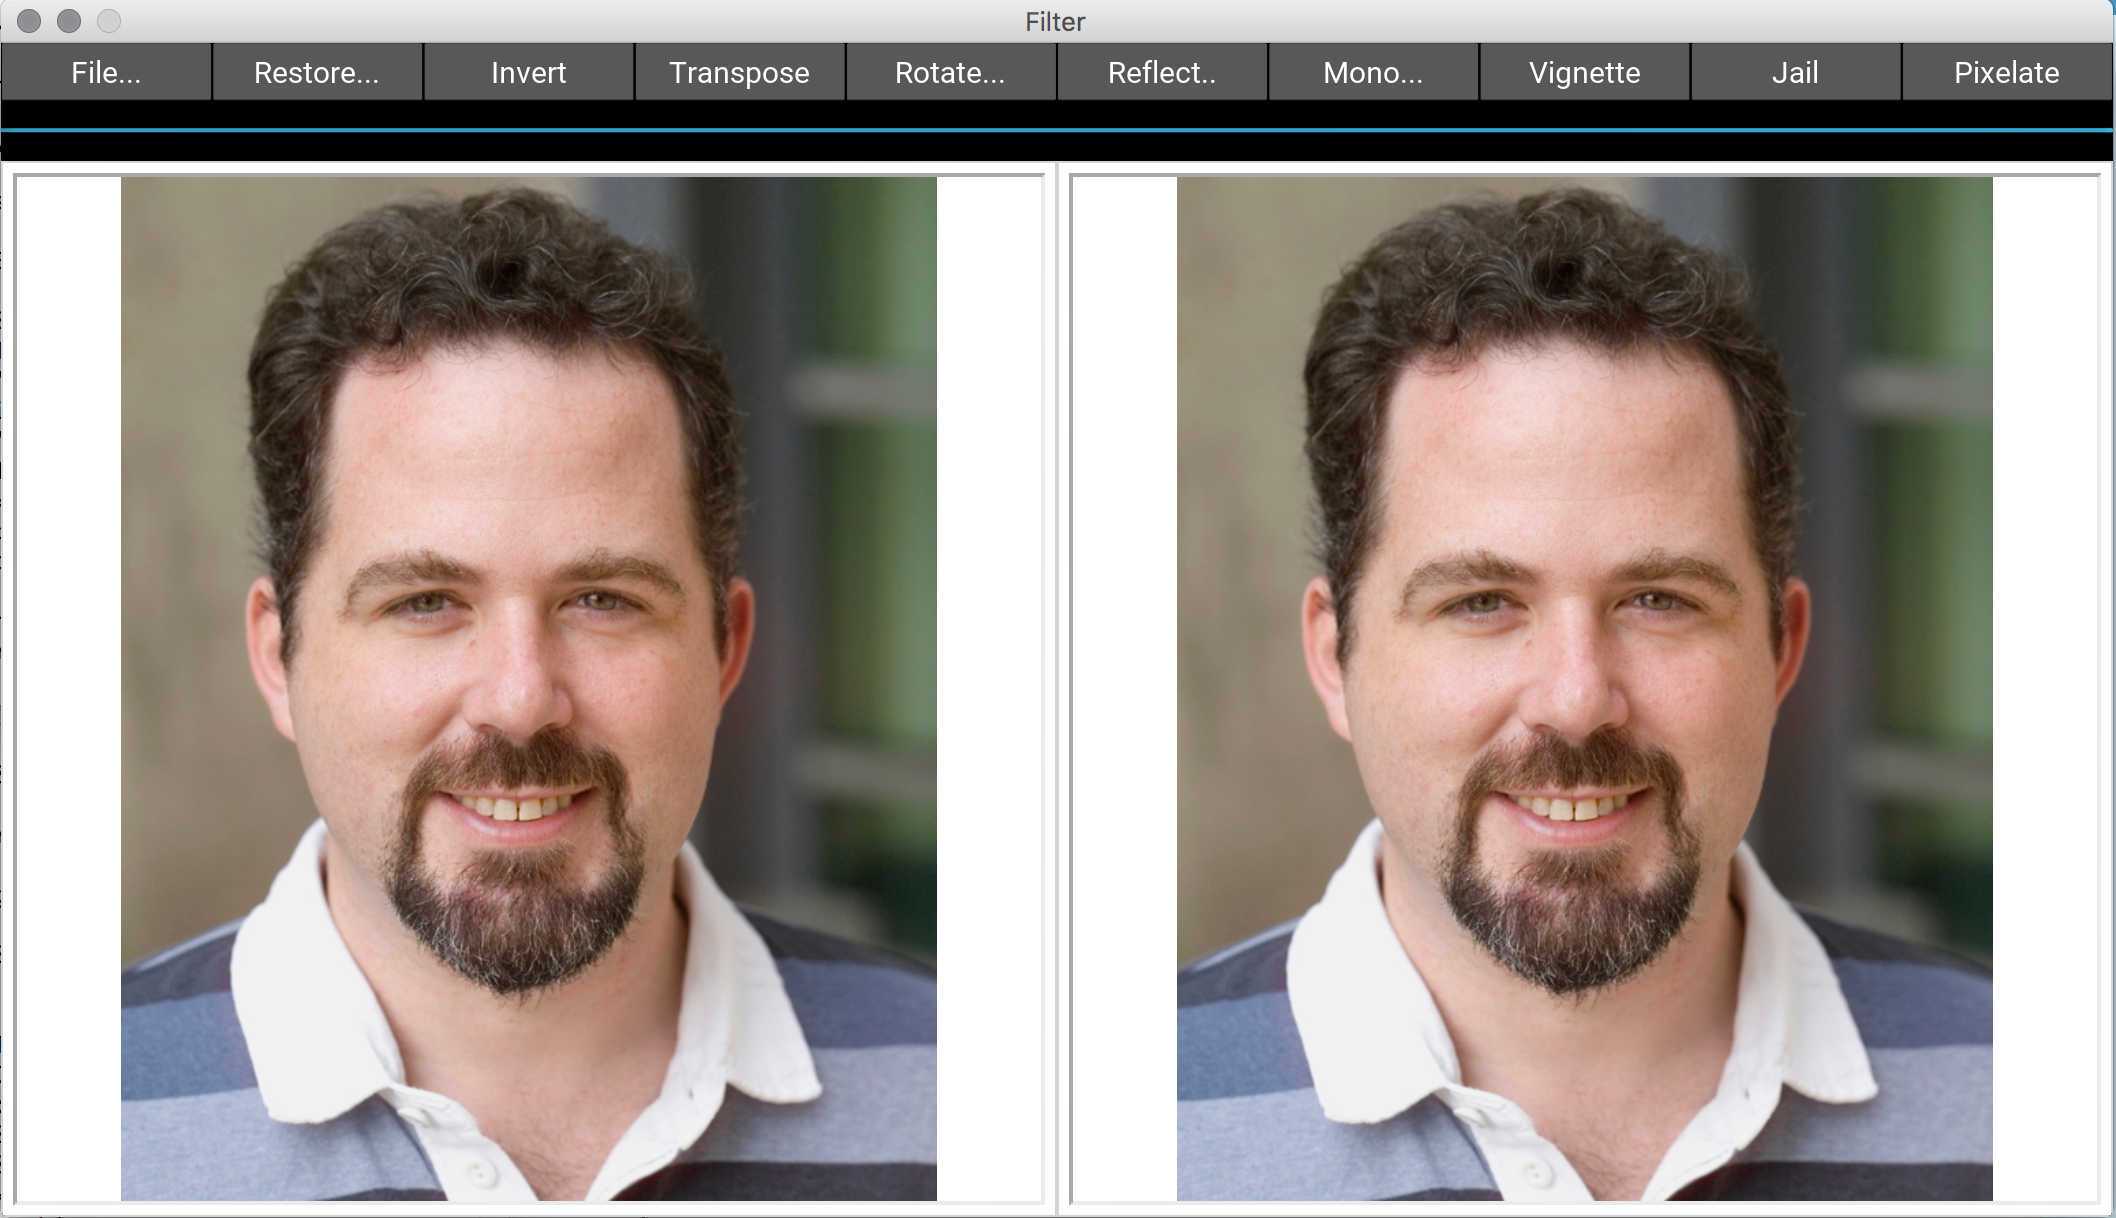
If you have not completed ImageHistory, there will be no image on the right.
If you have not completed Image, both sides will be blank squares.
As you work with this application, the left image will not change; it is the original image. The right image will change as you click buttons. The actions for the buttons Invert, Transpose, and Rotate.., are already implemented. Click on them to see what they do.
You will notice that this takes a bit of time (your instructor's computer takes 3 seconds for most operations). The default image is 598x750. This is almost 4.5 million pixels. The larger the image, the slower it will be. With that said, if you ever find this taking more than 30 seconds, your program is likely stuck and has a bug in it.
The effects of the buttons are cumulative. If you have implemented
ImageHistory, you can undo the last effect applied with Restore...
Undo. To remove all of the effects, choose Restore... Clear.
This will revert the right image to its original state.
You can load a new image at any time using the File... Load button. Alternatively, you can start up with a new image by typing
python imager myimage.png
where myimage.png is your image file. The program can handle PNG, JPEG,
and GIF (not animated) files. You also can save the image on the right at any time by
choosing File... Save. You can only save as a PNG file. The other formats
cause problems with Part 5 of the assignment.
The remaining buttons of the application are not implemented. Reflect... Horizontal works but the vertical choice does not. In Parts 3 and 4 of the assignment, you will write the code to make them work.
If you are curious about how this application works, most of the code is in filter.py and filter.kv. The file filter.kv arranges the buttons and colors them. The module filter.py contains Python code that tells what the buttons do. However, the code in this module is quite advanced and we do not expect you to understand any of it.
Warning: There is a Kivy bug that we have not been able to identify. One out of every 50 times that you launch your program, the application might freeze. All of the buttons are unresponsive and do not respond to clicks. You can tell that this has happened to you if nothing happens when you click the File... button. To solve the problem, simply quit and restart the application. It should go away on the second try. The issue is very sporadic and more of an annoyance than a real problem.
Using the Encoder Application
The final part of the assignment requires a slightly different application. Now you are not just working with images. You are working with images and text. To launch the encoder application, type
python imager --encode
As with the filter application, if you type the name of an image file at the end, it will make that the start-up image.
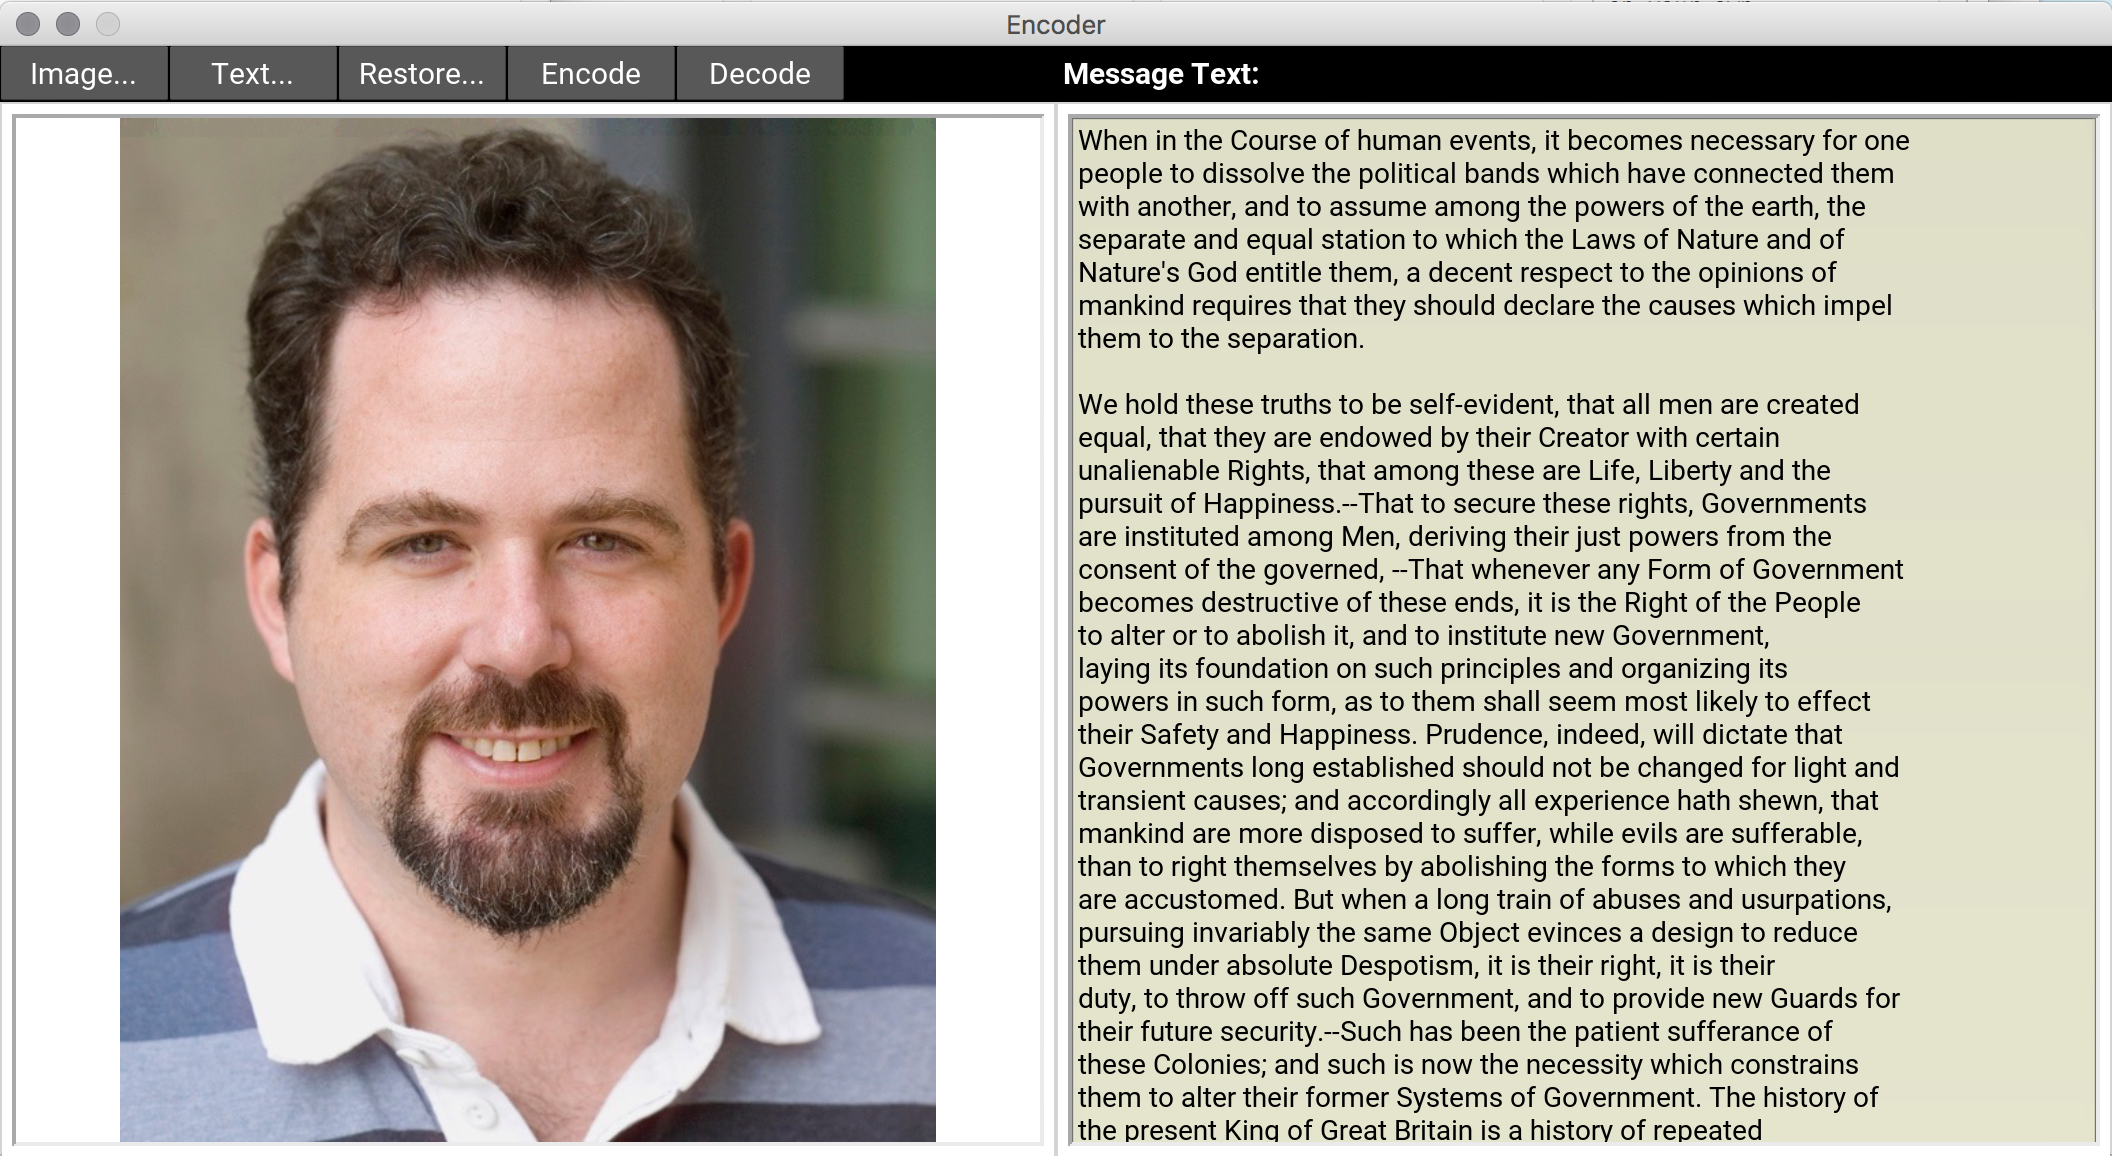
When you first launch this application, you will see an error message that says "No message was detected." This is perfectly normal. You have not encoded anything yet, so there is nothing to decode. As a rule, the application will always decode the message hidden in the file at start-up, and you will receive that error if there is no message.

To encode a message (once you have completed Part 5), type text in the box on the right. The box will change color to blue if you have unsaved changes. Once you press the Encode button, it will write the message inside the image and change color back. At this point, you will probably want to save the image to a PNG file to decode later.
Typing text in the box is a lot of work. Therefore, you can always read from a text file (or even a .py file). If you chose Text..., this will load the file into the box on the right. However, it will not encode the text until you chose to do so. Hence, the text box will be blue after the file is loaded.
The undo functionality of ImageHistory works for this application as well.
Choosing to undo will remove the most recently encoded message, restoring to a previously
encoded message.
If you are curious about how this application works, most of the code is in encoder.py and encoder.kv. The file encoder.kv arranges the buttons and colors them. The module encoder.py contains Python code that tells what the buttons do. However, the code in this module is quite advanced and we do not expect you to understand any of it.
Debugging the Application
This is a complex application. This means that bugs are guaranteed to happen. And while we think our code is solid (except for the weird freezing bug), any deviation from a method specification in your code could bring the whole thing down.
When either the filter or the encoder application runs into a bug, it will display an error message like the one below. In a few rare cases it might actually, crash. However, we have a lot of try-except statements to keep the code running should you want to try again.
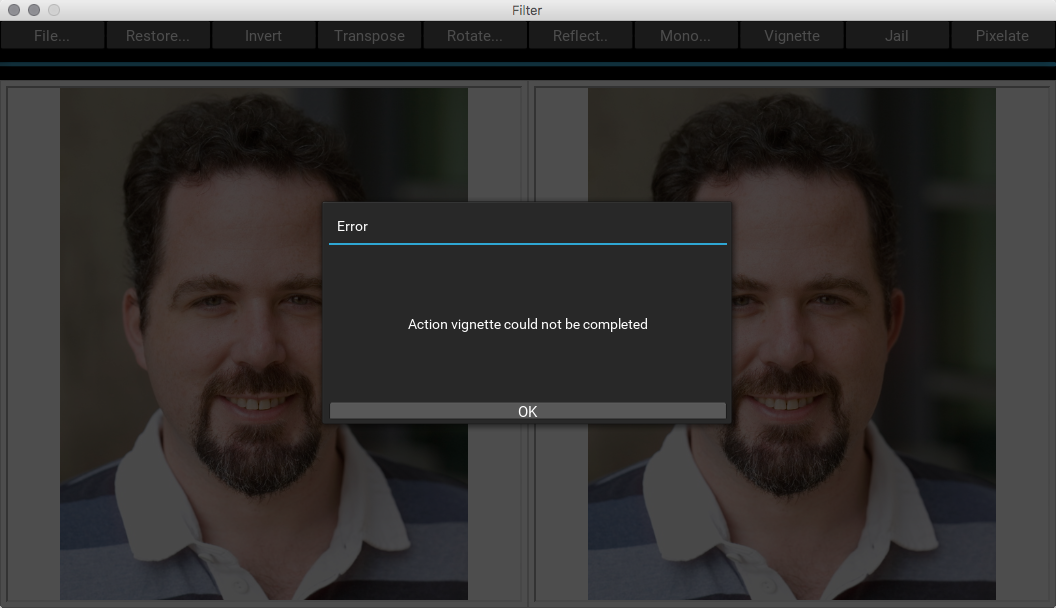
As you can see, these error messages are not particularly helpful. They are not going to help you debug the program. Fortunately, whenever an error message pops up, the application does display an error trace as well. But this error trace is not displayed in the GUI window. You have to go back to the command prompt where you started the application to see the error trace. So, like the Turtle assignment, you should have both windows front and center at all times.
The command prompt is also where any print statements you add will show up. The later parts of this assignment will probably require heavy use of watches and traces to debug the application. Learn where to look for them.
Assignment Instructions
There are so many parts to the imager application that this assignment can
feel very overwhelming. However, there are really only four files that you need to pay
attention to:
The first module is completed; you just need to understand how to use it. The others are incomplete. However, as long as you pay close attention to the specifications, you should be able to complete them without worrying about anything else in the application.
We will take you through all of this step-by-step. As long as you do a little bit at a time, this assignment is well within your ability.
Task 0: Understanding the Pixels Class
You do not ever need to worry about writing code to load an image from a file. There
are other modules in imager that handle that step for you. Those modules
will store the contents of the image in a Pixels object. This class is
defined in the module pixels.
As the name suggests, an object of this class stores the image pixels. Each pixel is a single RGB (red-green-blue) value that instructs you computer monitor how to light up that portion of the screen. Each RGB component is given by a number in the range 0 to 255. Black is represented by (0, 0, 0), red by (255, 0, 0), green by (0, 255, 0), blue by (0, 0, 255), and white by (255, 255, 255).
The Pixels has exactly one named attribute: buffer. This stores
the raw data for the graphics card. You never need to do anything with this attribute.
Instead, you should treat Pixels as if it were a list. To access
the contents, you should use the same bracket notation that we use for lists. For example,
if you want to access the first pixel in object p, you just write p[0].
If you want to access the last pixel, you write p[-1].
You can also slice the object like a list. For example, p[:] is a quick
way to make a copy of the image referenced by p. The class Pixels
does all this via operator overloading. While you can look at the code for this class,
as long you pretend that the object is a list, you will have no problems.
However, you do have to pay attention to how the image is stored in the list.
Pixels and Tuples
In previous assignments, we stored these pixels as an RGB object defined in
the cornell module. These were mutable objects where you could change
each of the color values. However, in the Pixels class the RGB colors are
represented via tuples, not RGB objects. A tuple looks like a list,
except that is defined with parentheses instead of square brackets. For example,
x = (1, 3, 4, 5)
is a four-element tuple. Tuples are sequences and can be sliced just like any other. Try the following out in Python:
>>> x = (1, 3, 4, 5)
>>> x[0]
1
>>> x[1:3]
(3,4)
The only difference between a tuple and a list is that tuples are immutable. You
cannot change the contents of a tuple, so any assignment (e.g. x[0] = 10)
will produce an error. Because tuples are immutable, you cannot change an image by
modifying the contents of a pixel value. Instead, you need to make a new pixel tuple
and store that new value in the right place in the list.
Tuples are a natural way of representing color values. You just use a threee-element tuple
with values 0..255. In Assignment 3, we preferred the
RGB objects because they had assert statements to check the invariants for
each color value. Tuples provide no such guarantees. However, tuples are much faster
to process, and Kivy prefers this format. Because image processing is slow enough already,
we have elected to stick with this format.
Flattened Representation
We generally think of an image as a rectangular list of pixels, where each pixel is has a row and column (indicating its position on the screen). For example, a 3x4 pixel art image would look something like the illustration below. Note that we generally refer to the pixel in the top left corner as the "first" pixel.
However, graphics cards really like images as one-dimensional list. One-dimensional lists are a lot faster to process and are more natural for custom hardware. So a graphics card will flatten this image into the following one-dimensional list.

If you look at this picture carefully, you will notice that is it is very similar to row-major order introduced in class. Suppose we represented the 3x4 image above as follows:
      E00  E01  E02  E03
      E10  E11  E12  E13
      E20  E21  E22  E23
The value Eij here represents the pixel at row i and column
j. If we were to represent this image as a two-dimensional list in
Python, we would write
[[E00, E01, E02, E03], [E10, E11, E12, E13], [E20, E21, E22, E23]]
Flattened representation just removes those inner brackets, so that you are left with the one-dimensional list.
[E00, E01, E02, E03, E10, E11, E12, E13, E20, E21, E22, E23]
This is the format that a Pixels object uses to store the image. If you
do not understand this, you should talk to a
staff member
before continuing.
Task 1. The Image Class
For some applications, flattened representation is just fine. For example, when you convert the image to greyscale in Task 3, you do not need to known exactly where each pixel is inside of the file. You just modify each pixel individually. However, other effects like rotating and reflecting require that you know the position of each pixel. In those cases you would rather have a two-dimensional list so that you can easily associate its pixel with its row and column. This will become clear in Task 3.
The Image class has attributes and methods that allow you to treat
the image either as a flattened one-dimensional list (with a length) or as a
two-dimensional list (with width and height), depending on your application. While
the data is not stored in a two-dimensional list, methods like getPixel(row,col)
allow you to pretend that it is. This is what we mean by an abstraction.
The file a6image.py contains the class definition for Image.
This class is fully specified. It has a class specification with the class invariants.
It also has specifications for each of the methods. All you have to do is to write
the code to satisfy these specifications.
As you work, you should run the test cases to verify that your code is correct. To get the most use out of the testing program, we recommend that you implement the methods in the same order that we test them.
The Initializer and Getter Methods
To do anything at all, you have to be able to create an Image object and
access the attributes. This means that you have to complete the initializer and the
getters and setters for the four attributes: pixels, length,
width and height. If you read the specifications, you will
see that these are all self-explanatory.
The only challenge here is the width and height. Note that there is an extra invariant that the following must be true at all times:
width*height == length
You must ensure this invariant in both the initialiers and the setters.
In addition, we expect you to enforce all preconditions with asserts. As we discussed
in class, should use isinstance instead of type to check the
type of an object.
The Setter Methods
Once you have the getters, it is time to write the setters. These are once again simple methods, except for ensuring the invariant for width and height. Once again, you should enforce all preconditions with asserts.
The FlatPixel Getter/Setter Methods
The FlatPixel methods present the image as a one-dimensional list. Therefore, these methods are extremely simple.
An important thing to note about these methods is that we do not want you to enforce the preconditions. Why not? There is an unfortunate trade-off in programming where assert statements make your program safer, but they also slow it down. This is particularly true in image processing, where the methods containing these asserts are called thousands of times. So adding asserts would really slow down the code.
More importantly, these asserts are already built-into the Pixel class. Hence not only would these asserts be slow, but they would also be redundant. So we ask you not to do them.
The Pixel Getter/Setter Methods
The Pixel methods present the image as a two-dimensional list. This is a little trickier. You have to figure out how to compute the flat position from the row and column. Here is a hint: it is a formula that requires the row, the column, and the width. You do not need anything else. Look at the illustrations in our discussion of flattened representation to see if you can figure out the formula.
In these methods we do want you to assert the preconditions, but only assert them for
the row and col parameters. The pixel parameter
is already handled for you by the Pixels object. You do not need to assert
its preconditions.
The __str__ Method
This method is arguably the hardest method in the entire module. We want you to create a string that represents the pixels in two-dimensional row-major order. We are very specific about spacing, so you cannot simply convert the Pixels object to a string.
As a hint, this is a classic for-loop problem. You will need an accumulator to store the string, and you will build it up via concatenation. You might also want to use previous methods that you wrote as helpers.
The Remaining Methods
The remaining two methods are very simple once you have implemented everything else. Finish them, test them, and you are done with this module.
Recommended Deadline
If you are taking the course for a grade, we highly recommend that you finish Image by Thursday, November 2. This guarantees that you have written a complete class before the exam, as this will be one of the questions on the exam.
If you are taking the course S/U, we recommend that you finish Image by Sunday, November 5. This is enough time after Assignment 5 is due to work on this class.
Task 2. The ImageHistory Class
The ImageHistory class is used to implement the Undo choice in the
imager application. How do you undo a edit? You keep all of the edits
around in a list and remove the latest edit. Hence this is a class that maintains a
list of images.
The file a6history.py contains the class definition for ImageHistory.
This class is fully specified, and implementing it is very straightforward. The only
method that might be confusing is increment. The method is called by
the GUI just before an edit is made, to provide a new scratch-space to work
in. When this scratch-space is deleted, that undoes the edit, reverting to the previous
step.
Read the specification clearly. You must pay close attention to the limit on the size of the edit history. If the list gets too long, you need to start forgetting old edits.
Recommended Deadline
This is a very simple class that should take you no more than a day. If you are taking the course for a grade, we highly recommend that you finish ImageHistory by Friday, November 3.
If you are taking the course S/U, we recommend that you finish Image by
Monday, November 6. Again, this is just one day after finishing the Image
class.
Task 3. The Basic Filters
You have now implemented enough code that you can run the filter application. Do that now. Play with the application and familiarize yourself with how it works. In this section, you will complete the reflection, monochrome, and jail functions. These are the easiest of the filters and can be finished before the exam.
The filters are all methods in the Editor class provided in the module
a6editor.py. This is a subclass of ImageHistory, so it
has access to all of the methods of that class as well.
While working on these methods, you may find that you want to introduce new helper methods.
For example, jail already has a _drawHBar helper provided.
You may find that you want a _drawVBar method as well. This is fine and
is actually expected.
However, you must write a complete and thorough specification of any helper method
you introduce. It is best to write the specification before you write the method
body because it helps you as you write the program. This is standard practice in this
course. It is a severe error not to have a specification, and points will be deducted
for missing or inappropriate specifications.
At this point, you should rely heavily on the filter application provided for testing. You are free to write your own test cases, but it is not always easy to do that with pictures. In addition, you should make heavy use of watches and traces while debugging.
Method reflectVert
This method should reflect the image about a horizontal line through the middle of the image.
Look at the method reflectHori for inspiration, since it does something similar.
This method should be relatively straightforward. It is primarily intended as a warm-up
to give you confidence.
Method monochromify
In this method, you will change the image from color to either grayscale or sepia tone.
The choice depends on the value of the parameter sepia.
To implement this method, you should first calculate the overall brightness of each pixel
using a combination of the original red, green, and blue values. The brightness is
defined by:
brightness = 0.3 * red + 0.6 * green + 0.1 * blue
For grayscale, you should set each of the three color components (red, green, and blue)
to the same value, int(brightness).
Sepia was a process used to increase the longevity of photographic prints. To simulate a
sepia-toned photograph, darken the green channel to int(0.6 * brightness)
and blue channel to int(0.4 * brightness), producing a reddish-brown tone. As a
handy quick test, white pixels stay white for grayscale, and black pixels stay black for
both grayscale and sepia tone.
To implement this method, you should get the color value for each pixel, recompute a new
color value, and set the pixel to that color. Look at the method invert as
well as the discussion of the Pixels class
to see how this is done.
Method jail
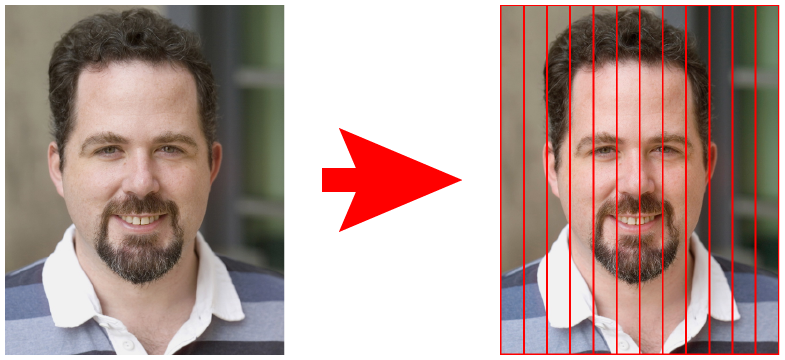 Always a crowd favorite, the
 jail method draws a a red boundary and vertical
bars on the image. You can see the result in the picture to the right. The specification
is very clear about how many bars to create and how to space them. Follow this specification
clearly when implementing the function.
We have given you helper method _drawHBar to draw a horizontal bar (note that
we have hidden it; helper functions do not need to be visible to other modules or classes).
In the same way, you should implement a helper method _drawVBar to draw a
vertical bar. Do not forget to include its specification in your code.
In this problem you have to be very careful with round-off error, in order to make sure that the bars are evenly spaced. Actual column positions should ints (you cannot have part of a pixel). However, the computed distance between bars should be a float. That means you should first compute your column position as a float and wait to turn this column position into an int (by rounding and casting) until you are ready to draw the bar.
When you are finished with this, open a picture and click the buttons Jail, Transpose, Jail, and Transpose again for a nice effect.
Recommended Deadline
With the exception of jail, these methods should not take you that long.
Furthermore, these methods are excellent practice for the exam for two reasons.
First, the class Editor is a subclass, which will be on the exam.
In addition, these methods are lot like writing functions on two-dimensional lists,
which are also on the exam. Therefore, we highly recommend that students taking the
course for a grade finish all three methods by Sunday, November 5. If you have to
delay jail, that might be okay. But definitely finish the other two.
Once you have finished these methods, it is okay to take a little time off and study for the exam. Come back when the exam is over.
If you are taking the course S/U, we recommend that you finish these methods by Thursday, November 9. That is the day of the exam, and now you are in-sync with the graded students.
Task 4. The Advanced Filters
The advanced filters are called such because their code is a lot more involved. They still use loops in much the same way as the other filter functions. However, the bodies of the loops, or the range of the loop variables are different in some way that requires careful thought. Anyone who can finish these before the exam will have absolutely no problem on the exam. However, that is not required.
Once again, you may find that you want to introduce new helper methods. This is fine (and expected). But remember that you must write a complete and thorough specification of any helper method you introduce. It is a severe error not to have a specification, and points will be deducted for missing or inappropriate specifications.
Method vignette
Camera lenses from the early days of photography often blocked some of the light focused at the edges of a photograph, producing a darkening toward the corners. This effect is known as vignetting, a distinctive feature of old photographs. You can simulate this effect using a simple formula. Pixel values in red, green, and blue are separately multiplied by the value
1 - d2/h2
where d is the distance from the pixel to the center of the image and
h is the Euclidean distance from the center to any one of the corners.
The effect is shown below.
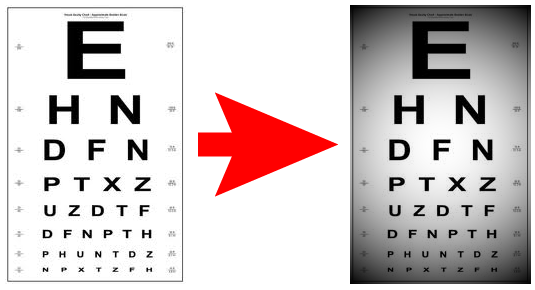
Like monochromification, this requires accessing the color values of each pixel, modifying their value, and putting them back together as a pixel (making sure that the values are ints when you do so). However, for this operation you will also need to know the row and column of the pixel you are processing, so that you can compute its distance from the center of the image.
For this reason, we highly recommend that you use the method getPixel
and setPixel in the class Image. These methods treat
the array as a two-dimensional list. Do not use the methods getFlatPixel
and setFlatPixel, which treat it like a one-dimensional list. That was
fine for invert and monochromify, but that was because the
row and column did not matter in those methods.
Method pixellate
Pixellation simulates dropping the resolution of an image. You do not actually change the resolution (that is a completely different challenge). However, you replace the image with large blocks that look like giant pixels.
To construct one of these blocks, you start with a pixel position
(row,col). You gather all of the pixels step
many positions to the right and below and average the colors. Averaging is exactly
what it sounds like. You sum up all the red values and divide them by the number of
pixels. You do the same for the green and blue values.
When you are done averaging, you assign this average to every pixel in the block. That
is every pixel starting at (row,col) and within step
positions to the right or down gets this same pixel color. This result is illustrated
below.
![]()
When you are near the bottom of the image, you might not have step pixels
to the right or below. In that case, you should go the edge of the image and stop.
We highly recommend that you write this averaging step as helper function. It will
greatly simplify your code in pixellate.
One thing you do need to watch out for is how you construct your loops in
pixellate. If you are not careful, the blocks will overlap each other,
messing up the pixellation effect. Think very carefully about what sequence or range
that you want to loop over.
Recommended Deadline
We recommend that everyone (graded or S/U) finish the advanced filters by Sunday, November 12. These are harder methods, but there are only two of them. Furthermore, this is three days after the exam, giving you enough time to decompress work on them. More importantly, it gives you three whole days to work on the last part, which is the most involved.
Task 5. Steganography
The last official part of the assignment is the most involved. Steganography, according to Wikipedia, is "the art and science of writing hidden messages in such a way that no one apart from the intended recipient even realizes there is a hidden message." This is different from cryptography, where the existence of the message is not disguised but the content is obscured. Quite often, steganography deals with messages hidden in pictures.
To hide a message, each character of the message is hidden in one or two pixels of an image by modifying the red, green, and blue values of the pixel(s) so slightly that the change is not noticeable to the eye.
Each character is represented using the American Standard Code for Information Interchange (ASCII) as a three-digit integer. We allow only ASCII characters; all the obvious characters you can type on your keyboard are ASCII characters, but it does not support certain foreign characters or emoji.
For the normal letters, digits, and other keyboard characters like
'$' and '@',
you can convert back and forth between a character and its ASCII representation using
the Python built-in functions ord and chr. For example,
ord('k')
evaluates to 107, and chr(107)
evaluates to 'k'. As you may remember,
you did this in the second lab.
We can hide the character 'k' in a pixel
whose RGB values are 199, 222, and 142 by changing the least significant digit of each
color component to one of the digits of 107, the integer representation of
'k':
| Original Pixel | Pixel with 'k' hidden |
|||||
| Red | Green | Blue | hide 'k', which is 107 |
Red | Green | Blue |
| 199 | 222 | 142 | → | 191 | 220 | 147 |
This change in each pixel is so slight that it is imperceptible to the human eye.
Decoding the message, the reverse process, requires extracting the last digit of each
color component of the pixel and forming an ASCII value from the three extracted digits,
then converting that ASCII value to a character.
In the above example, we would extract the digits 1, 0, and 7 from the RBG components
of the pixel, put them together to form 107, and then apply chr to this
value to obtain 'k'. Extracting the message does not change the image.
The message stays in the image forever.
Solve Three Important Problems
You are to write code to hide characters of a message text in the pixels
of an image in flattened representation, starting with pixel 0, 1, 2, ... Before you
write any code at all, you need to think about the following issues and solve them.
First, you need some way to recognize that the image actually contains a message. Thus, you need to hide characters in pixels 0, 1, 2, ... that have little chance of appearing in a real image. You cannot be sure that an image without a message does not start with the pixels resulting from hiding the characters, but the chances should be extremely small. You should have a beginning marker of at least two pixels that indicates that this file contains a message.
Next, you have to know where the message ends. You can do this in several ways. You can hide the length of the message in the first pixels in some way (how many pixels can that take?). You can also hide some unused marker at the end of the message. Or you can use some other scheme. You may assume that the message has fewer than one million characters (e.g. this is the precondition), but you must be prepared for the message to contain any sequence of characters, including punctuation.
Finally, the largest value of a color component (e.g. blue) is 255. Suppose the blue component is 252 and you try to hide 107 in this pixel. In this case, the blue component would be changed to 257, but this impossible because a color component can be at most 255. Think about this problem and come up with some way to solve it.
As you can see, this part of the assignment is less defined than the previous ones. You get to come up with the solutions to some problems yourself. You should feel free to discuss this part of the problem with the course staff. They will not tell you how to solve these problems, but they will discuss your ideas with you and point out any problems.
Complete the Methods encode and decode
You should complete the body of the methods encode and decode
in the class Editor. These two methods should hide a message and reveal
the message in the image. When you design decode, make sure it
attempts to extract the message only if its presence is detected.
Feel free to introduce other helper methods as needed. For example, we have provided
a helper method called _decode_pixel, which takes a pixel position
pos and extracts a three-digit number from it, using the encoding that we
suggested above. This suggests that you might want to create a helper method called
_encode_pixel, which encodes a number into a pixel. The exact specification
of such a helper is up to you (if you start with our specification, be sure to modify it
as appropriate for your code).
Note that the answers to the three problems above greatly influence how you write all
of these methods. Therefore, the specifications of these methods must include
any description of how you solved the three problems. For example, the specification
of _encode_pixel must describe how you handle the pixel overflow problem.
In some case this may require modification of specifications written by us.
You can change anything you want in the long description part of these methods. Do not
change the one line summary or the preconditions.
As an aside, you will also notice that we use the method getFlatPixel in
_decode_pixel. That is because it is very natural to think of an image as
one-dimensional list when encoding text. While an image is two-dimensional arrangement of
values, text is not. Hence, once again, we see the advantage of abstraction in
Image, allowing us to access the data how we want for a particular
application.
Test encode and decode
Debugging encode and decode can be difficult.
Do not assume that you can debug simply by calling encode and then
decode to see whether the message comes out correctly. Instead, write and
debug encode fully before going on to decode
How can you debug encode without decode? Start with short
messages to hide (up to three characters). Use the method getPixels
in Image and slice off that many pixels from the list. Print these out
and verify that they are what you expect.
When encode and decode are both done, try hiding and revealing
a long message (e.g. 1000, 2000, or 5000 characters). This is where you really make
use of the encoder application. Use the Text...
feature to load in a text file and try to encode that. We highly recommend that you
try to encode a Python program, as that is a good test of punctuation characters.
Save your messages
Clicking Image... Save saves the image in the specified directory with the
filename you enter. The message is saved in .png format, which is a lossless
format, meaning it does not drop or alter pixels after saving. Saving in .jpg
format would not work, because this format compresses the image, which would drops
pixels and corrupts your message.
With .png, you can hide a message, save, quit, and then restart the application
with the message still there. You should try to do that.
Finishing the Assignment
Once you have everything working you should go back and make sure that your program meets the class coding conventions. In particular, you should check that the following are all true:
- There are no tabs in the file, only spaces (this is not an issue if you used Komodo Edit).
- Functions are each separated by two blank lines.
- Lines are short enough (80 chars) that horizontal scrolling is not necessary.
- The specifications for all of the functions are complete and are docstrings.
- Specifications are immediately after the function header and indented.
As with all assignments, your submitted files (a6image.py,
a6history.py, and a6editor.py) should contain
(1) your name(s) and netid(s), and (2) the date you finished the assignment.
These should appear in the module docstring at the very top.
Upload the files a6image.py, a6history.py, and
a6editor.py to CMS by the due date: Wednesday, November 15th at 11:59 pm.
We do not want any other files. We do not want to see your test cases.
Survey
In addition to turning in the assignment, we ask that each of you individually (even if you worked in a group) complete the survey posted in CMS. Once again, the survey will ask about things such as how long you spent on the assignment, your impression of the difficulty, and what could be done to improve it. Please try to complete the survey within a day of turning in this assignment. Remember that participation in surveys comprise 1% of your final grade.