T-Th 9:05 or 11:15 in Kimball B11
CS 1110: Introduction to Computing Using Python
Spring 2013
About: Announcements
Staff
Consultants
Times & Places
Syllabus
Materials:
Texts
Python/Komodo
Command Shell
Terminology
Handouts:
Lectures
Assignments
Labs
Assessment:
Grading
Exams
Resources:
CMS
Piazza (link)
Piazza (about)
VideoNote
AEWs
FAQ
Python Library
Online Python Tutor
Style Guide
Academic Integrity
Authors of these pages: D. Gries, L. Lee, S. Marschner, & W. White, over the years
Assignment 3:
Color Perception
Due on CMS on Monday, March 4th at 11:59 pm.
Most recent version available online at
http://www.cs.cornell.edu/courses/cs1110/2013sp/assignments/assignment3.php
These instructions last updated on March 24 2013 11:54.
Any changes from the handout will be marked in orange and enumerated here on the online version.
(no substantive changes between time of printing and Feb 26 12:13).
Authors: D. Gries, L. Lee, S. Marschner, W. White. Image credit: Thomas Wolfmaier, 1999 (originating page)
Preliminaries
Many user interfaces — not just online, but also in good ol’ print and the physical world — use color to communicate information. But, in “Designing for the color-challenged: A challenge”, Thomas Wolfmaier (1999) writes that “About 8% of (Caucasian) males1 and 0.5% of females exhibit some form of color vision deficiency. Not taking into account their special needs could mean that 1 out of 20 visitors might not be able to use a website [or any type of user interface for that matter] at all or only with great difficulty.”
And the effects of so-called color-blindness spread far beyond that roughly 10%; they reach the daily experiences of a huge fraction of the world’s population:
Colors don’t matter much to [Mark] Zuckerberg; a few years ago, he took an online test and realized that he was red-green color-blind. Blue is Facebook’s dominant color, because, as he said, “blue is the richest color for me — I can see all of blue.”So, it is worth understanding something about how people’s perceptions of color differ; and you’ll learn a bit about this in doing this assignment.
— “The Face of Facebook”, Jose Antonio Vargas, The New Yorker, Sept. 20, 2010.
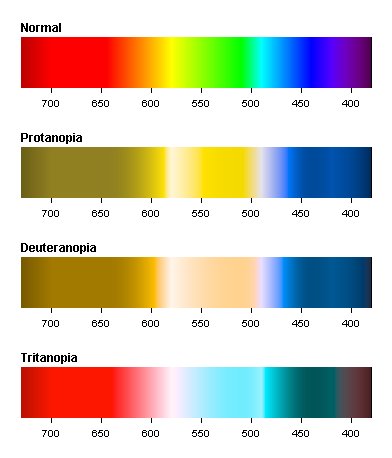
In brief, you’ll write a function that can take a color and a certain transformation as input, and produce as output an approximation of the color that a person with a certain kind of color blindness sees. The following image, from Wolfmaier (1999), demonstrates the results of such transformations. The top bar, labeled “Normal”, shows the “rainbow” red-to-violet spectrum. Each point in the subsequent bars shows what the color above it in the “Normal” space appears like for the corresponding condition. For example, for someone with protanopia, a form of red-green color blindness, the image shows that red comes out as a muddy yellow, and green comes out as a yellow as well. (If you have a form of color blindness, just trust us on this.)
You’ll begin with a semi-functioning graphical user interface (GUI) that allows you to pick and display a color. As you complete more and more of this short assignment, more and more functionality will be added. We hope you’ll be pleased by the results at the end.
Learning Objectives
This assignment is designed to give you (more) practice with the following skills, in preparation for the upcoming prelim:
- implementing functions, including helper functions, from specifications
- creating and handling objects from a pre-defined class
- using lists
- navigating a complex Python application that spans multiple modules
- deciding how to implement an arguably complex function
You will also be introduced very informally to the concept of matrices, which we may return to later on in the course.
We did not see a natural way to give you practice with if-statements in this assignment (although you are free to use them from now on unless told otherwise), but if-statements are fair game for the prelim.
Collaboration and Academic Integrity Policy
You may do this assignment with one other person. If you are going to work together, then form your group on CMS before submitting. Both parties must perform a CMS action to form the group: The first person proposes, and then the other accepts. Once you’ve grouped on CMS, only one person submits the files.
If you do this assignment with another person, you must work together. It is against the rules for one person to do some programming on this assignment without the other person sitting nearby and helping.
With the exception of your CMS-registered partner, you may not look at anyone else’s code or show your code to anyone else, in any form or manner whatsoever.
Getting Help
If you do not know where to start, find your progress has stalled, or become lost along the way, please see someone immediately; a little in-person help can do wonders. See the staff page for more information on office hours, consulting hours, and making appointments. Piazza is also an excellent resource for getting questions answered quickly (although you are not allowed to post your code there).
Table of Contents
- Representing Colors: The RGB Color Model
- Overview of the Code and Initial Activities
- Assignment Instructions
- Writing and Testing: Proceed Incrementally
- complement_rgb(rgb)
- list_to_rgb(clist)
- rgb_to_string(rgb)
- apply_matrix(matrix, rgb) and components_to_num(coeffs, rgb)
- Finishing the Assignment
Representing Colors: The RGB Color Model
 The widely-used RGB system is named after the initials of the three color names
red, green, and
blue. In this system, colors are considered to be additive mixtures of red, green and blue light, as shown in the image to the left. The amount of each of the three color components is represented by an integer in the range 0 to 255, inclusive. Black is 0 red, 0 green, and 0 blue;
white is 255 red, 255 green, and 255 blue. Here is a Wikipedia page giving the RGB components of many colors: list of colors.
The widely-used RGB system is named after the initials of the three color names
red, green, and
blue. In this system, colors are considered to be additive mixtures of red, green and blue light, as shown in the image to the left. The amount of each of the three color components is represented by an integer in the range 0 to 255, inclusive. Black is 0 red, 0 green, and 0 blue;
white is 255 red, 255 green, and 255 blue. Here is a Wikipedia page giving the RGB components of many colors: list of colors.
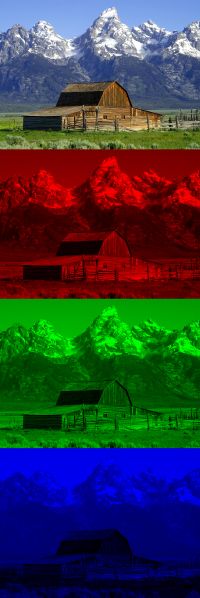
To demonstrate what this means for “real” images: the top image in the sequence of four on the right is a colored image. Below it is its separation into red, green, and blue (here is a high resolution version). In the three separation panels, the closer to black a point is, the less of the corresponding color it has. For example, the white snow is made up of a large amount of all three colors, whereas the brown barn is made up of red and green with very little blue.
To get some hands-on experience with this color model, let’s move on to downloading and exploring the source code for this assignment.
Overview of the Code and Initial Activities
Structure of the Assignment Source Code
Make a new directory, and download all of the following files into that same directory. (A zip file of all of them together is here.) You will need all of them. However, the only ones you should modify are marked in bold. We’ve ordered the six files in increasing importance for you to understand them. You don’t need to know a thing about the contents of colormodel.kv or a3app.py to complete this assignment (although looking at larger programs is an excellent way to learn more Python and programming techniques).
colormodel.kv and a3app.py: manage and display the graphical user interface (GUI). They work in concert with the functions you write. At first, the GUI only displays colors you specify (that is, no color transformation occurs), so you can get used to the RGB system. It will become more functional as you complete more of the assignment, and so eventually will show you “colors through the eyes of the color blind.” (Sort of.)
cunittest2.py: new unit-testing module; it’s a version of the cunittest module that allows you to see the stack trace when errors occur. (You now understand enough about the call stack for the stack trace to be useful to you.)
colormodel.py: provides the class RGB, so you can make RGB color objects. Also defines some color constants, should you want to use them; for instance, colormodel.MAGENTA is red 255, green 0, and blue 255, and colormodel.ORANGE is red 255, green 200, blue 0.
a3.py and a3test.py: where you will write and test your transformation and assorted helper functions to make a3app.py work properly. You will submit these files.
Now, let’s run a3app.py as an application.
You can do this by doing “Run Python module” in Komodo edit, but later on you’ll want to do this at the command shell, so we might as well remind you how to do that now. First, open the command shell (Terminal on OS X, Command Prompt on Windows) and navigate to the directory you just created for this assignment. (See the Command Shell course webpage for more guidance on how to do this.) Then type
python a3app.pyMany messages that look like this will appear:
[INFO   ] Kivy v1.4.0-dev
[INFO   ] [Logger      ] Record log in ...
[INFO   ] [Factory     ] 110 symbols loaded
[DEBUG  ] [Cache       ] register <kv.lang> with limit=None, timeout=Nones
[DEBUG  ] [Cache       ] register <kv.image> with limit=None, timeout=60s
[DEBUG  ] [Cache       ] register <kv.atlas> with limit=None, timeout=Nones
[DEBUG  ] [Cache       ] register <kv.texture> with limit=1000, timeout=60s
[DEBUG  ] [Cache       ] register <kv.shader> with limit=1000, timeout=60s
...
That is Kivy (our GUI library) initializing the application. When the messages are done, you should see a GUI window that looks like the following.

In this GUI, there is a solid color panel in the upper left — we initialized it to Cornell Red (red 179, green 27, blue 27), just for grins — , three sliders on the right, and some text boxes and a button down at the bottom. If you move the RGB sliders, you will see the color panels change color. You can also change the color by entering the new color value components into the R, G, and B text boxes and then hitting the “Set Color” button. The label that says “Red-green color-blindness (Protanopia)” is currently a lie (or maybe wishful thinking that Protanopia has been cured); but once you get your code working, the right-hand color pane will display the transformed color.
You can try out some colors in the GUI now. For some example RGB component values, look at the constants at the bottom of the colormodel module or at the aforementioned Wikipedia color-list page.
The colormodel Module: RGB Objects
Our GUI provides a graphical representation of objects of type RGB; this class is defined by the module colormodel. Objects of
type RGB have three attributes: red, green, and blue (they also have a secret attribute alpha which will not be
used in this assignment). The RGB constructor function takes three
arguments — integers in the range 0 through 255 inclusive — and assigns these values to the attributes in the order red, green, and blue. For example, to create a new RGB object
representing the color red and store its ID in the variable testcolor,
use the assignment statement
testcolor = colormodel.RGB(255,0,0)
(assuming you’re in an environment where you need to import colormodel and have done so).
Assignment Instructions
Writing and Testing: Proceed Incrementally
Below, we outline the functions that you are expected to write in a3.py and test in a3test.py. You should
write and test your functions, one at a time, in the order given; don’t proceed to the next function until you have tested the preceding one thoroughly. (We tell you this because of bitter experience.) But to speed things along and to give you examples of test cases as you prepare for the prelim, we have given you almost all the testcases you need! The only test cases you need to write are for your components_to_num function. In fact, you may want to look carefully both at our specifications and our testcases before you start implementing a given function; one of the purposes of writing testcases before function bodies is to make sure you understand the scope of the problem you are confronted with.
Note that for unit testing we’re using cunittest2.py instead of cunittest.py. The output when an assertion check fails will look a little different because you’ll have access to the whole stack trace. One reason we made this change is that in Komodo Edit, if you double-click on a Python-produced error message that lists a line number, then Komodo Edit will bring you right to that misbehaving line. (The code in cunittest.py prevented the Python-produced error messages from being displayed, which was easier for beginners to read, but you’re now beyond that stage.)
Read the descriptions below, and carefully read the specifications and comments for the modules and functions in the provided code. In this assignment, sometimes we give hints in the specs/comments about how best to write your functions.
complement_rgb(rgb)
First, a useful warm-up to practice accessing RGB object attributes and creating new RGB objects. If you set the left-hand color pane in the GUI to black, either via sliders or direct entry of component values, you’ll notice that the text labels inside the color panes disappear. That’s because we initially have the font color set to black, too. The solution that we’ll adopt to this problem is to set the font color to be the complementary color to the color being displayed. The complement of a color is like a color
negative, or “opposite color”, which means that when you get complement_rgb working, the text will always show up against its complementary-color background.
For a color with components red = r, green = g, and blue = b, the complementary color has components red = 255-r, green = 255-g, and blue = 255-b. With this information in hand, it should be straightforward to finish the function according to its specification. Then test that it works by running a3test; if you (eventually) get the printout “passed test of complement_rgb,” you’ll have succeeded. If you’re confused as to how to approach this, looking at the code in test_complement in a3test should help.
Now if you run a3app.py, you’ll see that you solved the problem of the disappearing text labels.
list_to_rgb(clist)
Now, a little exercise to practice using lists. Implement this helper function according to its specification and test it by running
a3test; if you (eventually) get the printout “passed test of list_to_rgb,” you’ll have succeeded.
If you feel like it, you can rewrite complement_rgb(rgb) using your new list_to_rgb(clist), for more practice using lists. Or you can use this helper function later in your code (one possibility is if you decide to use the map function to implement apply_matrix). But you don’t have to use this function at all if you don’t want to.
rgb_to_string(rgb)
Suppose we find a particularly nice color via the sliders, and want to remember it for posterity. To do so, it would be nice if our GUI told us the RGB values of the color(s) it displayed. rgb_to_string(rgb) to the rescue! Implement it according to its specification and test it by running
a3test; if you (eventually) get the printout “passed test of rgb_to_string,” you’ll have succeeded.
Once you have got this running, run python a3app.py
again. Move the sliders around, and marvel at your accomplishment: the RGB values of the color you’re seeing should be displayed. To check this, you can set the G slider all the way up and the other two sliders all the way down and check that you see the string (0,255,0), or whatever similar experiments you like.
apply_matrix(matrix, rgb) and components_to_num(coeffs, rgb)
Now it’s time to consider how to create the color-blind version of a given RGB color object.
We’ll consider color transformations that can be represented by three-by-three matrices, which for the purposes of this assignment can be considered to be 3-item lists of 3-item lists. (Yes, if lists can contain any sort of thing, they can contain lists as well!) We give you several examples at the top of a3test.py. Let matrix, for example, be the protanopia (red-green color blindness) list [[0.56667, 0.43333, 0],[0.55833, 0.44167, 0],[0, 0.24167, 0.75833]], or, to make the embedded lists a little easier to see, let’s write it like this:
[[0.56667, 0.43333, 0],

[0.55833, 0.44167, 0],

[0,       0.24167, 0.75833]]
If oldcolor is an RGB object, after executing newcolor = apply_matrix(matrix, oldcolor), the following is true of newcolor:
newcolor.red is .56667*oldcolor.red + .43333*oldcolor.green + 0*oldcolor.blue
newcolor.green is .55833*oldcolor.red + .44167*oldcolor.green + 0*oldcolor.blue
newcolor.blue is 0*oldcolor.red + .24167*oldcolor.green + .75833*oldcolor.blue
That is, each component of newcolor is a linear combination
of the three components of oldcolor. The coefficients
— the numbers you multiply each oldcolor component by before
summing all the results — are given by the corresponding list in
matrix; for instance, matrix[0] is the list of three
coefficients for deriving newcolor’s red component.
Given
this, first, implement and test the helper function
components_to_num(coeffs, rgb) according to its specification.
You will need to write some additional appropriate testcases for this
function; place them in the appropriate place (roughly line 101 and
following) in a3test.py. If you (eventually) get the printout “passed test of components_to_num” when running a3test.py, you’ll have succeeded. Thoroughly testing and debugging this
function will help you in working on apply_matrix, whether or not
you end up using this helper function in the final function.
Then, implement apply_matrix(matrix, rgb)
according to its specification. Note that we require you to use Python’s
round function as part of converting floats to ints (we leave it
to you to determine when/why you would want to do so, but you may not pass
our testcases if you don’t use it). We do not require you to use
components_to_num(coeffs, rgb) in your implementation, although
using it leads directly to a compact solution. You may, if you wish, try a
solution using map, or for-loops, or whatever you like; we leave
it up to you.
Test apply_matrix(matrix, rgb) by running
a3test; if you (eventually) get the printout “All test
cases for A3 passed,” you’ll have succeeded.
Once
you’ve reached this point, you can try the following experiment. Run two
instances of a3app.py (you may want to do this using the
command shell). In one, set the RGB values to red (255, 0, 0), and in the
other, set them to green (0, 255, 0). You should see that, sort of like the
image at the beginning of the assignment (our transformation is only an
approximation), the transformed colors are both a kind of greenish-yellow,
and thus far less distinguishable than the original colors were.2 Now you know
what color blindness is (sort of) like!
Finishing the Assignment
Submit your a3.py and a3test.py on CMS, after making sure that they
meet the class coding conventions. In particular, you should check that the
following are all true:
- There are no tabs in the file, only spaces (this is usually not a problem).
- Functions are separated by two blank lines.
- Lines are short enough that horizontal scrolling is not necessary; about 80 chars is long enough. (You can go to the Smart Editing section of Preferences in Komodo Edit to be able to visually see the 80-character boundary: click the “Draw the edge line column” box with the value “Edge line column” box set to 80.)
- You have deleted all lines of the form “pass” or comments of the form “implement me”
- At the top of each module that you worked on (
a3.py,a3test.py) you have three single-line comments with (1) the module name, (2) your name(s) and netid(s), and (3) the date you finished the assignment.
Upload the files a3.py and a3test.py to CMS by
the due date: Monday, March 4th at 11:59 pm.
Do not submit any files with the extension/suffix .pyc. It will
help to set the preferences in your operating system so that extensions always appear.
Unlike A1, you do not get to revise this assignment in response to feedback. (As it happens, CMS lets you submit multiple times before the due date. We will grade the most recent version submitted; we will not look at versions submitted before the deadline.)
Save your code; for the next assignment, we’re planning on having you extend your code from this project with the ability to take different kinds of color-blindness transformations from files as input.
1. [Statistics for a broader selection of the world’s population are given here, but no references are cited](go back)
2. [In general, the GUI’s right-hand pane’s colors will not exactly match what’s shown on the spectrum image at the top of this writeup because the matrix-based transformations we’re considering can only partially approximate the phenomenon.](go back)