T-Th 9:05
or
T-Th 11:15
in Olin 155
CS 1110: Introduction to Computing Using Python
Fall 2012
About: Announcements
Staff
Consultants
Times & Places
Calendar
Materials:
Texts
Python
Command Shell
Terminology
Handouts:
Lectures
Assignments
Labs
Assessment:
Grading
Exams
Resources:
CMS
Piazza (link)
Piazza (about)
AEWs
FAQ
Python API
Style Guide
Academic Integrity
Assignment 6:
Images
Due to CMS by Friday, November 16th at 11:59 pm
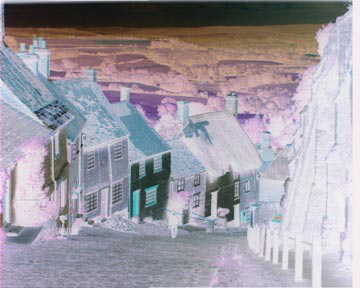
While the previous assignment was interesting, the types of things that you could do with images was pretty limited. In that assignment, all you could do was move the four corners of the image. Suppose you wanted to do the types of effects that you can do in Photoshop, such as blur an image or invert its colors (seen to the right). In that case you need to modify the image pixel by pixel.
We already saw in class that you can represent an image as a 2-dimensional list of
color pixels. For purposes of efficiency, however, most graphics cards like to
represent images as a 1-dimensional list in row-major order,
which we describe below. Row-major order can be really confusing to beginners.
Therefore, this assignment encapsulates
the image's pixel list inside of a class called ImageArray. This class provides
an abstraction that allows us to treat the list of pixels as either a one-dimensional
or a two-dimensional list, depending on our application. So in addition to learning
about images, you will also learn a lot about encapsulation.
Reading the Instructions
In the instructions below, we provide a lengthy aside on application design. We refer to certain parts of the application as model, view, or controller. This is the subject of one of the lectures from just before the second prelim. We have provided this discussion so you can see how to apply these concepts to a simple application like this one.
With that said, this discussion is very long, and you might find it a bit overwhelming. You do not need to follow all of it to do this assignment. If you find the section on application design confusing, or you just want to get started with the assignment, feel free to skip over it and start with the discussion of ImageArray instead.
Even skipping over the section on application design, these instructions are quite long. You should spend at least one evening simply reading these instructions while looking over the existing classes. Do not write any code until you understand how everything fits together.
Learning Objectives
This assignment has several important objectives.
-
It gives you practice with writing while-loops and using invariants.
(While you could use for-loops for many of these methods, while-loops are preferred) - It gives you practice with writing loops to process both 1-dimensional and 2-dimensional sequences.
- It gives you practice with using helper methods and constants to structure your code properly.
- It gives you practice with using encapsulation to make difficult programming concepts easier.
- It introduces you to the concept of a tuple, which is essentially an immutable list.
- It gives you practice with manipulating images at the pixel level.
- It introduces you to the concept of the model-view-controller pattern.
Table of Contents
- Before You Get Started
- Understanding the
ImagerAppApplication - Advanced Application Design
- Code Organization
- Class
ImageArray - Pixels and Tuples
- Class
ImagePanel - The Module
imager.kv - Class
Main - Class
ImageProcessor - Assignment Instructions
- Testing Guidelines
- Task 1.
vertReflect - Task 2.
jail - Task 3.
monochromify - Task 4.
vignette - Task 5. Steganography
- Optional:
fuzzify - Finishing the Assignment
Before You Get Started
Read this entire document carefully. Budget your time wisely. In particular, you should get started on this assignment immediately. This assignment is due only nine days after the second prelim (Tuesday, November 6), and there is no room to grant extensions. There are seven methods in total. We recommend that you work on at least one method a day. The last two methods might need three days.
Academic Integrity
While this is the first time we have presented this assignment in Python, we have given it before in Java. It is a good one, and students really like it. Do not share your code with others. Do not obtain or look at a copy of the earlier solution or a version being done by another student. Such cheating helps no one, especially you, and it makes more unnecessary work for us.
As with the last assignment, it is highly unlikely that your code for this assignment will look exactly like someone else's. Once again, we will be using Moss to check for instances of cheating and plagiarism. Anyone caught copying code will be prosecuted, with the end result perhaps being to fail the course.
Collaboration Policy
You may do this assignment with one other person. If you are going to work together, then form your group on CMS as soon as possible. If you do this assignment with another person, you must work together. It is against the rules for one person to do some programming on this assignment without the other person sitting nearby and helping.
With the exception of your CMS-registered partner, you may not look at anyone else's code or show your code to anyone else, in any form whatsoever.
Assignment Source Code
The first thing to do in this assignment is to download the zip file A6.zip from this link. You should unzip it and put the contents in a new directory. This zip file contains the following:
imager.py-
This file contains the class
Main, which is the primary class for the application. It initializes all of the objects in the application. It has methods that perform actions in response to the user clicking on buttons in the application.The file also contains subsidiary classes that manage dialogs that appear in response to various user actions (loading a file, saving a file, etc.). It also has the main driver class
ImagerAppthat initializes the GUI and starts up the application.In our application design, this is a controller module.
imager.kv-
This is a Kivy declaration file that describes the layout of the GUI with buttons, panels, and other features. It does not do anything with the buttons; it just describes their arrangement on the screen, while
imager.pyhas the methods that perform actions when they are clicked.In our application design, this file is essentially a view module.
image_panel.py-
This module contains a single class
ImagePanel.Objects of this class have a single method:display, which is used to draw an image on an ImagePanel.In our application design, this is a view module.
image_processor.py-
This file contains a single class
ImageProcessor, which is the class that has methods for manipulating an image. This is the only class that you will need to modify.In our application design, this is a controller module.
image_array.py-
This file contains a single class
ImageArray. An object of this class maintains an array of pixels in an image in row-major order. It has methods for getting and setting a pixel in an image, and provides abstractions to treat the image as either a 1-dimensional or a 2-dimensional list.In our application design, this is a model module.
samples/-
This is a subdirectory containing a number of images in
.jpgand.pngformat. You are welcome to add your own images if you like.
The program is explained in more detail below. The
only class that you will need to modify is ImageProcessor. However,
feel free to look at the code for the entire project, as it is very illuminating.
While the view modules are hard to read (as they are in a language other
than Python), you should be able to understand the controller and model
modules with no problem.
All of this code comes with online documentation describing the interface and specifications.
Running the Application
In order to run the application, navigate to the directory containing these files and type
python imager.py
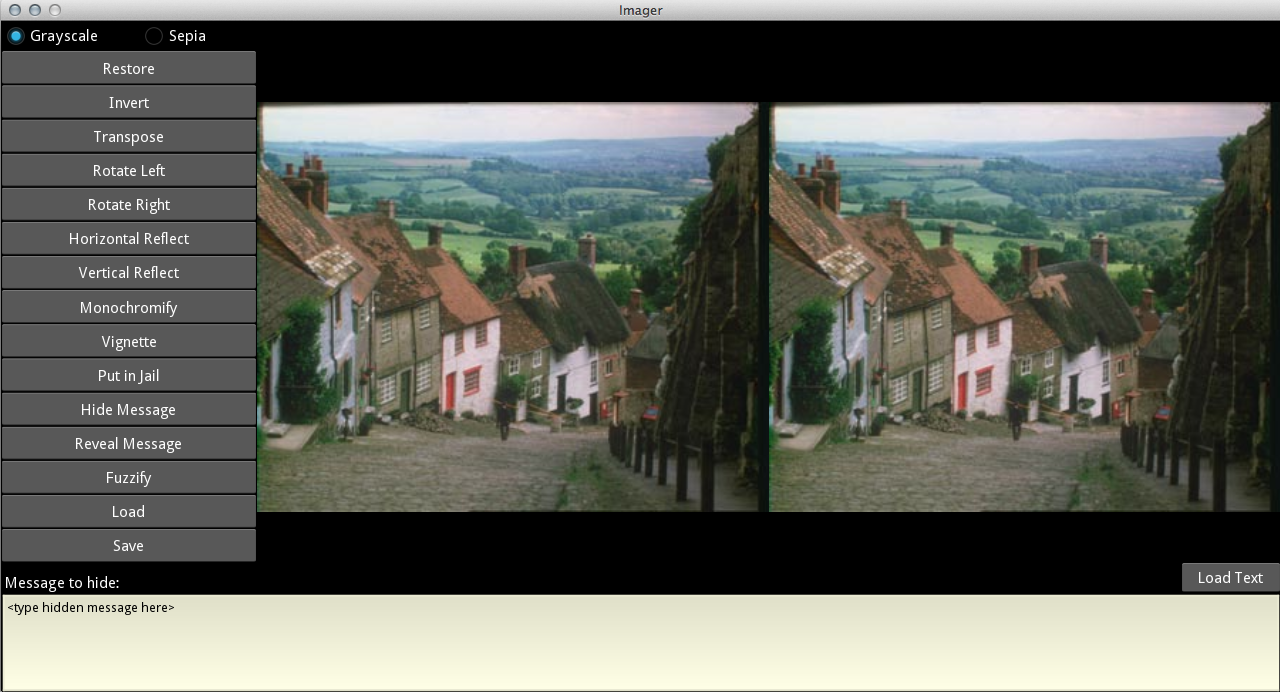
This will import all the files and run the application. A window will open with two versions of a default image, some buttons, and a text area, as shown below.
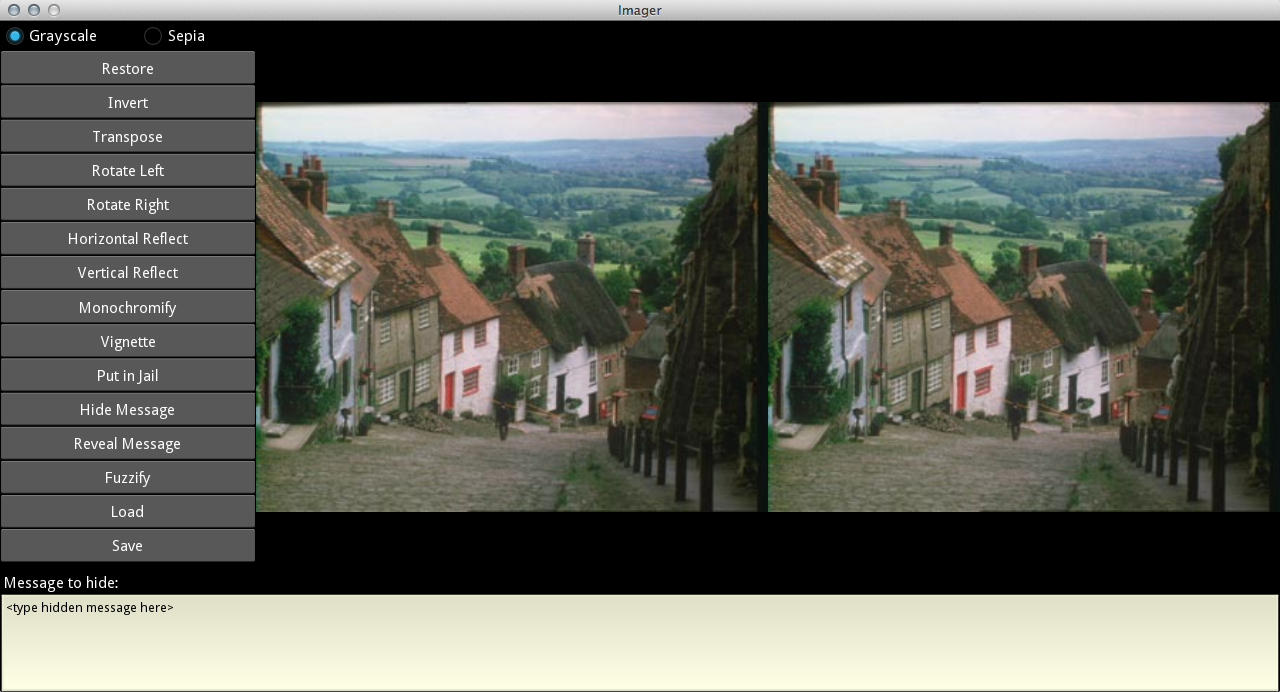
When you work with this application, the left image will not change; it is the original image. The right image will change as you click buttons. The actions for the buttons Invert, Transpose, Horizontal Reflect, and Rotate Right are already implemented. Click on them to see what they do. The effects of the buttons are cumulative. After any series of clicks, the Restore button returns the right image to its original state.
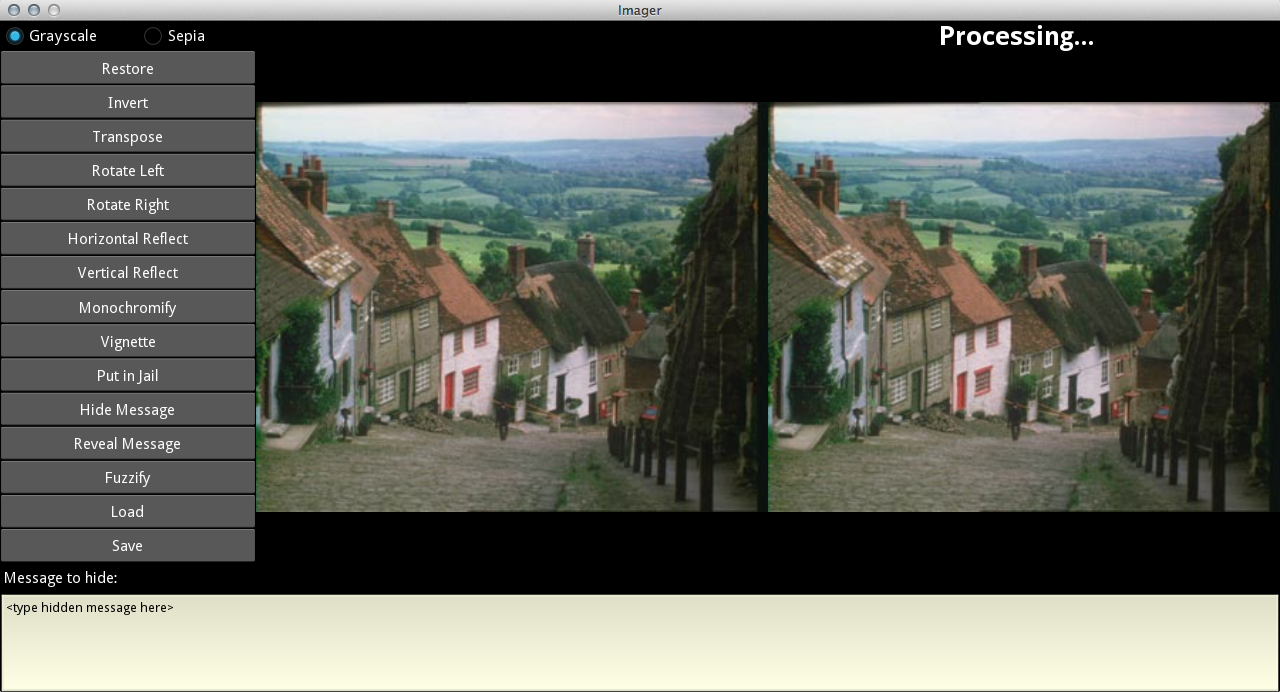
Python is not a speedy language, and image processing is intensive. When you click on the buttons, you might notice that it takes a second or two for something to happen. To give you some feedback on this process, you will notice that the word Processing... will appear in the upper right corner whenever the application is doing something. If this word does not go away after 5 seconds or so, then your program is likely stuck and has a bug in it (e.g. you might have a while-loop that runs forever).
The remaining buttons are not implemented (Rotate Left does something, but not the correct thing. Do you see why?). It is your task to write the code to make them work.
Getting Help
If you do not know where to start, or if you are completely lost, please see someone immediately. This is a more complex assignment than the previous ones. You may talk to the course instructor, a TA, or a consultant. See the staff page for more information. Do not wait until the last minute!
Understanding the ImagerApp Application
The application ImagerApp is a complicated one, and in this section we give you
an idea of the various components. However, you do not actually need to understand all of
these components to get started. Feel free to skip over to
the discussion of ImageArray if you are impatient.
Advanced Application Design
Real software applications are not made from a single component. They are often composed of many components, perhaps even hundreds. When you have a program that is made up of several components, it is important to organize them in a logical and coherent way, so that it is clear what each component is responsible for and so that interactions between them are kept reasonable. The larger and more complicated the task of a program, the more important it is to have good organization.
The classic way of organizing applications—particularly those that sit on a single computer and do not need to connect to the internet—is using what is known as the model-view-controller pattern. In this pattern, every class is categorized as either a model, a view, or a controller. The roles of each are detailed below.
Model
A model is a class that holds the application data. It provides getters and setters
(either via properties, or normal methods) to manipulate the data. It also provides useful
additional methods to perform common tasks on the data. The Vector and
Matrix classes that you worked on in the previous assignment are examples
of models.
View
A view is a class that allows a human user to interact with the program. It displays information on the screen in human-understandable form using a graphical user interface (GUI). It also monitors user input, such as typing or moving/clicking a mouse. However, it does not tell the program what to do when the user performs input. It only keeps track of the fact that it happened.
The Window class that you used in the
Turtle Assignment
is a classic example of a view box. It displayed a window but did not actually do anything
unless you added more features (like the Turtle).
Controller
Controllers are the heavy lifters that do everything else. They start up the program and instantiate the other classes (e.g., the view and model). They also provide methods that do something when the user performs some input. Finally, they also force the view to refresh the screen whenever it should be updated.
While you have not yet written a "pure" controller class in this course yet, the Turtle methods in Assignment 4 are are fairly close to what a controller does.
Code Organization
Now that you have been introduced to the model-view-controller concept, the diagram to the right shows how this application is organized. When we draw lines between two components, that means that we are emphasizing that the two components must communicate with each other. If the components are objects of a class, communication is typically done by one object calling a method or accessing the data of the other. If there are no lines between classes, then we are not concerned about communication between objects of those other classes. This is another important feature in organizing code.
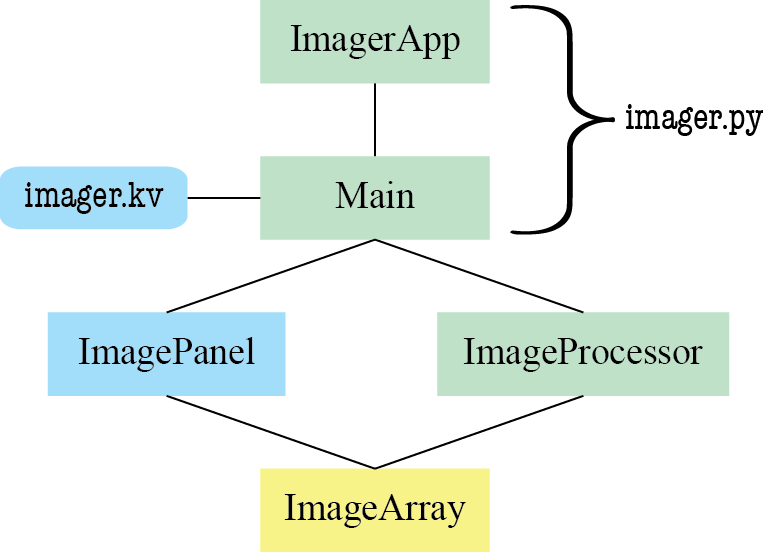 In this diagram, the first class that is instantiated and has its methods called is
 ImagerApp;
this happens when you type
python imager.py
This class builds the GUI specified in the file imager.kv, and then
calls the config method of the Main class. This method
initializes the application, creating instances of the ImageArray and
ImageProcessor classes that can communicate with one another.
The Main class also listens for button clicks and calls the appropriate
method, called a handler, to do something in response to the click.
Most of the time, the handler methods call a method in ImageProcessor
to modify the displayed image, and then redraw the result. Some functionality,
such as loading and saving a file, is provided by pop-up windows that are supported
by other, minor classes in the imager module.
The image itself is maintained internally as a one-dimensional list of pixels
in the class ImageArray. As an image is conceptually a two-dimensional
list (width x height), the one-dimensional list stores the pixels in row-major order.
This means that it first stores the elements of row 0, then the elements of row 1,
then the elements of row 2, and so on. As a model class, ImageArray
provides methods for manipulating the image, allowing a user to process the pixels of an
image row by row, column by column, or without regard to the order.
The class ImageProcessor provides methods for transforming the image,
which is maintained as an ImageArray object. It does not hold the image
data, but only manipulates it. For this reason, it is categorized as a controller,
not a model. As the lines in the diagram show, the ImageProcessor knows
nothing about the GUI; it simply calculates. However, it does communicate with
ImageArray.
The file imager.kv is a Kivy file that specifies the placement of buttons,
labels with text, message area, and images on the screen. It also specifies the handlers
to be called in response to button clicks. This file is not written in Python, but
instead has an alternate format that is intended to make GUI layout simple. If you
are interested, we describe a bit of it below.
Finally, there is the class ImagePanel. This is just the view to display
the image. It has a single method called display which scales the
image to fit on screen and displays it. In this application, there are two instances
of ImagePanel, one for the original image on the left and one for the
modified image on the right. Calling the display method of either
one of them will cause its image to be updated, so that Python will redraw it.
In reading the various classes, the format of the specification might see very strange to you. That is because we have formatted our specifications to be compatible with Sphinx, a tool for generating documentation web pages. We have used this to generate online documentation for this application.
The Class ImageArray
Images are actually stored in the Image objects provided by the PIL library.
This library allows you to load images in any popular format, such as .jpg or .png.
Exactly how the image is stored in an Image object is of no concern to us.
Abstractly, the image consists of a rectangular list of pixels (picture elements),
where each pixel entry is a tuple that describes the color pixel. We show a 3x4 list below,
with 3 rows and 4 columns, where each Eij is a pixel.
      E00  E01  E02  E03
      E10  E11  E12  E13
      E20  E21  E22  E23
This looks a lot like a two-dimensional list, which we have already talked about in class. However, one-dimensional lists are a lot faster to process, and image processing can be very slow. Therefore, in practice, images are stored as one-dimensional lists.
The class ImageArray maintains the pixels in a one-dimensional list of
length r*c, where r is the number of rows, and c is the number of columns. For the 3-by-4 image shown above, the list would
contain the elements in row-major order:
E00, E01, E02, E03, E10, E11, E12, E13, E20, E21, E22, E23
An object im of the class ImageArray maintains this list in
its hidden field _data. You should never access this field directly.
Instead, we have provided methods for accessing this field indirectly.
You can get the individual pixel of im with im.getPixel(row,col).
You can also use im.getFlatPixel(n). The former treats the image as a two-dimensional
list, while the latter treats it as a one-dimensional list. The one that you wish to use
depends upon your application. As you switch back and forth between these two methods, you
will see the benefit of encapsulation (e.g. hiding the field and forcing you to go through
getters and setters).
In addition to the getters, you can change the image using im.setPixel(row,col,pixel)
and im.setFlatPixel(n,pixel) in the same way. Thus, to set the pixel in row
row and column col to a new value val, you would write
im.setPixel(row,col,val). There is also im.swapPixels(r1,c1,r2,c2)
which can swap the pixels at two different locations. That is all you need to know to manipulate
images in this assignment. You never need to access the hidden field, and never need to understand
how row-major representation works.
If you look at the class ImageArray, you will notice that it does not enforce all
preconditions, especially in the methods for getting and setting pixels. There are assert statements there, but
they have been commented out. This is because of an unfortunate trade-off in programming;
assert statements make your program safer, but they also slow it down. This is particularly
true in image processing, where the methods containing these asserts are called thousands of times.
Uncomment the assert statements in setFlatPixel and then try the Invert
button in the Imager application. See how much slower it is?
This is one reason we do not always enforce our preconditions. We put the preconditions in comments, but rely on "the honor system", as asserts would slow down the program. But asserts are really, really helpful with debugging. Particularly when we have invariants, such as the restriction that each component of a color value is an int in 0..255. A common feature in many languages (other than Python) is to have a "release" mode and a "debug" mode. In "debug" mode, the language executes the assert statements, while it skips over them in "release" mode.
Python does not have this advantage, which is why we put the commented-out assert statements
in ImageArray. If you are having trouble with one of the functions, uncomment
these assert statements. Then, when you believe that everything is working fine, comment them
out again so that the program runs faster.
Pixels and Tuples
As we discussed in a previous assignment, your monitor uses the RGB (red-green-blue) color system
for images. Each RGB component is given by a number in the range 0 to 255. Black is represented
by (0, 0, 0), red by (255, 0, 0), green by (0, 255, 0), blue by (0, 0, 255), and white by
(255, 255, 255). In previous assignments, we stored these values in an RGB object
defined in the colormodel module. These were mutable objects where you could change
each of the color values.
In the PIL Image library, the RGB colors are represented via tuples, not RGB
objects. A tuple looks like a list, except that is defined with parentheses instead of
square brackets. For example,
x = (1, 3, 4, 5)is a four element tuple. Tuples are sequences and can be sliced just like any other. Try the following out in Python:
>>> x = (1, 3, 4, 5)
>>> x[0]
1
>>> x[1:3]
(3,4)
The only difference between a tuple and a list is that tuples are immutable. You cannot
change the contents of a tuple, so any assignment (e.g. x[0] = 10) will produce
an error.
Tuples are a natural way of representing color values. You just use a 3-element tuple with
values 0..255. Indeed, in
Assignment 3, some
of you accidentally returned a tuple for your functions rather than an RGB object.
We preferred the RGB objects because they had assert statements to check the
invariants for each color object. Tuples provide no such guarantees.
The important thing about images is that the pixel values are immutable. You do not change
an image by modifying the contents of a pixel object. You need to make a new pixel value and
store that new value in the right place in the image (using the setter methods in ImageArray).
This is one of the reasons why the PIL image library uses tuples to represent pixels. We could
have converted these tuples to RGB objects to make them more familiar. However,
like assert statements, this conversion would slow down image processing. So we want you to
deal with tuples directly.
The Class ImagePanel
An ImagePanel object maintains two data items: a kivy.uix.widget.Widget
object to display the image, and a reference to an ImageArray object. These items
are supplied to the constructor when the ImagePanel object is created.
The display method is called to display an image on the Widget. If given an
argument, it uses the new ImageArray object; otherwise it uses the one provided
to the constructor. It constructs a "texture" from the image, calculates its proper size and
placement, and applies the texture to the Widget. This is why we refer to ImagePanel
as a view class; it does nothing but draw the image.
How does one learn to write all this code properly? When faced with doing something like this, most people will read the API specifications (located at kivy.org) and then start with other programs that do something similar and modify them to fit their needs.
The Module imager.kv
The class ImagePanel is the only explicitly-defined view class. All of the other
components of the view are defined in the file imager.kv. This is a Kivy file.
It is a simple way to lay out buttons, sliders and text boxes that cuts down on the amount
of Python code that you have to write. If you have ever done any work with web pages, this
file is a lot like a CSS file. It defines the look of your application, so that you only
need to write Python for the parts that do things.
We are not going to teach the Kivy language in this course, but it is not too difficult if
you simply want to understand what is going on. You start with the name of a Kivy class
in angle brackets (all of these classes are a subclass of kivy.uix.widget.Widget,
which is used to draw something). Underneath you indent pairs of the form
attribute_name: attribute_valueOn start up, Kivy creates such an object for each of these classes and initializes its attributes to be the values you provided.
In addition, you will notice that sometimes a class is indented inside another class in
imager.kv. This means that it will draw that object inside of the other.
This how you align objects on the screen. For example, consider the following lines
from imager.kv:
  BoxLayout:
      orientation: 'vertical'
      size_hint_x: .5

      Button:
          text: 'Restore'
          on_release: root.do(root.image_processor.restore)

      Button:
          text: 'Invert'
          on_release: root.do(root.image_processor.invert)
This means that we create a BoxLayout object which has attribute orientation
(we ignore attribute size_hint_x for now).
Since the value of this attribute is 'vertical', everything
drawn inside this object is arranged vertically. The Button objects are all
indented underneath, so they are drawn inside (and hence arranged vertically).
You will also notice in the example above that each Button object has an attribute
on_release with a method call following it. This is how we hook up the imager.kv
file with our Python code. These are the handlers that specify what happens when you press a button.
The Class Main
The class Main is the primary controller. It creates all of the other objects,
including the ImageProcessor object. It also implements some functionality that
is not strictly image manipulation, such as file I/O and calling display to
redraw the screen.
The class Main is considered a controller class because all of the
methods are handler methods that react to the user doing something, like pressing a button,
or saving a file. There is no code here for arranging where buttons go, what they look like,
or what their names are. You will note, however, that there is a class called Main
inside of imager.kv, which does all of these things. This is not a coincidence.
The purpose of imager.kv is, for each class in imager.py, to
define the view corresponding to the controller class of the same name. This is the underlying
design philosophy of Kivy: define the view in the Kivy language and write the controllers in
Python.
You will notice several other classes in both imager.py and imager.kv.
These minor classes define things like pop-up windows to load and save files. In each case,
the view is specified in imager.kv while the controller is specified in imager.py.
A few of these controller classes are essentially empty; that is because we are inheriting
the controller functionality from some base class, and we just needed to subclass it to make
sure that the controller and view had the same name.
The Class ImageProcessor
This class provides all the methods for manipulating the image given to it as an ImageArray
in the constructor. The constructor stores the image in the (immutable) property original
and stores a copy of it in the (mutable) property current.
As the image is manipulated, the object in current changes. It can be restored to its
original state by copying the property original to current. That is
what the procedure restore does. Note that restore actually creates
a new object; it is not sufficient to just assign original to current.
If we did that, both would point to the same object, so that whenever current changes,
original would change also. It is necessary to make a "deep" copy.
Other methods in this class implement the various handlers for the buttons. When a button
is clicked, the application calls the appropriate handler. The procedures invert,
horizReflect, transpose, and restore are provided for you.
The procedure invert retrieves each pixel, computes its color complement, and places the new pixel back into
current.
Your goal in this assignment is to implement the procedures corresponding to the other buttons.
Assignment Instructions
The hardest part of this assignment is simply understanding how all of the classes fit
together. However, the only class that you need to modify is ImageProcessor.
Looking at this class, you will see that several methods are already complete, while
others are just stubs. For this assignment, you need to implement the following
six methods:
The method fuzzify is not required.
It is just presented as an optional challenge. We will not grade it even if you do complete it.
While working on these methods, you may find that you occasionally want to introduce new helper methods. This is fine, and is actually expected for some of the tasks below. However, you must write a complete and thorough specification of any helper method you introduce. It is best to write the specification before you write the method body, because it helps you as you write the program. This is standard practice in this course. It is a severe error not to do so, and points will be deducted for missing or inappropriate specifications.
You need not write loop invariants, and if you do, we will not grade them. But we encourage
you to write them for each loop so that you get used to thinking in terms of the invariant.
Look at the implemented methods in ImageProcessor to see what a loop invariant
might look like.
Testing Guidelines
Before you write any code, you should be aware of our guidelines for testing. Using Python unit tests is difficult because it is not easy to access a picture. You do not have to use one. But this means you will need other creative ways of testing and debugging your code, such as print statements. You are well-aware of using traces and watches now; use them to your advantage.
If you add print statements to your code, please remember to remove them before submitting. We will deduct points if you do not remove them.
Task 1. vertReflect
This method should reflect the image about a horizontal line through the middle of the image.
Look at the method horizReflect for inspiration, since it does something similar.
This should be relatively straightforward. Remember that loop invariants are not required, and
will not be graded. However, we will give you some feedback on them if you provide them.
Once you have implemented this method, you will notice that both the Vertical Reflect
and Rotate Left buttons now work. That is because the method rotateLeft
uses vertReflect as a helper. This demonstrates an alternate way of rotating
an image that is different than what we did in the previous assignment.
Task 2. jail
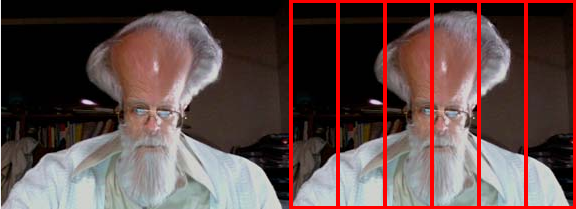 This method is called when the user clicks the "Put in Jail" button. You can see the effect in
the picture to the right. This method draws a red boundary and vertical bars. This will happen
when you implement the method according to its specification, given
as a comment in the method. Be sure to follow that specification carefully.
This method is called when the user clicks the "Put in Jail" button. You can see the effect in
the picture to the right. This method draws a red boundary and vertical bars. This will happen
when you implement the method according to its specification, given
as a comment in the method. Be sure to follow that specification carefully.
We have given you helper method _drawHBar to draw a horizontal bar (note that we
have hidden it; helper functions do not need to be visible to other modules or classes). In
the same way, implement a helper method _drawVBar to draw a vertical bar. Do
not forget to include its specification in your code.
This is a problem where you have to be very careful with round-off error, to make sure that the bars are evenly spaced. You need to be aware of your types at all times. The number of bars should be an integer, not a float (you cannot have part of a bar). However, the distance between bars should be a float. That means your column position of each bar will be a float. Wait to turn this column position into an int (by rounding and casting) until you are ready to draw the bar.
When finished, open a picture, click the buttons Put in Jail, Transpose, Put in Jail, and Transpose again for a nice effect.
Task 3. monochromify
In this method, you will change the image from color to either grayscale or sepia. The choice
depends on the value of the integer parameter color, which is either 0 to indicate
grayscale or 1 to indicate sepia. However, do not use integer constants 0 and 1. Instead
use the names GRAY and SEPIA, which are already defined in image_processor.py to be 0 and 1,
respectively. There are a couple of good reasons for this. First, using mnemonic names rather than
the actual values makes the program more readable, because the names indicate the intended
meaning. Second, if you ever decide to change the representation in the future
(say to 3 and 4), you can do so in one place without having to go through the whole program
searching for (the right) occurrences of 0 and 1.
To implement this method, you should first calculate the overall brightness of each pixel using a combination of the original red, green, and blue values. The brightness is defined by:
brightness = 0.3 * red + 0.6 * green + 0.1 * blue
int(brightness).
Sepia was a process used to increase the longevity of photographic prints.
To simulate a sepia-toned photograph, darken the green channel to int(0.6 * brightness)
and blue channel to int(0.4 * brightness), producing a reddish-brown tone. As a
handy quick test, white pixels stay white for grayscale, and black pixels stay black for
both grayscale and sepia tone.
To implement this method, get the color value for each pixel, recompute a new color value, and set the pixel to that
color. Look at procedure invert as well as the
discussion on tuples to see how this is done.
Task 4. vignette
Camera lenses from the early days of photography often blocked some of the light focused at the edges of a photograph, producing a darkening toward the corners. This effect is known as vignetting, a distinctive feature of old photographs. You can simulate this effect using a simple formula. Pixel values in red, green, and blue are separately multiplied by the value
1 - d2/h2
d is the distance from the pixel to the center of the image and
h is the distance from the center to any one of the corners.
Like monochromification, this requires unpacking each pixel, modifying the RGB values, and repacking them (making sure that the values are ints when you do so). However, for this operation you will also need to know the row and column of the pixel you are processing, so that you can compute its distance from the center of the image.
For this reason, we highly recommend that you use the method getPixel
and setPixel in the class ImageArray. These methods treat
the array as a 2-dimensional list. Do not use the methods getFlatPixel
and setFlatPixel, which treat it like a 1-dimensional list. That was
fine for invert and monochromify, but that was because the
row and column did not matter in those methods.
Task 5. Steganography
The last official part of the assignment is the most involved. Steganography, according to Wikipedia, is "the art and science of writing hidden messages in such a way that no one apart from the intended recipient even realizes there is a hidden message." This is different from cryptography, where the existence of the message is not disguised but the content is obscured. Quite often, steganography deals with messages hidden in pictures.
To hide a message, each character of the message is hidden in one or two pixels of an image by modifying the red, green, and blue values of the pixel(s) so slightly that the change is not noticeable to the eye.
Each character is represented using the American Standard Code for Information Interchange (ASCII) as a three-digit integer. We allow only ASCII characters; all the obvious characters you can type on your keyboard are ASCII characters, but it does not support certain foreign characters or Kanji.
For the normal letters, digits, and other keyboard characters like '$'
and '@', you can convert back and forth between a character
and its ASCII representation using the Python built-in functions ord and
chr. For example, ord('k')
evaluates to 107, and chr(107)
evaluates to 'k'.
We can hide the character 'k' in a pixel
whose RGB values are 199, 222, and 142 by changing the least significant digit of each
color component to one of the digits of 107, the integer representation of
'k':
| Original Pixel | Pixel with 'k' hidden |
|||||
| Red | Green | Blue | hide 'k', which is 107 |
Red | Green | Blue |
| 199 | 222 | 142 | → | 191 | 220 | 147 |
This change in each pixel is so slight that it is imperceptible to the human eye.
Decoding the message, the reverse process, requires extracting the last digit of each
color component of the pixel and forming an ASCII value from the three extracted digits,
then converting that ASCII value to a character.
In the above example, we would extract the digits 1, 0, and 7 from the RBG components
of the pixel, put them together to form 107, and then apply chr to this
value to obtain 'k'. Extracting the message does not change the image.
The message stays in the image forever.
Three Problems for You to Solve
You are to write code to hide characters of a message text in the pixels
of an image in row-major order, starting with pixel 0, 1, 2, ... Think about the
following issues and solve them.
First, you need some way to recognize that the image actually contains a message. Thus, you need to hide characters in pixels 0, 1, 2, ... that have little chance of appearing in a real image. You cannot be sure that an image without a message does not start with the pixels resulting from hiding the characters, but the chances should be extremely small. You should have a beginning marker of at least two pixels that indicates that this file contains a message.
Next, you have to know where the message ends. You can do this in several ways. You can hide the length of the message in the first pixels in some way (how many pixels can that take?). You can also hide some unused marker at the end of the message. Or you can use some other scheme. You may assume that the message has fewer than one million characters, but you must prepared for the message to contain any sequence of characters, including punctuation.
Finally, the largest value of a color component (e.g. blue) is 255. Suppose the blue component is 252 and you try to hide 107 in this pixel. In this case, the blue component would be changed to 257, but this impossible because a color component can be at most 255. Think about this problem and come up with at least two ways to solve it. Implement one of them.
As you can see, this part of the assignment is less defined than the previous ones. You get to come up with the solutions to some problems yourself. Part of this assignment will be to document and discuss your solutions.
Documenting Your Approach
You should decide how you will solve the problems mentioned above. As you design and implement this part, write a short essay that documents at least two solutions to each of the three problems mentioned above. By "essay", we mean a few paragraphs, not a term paper!
You should write this essay in a separate text file called essay.txt.
If you do not know what a text file is, it is just normal text document without any of the
fonts and other formatting that you would get from a program like Microsoft Word. Komodo
can make text documents as well as Python modules; just save the file with extension
.txt. You will upload this text file along with your Python code when you
are done.
This essay should indicate what your solutions are and discuss their advantages and disadvantages. Advantages could be: fewest number of pixels used in hiding an image, least time spent hiding a message, or something similar.
In your essay, do not describe your code (e.g. what the if-statements are, and what assignments are used). Your reasoning should be at a higher level than that. Use English, not code. At the end of the essay, state precisely the format of a hidden message. Tell us what the beginning marker is if there is one, how you encode length, and so on.
You should feel free to discuss this part of the problem with the course staff. They will not tell you how to solve these problems, but they will discuss your ideas with you. All of them have done this assignment before, back when it was in Java. And this is a case where the Java/Python differences do not matter at all.
Complete the Method getPixels(n)
Before you do any steganography at all, complete and test the function
getPixels(n) in the class ImageProcessor. The purpose of this
extra method is to help with debugging the method hide. From experience,
we know that students who do not test hide properly can have great difficulty
with this part of the assignment. After writing this function, you can insert this call
anywhere in ImageProcessor to print the first 21 pixels of the current image:
print self.getPixels(21)
This should result in output similar to the following (this is for the image goldhill.png, not the default goldhill.jpg):
Pixels of current image:
     000:025:006 014:028:013 029:025:016 038:027:021 044:037:027
     048:048:036 050:052:039 053:055:042 048:048:036 050:048:036
     051:049:037 053:049:038 056:049:041 055:051:042 052:052:042
     052:054:041 053:053:041 056:054:041 056:054:041 057:055:042
     058:056:043
You will notice in the output above that we padded all of the color values
with zeroes to make them three digits. This makes everything "line up"
so it is easier to figure out what the problem is. You can get this
output yourself by using the helper method _pixel2str.
With that said, you do not need to use this helper method if you do
not want to. Just follow the specification.
One way to test that your getPixels is working is to try
it out on the provided image whiteout.png.
This is an all-white image, so the pixel values should all be 255:255:255
Complete the Methods hide and reveal
You should complete the body of the methods hide and reveal
in the class ImageProcessor. These two methods should hide a message
and reveal the message in the image. When you design reveal, make sure it
attempts to extract the message only if its presence is detected.
Feel free to introduce other helper methods as needed. For example, we have provided
a helper method called decode, which takes a pixel position p
and extracts a 3-digit number from it, using the encoding that we suggested above.
This suggests that you might want to create a helper method called encode,
which encodes a number into a pixel. The exact specification of such a helper is
up to you (if you start with our specification, be sure to modify it as appropriate for your code).
You will also notice that we use the method getFlatPixel in decode.
That is because it is very natural to think of an image as 1-dimensional list when encoding
text. While an image is 2-dimensional arrange of values, text is not. Hence, once again,
we see the advantage of encapsulation in ImageArray, allowing us to access the
data how we want for the particular application.
Testing hide and reveal
Debugging hide and reveal can be difficult. We encourage the use
of helper methods to keep your code simple and short. You get to decide which ones to write
as you design and implement this assignment. Be sure to specify each method appropriately in
a comment.
Do not assume that you can debug simply by calling hide and then reveal
to see whether the message comes out correctly. Instead, write and debug hide and then
write and debug reveal. Start with short messages to hide (up to three characters)
and use getPixels to check that the pixels contain the message. Remember to delete
the starting message:
<type hidden message here>before hiding your message. Otherwise, you will encode that message as well.
When hide and reveal are done, try hiding and revealing a long message
(e.g. 1000, 2000, or 5000 characters). This might be a little difficult. It appears that
Kivy support for external clipboards (e.g. copying from one program and pasting in another)
is broken in Macintosh, and unreliable on some Windows machines. If this is the case, we
have introduced an "easter egg" to make things easier.
Go into imager.kv and look at lines 224-228. You will notice that they are
commented out (with a #, just as in Python). Remove the comment symbols so that
<Button>: is now aligned under <Widget> above it. Relaunch the application
and you will now see a Load Text button like the one shown below (look at the lower right). Press this
button to load the contents of a text file into the text box.
When you test your program on large messages, do you notice any difference in the time to hide and the time to reveal? Can you figure out why? We will discuss this in class at the appropriate time.
About the Save Button
Clicking the Save button saves the image in the specified directory with the filename
you enter. The message is saved in .png format, which is a lossless format.
Saving in .jpg format would not work, because doing so tries to compress the image,
which would result in less space but would also clobber your hidden message.
With .png, you can hide a message, save, and then reload the image
with the message still there.
Optional: fuzzify
You are not required to implement fuzzify. It is simply an extra challenge
for those of you who want one.
 This method works like the blur tool in Photoshop. This method replaces each pixel of the
current image by the average of itself and its neighbors. Note that pixels in the corners
have three neighbors, pixels on the edges but not on the corners have five, and interior
pixels (those not on an edge) have eight. The averages must be taken separately for each
color component. Thus an interior pixel's red component will be replaced by the average
of the red components of that pixel and its eight neighbors, and similarly for the blue
and green components.
This method works like the blur tool in Photoshop. This method replaces each pixel of the
current image by the average of itself and its neighbors. Note that pixels in the corners
have three neighbors, pixels on the edges but not on the corners have five, and interior
pixels (those not on an edge) have eight. The averages must be taken separately for each
color component. Thus an interior pixel's red component will be replaced by the average
of the red components of that pixel and its eight neighbors, and similarly for the blue
and green components.
As in transpose, the method will have two nested loops, and each iteration
of the inner loop will process one pixel. Do not write all the code to process a pixel
in the inner loop. Instead, write a helper method that processes the pixel, and call
this from the body of the inner loop. This is done to keep each method simple and short.
Also, you can initially stub in the helper method (e.g. have it set the pixel to
carnelian, (179, 27, 27) ) to facilitate constructing and testing one part of your
code at a time.
Even if you do it correctly, this method is slow. Our solution takes 3-4 seconds on each of the sample images. Keep this in mind if you choose to implement this method.
Finishing the Assignment
Once you have everything working you should go back and make sure that your program meets the class coding conventions. In particular, you should check that the following are all true:
- There are no tabs in the file, only spaces
- Classes are separated from each other by two blank lines.
- Methods are separated from each other by a single blank line.
- Class contents are ordered as follows: fields, properties, constructor, operators, methods.
- Lines are short enough that horizontal scrolling is not necessary (about 80 chars is long enough).
- The specifications for all of the methods and properties are complete.
- Specifications are immediately after the method header and indented.
There is a new coding convention which we have not yet explicitly stated. Non-hidden
methods should be in camelCase. That is, compound words are not separated by underscores,
but instead are indicated by making the first letter of each word (after the first)
upper case. This allows us to distinguish methods from functions, as functions are all
lower case separated by underscores. You may notice that we break this convention a few
times in the class Main in module imager. You are allowed to
break this convention with hidden helper methods, but not in methods that are meant to
be accessed outside of the module.
Finally, at the top of image_processor.py you should have three single line
comments with (1) the module name, (2) your name(s) and netid(s), and (3) the date you
finished the assignment. We have been taking off points for people that keep forgetting
to do this.
Turning it In
Upload the files image_processor.py and essay.txt to CMS by
the due date: Friday, November 16th at 11:59 pm. Do not forget the essay.
Do not submit any files with the extension/suffix .pyc (or .doc
or .pdf). It will help to set the preferences in your operating system so that
extensions always appear.
Survey
In addition to turning in the assignment, we ask that each of you individually (even if you worked in a group) complete the survey posted in CMS. Once again, the survey will ask about things such as how long you spent on the assignment, your impression of the difficulty, and what could be done to improve it. Please try to complete the survey within a day of turning in this assignment. Remember that participation in surveys comprise 1% of your final grade.