T-Th 9:05
or
T-Th 11:15
in Olin 155
CS 1110: Introduction to Computing Using Python
Fall 2012
About: Announcements
Staff
Consultants
Times & Places
Calendar
Materials:
Texts
Python
Command Shell
Terminology
Handouts:
Lectures
Assignments
Labs
Assessment:
Grading
Exams
Resources:
CMS
Piazza (link)
Piazza (about)
AEWs
FAQ
Python API
Style Guide
Academic Integrity
Assignment 3:
Color Models
Stage One Check in CMS on Monday, October 1st at 11:59 pm
Stage Two Check in CMS by Thursday, October 11th at 11:59 pm
Now that you have been introduced to the basics of writing functions, we are going to start having more interesting assignments that take advantage of the graphics capabilities of Python. This assignment is the first of many GUI applications we will work on in this course.
One of the main things that you will learn about in this assignment is the different color models available. There are many different ways to represent color, and the choice of color model often depends on the application. For example, RGB is used when the colors need to be displayed on a computer monitor (such as a web site), while CMYK is often used for printing out colors on paper.
You have a lot longer to do this assignment than the previous one — two full weeks. However, you should still start early on this assignment because the first prelim is just a few days after this is due. Again, please remember to fill out the survey telling us how long you worked on this assignment.
Learning Objectives
This assignment has five very important roles:
- It introduces three color models that are used in computing and graphics.
- It gives you practice in writing complex functions with conditionals.
- It gives you experience with using traces to test and debug a program.
-
It introduces you to the difference between backquotes and
str(). - It gives you experience with using asserts to bolster your preconditions.
- It introduces you to the notion of attribute invariants.
- It gives you experience with a complex Python application that spans multiple modules.
Even though this is a complex Python application, we have provided most of
the modules for you. You only need to focus on one module: a3.py.
As the semester progresses, we will provide you with less and less.
Important:
Python has a built-in color conversion module called colorsys.
You are forbidden from using that module in this assignment.
Table of Contents
- Before You Get Started
- An Overview of Color Models
- New Concepts
- Assignment Overview
- Assignment Source Code
- Understanding the Program GUI
- Experimenting with Color Models
- Testing and Debugging
- Assignment Instructions
- complement_rgb(rgb)
- truncate5(value)
- round5(value)
- to_string(c)
- rgb_to_hsv(rgb)
- hsv_to_rgb(hsv)
- rgb_to_cmyk(rgb)
- cmyk_to_rgb(cmyk)
- Finishing the Assignment
Before You Get Started
The Stage Checks
At the top of the instructions, you may have noticed that there are two due dates for this assignment. As we have said in class, we would move the prelim if we could, but we cannot. Therefore, in order to give you enough time to revise Assignment 1, we had to push the due date of this assignment to after fall break. But at the same time, this assignment provides much of practice with many of the topics of the first prelim.
To solve this problem, we have broken this assignment up into two submissions. The first submission will take place on Monday, October 1st at 11:59 pm, before the exam. For this check, you will be graded pass/fail on whether you have made a good faith effort to complete the portion of the assignment for the stage check. See below for more information on what we are looking for in the first stage check.
In the first stage check, we will not grade the code for correctness; we will not look at your test cases. We will only check that you have finished the necessary functions that that they look "mostly correct". We simply want to ensure that you get practice before the exam, and give you the chance to assess whether you are well-prepared for the exam. If you have trouble with the first stage, we urge you to see a staff member.
In the second stage, we want your full submission. We will grade your code for correctness, and verify that you have enough test cases.
Academic Integrity
We have given this assignment before, though in a different programming language. It is a good one, and students really like it. Do not share your code with others. Do not obtain or look at a copy of the earlier solution or a version being done by another student. Such cheating helps no one, especially you, and it makes more unnecessary work for us.
Unlike the previous assignments, it is highly unlikely that your code for this assignment will look exactly like someone else's. This is the first assignment that we will actively be using Moss to check for instances of cheating and plagiarism.
Important:
Python has a built-in color conversion module called colorsys.
You are forbidden from using that module in this assignment.
Collaboration Policy
You may do this assignment with one other person. If you are going to work together, then form your group on CMS as soon as possible. If you do this assignment with another person, you must work together. It is against the rules for one person to do some programming on this assignment without the other person sitting nearby and helping.
With the exception of your CMS-registered partner, you may not look at anyone else's code or show your code to anyone else, in any form what-so-ever.
Getting Help
If you do not know where to start, if you do not understand testing, or if you are completely lost, please see someone immediately. This can be the course instructor, a TA, or a consultant. Do not wait until the last minute, particularly since this is due so close to the exam. A little in-person help can do wonders. See the staff page for more information.
An Overview of Color Models
Color Model RGB

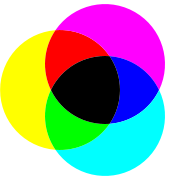
 The RGB system is named after the initials of the three color names:
red, green, and
blue. In this color model, light from these three colors is
mixed to produce other colors, as shown in the image to the left. Black is the absence of color;
white the maximum presence of all three.
The RGB system is named after the initials of the three color names:
red, green, and
blue. In this color model, light from these three colors is
mixed to produce other colors, as shown in the image to the left. Black is the absence of color;
white the maximum presence of all three.
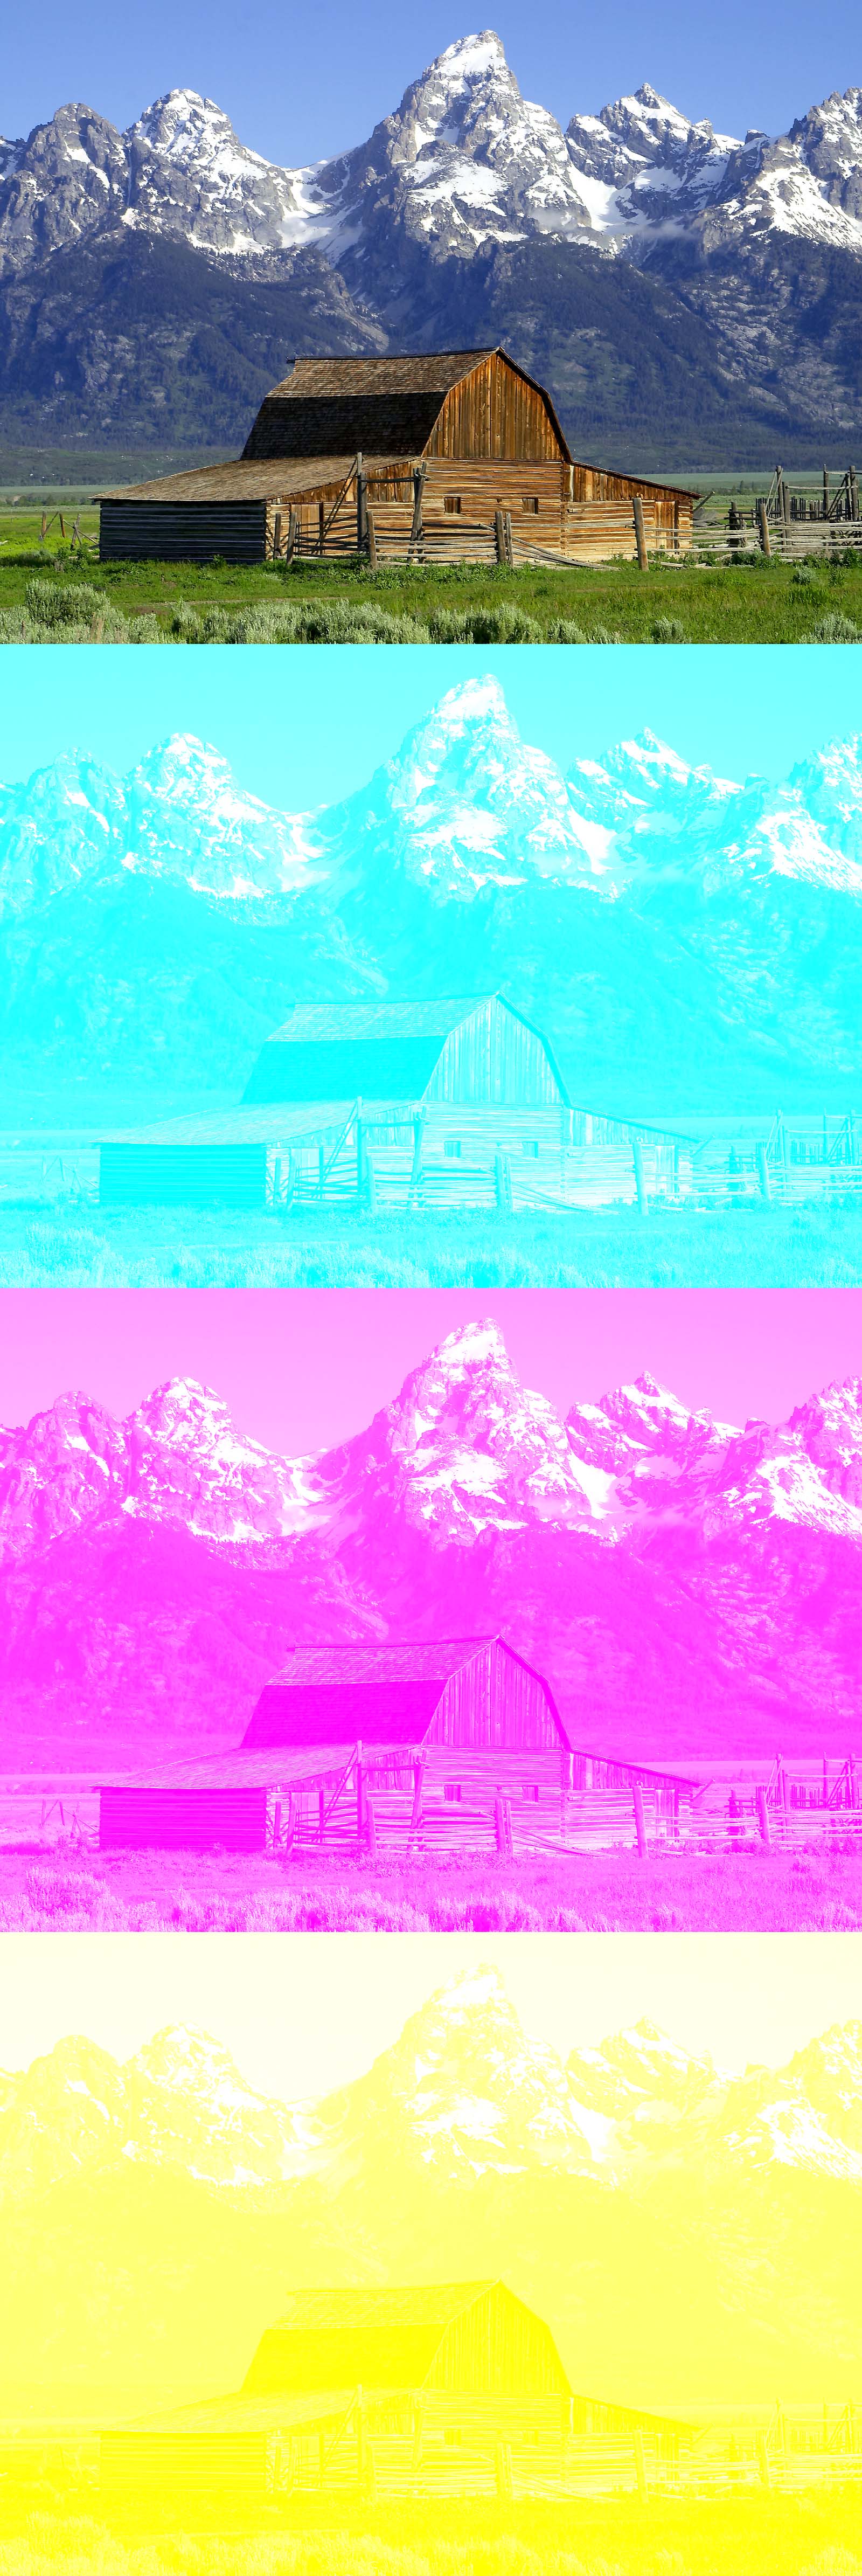
In the upper right is a colored image. Below it is its separation into red, green, and blue (here is a high resolution version). In the three separation panels, the closer to black a point is, the less of that color it has. For example, the white snow is made up of a large amount of all three colors, whereas the brown barn is made up of red and green with very little blue. Because it works by adding colors to black, the RGB system is “additive”.
The color model RGB is used in your TV and computer screens, and hence on web pages. Its roots are in the 1953 RCA color-TV standards. But the idea has been around longer; see this exhibit for some amazing full-color images taken with an RGB camera over 100 years ago.
In the RGB model used in most systems, the amount of each of red (R), green (G) and blue (B) is represented by a number in the range 0..255. Black, the absence of color, is [0, 0, 0]; white, the maximum presence of R, G, and B, is [255, 255, 255]. This means that there are 16,777,216 different colors.
In this assignment, RGB color is supported by objects of type RGB. The
RGB class is provided by the module colormodel. Objects of
type RGB have three attributes: red, green, and
blue (they also have a secret attribute alpha which will not be
used in this assignment). The RGB constructor function takes three
arguments, assigning these values to the attributes in the order red,
green, and blue. For example, to create an RGB object
representing the color red, and put the name of this object in the variable red,
use the assignment
red = colormodel.RGB(255,0,0)You can drop the
colormodel prefix if you use from to import
this module.
The module colormodel also has some constants (e.g. global variables that should
not be altered) that you can use for some of the possible colors. For example,
colormodel.MAGENTA is [255, 0 , 255] and
colormodel.ORANGE is [255, 200, 0]. There is a Wikipedia page
with a
list of colors that gives (non-Python)
names to many RGB colors.
In some graphics systems, RGB is used with float numbers in the range 0.0..1.0 instead of int values 0..255. The reasons for this discrepancy is that the mathematical formulas for color require real numbers 0.0..1.0, but it takes a lot less memory to store ints instead (and images require a lot of memory). In your program, you may have to convert each number in the integer range 0..255 to a float in 0.0..1.0, calculate a mathematical formula, and then convert back to 0..255.
Color Model CMYK

 For your ink-jet printer, you buy expensive ink cartridges in the colors
cyan, magenta,
yellow, and black. The printer mixes these inks
in different amounts on paper to make the full range of colors.
Black is referred to using K (originally for “Key”) to avoid confusion with
Blue.
For your ink-jet printer, you buy expensive ink cartridges in the colors
cyan, magenta,
yellow, and black. The printer mixes these inks
in different amounts on paper to make the full range of colors.
Black is referred to using K (originally for “Key”) to avoid confusion with
Blue.
The process works similarly to RGB on a monitor, but in reverse. The paper starts off white (equal parts red, green, and blue), and the colors of these inks are chosen so that cyan ink absorbs red light, removing it from the color of the paper; similarly, magenta removes green, and yellow removes blue. Black ink removes all three colors in equal amounts. For instance, paper printed with only yellow ink appears the same color as a monitor that is displaying a yellow color [255, 255, 0] because it has removed all the blue, leaving the red and green. Printing magenta and cyan removes red and yellow and results in blue [0, 0, 255]. Because it works by removing color, this kind of system is “subtractive”.
Theoretically, only C, M, and Y are needed to achieve any color, but in practice it is hard to get a good black by mixing colored inks; instead you get a soggy, expensive brown-black. By using the black ink to do the “heavy lifting” of absorbing most of the light when printing dark colors, a lot of ink can be saved (This is a simplified view of color printing; more complicated calculations are needed to get accurate colors with real inks).
To demonstrate, in the upper right, we show you an image; below it is its separation into cyan, magenta, and yellow. To the right of that, you see the same image separated into four components; C, M, Y, K. Much less of the CMY colors is needed to make the image when black is also used (here is an enlarged version of the CMY image and an enlarged CMYK image).
In the CMYK system, each of the four components is traditionally represented by a percentage, which we represent in our system as a float value in the range 0.0..100.0.
In this assignment, CMYK color is supported by objects of type CMYK. The
CMYK class is provided by the module colormodel. Objects of
type CMYK have four attributes: cyan, magenta, yellow, and
black. The CMYK constructor function takes four arguments, assigning
these values to the attributes in the order cyan, magenta,
yellow, and black. For example, to create a CMYK object
representing the color cyan, and put the name of this object in the variable cyan,
use the assignment
cyan = colormodel.CMYK(100.0,0.0,0.0,0.0)You can drop the
colormodel prefix if you use from to import
this module.
Color Model HSV (or HSB)

 The HSV model, used heavily in graphics applications, was created in 1978 by Alvy Ray Smith.
Artists prefer the HSV model over others because of its similarities to the way humans perceive
color. HSV can be explained in terms of the cone that appears to the left.
The HSV model, used heavily in graphics applications, was created in 1978 by Alvy Ray Smith.
Artists prefer the HSV model over others because of its similarities to the way humans perceive
color. HSV can be explained in terms of the cone that appears to the left.
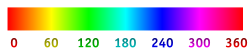 H, the Hue, defines the basic color. H is an angle in the range 0 ≤ H < 360,
if one views the top of the cone as a disk. Red is at angle 0. As the angle increases, the hue
changes to orange, yellow, green, cyan, blue, violet, magenta, and back to red. The
image above shows the angles for some colors.
H, the Hue, defines the basic color. H is an angle in the range 0 ≤ H < 360,
if one views the top of the cone as a disk. Red is at angle 0. As the angle increases, the hue
changes to orange, yellow, green, cyan, blue, violet, magenta, and back to red. The
image above shows the angles for some colors.
S, in the range 0 ≤ S ≤ 1, is the Saturation. It indicates the distance from the center of the disk. The lower the S value, the more faded and grayer the color. The higher the S value, the stronger and more vibrant the color.
V, the Value, also called the Brightness, is in the range 0 ≤ V ≤ 1. It indicates the distance along the line from the point of the cone to the disk at the top. If V is 0, the color is black; if 1, the color is as bright as possible.
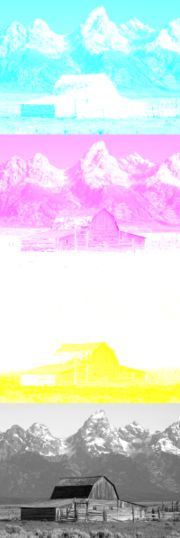
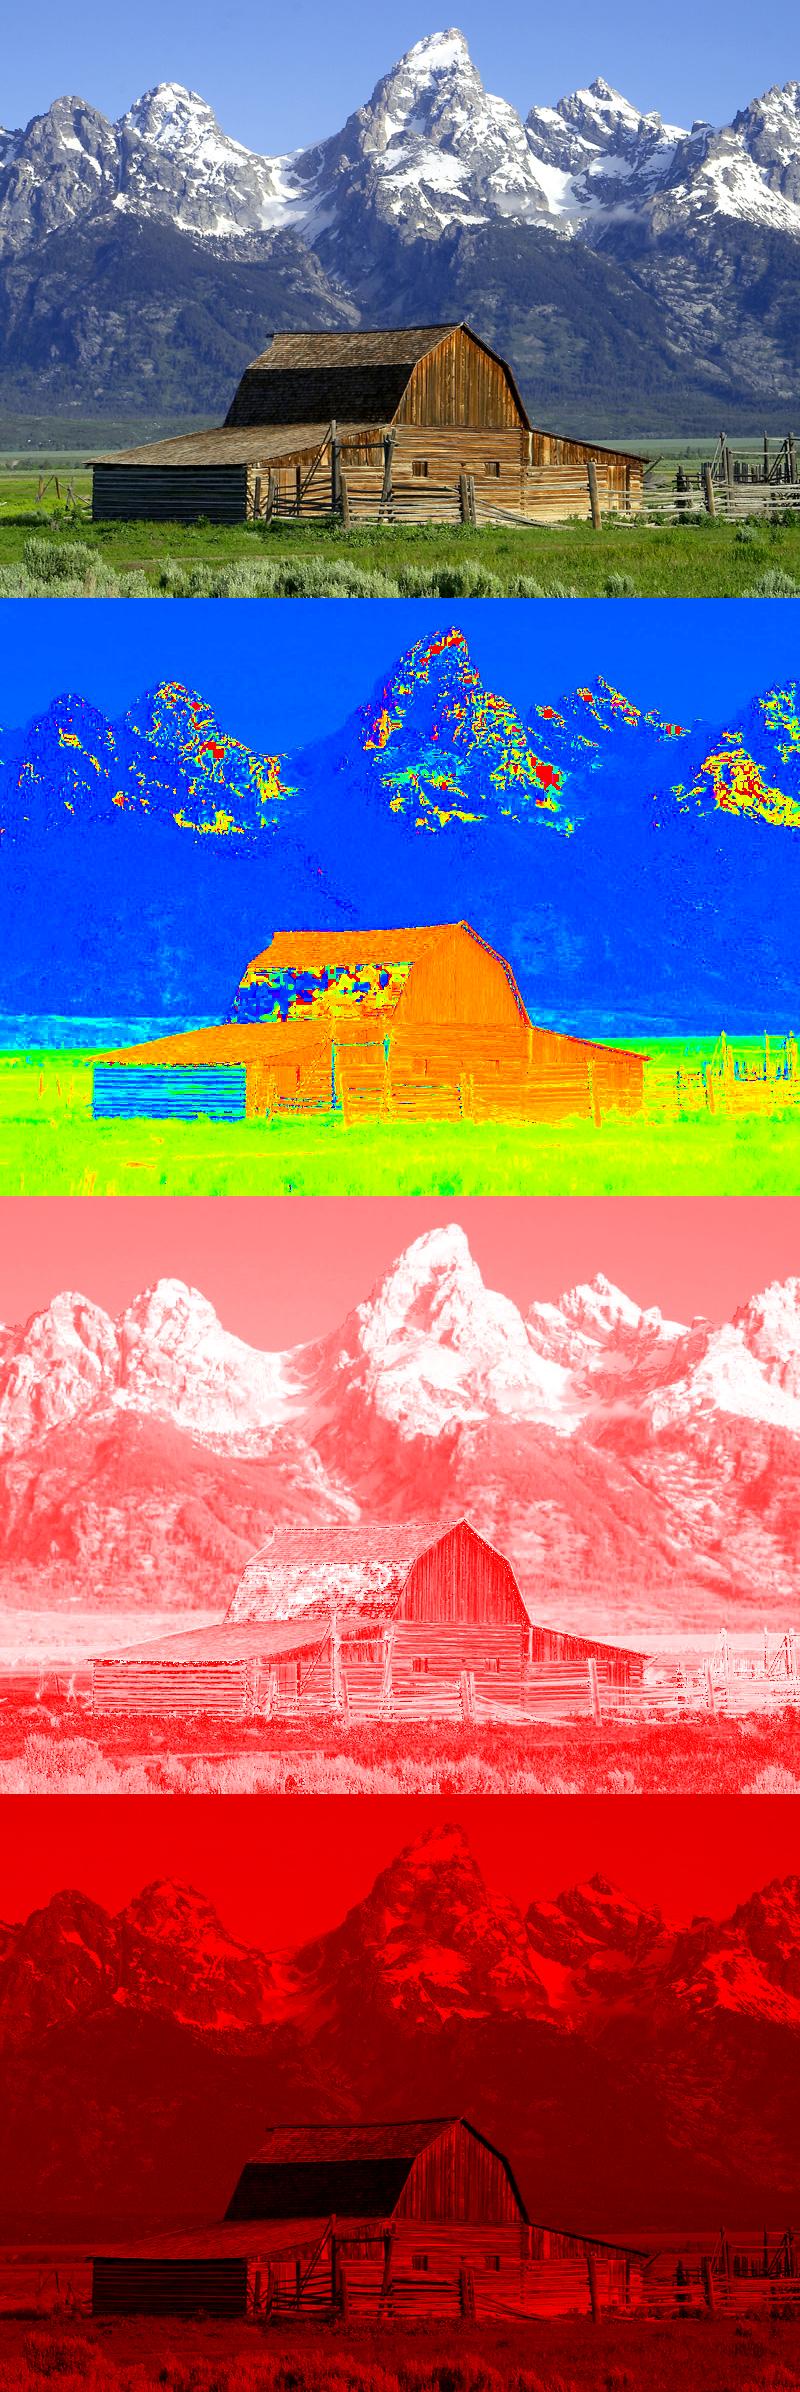
To the right at the top is a picture. Below it we see its hue, saturation (white is zero saturation, red is full saturation), and brightness components. The hue component shows color. The snow has color, but its saturation is low, making it almost grayish. Look at the various components of the image —the sky, the green grass, the snow, the dark side of the barn, and so on — to see how each component H, S, and V contributes. You can see more detail in this high-resolution version.
In this assignment, HSV color is supported by objects of type HSV. The
HSV class is provided by the module colormodel. Objects of
type HSV have three attributes: hue, saturation, and
value. The HSV constructor function takes three
arguments, assigning these values to the attributes in the order hue,
saturation, and value. For example, to create an HSV object
representing the color red, and put the name of this object in the variable red,
use the assignment
red = colormodel.HSV(0.0,1.0,1.0)You can drop the
colormodel prefix if you use from to import
this module.
New Concepts
In this assignment, you will get exposure to several new Python concepts for the first time.
Backquotes vs. str()
In class, we have generally used backquotes to convert a non-string value to a string.
That is not the only way to do it. We could also use the str() function.
To see the difference, download the
point.py file
from Lab 3. In the
interactive shell, create a point object, and put its name in a variable p.
Then type the following expressions into the interactive shell:
  >>> p = point.Point(1,2,3)
  >>> `p`
  >>> str(p)
See the difference? Backquotes give us the string
"<class 'point.Point'>(1.0,2.0,3.0)"
while str(p) gives us
'(1.0,2.0,3.0)'
The first is unambiguous. We can look at it and tell immediately that it
is a point object. The second is unclear. Is it a point object? Is it a color
value (red, green, blue)? We do not know. The idea here is that backquotes are
used when you want to display complete information about a value; str()
is when you want to display the information in a way that looks pretty. They are not
always different; many times they are the same. But you can see that they are
different in this case.
We also want them to be different for our color model objects. Suppose you created the color object
c = colormodel.RGB(255,0,0)If you use backquotes, you will get the string
'(red=255,green=0,blue=0,alpha=255)'
This contains explicit information about which value is which. It even mentions a
mysterious alpha value that we will not use at all in this assignment. This is
ugly, and is not what we want to use in our GUI. The GUI has other ways to indicate
that we are looking at a color value, so we just show the numbers. Therefore we want
the function str() to display this color as
'(255, 0, 0)'
You will get more practice with this in the to_string
functions below.
Asserts
We have seen assert statements in class. These check a boolean expression,
and create an error if the expression is not True.
The syntax is for an assert statement is
assert <boolean-expression>, <string-expression>The string expression is what is printed out as an error message if the boolean expression is false.
Asserts are ideal for checking preconditions. For example, here is the precondition
for complement_rgb:
  def complement_rgb(rgb):
      """Returns: the complement of color rgb.

      Precondition: rgb is an RGB object"""
To check the precondition, we add the following code
assert type(rgb) == colormodel.RGB, 'Value '+`rgb`+' is not an RGB object'
You will not be graded on your use of assert statements in this assignment. However, you will find them very helpful, so you should get into the habit of using them. They will become very important in later assignments.
Attribute Invariants
All of the objects in this assignment have attribute invariants. An attribute invariant is a property of an attribute (which is essentially a variable) inside an object. The invariant cannot be violated. Attempting to violate an invariant will cause an error.
For example, for RGB objects, the red attribute has an invariant that it
must be an int and it must be in the range 0..255, inclusive. The following code
produces an error:
>>> import colormodel
>>> rgb = colormodel.RGB(255,255,255)
>>> rgb.red = -1
Traceback (most recent call last):
  ...
AssertionError: value -1 is outside of range [0,255]
The invariants for this assignment are simple:
-
The
red,green, andblueattributes ofRGBmust all be ints, and in the range 0 to 255, inclusive. -
The
cyan,magenta,yellowandblackattributes ofCMYKmust all be floats, and in the range 0.0 to 100.0, inclusive. -
The
hueattribute ofHSVmust be a float in the range 0.0 to 360.0, not including 360.0. -
The
saturationandvalueattributes ofHSVmust all be floats, and in the range 0.0 to 1.0, inclusive.
Assignment Overview
For this assignment, we are providing you with a lot of code already written. In that respect, this assignment is going to be a lot more like a lab, where you fill in the extra details. In addition, we are providing you with an online color conversion tool, so that you know what your answers should look like.
Assignment Source Code
As we said above, this assignment will involve several files. You will need to download six files. Four are completed by us, and the other two have functions stubs or incomplete implementations that you must finish yourselves. They must all be in the same directory for this assignment to work. You can find all of these modules in a single compressed zip file, which is available here.
The following are the four completed source code files (You should not need to modify the contents of any of these files at all):
a3app.py- This module provides the GUI functionality (e.g. window, sliders, and text boxes) of the program. It will not work at first, but will become more functional as you complete more of the assignment.
colormodel.py-
This module provides the classes
RGB,CMYK, andHSVso that you can make objects of each type. They are described in the following documentation. cunittest.py- This is the unit testing module from lab 3; you will use it in testing.
- This is not a Python module; this is a special file that Kivy uses to arrange the sliders, buttons, and other widgets in the application. It must be in the same directory as all of the other modules.
colormodel.kv
In addition, the following source code files are skeletons (i.e., they are incomplete and you are expected to add functionality to them):
a3.py-
The class contains the functions that do most of the work behind the scenes. Filling in the
function stubs in this class will help
a3app.pywork properly. a3test.py-
This is a unit test module to verify that the module
a3is working properly. We do not trust our visual color perception enough to leave all the testing to "eye-balling".
To get started with the source code, put them all in a new directory. They must all be
in the same folder to work. You then need to run a3app.py as an application.
That is, open the command shell and navigate to the directory for this assignment. Then type
python a3app.pyYou will see a bunch of crazy messages that look like this:
[INFO   ] Kivy v1.4.0-dev
[INFO   ] [Logger      ] Record log in ...
[INFO   ] [Factory     ] 110 symbols loaded
[DEBUG  ] [Cache       ] register <kv.lang> with limit=None, timeout=Nones
[DEBUG  ] [Cache       ] register <kv.image> with limit=None, timeout=60s
[DEBUG  ] [Cache       ] register <kv.atlas> with limit=None, timeout=Nones
[DEBUG  ] [Cache       ] register <kv.texture> with limit=1000, timeout=60s
[DEBUG  ] [Cache       ] register <kv.shader> with limit=1000, timeout=60s
...
That is Kivy (our GUI library) initializing the application. When the messages are done, you should see a GUI window that looks like the following.

In this application there is a solid color panel in the upper left, some sliders on the right, and some text boxes and buttons down at the bottom. Right now, very little works. If you move the RGB sliders, you will see the color panels change color; however, none of the other sliders work. You can also change the color by entering the new color value into the R, G, and B fields and then hitting the RGB button; none of the other fields or buttons do anything.
We recommend that you do not run a3app.py using the "run button"
in Komodo. While this works, it will interfere with your
testing and debugging. For some reason, Komodo
does not always display print statements (e.g. your watches and traces) until the
application has stopped running. This can be confusing. Stick with the command
shell (Terminal on OS X, Command Prompt on Windows) instead.
Your job is to write and test, one by one, the functions in module
a3. As you do, more and more of the GUI will work properly.
Understanding the Program GUI
A working GUI should look like the one shown below. The color panels on the left should be two different colors, and they should each be the complement of the other. The text will also be in the complement color, and it will display the color values, in RGB, CMYK, and HSV, for the background color.

You can change these colors by moving the sliders. If you move the sliders in one color model, then the sliders in the other color models will follow automatically. This way, all three models (RGB, CMYK, and HSV) register the same color.
On the bottom, you will see fields into which you can type numbers for the RGB, CMYK, and HSV components. In the illustration above, you can see that we have started to type numbers into the fields for RGB. Once we are done typing, we can press the RGB button to make this the new color. The same thing works in the other color models. This allows you to try exact colors while testing your application.
The numbers in the text field should be in their respective ranges: 0..255 for R, G, B; 0.0..100.0 for C, M, Y, K; 0.0..1.0 for S, V; and 0.0..359.99999999 for H. If you type in a negative number, the program replaces it and uses 0 instead. If you type in too large a number, the program replaces it and uses the maximum value for the range.
We will show off our solution several times in class. We will also make it available to TAs to show in office hours.
Experimenting with the Color Models
If we could, we would give you a sample solution to play with so that you would see what a working program is supposed to look like. Unfortunately, we cannot do that. Python is not a compiled language, so there is no easy way to give you a solution without showing you the source code.

Click on Image to Experiment
Instead, we are doing the next best thing. We have provided you with an online color converter. Click on the image above to go to a special web page where you can enter various color values. This web page shows you what the answers should look like for various inputs (after you enter a value in a field on that page, you have to click on a different field to get the whole page to update to the new values). Use this page to help you design your test cases for the rest of the assignment.
Testing and Debugging
You should use the testing and debugging methodologies that you learned in
lab 3 as well
as the first assignment.
You will want to unit test with a3test.py; we have already
started several of the test procedures for you. You will be graded on the
completeness of your test cases. Remember our comments from the first
assignment.
You will probably want to add print statements to a3.py
for watches (e.g. print statements that display the contents
of a variable) and traces (e.g. print statements that indicate the
line of code that is currently executing). Traces will be
particularly valuable for this assignment because it is the
first major assignment involving conditionals. We talked about
how to use traces in Lecture 7.
Because this is a much more complex assignment than the first, we
recommend that you be very descriptive with your watches and traces.
Suppose you are trying to find an error in function
rgb_to_hsv (or in a function that calls rgb_to_hsv)
and that rgb_to_hsv changes a variable h at line 36.
Then, you might insert at line 37 a statement like
print 'rgb_to_hsv: h at line 36 is '+ `h`
If you are using print statements in a3.py, do not
run a3app.py with the run button. Run the application
from the command shell instead. That is because Komodo will not
show you the output of the print statements while the GUI is running
(it will happily show you the output after the application is
finished, however). If you want to see the output of the print
statements while the programming is running, run the application
from the command shell, and look at the command shell for the
output.
About the Color Value Objects
As we said previously, the module colormodel provides the various classes to support
color models. Objects of class RGB represent RGB colors. Similarly, objects of
type CMYK represent CMYK colors and objects of type HSV represent
HSV colors.
As we discussed above, these classes are designed with built-in
error detection. If you violate one of the attribute invariants, you will get an
AssertionError, and the program will crash. As a reminder, the attribute
invariants are as follows:
-
The
red,green, andblueattributes ofRGBmust all be ints, and in the range 0 to 255, inclusive. -
The
cyan,magenta,yellowandblackattributes ofCMYKmust all be floats, and in the range 0.0 to 100.0, inclusive. -
The
hueattribute ofHSVmust be a float in the range 0.0 to 360.0, not including 360.0. -
The
staturationandvalueattributes ofHSVmust all be floats, and in the range 0.0 to 1.0, inclusive.
For more information on the attribute invariants, see the color model documentation for this assignment.
Assignment Instructions
Below, we outline the functions that you are expected to write for this assignment. You should write and test your functions, one at a time, in the order given. Read the text below, but also make sure you carefully read the specifications and comments in the provided code. In this assignment, sometimes we give hints in the specs/comments about how best to write your functions.
complement_rgb(rgb)
We gave you some partial code that you need to fix. The complement of a color is like a color negative. If R, G, and B were color components of the RGB value in the range 0.0..1.0 (not 0..255!), then the color components of the complement would be 1-R, 1-G, and 1-B. However, since we are using values in the range 0..255, the complementary color of the RGB color [r, g, b] is the color [255-r, 255-g, 255-b].
We have already given you a helpful assert statement so that you can see what one looks like.
We also provide a test case for this function in the module a3test (should you add more?).
This test case will not succeed until you rewrite the function. Finish the function and test
that it works.
This function should be completed for the stage check. It is a very simple function that is no more than one line.
truncate5(value)
There is a stubbed-in return statement in the current version of this function so that the
function produces a value of the right type (i.e., a string). Write this function,
using the guidance given as comments in the function body. Note that this function has an
assert in it, which we discussed in class. In addition, we have provided test cases
for this function in the module a3test (should you add more?) so that you can test
it when done.
This function should only be used as a helper function for round5.
It is not to be used for the conversion functions, since it results in a loss
of mathematical precision.
We have provided you with two assert statements to show you what they should look like for this type of function. Note that one checks whether the argument is of the right type; the other checks if the value is in range.
This function should be completed for the first stage check.
round5(value)
This function is most easily written by calling truncate5 appropriately.
There is a stubbed-in return statement in it so that the function produces a value of the right
type (i.e., a string). Write this function, using the guidance given as comments in the function
body. We provided test cases for it in module a3test (should you add more?).
Within this assignment, this function should be used only to get values to appear
in the GUI in a consistent format; values should always be 5 characters long. In particular,
it is meant to be used in the to_string functions below.
It is also useful in testing, as shown in a3test. It is not to
be used for the conversion functions, since it results in a loss of
mathematical precision.
We have not provided you with an assert statement for this function. For the remainder
of the functions in this assignment, it is your decision as to whether or not to add asserts.
If you decide to use an assert, you might take some inspiration from the assert for
truncate5(). But read the specification; the ranges are different for
these two functions.
This function should be completed for the first stage check.
Important Words About Testing
We have talked in class about how floats are approximations of real numbers, but are not
always exact. This can cause some problems if you try to test round5
"on the border" (e.g. on a 6 character number, including the dot, where the last character
is 5). For example, depending on how you implemented round5 output of
round5(100.55)is highly likely to be '100.5' (if you get '100.6', do not assume your function is wrong; you just implemented it slightly differently from us). On the other hand, the output of
round5(100.55)is also highly likely to be '100.5'.
In other words, the behavior of round5 is unpredictable for numbers
"on the border". In technical terms, we say round5 is underspecified;
the specification does not tell us how to accurately handle numbers on the border. You
are never expected to test inputs whose output is unpredictable (or that is unspecified).
So do not use these test cases.
This should not be a problem for the rest of the assignment. It is highly unlikely that the computations in the rest of the assignment will ever produce a value that is on the border.
The to_string(c) Functions
In the discussion above on the function str(), we
told you that we want str() to format the color values as they will
be displayed in the GUI.
However, if you try str() right now, you will discover that it does not work;
you get the empty string instead. That is because we have made some changes
to str() behind the scenes (which you will learn how to do later).
The function str() now calls some of the functions in a3.py
as helper functions. Until you complete these helper functions, str()
will not work properly.
The first function — rgb_to_string(rgb) — should be completed
for the first stage check. The rest can be delayed until
the the final stage. With that said, they are rather
straightforward, and you should have no problem with them after assignment 1.
rgb_to_string(rgb)
Implement this function according to the specification in a3.py.
When you implement this function, str() will work properly on RGB
objects (but not necessarily CMYK or HSV objects). As part of this function, you
will probably want to add an assert statement checking that the type of
rgb is indeed colormodel.RGB.
Once you have got this running, run python a3app.py
again. Move the sliders around, and marvel at your accomplishments
&mdash you have got the color data showing up!
cmyk_to_string(cmyk)
Implement this function according to the specification in a3.py.
When you implement this function, str() will work properly on CMYK
objects (but not necessarily HSV objects). In addition, the numerical
CMYK color will display properly in the two color panes.
This function should call function round5 to round each CMYK value to 5
characters.
As part of this function, you will probably want to add an assert statement
checking that the type of cmyk is indeed colormodel.CMYK.
We do not provide test cases for this function. You must write at least two of them.
hsv_to_string(hsv)
Implement this function according to the specification in a3.py.
When you implement this function, str() will work properly on HSV
objects (and hence all colors if you have done these in order). In addition, the numerical
HSV color will display properly in the two color panes.
This function should call function round5 to round each HSV value to 5
characters. As part of this function, you will probably want to add an assert statement
checking that the type of hsv is indeed colormodel.HSV.
We do not provide test cases for this function. You must write at least two of them.
rgb_to_hsv(rgb)
This function converts an RGB value to an HSV value. When you get the function working, moving the RGB sliders will cause the HSV sliders to move. However, the reverse is not true; moving the HSV sliders will still not affect the RGB sliders. There will also be no affect to the CMYK sliders.
Here is how the conversion works.
First, convert the RGB values so that R, G, and B are
in 0..1. Let MAX be the maximum and MIN be the minimum
of the (R, G, B) values. H will satisfy
0 ≤ H < 360 and S, V will be in 0..1.
H is given by 5 different cases:
(a) MAX = MIN: H = 0 (b) MAX = R and G ≥ B: H = 60.0 * (G - B) / (MAX - MIN) (c) MAX = R and G < B: H = 60.0 * (G - B) / (MAX - MIN) + 360.0 (d) MAX = G: H = 60.0 * (B - R) / (MAX - MIN) + 120.0 (e) MAX = B: H = 60.0 * (R - G) / (MAX - MIN) + 240.0
S is given by: if MAX = 0 then 0, else 1 – MIN/MAX. Finally, V = MAX.
As part of this function, you will probably want to add an assert statement
checking that the type of rgb is indeed colormodel.RGB.
This function is the last part of the first stage check. Normally, you would have worked on the function rgb_to_hsv(rgb) before this one (to get the CMYK sliders to work). However, this problem is better prepartion for the exam.
Testing
You will need to provide at least 5 test cases in the module a3test, so
that each expression in the cases for H is evaluated in at least one test case.
Again, remember that you can use the
online color conversion tool in order to find out what the
values in one color model should be in a different color model.
hsv_to_rgb(hsv)
This function converts an HSV value to an RGB value. Once you get it working, moving the HSV sliders will cause the RGB sliders to also move.
To perform the conversion, you first need to compute the following values
Hi = floor(H/60), f = H/60 Hi, p = V(1-S), q = V(1-fS), t = V(1-(1-f)S)
Once you have this computed, the values R, G, and B
depend on
the value Hi as follows:
If Hi = 0, then R = V, G = t, B = p
If Hi = 1, then R = q, G = V, B = p
If Hi = 2, then R = p, G = V, B = t
If Hi = 3, then R = p, G = q, B = V
If Hi = 4, then R = t, G = p, B = V
If Hi = 5, then R = V, G = p, B = q
This produces RGB values in the range 0.0..1.0, and they must be converted to the range 0..255. You should use rounding in converting the answer to an int. We will say it again because in previous semesters students have not complied: ROUND; DO NOT TRUNCATE. Remember that casting truncates, and does not round. Furthermore, do not round with round5(); that does not round to an int.
One last time, as part of this function, you will probably want to add an assert statement
checking that the type of hsv is indeed colormodel.HSV.
Note: If you look at the Wikipedia entry, you will note that it uses
Hi = floor(H/60) % 6 and f = H/60 floor(H/60)
Because H satisfies 0 <= H < 360 (degrees), the values (floor(H/60) % 6) and floor(H/60) are equivalent. Therefore, we use the simpler one.
This function is not part of the first stage check. It can be delayed to after the exam.
Testing
In testing your code, you should provide at least 6 test cases for this function because of the 6 possible values of Hi. Again, remember that you can use the online color conversion tool in order to find out what the values in one color model should be in a different color model.
rgb_to_cmyk(rgb)
This function converts an RGB value to a CMYK value. When you get it working, moving the RGB sliders will cause the CMYK sliders to move as well. There are several different ways to convert, depending on how much black is used in the CMYK model. Our conversion uses as much black as possible.
Let R, G, and B be the color components of the RGB value in the range 0.0..1.0 (not 0..255!); that means that you will need to divide the values in the RGB object by 255.0. Once you do that, then the conversion is as follows:
- Compute C' = 1 - R, M' = 1 - G, and Y' = 1 - B.
-
If C', M', and Y' are all 1, use the CMYK value (0, 0, 0 , 1).
If not, compute and use the following:
K = minimum of C', M', and Y',
C = (C' - K)/(1 - K), M = (M' - K)/(1 - K), Y = (Y' - K)/(1 - K).
The resulting CMYK values are in the range 0.0..1.0, and they must be converted to the range 0..100.0. And that is it! Not too bad, eh?
As part of this function, you also will probably want to add an assert statement
checking that the type of rgb is indeed colormodel.RGB.
This function is not part of the first stage check. It can be delayed to after the exam.
Testing
Providing test cases is a bit problematic because float values
are only approximations to the real values, and slightly different ways of computing might
produce different results. In fact, we saw this problem with currencies in
the first assignment.
This time, instead of using assert_equal_floats, we would prefer that you
use the round5 function defined in this assignment, since that is what appears
in the color panes of the GUI.
To show you how to do this, we have provided three test cases in a3test.
Add a few more test cases following our example. In designing your test cases,
remember that you can use the
online color conversion tool in order to find out what the
values in one color model should be in a different color model.
cmyk_to_rgb(cmyk)
This function converts a CMYK value to an RGB value. When you get it working, everything in the GUI should work (provided that you followed instructions and left this function for the end). In particular, the CMYK sliders will cause the RGB sliders to also move. Let C, M, Y, and K be the color components of the CMYK value, all in the range 0.0..1.0 (not 0..100.0; you will need to convert this first). Then the conversion is as follows:
R = (1 - C)(1 - K), G = (1 - M)(1 - K), and B = (1 - Y)(1 - K)
This produces RGB values in the range 0.0..1.0, and they must be converted to the range 0..255. You should use rounding in converting the answer to an int. We will say it again because in previous semesters students have not complied: ROUND; DO NOT TRUNCATE. Remember that casting truncates, and does not round. Furthermore, do not round with round5(); that does not round to an int.
As part of this function, you will probably want to add an assert statement
checking that the type of cmyk is indeed colormodel.CMYK.
This function is not part of the first stage check. It can be delayed to after the exam.
Testing
You should put at least two test cases for this function in module a3test.
Remember that you can use the
online color conversion tool in order to find out what the
values in one color model should be in a different color model.
Finishing the Assignment
As we mentioned above, we are breaking this assignment up into multiple due dates. This is to give you some breathing room in the course, but also to make sure that you are sufficiently prepared for the first prelim.
Stage One
The purpose of the first stage check is to make sure that you are making progress on this
assignment, and not delaying until after the exam (which would likely would ensure
that you do not pass the exam). As part of the stage check we would like you to
submit your a3.py module, but not your a3test.py module.
We do not care about your tests right now.
Within the module, we would like to see evidence of completion of the following functions
You do not need to finish any of the other color conversion functions or to_string functions.
We have picked rgb_to_hsv(rgb) because it involves an if-statement, and we want
you to have maximum exposure to these before the exam.
The stage check is pass/fail. If we see indication that you made a good faith effort to finish all these functions, then you will receive full credit regardless of whether or not they are correct. Good faith means that we need to see signs that the basic algorithm is there; enough that we would give you partial credit for this type of question on the exam.
You will receive a grade on the stage check equal to 10% of the weight of this entire assignment. The grade will be all or nothing. Please take the stage check seriously.
Stage Two
For the final submission, you need everything working and polished. In addition to make sure that your modules are correct, you should make sure that they meet the class coding conventions. In particular, you should check that the following are all true:
- There are no tabs in the file, only spaces
- Functions are each separated by two blank lines.
- Lines are short enough that horizontal scrolling is not necessary (about 80 chars is long enough).
- The specifications for all of the functions are complete and are docstrings.
- Specifications are immediately after the function header and indented.
Furthermore, at the top of each module that you worked on (a3.py, a3test.py)
you have three single line comments with (1) the module name, (2) your name(s) and netid(s), and
(3) the date you finished the assignment.
Upload the files a3.py and a3test.py to CMS by
the due date: Thursday, October 11th at 11:59 pm.
Do not submit any files with the extension/suffix .pyc. It will
help to set the preferences in your operating system so that extensions always appear.
You do not get to revise this assignment, though you may submit multiple times before the due date. We will grade the most recent version submitted.
Survey
In addition to turning in the assignment, we ask that you complete the survey posted in CMS. Once again, the surveys will ask about things such as how long you spent on the assignment, your impression of the difficulty, and what could be done to improve it. Please try to complete the survey within a day of turning in this assignment. Remember that participation in surveys comprise 1% of your final grade.