The Groups Page
Here you can view and edit current groups, assign Staff members to
grade certain groups, view grades, and download student
submissions. This page is also used to select groups for the
Grading page. Some of the features described on this page may not
be available to Staff members with less than Admin privilege.
To Get There: Select
the assignment in the
Groups menu, or
click the corresponding
groups link in
the assignment table
.
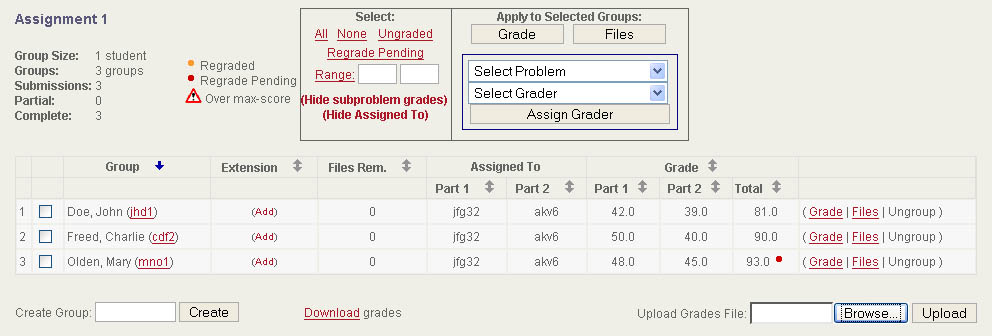
The Groups Table
This table gives you a view of all the students in the class as they're
grouped for an assignment. You can reorder the table based on a
column by clicking the

link at the top of
the column. The following information is available here:
- Group: This
column lists the members in each group. Each students' NetID
links to a Grading page where you can edit that student's grades for
any assignment.
- Extension:
Shows you any extensions which have been allowed in this
assignment. For more information see Granting Extensions below.
- Files Rem.: This is
the number of Required Submissions for this assignment which the group
has not yet submitted. (Groups which have
submitted all their files
will show zero here)
- Assigned To:
This shows which Staff members are assigned to grade this group, broken
down by Problem (if applicable). You can hide
this column from the table by clicking the (Hide
Assigned To) link
above the table. For more information see Assigning Graders below.
- Grade: Since
students in the same group may be given different grades, the numbers
shown in this column are the group's average grade
for the
assignment. Groups for which the members have different grades
will have their grades flagged here. You can also see the group's
Problem grades (if applicable) by clicking the (Show
Problem Grades)
link above the table.
Each row also has a check box associated with it, which is used for
selecting multiple groups to use with some of the page's actions.
On top of the Groups table, in the box labeled
Select, you can click on the
following options to change the current selection:
- All: Select every group
on the page (useful for
exporting files for the entire class)
- None: Deselect every
group
- Ungraded: Select all
groups which have not been given
any grade for this assignment
- Regrade Pending: Select
all groups which have regrade
requests which have not yet been responded to
- Range: Specify a range
of row numbers to select only
those groups
Managing Student Groups
You can allow students to form their own groups by enabling it on the
Assignment Editing page. Any staff member with Groups privilege
can also manually create or disband groups from this
page. A student's group can not be changed after the student
receives a grade for the assignment.
To Create a New Group:
- Find the text box labeled Create Group underneath the
Groups table.
- Enter a comma-separated list of NetIDs of students who are
not currently grouped with anyone else.
- Click the Create button to
form the group. Any files
the students had previously submitted will belong to the group, with
the most recent one being the main submisison.
To Disband an Existing Group:
- Find the row for the group you want to disband in the
Groups table.
- Click the Ungroup link in
that row to disband the
group. Each student will now be in their own group with a copy of
all the files which belonged to the group.
Downloading Group Submissions
To Download the most recent
submissions for a single group: click the
Files
link in that group's row in
the table. (Older submitted
files can be found on the Grading page)
To Download submissions for
multiple groups: check the boxes of the
groups you want files for and click the
Files
button under the
Apply to Selected
Groups heading at the top of the page.
Grading Groups
From the groups page, you can select groups to view on the Grading
page. This feature is only available to Staff members with Grades
privilege.
To View a single group on the
Grading page: click the
Grade link
in that group's row in the
table.
To View multiple groups on the
Grading page: check the boxes of the groups you want and
click the
Grade button under the
Apply
to Selected Groups heading at the top of the page.
Assigning Graders
A Staff member with Admin privilege can assign other Staff members to
grade certain groups in an assignment. If that assignment is
broken down into Problems, then different graders can be assigned to
grade the different Problems for each group. You can only assign
Staff members who have Grades privilege to be graders. If you
have enabled the
Assigned Graders Only
option for this assignment, then Staff members who are not Admin
privilege will only be able to view and edit grades for groups they're
assigned to.
To Assign a Staff Member:
- Check the boxes of the groups you want to assign to this
staff member.
- If this assignment uses Problems, choose a Problem from the
Select Problem drop-down menu at the top of the page.
- Choose a grader from the Select Grader drop-down menu, or
choose <unassigned> to remove previous assignments.
- Click the Assign Grader button
to finalize your selection.
Granting Extensions
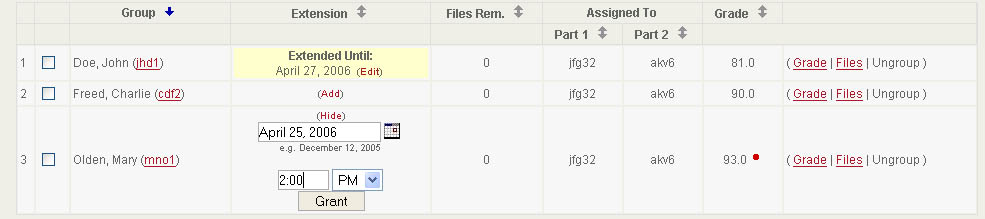
A Staff member with Admin privilege can override the standard due
date/late submission deadline scheme per group. Normally, a group
can
only submit files when an assignment is in the Open status and before
the due date (with grace period) passes.
If a late submission deadline is enabled, then groups can continue to
submit files until it has passed
as long as the assignment's status remains Open. Groups that have
an
extension can submit files any time before it
expires,
even when the assignment is in Closed or
Graded status.
To Grant an Extension to a Group:
- Click the (Add) link in that
group's row of the Groups
table.
- Provide a date and time for the extension to expire.
- Click the Grant button to
finalize your choices.
To Change or Remove an Extension:
- Click the (Edit) link
corresponding to the extension you
want to change.
- Make the changes you want and click the Change button or
the Remove button.
Importing/Exporting Grades
You can directly view and edit grades on the web using the Grading
page, but for updating many grades at once it is often more convenient
to use a
CSV file.
To Export a CSV file of current
grades: Click the Download grades link at the bottom of
the page. (You can edit this file and use it to Import grades in
the next section)
To Import Grades from a CSV file:
- a) If this
assignment is broken down into Problems, the columns of your CSV file
should be named NetID, Problem Name 1,
... , Problem
Name N. You don't need to provide a Total column, but it's
fine to have one (if you're using an exported file, for example), CMSX
will ignore it.
b) Otherwise, the
columns of your CSV file should be named NetID and Grade.
- Select your CSV file where it says Upload Grades File at
the bottom of the page, and click the Upload
button.
You will be prompted to confirm the parsing of the file before it
is finalized.