Managing Content
Tables
You can augment your course's Home page with Content Tables containing
text, files, or links related to your course.
 Creating a New Content Table From Template
In CMSX, you can create a new Content Table from a template, saving you valuable time and effort. To use this feature, navigate to the
Content link on the Navigation bar on the left side of the page. Then, click "
(show)" next to the
Create Content From Template heading. You can choose from one of the available content options:
- Lecture Slides - "Number", "Date", "Topics", "Slides", and "Remarks"
- Office Hours - "Day", "Time", "Location", "Staff", and "Remarks"
- Office Hours Calendar - "Google Calendar iframe"
You can always add or remove columns after creating the Content Table, and all tables start off visible only to Staff, so any changes you make will not be visible to students until you decide to release them.
Creating a New Content Table From Scratch
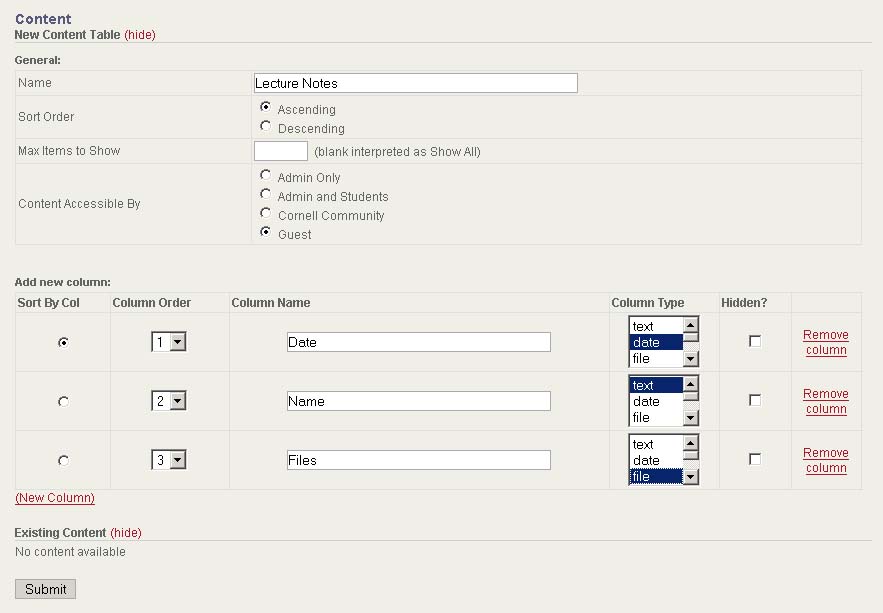
You define the basic attributes of the table and give types to each of
its columns. Then you can add rows to your table corresponding to
those types.
- Click the Content link on the
Navigation
bar on the left side of the page.
- Complete the General
section:
- Name: The title
appearing at the top of this Content Table
- Sort Order:
Choose Ascending/Descending ordering for contents display (based on
chosen Sort By Col)
- Max Items to Show:
This table will only display this number of rows of this table by
default.
- Content Accessible By:
You can choose to restrict who has access to view this table and
download files stored in it. (More about Access Levels)
- Content Release Date:
You can choose whether to allow release dates to be added to each of the rows of this table. If no release date is set, the row will be visible to everyone with view access to the table. If a release date is set, it will be viewable by students only after the date has passed. Staff are able to view all rows, regardless of the current date.
- Add columns to your table by clicking (New Column).
- Choose one column to be the Sort By Col, which will be used to
determine the order rows of this table are displayed
- Use the Column Order
option to determine the left-to-right ordering each column in this
table (1 is the
left-most column). Also choose a Column
Name.
- The following choices are available for the Column Type option:
- Text: a block
of HTML-enabled text (8000 character limit)
- Date: month,
day, and year (useful for ordering things chronologically)
- File: any
number of files can be uploaded
- URL: a link to
another site (will be displayed in new window)
- Number: an
integer (useful for ordering, but accepts negative/zero/positive)
- You may also choose to make a column Hidden if you don't want it shown
to students. This is useful, for example, for user-defined sorting:
create a hidden column of Number type.
- Click Submit to finalize your
choices and create a new empty table.
You can edit these options after finalizing by choosing this Content
Table from the
Edit Layout menu on the
Navigation Bar, or by following
the
Edit Layout link underneath the table
on the course's Home
page.
Adding Content to a Table

After deciding on a layout for your table, you can start adding
information to it.
- Select the table you want from the Add/Edit
Data menu on
the Navigation Bar, or click the Add/Edit Data
link underneath the
table on the course's Home page.
- Click the (New Row) link to
start a new row in the table.
- Provide data for each of the columns you defined
earlier.
- Click the Submit button at
the bottom of the page when you're ready to finalize your changes.