- a finite set of states, S
- a finite alphabet of input symbols, Σ
- a transition function, T : S × Σ → S
- a start state, s in S
- a set of accept states, A a subset of S
- r0 = s
- ri+1 = T(ri, xi), for i = 0, ..., n-1
- rn in A.
According to the first condition, the machine M starts in the start state s. The second condition says that given each character of string X, the machine will transition from state to state as ruled by the transition function T. The last condition says that the machine accepts if the last input of X causes the machine to be in one of the accepting states, A. Otherwise, it is said to reject the string.
Let's consider the example mentioned above, of a DFA that accepts strings of 0's and 1's that have an even number of 0's (and rejects ones with an odd number of 0's).
- Σ = {0, 1}, input strings are over the alphabet of 0's and 1's
- S = {S1, S2}, there are two states
- s = S1, the start state is S1
- A = {S1}, the only accept state is S1, which is the state when there are an even number of 0's
- T is defined as below.
A transition function T is commonly defined using a state transition table, that specifies for each pair of a state and an input symbol, what the resulting state is:
|
0
|
||
| S1 | S2 | S1 |
| S2 | S1 | S2 |
This can also be visualized using a state diagram. For our machine E0 this is:
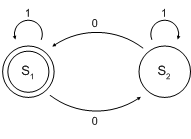
Simply put, the accepting state S1 represents that there has been an even number of 0s in the input so far, while S2 signifies an odd number. An occurrence of a 1 in the input does not change the state of the automaton (look at the second column of the table or at the edges labeled 1 in the diagram). When the input ends, the state will show whether the input contained an even number of 0s or not.
It is relatively straightforward to implement a linear-time, constant-space algorithm for determining whether or not a given string is accepted by a particular DFA.
A nondeterministic finite automaton (abbreviated NDFA or NFA) differs from a DFA in that the combination of a state and an input symbol no longer specifies a particular state to transition to. Rather, it specifies a set of possible states to transition to. Thus at any point an NDFA can be in a subset of all the states, based on the input read so far, whereas in contrast a DFA can be in just a single state, based on the input read so far. An NDFA also generally has a set of start states rather than a single start state.
Let's consider an example, of an NDFA that determines whether a string over the alphabet of 0's and 1's has an even number of 0's or an even number of 1's (i.e., accepting such strings and rejecting strings that have an odd number of both 0's and 1's).
- Σ = {0, 1},
- S = {S0, S1, S2, S3, S4},
- s = {S0},
- A = {S1, S3}, and
- The transition function T can be defined by the following state transition table. Note that in contrast to the DFA this table specifies a set of states rather than a single state for each transition. Also the extra symbol ε corresponds to reading no input.
|
0
|
1
|
ε
|
|
|
S0
|
{}
|
{}
|
{S1,
S3}
|
|
S1
|
{S2}
|
{S1}
|
{}
|
|
S2
|
{S1}
|
{S2}
|
{}
|
|
S3
|
{S3}
|
{S4}
|
{}
|
|
S4
|
{S4}
|
{S3}
|
{}
|
The state diagram for E01 is:
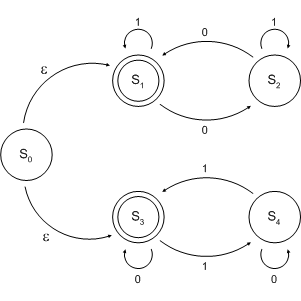
Note that the only difference in the state diagram versus a DFA is that there can be multiple edges with the same label leaving a given state.
In understanding how this NDFA example works, note that it can be seen as two DFA's, one for seeing if the string has an even number of 0's and one for seeing if it has an even number of 1's (the only state with two outlinks that have the same label is the start state). We run both of these DFA's in parallel on the input, and accept the string if either one accepts.
CVS
CVS is a revision control system that makes it easier for several people to work simultaneously on a software project while maintaining their own separate working areas. This page describes the basic commands that you need to know to start using cvs.
Your changes to the source code are only distributed to other users when you explicitly commit your code using the "cvs commit" command. Changes made by other users are only seen by you when you explicitly request them via a "cvs update" command. CVS provides many other useful capabilities, see the CVS manual pages for a detailed description of how to use CVS.
The CVS executable is
available on the CSUGLab machines. In Windows
just open a cygwin window and type "cvs".
On the CSUGLab Linux hosts (csug01, ...,
csug06), you'll find it in /usr/bin/cvs. This
page gives information about how to request a
cvs repository in the CSUGLab, and then gives a
quick overview of the main cvs commands. Once
you have set up your cvs repository, we
encourage you to use the Eclipse development
environment available on the CSUGLab machines.
Eclipse has a user-friendly interface to cvs,
making it easier to use than from the command
line.
CVS Repository
CVS is available to students with CS Undergraduate Lab (CSUGLab) accounts for use in a course or project. The main repository is set up on a host named cvs.csuglab.cornell.edu in /cvsroot directory.
To request for a project directory created in CSUGLab's CVS repository, please submit a ticket to the Helpdesk or send an e-mail to csuglab-admin@cs.cornell.edu with the subject line, "Requesting CVS repository in CSUGLab". In your message, include the project name, userids of the project group members, and the semester(s) the repository will be needed. If no semester is specified, the repository will be available only until the end of the current semester. For more information on setting up CVS see the csuglab CVS page.
Basic commands once you have a repository set up:
To checkout all the files in a repository:
cvs -d :ext:<your_netid>@cvs.csuglab.cornell.edu:/cvsroot checkout <repository>To obtain the latest version of a file, execute :
cvs update <filename>To put a modified file in the repository, execute :
cvs commit -m "<comment>" <filename>To view the differences between a file in the working directory and the repository, execute :
cvs diff <filename>To add a new file to the repository, execute :
cvs add <filename>Note : You must commit the file after adding it before other group members can check it out.
To remove a file from the repository, execute :
cvs remove <filename>Note : You must commit the file before it is actually removed.